(albertyi原創)Eclipse 安裝,調試快速入門
最近一直用UltraEdit和gmake來做Java程序,感覺確實很輕省,但是常常懷念VC強大的程序編輯,調試功能。。。
遂決定找一個強大的IDE環境,經過分析網上N個帖子,我的目標逐漸鎖定了Eclipse;
安裝非常簡單,從網上下載了最新的Eclipse3.1.0以及最新的j2sdk1.4.2.
一、安裝步驟如下:
1、卸載機器上老版本的JDK
2、安裝最新的JDK1.4.2,安裝好之後需要配置環境變量Java_HOME,path,classpath.
(注意:必須要把JDK1.4.2的路徑設置再最前面,不然Eclipse啟動會報錯,“need jdk 1.4.1, available jdk1.2.1”,這個是因為我的機器上裝了oracle,而Oracle自帶的jdk版本低,且他在環境變量中的位置比剛才安裝的jdk1.4.2的位置前"。)
環境變量驗證方法:
在cmd中輸入path就能看到整體的位置
example:
C:\>pathPATH=f:\oracle\ora92\bin;C:\j2sdk1.4.2\bin.;C:\j2sdk1.4.2\lib.;C:\Program Files\Oracle\jre\1.3.1\bin;
上面這樣的path設置就是正常的,沒有問題,可以見到Oracle自帶的jdk放在jdk1.4.2的後面。
3、解壓下載的的Eclipse3.1.0的壓縮包,即可運行。
二、強大的調試功能:
1、首先建立一個簡單的helloworld類用於調試測試。
package simple;//
public class helloworld {
/** * @param args * @author albertyi * @param String[] args */ public static void main(String[] args) { System.out.println("enter main!"); test1(); test2(); test3(); System.out.println("exit main!"); } public static void test1(){ System.out.println("enter test1!"); System.out.println("exit test1!"); } public static void test2(){ System.out.println("enter test2!"); System.out.println("exit test2!"); } public static void test3(){ System.out.println("enter test3!"); System.out.println("exit test3!"); }}
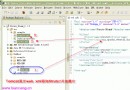
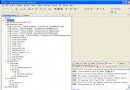
2、選擇,菜單window->Open perspective->other->debug,把整體視圖切換到debug模式下
3、Ctrl+Shift+B在需要調試的地方加入一個斷點
4、選擇菜單 Run->Debug as-> Java application
5、F6是單步向下(Step Over),F5是單步進入(Step into)
6、在Console窗口中能看到運行的結果
enter main!enter test1!exit test1!enter test2!exit test2!enter test3!exit test3!exit main!
是不是很簡單就能向VC一樣調試了^_^