最近在使用Liferay開發一個門戶網站的過程中遇到默認的在線文章編輯器無法滿足用戶需求的問題。Liferay默認的文章編輯器功能比較簡單,且可擴展性較差。經過再三權衡,決定采用tinyMCE作為Liferay的默認在線文章編輯器。但是,官方下載的tinyMCE的advimage插件不具有圖片上傳的功能,需要對該插件進行擴展。經過反復琢磨,終於解決了以上的問題。現在把解決方法寫出來,希望能給有需要的網友一點幫助。
需要注意的是早期的liferay-3.6.1集成tinyMCE存在問題,在IE浏覽器環境下不能正確顯示編輯器,顯示“timyMCE為定義”錯誤。在Firefox浏覽器下可以正確顯示,但是頁面初始化時非常慢。經過很多嘗試這些問題忍讓沒有解決,估計問題與Liferay的頁面緩存有關。另外在liferay-3.6.1環境下上傳圖片時會出現圖片文件大小發生變化,且文件被破壞的問題。Liferay的更新版本已經發布,且以上存在的問題可能與Liferay本身的實現機制有關,解決這些問題可能比較棘手(呵呵,如果哪位大俠知道還望不吝賜教啊!),因此實現中使用的軟件版本如下:
tinyMCE:tinymce_2_0_8
Liferay:liferay-portal-tomcat-4.1.2
在使用tinyMCE前先解決tinyMCE的中文化以及中文字體的使用問題。
版權聲明:任何獲得Matrix授權的網站,轉載時請務必保留以下作者信息和鏈接
作者:李樂鑫
原文:http://www.matrix.org.cn/resource/article/2006-11-19/Liferay+tinyMCE_c6b2d4d0-7771-11db-bdce-bdc029e475a1.Html
關鍵字:Liferay;tinyMCE
(一)tinyMCE的中文化以及中文字體
中文化方法:
tinyMCE的中文化問題解決非常簡單。首先到tinyMCE的官方下載中文語言包tinymce_lpackage_zh-cn.jar,並將其解壓(假設解壓後的路徑為{$LANGUAGE_PATH})。然後將解壓後的{$LANGUAGE_PATH}\tinymce\JScripts\tiny_mce目錄下的所有文件復制到liferay安裝路徑(假設liferay的安裝路徑為{$LIFERAY_HOME})的/webaPPS/ROOT/Html/JS/editor/tinymce目錄下,修改該路徑下的timymce.JSP,在tynyMCE.init中增加配置項 language : "zh_cn"。
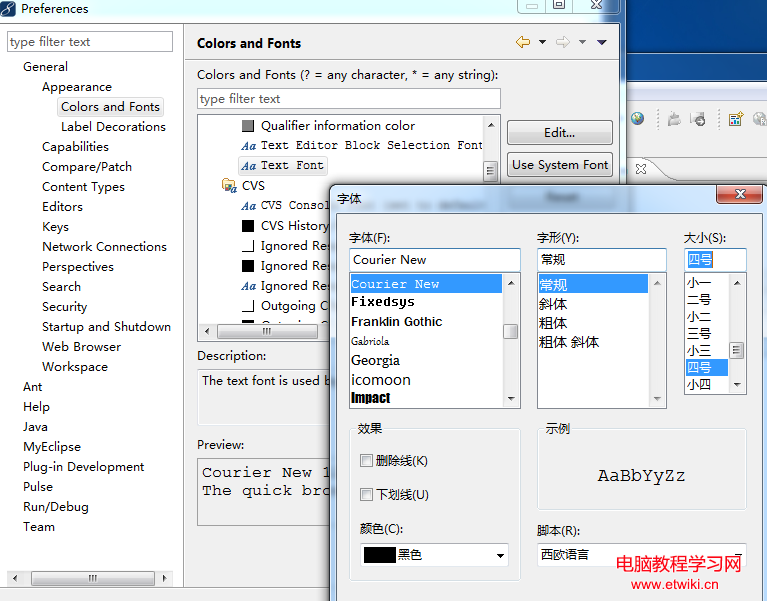
中文字體設置方法:
默認情況下,tinyMCE編輯工具欄的字體下拉框中沒有中文字體,需要在下拉框中增加需要的中文字體。修改方法如下,分別修改{$LIFERAY_HOME}/webaPPS/ROOT /Html/ js/editor/ tinymce/themes/ 目錄下的兩個子目錄advanced和simple目錄下的editor_template.JS。在var iFonts='…'和var nFonts='…'中增加中文字體,如增加“宋體=宋體;方正姚體=方正姚體”等。
(二)集成Liferay和tinyMCE
1.下載tinymce_2_0_8.zip,並解壓(假設解壓目錄為{$TINYMCE_PATH})。然後將解壓後的文件夾{$TINYMCE_PATH}\tinymce\JScripts\tiny_mce復制到{$LIFERAY_HOME}\ \webaPPS\ROOT\Html\JS\editor下,並改名為tinymce;
2. 設置Liferay應用的默認html編輯器為tinymce;(可以修改配置文件system.propertIEs或直接修改{$LIFERAY_HOME}\webaPPS\ROOT\Html\js\editor\editor.JSp); 修改後的editor.JSP如下:
<%@ page import="com.liferay.portal.util.Constants" %>
<%@ page import="com.liferay.portal.util.PropsUtil" %>
<%@ page import="com.liferay.util.BrowserSniffer" %>
<%@ page import="com.liferay.util.ParamUtil" %>
<%
String editorImpl = "simple";
if (BrowserSniffer.is_rtf(request)) {
editorImpl = ParamUtil.get(request, "editorImpl", PropsUtil.get(EDITOR_WYSIWYG_IMPL_KEY));
}
//editorImpl = "fckeditor";
//editorImpl = "liferay";
//editorImpl = "simple";
editorImpl = "tinymce";
// Resin won't allow dynamic content inside the JSP:include tag
RequestDispatcher rd = application.getRequestDispatcher(Constants.TEXT_Html_DIR +
"/JS/editor/" + editorImpl + ".JSP");
rd.include(request, response);
%>
<%--
(三)為tinyMCE增加圖片上傳功能
本實現采用Struts實現圖片的上傳。 步驟如下:
1.編寫文件上傳類。代碼清單如下:
FileUploadAction.Java代碼清單如下:
package com.family.fileupload.web.action;
import Java.util.Calendar;
import Java.util.Date;
import Javax.servlet.http.HttpServletRequest;
import Javax.servlet.http.HttpServletResponse;
import org.apache.struts.action.ActionForm;
import org.apache.struts.action.ActionForward;
import org.apache.struts.action.ActionMapping;
import org.apache.struts.actions.DispatchAction;
import com.family.fileupload.web.form.FileUploadForm;
import com.family.fileupload.web.utils.FileUpload;
public class FileUploadAction extends DispatchAction {
public ActionForward uploadImage(ActionMapping mapping, ActionForm form,
HttpServletRequest request, HttpServletResponse response) throws Exception {
FileUploadForm uploadForm = (FileUploadForm) form;
FileUpload fu = new FileUpload(uploadForm.getFile());
String realPath = this.getRealPath("/pictures");
String fileName = this.getFileKeyRule() + "." + fu.getExtendName().toLowerCase();
String filePath = realPath + "/" + fileName;
fu.saveToFile(filePath);
request.setAttribute("fileUrl", this.getRootUrl(request) + "/pictures/" + fileName);
return mapping.findForward("image.success");
}
private String getRootUrl(HttpServletRequest request) {
StringBuffer buf = request.getRequestURL();
int length = request.getRequestURI().length();
buf.delete(buf.length() - length, buf.length());
return buf.toString();
}
private String getRealPath(String floder) {
return this.getServlet().getServletConfig().getServletContext().getRealPath(floder);
}
private String getFileKeyRule() {
Calendar cal = Calendar.getInstance();
cal.setTime(new Date());
int iYear = cal.get(Calendar.YEAR);
int iMonth = cal.get(Calendar.MONDAY) + 1;
int iDay = cal.get(Calendar.DAY_OF_MONTH);
int iHour = cal.get(Calendar.HOUR_OF_DAY);
int iMinute = cal.get(Calendar.MINUTE);
int iSecond = cal.get(Calendar.SECOND);
StringBuffer strKey = new StringBuffer(15);
strKey.append(iYear);
if (iMonth < 10) {
strKey.insert(4, '0');
strKey.insert(5, iMonth);
} else {
strKey.insert(4, iMonth);
}
if (iDay < 10) {
strKey.insert(6, '0');
strKey.insert(7, iDay);
} else {
strKey.insert(6, iDay);
}
if (iHour < 10) {
strKey.insert(8, '0');
strKey.insert(9, iHour);
} else {
strKey.insert(8, iHour);
}
if (iMinute < 10) {
strKey.insert(10, '0');
strKey.insert(11, iMinute);
} else {
strKey.insert(10, iMinute);
}
if (iSecond < 10) {
strKey.insert(12, '0');
strKey.insert(13, iSecond);
} else {
strKey.insert(12, iSecond);
}
return strKey.toString();
}
}
FileUploadForm.Java代碼清單如下:
package com.family.fileupload.web.form;
import org.apache.struts.action.ActionForm;
import org.apache.struts.upload.FormFile;
public class FileUploadForm extends ActionForm {
private static final long serialVersionUID = 1L;
private FormFile file = null;
public FormFile getFile() {
return file;
}
public void setFile(FormFile file) {
this.file = file;
}
}
FileUpload.Java代碼清單如下:
package com.family.fileupload.web.utils;
import Java.io.FileNotFoundException;
import Java.io.FileOutputStream;
import Java.io.IOException;
import Java.io.InputStream;
import Java.io.OutputStream;
import org.apache.struts.upload.FormFile;
public class FileUpload {
private FormFile file;
private int fileSize;
private String fileName;
private String extendName;
private String contentType;
public FileUpload (FormFile file) {
this.file = file;
fileName = this.file.getFileName();
fileSize = this.file.getFileSize();
contentType = this.file.getContentType();
int position = this.file.getFileName().indexOf(".");
extendName = this.file.getFileName().substring(position + 1,
this.file.getFileName().length());
}
public void saveToFile(String fileName) {
try {
InputStream is = this.file.getInputStream();
int bytesRead = 0;
byte[] buffer = new byte[8912];
OutputStream os = new FileOutputStream(fileName);
while ((bytesRead = is.read(buffer, 0, 8912)) != -1) {
os.write(buffer, 0, bytesRead);
}
is.close();
os.close();
} catch (FileNotFoundException e) {
e.printStackTrace();
} catch (IOException e) {
e.printStackTrace();
}
}
public String getContentType() {
return contentType;
}
public String getExtendName() {
return extendName;
}
public FormFile getFile() {
return file;
}
public String getFileName() {
return fileName;
}
public int getFileSize() {
return fileSize;
}}
2.將以上文件編譯後打包成 upload.jar,並發布到Liferay應用的包路徑下({$LIFERAY_HOME}/webaPPS/ROOT/WEB-INF/lib);
3.編寫upload.JSP並復制到liferay應用的的{$LIFERAY_HOME}/webaPPS/ROOT\Html\JS\editor\ tinymce\ plugins\advimage\目錄下;
Upload.JSP的代碼清單如下:
4.編寫imagePath.JSP並復制到\webaPPS\ROOT\Html下;
代碼清單如下:
5. 在tinymce.JSP中增加如下代碼
*/
function fileBrowserCallBack(fIEld_name, url, type, win) {
//打開文件上傳窗口
win.open("upload.JSP");
}
6. 在liferay的配置文件struts-config.xml或struts-config-ext.XML文件中增加如下配置:
增加formbean配置:
......
type="com.family.fileupload.web.form.FileUploadForm" />
增加action配置:
……
name="fileUploadForm"
path="/portal/fileUpload"
scope="request"
type="com.family.fileupload.web.action.FileUploadAction"
parameter="method">
注:本實現中有關文件上傳的組件與liferay集成在同一個web應用中,事實上也可以根據實際情況將文件上傳的組件獨立成一個單獨的web應用。但是需要對tinymce.JSP代碼做適當的修改。大家不妨試試:)