今天開始系統的學習一下hibernate3.3.2 (annotations版)首先去hibernate的官方網站下載hibernate-distribution-3.3.2.GA版本,然後下載slf4j-1.5.8
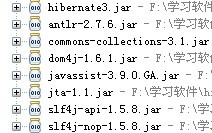
一、hibernate-annotations-3.4.0.GA,然後在MyEclipse下建立一個java工程,加入如圖的jar包。一個是hibernate的核心包hibernate3.jar,然後是lib目錄下required下的全部jar,最後是一個是slf4j-1.5.8中的slf4j-nop-1.5.8.jar
二、然後引入MySQL的驅動jar,建立一個名為hibernate的數據庫,一個student表,有id,name,age字段.
三、建立一個Student的類文件代碼如下
public class Student {
	private int id;
	private String name;
	private int age;

	public int getId() {
		return id;
	}

	public void setId(int id) {
		this.id = id;
	}

	public String getName() {
		return name;
	}

	public void setName(String name) {
		this.name = name;
	}

	public int getAge() {
		return age;
	}

	public void setAge(int age) {
		this.age = age;
	}

}
四、然後建立一個Student.hbm.xml文件,裡面寫的是Student中的屬性,代碼如下
<?xml version="1.0"?>
<!DOCTYPE hibernate-mapping SYSTEM "http://hibernate.sourceforge.net/hibernate-mapping-3.0.dtd" >

<hibernate-mapping package="com.fengpeng.model">

	<class name="Student">
		<id name="id"></id>
		<property name="name"></property>
		<property name="age"></property>
	</class>

</hibernate-mapping>
五、建立一個hibernate.cfg.xml文件,這個文件很重要不要寫錯了代碼如下
<?xml version='1.0' encoding='utf-8'?>
<!DOCTYPE hibernate-configuration PUBLIC
        "-//Hibernate/Hibernate Configuration DTD 3.0//EN"
        "http://hibernate.sourceforge.net/hibernate-configuration-3.0.dtd">
<hibernate-configuration>
<session-factory>

	<!-- Database connection settings -->
	<property name="connection.driver_class">
		com.mysql.jdbc.Driver
	</property>
	<property name="connection.url">
		jdbc:mysql://localhost:3306/hibernate
	</property>
	<property name="connection.username">root</property>
	<property name="connection.password">rootroot</property>

	<!-- JDBC connection pool (use the built-in) -->
	<property name="connection.pool_size">2</property>

	<!-- SQL dialect -->
	<property name="dialect">
		org.hibernate.dialect.MySQLDialect
	</property>

	<!-- <property name="current_session_context_class"> org.hibernate.context.ManagedSessionContext
		</property>Enable Hibernate's current session context -->


	<!-- Disable the second-level cache  -->
	<property name="cache.provider_class">
		org.hibernate.cache.NoCacheProvider
	</property>

	<!-- Echo all executed SQL to stdout -->
	<property name="show_sql">true</property>

	<!-- <property name="hbm2ddl.auto">create</property>Drop and re-create the database schema on startup -->
	<mapping resource="com/fengpeng/model/Student.hbm.xml" />
</session-factory>

</hibernate-configuration>
六、建立一個測試類
public class Test {

	/**
	 * @param args
	 */
	public static void main(String[] args) {
		// TODO Auto-generated method stub
		Session session=new Configuration().configure().buildSessionFactory().openSession();

		Student student=new Student();
		student.setId(2);
		student.setName("wang");
		student.setAge(2);
		session.save(student);
		session.beginTransaction().commit();
		session.close();
	}

}
然後運行測試類,會在命令行出現Hibernate: insert into Student (name, age, id) values (?, ?, ?)
說明已經插入成功