SWT中還有一些常用的組件,它們可以使組件更有表現力,且稱之為展現組件,它們在SWT 開發中也是不可缺少的,包括菜單組件、工具欄組件ToolBar和ToolItem、工具欄組件 CoolBar和CoolItem、滾動組件Slider、刻度組件Scale和進度條組件ProgressBar等。
菜單組件
在程序中,菜單是提供信息比較好的方式,SWT中通過Menu和MenuItem實現菜單和菜單項 ,在程序中添加菜單的步驟如下。
(1)創建Menu對象,並指定創建的樣式,例如“menuBar = new Menu(shell, SWT.BAR); ”。
(2)創建MenuItem對象,並指定創建樣式,例如“fileEnglishItem = new MenuItem (fileMenu, SWT.RADIO);”。
(3)設置Menu和MenuItem的關聯(Menu中還可以有子Menu),例如“fileMenuHeader. setMenu(fileMenu);”。
(4)添加MenuItem的事件監聽器,例如“fileEnglishItem.addSelectionListener(new RadioItemListener());”。
為了更好地掌握菜單,下面通過一個實例演示如何創建菜單,代碼如例程1所示。
例程1 MenuExample.java
/**

* 為了節省篇幅,所有的import類已經被注釋

* 讀者可以通過ctrl+shift+o快捷鍵,自動引入所依賴的類

* 如果有問題可發郵件到ganshm@gmail.com

* */

public class MenuExample {

Display display;

Shell shell;

Menu menuBar, fileMenu, editMenu;

MenuItem fileMenuHeader, editMenuHeader;

MenuItem fileExitItem, fileSaveItem, fileEnglishItem, fileGermanItem,

editCopyItem;

Text text;

public MenuExample() {

display = new Display();

shell = new Shell(display);

shell.setText("Menu Example");

shell.setSize(300, 200);

text = new Text(shell, SWT.BORDER);

text.setBounds(80, 50, 150, 25);

//添加主菜單項

menuBar = new Menu(shell, SWT.BAR);

//添加一級子菜單

fileMenuHeader = new MenuItem(menuBar, SWT.CASCADE);

fileMenuHeader.setText("&File");

//添加一級子菜單的菜單項

fileMenu = new Menu(shell, SWT.DROP_DOWN);

fileMenuHeader.setMenu(fileMenu);

fileSaveItem = new MenuItem(fileMenu, SWT.PUSH);

fileSaveItem.setText("&Save");

fileEnglishItem = new MenuItem(fileMenu, SWT.RADIO);

fileEnglishItem.setText("English");

fileGermanItem = new MenuItem(fileMenu, SWT.RADIO);

fileGermanItem.setText("German");

fileExitItem = new MenuItem(fileMenu, SWT.PUSH);

fileExitItem.setText("E&xit");

editMenuHeader = new MenuItem(menuBar, SWT.CASCADE);

editMenuHeader.setText("&Edit");

editMenu = new Menu(shell, SWT.DROP_DOWN);

editMenuHeader.setMenu(editMenu);

editCopyItem = new MenuItem(editMenu, SWT.PUSH);

editCopyItem.setText("&Copy");

//添加菜單項的事件監聽器

fileExitItem.addSelectionListener(new MenuItemListener());

fileSaveItem.addSelectionListener(new MenuItemListener());

editCopyItem.addSelectionListener(new MenuItemListener());

fileEnglishItem.addSelectionListener(new RadioItemListener());

fileGermanItem.addSelectionListener(new RadioItemListener());

shell.setMenuBar(menuBar);

shell.open();

while (!shell.isDisposed()) {

if (!display.readAndDispatch())

display.sleep();

}

display.dispose();

}

class MenuItemListener extends SelectionAdapter {

public void widgetSelected(SelectionEvent event) {

text.setText("You selected " + ((MenuItem) event.widget).getText());

if (((MenuItem) event.widget).getText().equals("E&xit")) {

shell.close();

}

}

}

class RadioItemListener extends SelectionAdapter {

public void widgetSelected(SelectionEvent event) {

MenuItem item = (MenuItem) event.widget;

text.setText(item.getText() + " is on.");

}

}

public static void main(String[] args) {

MenuExample menuExample = new MenuExample();

}

}
以上程序中添加了主菜單,並在主菜單中添加了兩個子菜單項,子菜單項添加了相應的事 件響應機制,程序運行效果如圖1所示。
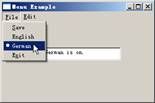
圖1 Menu\MenuItem組件
菜單是可以級聯的,在子菜單中還能夠包含其它的菜單項。
工具欄組件ToolBar和ToolItem
ToolBar是SWT中的工具欄組件,ToolItem是工 具欄中的工具項(一般表現為按鈕或分隔符,也可以是其他組件),在程序中添加工具欄的 步驟如下:
1. 創建ToolBar對象,並指定創建的樣式,例如“toolBar = new ToolBar(shell, SWT.FLAT | SWT.WRAP | SWT.RIGHT);”。
2. 創建ToolItem對 象,並指定創建樣式,例如“ToolItem itemPush = new ToolItem (toolBar, SWT.PUSH);”。
3. 設置ToolItem的圖標和相關屬性,例如 “itemPush.setImage(icon);”。
4. 添加ToolItem的事件監聽器,例如 “itemPush.addListener(SWT.Selection,selectionListener);”。
為了 更好地掌握工具欄組件,下面通過一個實例演示如何創建工具欄組件,代碼如例程2所示。
例程2 ToolBarExample.java
public class ToolBarExample {

Display display = new Display();

Shell shell = new Shell(display);

ToolBar toolBar;

public ToolBarExample() {

//添加工具欄

toolBar = new ToolBar(shell, SWT.FLAT | SWT.WRAP | SWT.RIGHT);

//添加工具項

ToolItem itemPush = new ToolItem(toolBar, SWT.PUSH);

itemPush.setText ("PUSH item");

//設置工具項的顯示圖標

//Image icon = new Image(shell.getDisplay(), "icons/new.gif");

//itemPush.setImage (icon);

ToolItem itemCheck = new ToolItem(toolBar, SWT.CHECK);

itemCheck.setText("CHECK item");

ToolItem itemRadio1 = new ToolItem(toolBar, SWT.RADIO);

itemRadio1.setText("RADIO item 1");

ToolItem itemRadio2 = new ToolItem(toolBar, SWT.RADIO);

itemRadio2.setText("RADIO item 2");

ToolItem itemSeparator = new ToolItem(toolBar, SWT.SEPARATOR);

final ToolItem itemDropDown = new ToolItem(toolBar, SWT.DROP_DOWN);

itemDropDown.setText("DROP_DOWN item");

itemDropDown.setToolTipText("Click here to see a drop down menu ...");

final Menu menu = new Menu(shell, SWT.POP_UP);

new MenuItem(menu, SWT.PUSH).setText("Menu item 1");

new MenuItem (menu, SWT.PUSH).setText("Menu item 2");

new MenuItem(menu, SWT.SEPARATOR);

new MenuItem(menu, SWT.PUSH).setText("Menu item 3");

//設置工具項的事件監聽器

itemDropDown.addListener (SWT.Selection, new Listener() {

public void handleEvent(Event event) {

if (event.detail == SWT.ARROW) {

Rectangle bounds = itemDropDown.getBounds();

Point point = toolBar.toDisplay(bounds.x, bounds.y

+ bounds.height);

//設置菜單的顯示位置

menu.setLocation (point);

menu.setVisible(true);

}

}

});

//設置工具項的事 件監聽器

Listener selectionListener = new Listener() {

public void handleEvent(Event event) {

ToolItem item = (ToolItem) event.widget;

System.out.println(item.getText() + " is selected");

if ((item.getStyle() & SWT.RADIO) != 0

|| (item.getStyle() & SWT.CHECK) != 0)

System.out.println("Selection status: "

+ item.getSelection());

}

};

itemPush.addListener(SWT.Selection, selectionListener);

itemCheck.addListener(SWT.Selection, selectionListener);

itemRadio1.addListener(SWT.Selection, selectionListener);

itemRadio2.addListener(SWT.Selection, selectionListener);

itemDropDown.addListener(SWT.Selection, selectionListener);

toolBar.pack();

shell.addListener(SWT.Resize, new Listener() {

public void handleEvent(Event event) {

Rectangle clientArea = shell.getClientArea();

toolBar.setSize(toolBar.computeSize (clientArea.width,

SWT.DEFAULT));

}

});

shell.setSize(400, 100);

shell.open();

while (!shell.isDisposed()) {

if (! display.readAndDispatch()) {

display.sleep();

}

}

display.dispose();

}

public static void main(String[] args) {

new ToolBarExample();

}

}
程序添加了工具欄,並在工具欄中添加 了相應的工具項,工具項中添加了相應的事件響應機制,程序運行效果如圖2所示。

圖2 工具欄組件
本示例顯示了工具欄和菜單欄的配合使用,菜單動態設定顯示的位置 。
工具欄組件CoolBar和CoolItem
CoolBar是另外一種形式的工具欄,它能夠 調整CoolItem的位置,每一個CoolItem可以設定相關的組件(也可以是另一個工具欄),創 建CoolBar的步驟如下:
1. 創建CoolBar對象,並指定創建的樣式,例如 “CoolBar composite = new CoolBar (parent, SWT.NONE);”。
2. 創建 CoolItem對象,並指定創建樣式,例如“CoolItem item = new CoolItem(composite, SWT.NONE);”。
3. 設置CoolItem的Control對象,例如 “item.setControl(tb);”。
CoolBar相當於一個面板容器,CoolItem是 容器中的每一項,CoolItem能設置相應的組件作為此項的子容器(也可以是其他組件)。為 了更好地掌握CoolBar組件,下面通過一個實例演示如何創建CoolBar組件,代碼如例程3所示 。
例程3 CoolBarExample.java
public class CoolBarExample extends ApplicationWindow {

public CoolBarExample() {

super(null);

}

protected Control createContents(Composite parent) {

getShell ().setText("CoolBar Test");

String asCoolItemSection[] = { "File", "Formatting", "Search" };

//添加 CoolBar

CoolBar composite = new CoolBar(parent, SWT.NONE);

for (int idxCoolItem = 0; idxCoolItem < 3; ++idxCoolItem) {

CoolItem item = new CoolItem(composite, SWT.NONE);

//添加子組件

ToolBar tb = new ToolBar (composite, SWT.FLAT);

for (int idxItem = 0; idxItem < 3; ++idxItem) {

ToolItem ti = new ToolItem(tb, SWT.NONE);

ti

.setText (asCoolItemSection[idxCoolItem] + " Item #"

+ idxItem);

}

Point p = tb.computeSize(SWT.DEFAULT, SWT.DEFAULT);

tb.setSize(p);

Point p2 = item.computeSize(p.x, p.y);

//設置為一個CoolItem的控制類

item.setControl(tb);

item.setSize(p2);

}

return composite;

}

public static void main(String[] args) {

CoolBarExample app = new CoolBarExample();

app.setBlockOnOpen(true);

app.open();

Display.getCurrent().dispose();

}

}
以上代碼演示了如何創建 CoolBar。CoolBar中每一個CoolItem可以根據用戶的需要調整位置,程序運行效果如圖3所示 。

圖3 CoolBar組件
CoolBar和ToolBar的展現樣式不一樣,CoolBar可以動態調整工具欄 的位置。
滾動組件Slider
為了方便用戶輸入數據,SWT中提供了Slider組件, 用戶可通過Slider設置數據的增量值,用來控制其他組件,也可以作為滾動條控制其他組件 中的數據顯示。添加Slider組件的步驟如下:
1. 創建Slider對象,並指定創建的樣 式,例如“Slider slide = new Slider(shell, SWT.HORIZONTAL);”。
2. 設置Slider的最大值和最小值,例如“slide.setMaximum(100);”。
3. 設置Slider增量的增加或遞減值,例如“slide.setIncrement(1);” 。
4. 添加Slider的事件監聽器,例如“slide.addSelectionListener (selectionListener);”。
為了更好地掌握Slider組件,下面通過一個實例演 示如何創建Slider組件,代碼如例程4所示。
例程4 SliderExample.java
public class SliderExample {

Display dispaly;

Shell shell;

SliderExample() {

dispaly = new Display ();

shell = new Shell(dispaly);

shell.setSize(300, 250);

shell.setText("A Slider Example");

//添加Slider對象

final Slider slide = new Slider(shell, SWT.V_SCROLL);

//設置Slider的位置和大小

slide.setBounds(170, 25, 25, 20);

//設置Slider的最小值

slide.setMinimum(0);

//設置Slider的最大值

slide.setMaximum(100);

//設置Slider單擊左右箭頭的增加或遞減值

slide.setIncrement(1);

final Text t = new Text(shell, SWT.BORDER);

t.setBounds(115, 25, 55, 20);

t.setText("0");

t.setFocus();

//添加Slider的事件監聽器

slide.addSelectionListener(new SelectionAdapter() {

public void widgetSelected(SelectionEvent e) {

t.setText(new Integer(slide.getSelection ()).toString());

}

});

shell.open();

while (! shell.isDisposed()) {

if (!dispaly.readAndDispatch())

dispaly.sleep ();

}

dispaly.dispose();

}

public static void main(String[] args) {

new SliderExample();

}

}
以上代碼添加了一個Text組 件和一個Slider組件。Slider組件設置了增量值為1,另外Slider組件添加了選擇事件,當選 擇了Slider組件後,Slider將為Text組件賦值。程序運行效果如圖4所示。
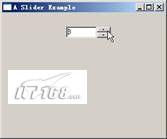
圖4 Slider組件
Slider組件要配合其它的組件使用,輔助其它的組件完成功能。
刻度組件Scale
Scale和Slider類似,在SWT中都表示一種尺度,但兩者的表現 形式不一樣,Scale更像一個刻度,而Slider則是提供一個滾動條。添加Scale組件的步驟如 下:
1. 創建Scale對象,並指定創建的樣式,例如“Scale scale = new Scale(shell, SWT.VERTICAL);”。
2. 設置Scale的最大值和最小值,例如 “scale.setMaximum(20);”。
3. 設置Scale增量的增加或遞減值,例如 “scale.setPageIncrement(5);”。
4. 添加Scale的事件監聽器,例如 “scale.addSelectionListener(selectionListener);”。
為了更好地掌 握Scale組件,下面通過一個實例演示如何創建Scale組件,代碼如例程5所示。
例程5 ScaleExample.java
public class ScaleExample {

Display display = new Display();

Shell shell = new Shell(display);

Scale scale;

Text value;

public ScaleExample() {

shell.setLayout(new GridLayout(1, true));

Label label = new Label(shell, SWT.NULL);

label.setText ("Volume:");

//添加Scale組件

scale = new Scale(shell, SWT.VERTICAL);

scale.setBounds(0, 0, 40, 200);

//設置Scale的最大值

scale.setMaximum(20);

//設置Scale的最小值

scale.setMinimum(0);

//設置Scale的增量值

scale.setPageIncrement(5);

//添加Scale的事件監聽 器

scale.addListener(SWT.Selection, new Listener() {

public void handleEvent(Event event) {

int perspectiveValue = scale.getMaximum() - scale.getSelection() +

scale.getMinimum();

value.setText("Vol: " + perspectiveValue);

}

});

value = new Text(shell, SWT.BORDER | SWT.SINGLE);

value.setEditable(false);

scale.setLayoutData(new GridData(GridData.HORIZONTAL_ALIGN_CENTER));

value.setLayoutData(new GridData(GridData.HORIZONTAL_ALIGN_CENTER));

shell.pack();

shell.open();

while (!shell.isDisposed()) {

if (! display.readAndDispatch()) {

display.sleep();

}

}

display.dispose();

}

private void init() {

}

public static void main(String[] args) {

new ScaleExample();

}

}
上例中 ,通過事件監聽器監聽當前選擇的刻度,並用Text組件顯示出來,程序運行效果如圖5所示。
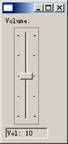
圖5 Scale組件
Scale組件能夠精確的顯示刻度,用戶可以設制好刻度的范圍,這是非 常有用的。
進度條組件ProgressBar
ProgressBar是SWT中的進度條組件。進度 條提供了比較長時間操作的進度信息。添加ProgressBar組件的步驟如下:
1. 創建 ProgressBar對象,並指定創建的樣式,例如“ProgressBar pb1 = new ProgressBar (shell, SWT.HORIZONTAL | SWT.SMOOTH);”。
2. 設置ProgressBar的最大值和 最小值,例如“pb1.setMaximum(30);”。
3. 在長時間的任務中設置當前 進度條的進度,例如“progressBar.setSelection (progressBar.getSelection() + 1);”。
進度條能反映當前的工作進度,為了配合處理長時間的任務,進度條經 常配合線程使用,以免產生阻塞影響界面的操作。為了更好地掌握ProgressBar組件,下面通 過一個實例演示如何創建ProgressBar組件,代碼如例程6所示。
例程6 ProgressBarExample.java
public class ProgressBarExample {

public static void main(String[] args) {

Display display = new Display();

Shell shell = new Shell(display);

shell.setLayout(new GridLayout());

//添加平滑的進度條

ProgressBar pb1 = new ProgressBar(shell, SWT.HORIZONTAL | SWT.SMOOTH);

pb1.setLayoutData(new GridData(GridData.FILL_HORIZONTAL));

//設置進度條的最小值

pb1.setMinimum(0);

//設置進度條的最大值

pb1.setMaximum(30);

//添加自動遞增的進度條

ProgressBar pb2 = new ProgressBar(shell, SWT.HORIZONTAL |

SWT.INDETERMINATE);

pb2.setLayoutData(new GridData(GridData.FILL_HORIZONTAL));

//添加線程,在 線程中處理長時間的任務,並最終反映在平滑進度條上

new LongRunningOperation (display, pb1).start();

shell.open();

while (!shell.isDisposed()) {

if (!display.readAndDispatch()) {

display.sleep();

}

}

}

}

class LongRunningOperation extends Thread {

private Display display;

private ProgressBar progressBar;

public LongRunningOperation (Display display, ProgressBar progressBar) {

this.display = display;

this.progressBar = progressBar;

}

public void run() {

//模仿長時 間的任務

for (int i = 0; i < 30; i++) {

try {

Thread.sleep (1000);

} catch (InterruptedException e) {

}

display.asyncExec(new Runnable() {

public void run() {

if (progressBar.isDisposed()) return;

//進度條遞增

progressBar.setSelection(progressBar.getSelection () + 1);

}

});

}

}

}
以上代碼添加了兩個進度條, 一個進度條為自動顯示增加進度的信息(SWT.INDETERMINAT樣式),另外一個進度條通過線 程處理長時間的任務,並設定進度條的信息。程序運行效果如圖6所示。
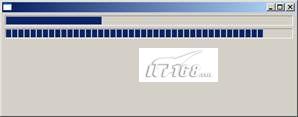
圖6 ProgressBar組件
進度條有不同的樣式,在程序中,開發人員可以控制進度條的進度 ,執行某些長時間的操作。