本文介紹在Eclipse裡如何配置一個簡單的基於Eclipse Equinox OSGi實現的Web應用程序,在它的基 礎上可以構造更加復雜的應用,本文使用的是Eclipse 3.3.1版本,如果你的Eclipse版本在3.2.0或以上 應該都可以。
一、支持靜態頁面和Servlet
1. 創建一個新的plugin項目, net.bjzhanghao.osgi.test,在向導第一步裡選中“This plug-in is target,在下一步的“Plug-in Options”裡選中“Generate an activator”。

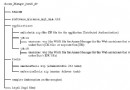
2. 在例子項目的MANIFEST.MF裡添加如下依賴項目,這些項目都是Eclipse自帶的:
org.eclipse.equinox.http.jetty

org.eclipse.equinox.http.servlet

org.mortbay.j etty

org.apache.commons.logging

javax.servlet

org.eclipse.equinox.http.registry
3. 在例子項目根目錄下創建一個放置web文件的目錄,如“web_files”,在這個目錄下寫一個簡單的 index.html文件。
4. 為項目建一個plugin.xml文件,內容如下:
alias="/web"
base-name="/web_files"/>
注意,這時若MANIFEST.MF裡提示錯誤,只要在Bundle-SymbolicName這一行後面加上 “;singleton:=true”即可解決。
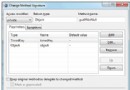
5. 現在可以啟動這個應用程序了。在Eclipse菜單裡選擇“Run->Open Run Dialog...”,在左邊 的 “OSGi Framework”項下創建一個新的啟動配置項,在右邊先點“Deselect All”清空所有復選框, 然後在Workspace下選中自己的osgi項目,再點“Add Required Bundles”按鈕,Eclipse會自動把所依賴 的項目選中。最後按“Debug”按鈕啟動,內嵌的jetty和我們的項目會一起被啟動。
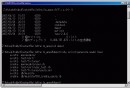
6. 打開浏覽器,輸入“http://localhost/web/index.html”應該可以看到index.html裡的內容。
以上只驗證了靜態頁面,現在來配置一個servlet看看。
7. 在項目裡創建一個繼承自HttpServlet的類,覆蓋doGet()方法,內容是在網頁上打印一些文本。
8. 在項目的plugin.xml裡添加下面的內容,這些內容指定了servlet的訪問路徑和實現類:
alias="/exampleServlet"
class="net.bjzhanghao.osgi.example.servlet.ExampleServlet"/>
9. 重新啟動項目,在浏覽器裡輸入“http://localhost/exampleServlet”,應該可以看到servlet的 輸出。
二、支持JSP頁面
10. 在index.html所在目錄下創建一個簡單的jsp文件index.jsp
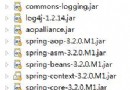
11. 打開項目的MANIFEST.MF文件,添加如下項目依賴:
org.eclipse.equinox.jsp.jasper,

org.apache.jasper,

org.eclipse.equinox.jsp.ja sper.registry,

javax.servlet.jsp,

org.apache.commons.el,

org.eclipse.equinox.http.h elper,

org.eclipse.osgi,

org.eclipse.osgi.services
其中org.eclipse.equinox.http.helper需要從cvs裡下載得到(目前是在/cvsroot/eclipse下的 equinox-incubator目錄裡,以後可能會直接放到/cvsroot/eclipse下)。
12. 修改Activator,目的是注冊一個處理擴展名為.jsp類型的servlet,感覺這一步以後應該有更簡 單的方法,例如通過擴展點。
public class Activator implements BundleActivator {


private  ServiceTracker httpServiceTracker;


String jspContext = "/jsps";

String  jspFolder = "/web_files";


public void start(BundleContext context) throws  Exception {

httpServiceTracker = new HttpServiceTracker (context);

httpServiceTracker.open();

}


public void stop(BundleContext  context) throws Exception {

httpServiceTracker.open();

}


private class  HttpServiceTracker extends ServiceTracker {


public HttpServiceTracker (BundleContext context) {

super(context, HttpService.class.getName(), null);

}


public Object addingService(ServiceReference reference) {

final HttpService  httpService = (HttpService) context

.getService(reference);

try {

HttpContext  commonContext = new BundleEntryHttpContext(context

.getBundle(),  jspFolder);

httpService.registerResources(jspContext, "/",  commonContext);


Servlet adaptedJspServlet = new ContextPathServletAdaptor(

new  JspServlet(context.getBundle(),  jspFolder),

jspContext);

httpService.registerServlet(jspContext +  "/*.jsp",

adaptedJspServlet, null, commonContext);

} catch (Exception e)  {

e.printStackTrace();

}

return httpService;

}


public void  removedService(ServiceReference reference, Object service) {

final HttpService  httpService = (HttpService) service;

httpService.unregister (jspContext);

httpService.unregister(jspContext + "/*.jsp");

super.removedService (reference, service);

}

}

}
13. 打開Debug對話框,選中workspace裡的例子osgi項目和org.eclipse.equinox.http.helper項目, 再按“Add Required Bundles”按鈕,然後啟動程序。
14. 在浏覽器裡輸入“http://localhost/jsps/index.jsp”,應該可以看到jsp輸出。
例子項目下載(鏈接):http://www.bianceng.net/java/201212/717.htm