早期地下采煤的時候,礦井中的金絲雀常常擁有短暫而有價值的一生。因為它 們對於甲烷和一氧化碳等致命毒氣非常敏感,從棲木上掉下來的金絲雀是一個明 顯的信號,告訴礦工是時候離開了。過一段時間之後,如果新換上的金絲雀安然 無恙,礦工們又可以安全地重返礦井。
您的軟件項目也可以有自己的礦井 金絲雀。如果您在使用 CruiseControl 之類的持續集成工具,那麼很可能熟悉當 構建失敗時發送給團隊的電子郵件消息。這是一個信號,說明項目代碼中有些地 方需要馬上改正。但是,當收件箱中還有很多其他郵件時,這些消息有時候會被 忽略。然後,在知道消息之前,我已經從有問題的儲存庫中更新了本地副本,或 者直接回家了,讓團隊中的其他人直抱怨。
這時需要某種高度可視的東西,就像金絲雀一樣,快速一瞥後就能發現持續構 建過程的狀態。我的金絲雀是一種新的來自 Sun Microsystems 的開源技術,它 的名稱是 Sun Small Programmable Object Technology(SPOT)。本文介紹 SPOT,並展示如何建立用於監視 CruiseControl 的構建監視器。
什麼是 SPOT?
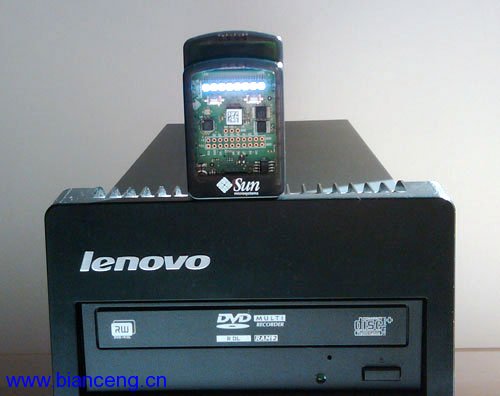
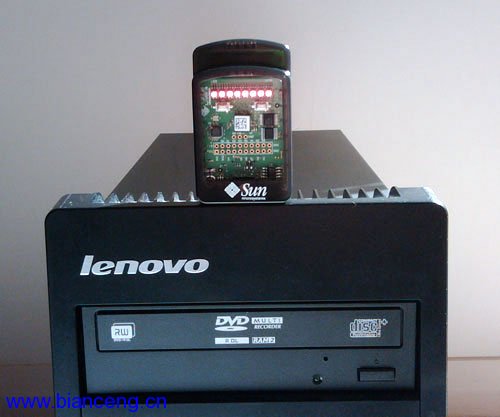
SPOT(見 圖 1)是運行 Java™ 程序的小型無線設備。SPOT 載有很多 傳感器,用於監視它的環境,還有一組彩色 LED 用於與外部通信,以及兩個用於 提供基本反饋的按鈕。我使用 LED 來顯示構建的狀態。可以通過一條 USB 線將 一些 SPOT 連接起來,作為一個基站,其他 SPOT 可以通過這個基站訪問工作站 上的資源,例如數據庫或 Web 應用程序。
圖 1. Sun SPOT
獲得 SPOT
如果要獲得一些 SPOT,以便組成自己的構建監視器,那麼可以通過 Sun SPOT World購買工具包。在工具包中,有兩個 SPOT 和一個基站,一些 USB 線纜,以 及放在 CD 中的 SDK。這種工具包有時候會脫銷(而且仍然比較貴),但是不要 因此而耽誤進程。隨 SDK 還附帶了一個名為 Solarium 的模擬器,這意味著可以 在虛擬 SPOT 上馬上開始工作。
安裝 SDK 後,可以探索示例應用程序、開發人員指南、技術規范、源代碼和 一些項目描述,例如使用 SPOT 控制 Web 相機。
SPOT 由以下硬件元件組成:
主處理器是一個 180MHz Atmel AT91RM9200 系統芯片(system-on-chip)。
每個 SPOT 有 4MB Flash RAM 和 512K 偽靜態 RAM。
電力由內部充電電池(圓柱形锂電池)、外接電源或 USB 主機提供。
電池充電後可無間斷使用大約 3 小時。當無事發生時,它進行休眠,從而延 長使用壽命。
演示子板包含溫度和光傳感器、一個三軸加速計、8 個三色 LED 以及兩個按 鈕開關。必要時,還可以通過 5 個通用 I/O 插腳和 4 個高電流輸出插腳增加更 多的子板。
無線通信通過一個遵從 IEEE 802.15.4 的收發器完成,該收發器采用 2.4GHz-to-2.4835GHz 免授權頻段。
在這樣的硬件上,SPOT 運行一個名為 Squawk 的小型 JVM,這個 JVM 幾乎完 全是用 Java 語言編寫的。Squawk 遵從 Connected Limited Device Configuration(CLDC)1.1 Java Micro Edition(Java ME)配置。它無需底層 操作系統便可運行 — 也就是所謂的 “在裸機上運行”。
計算物理系統
SPOT 是計算物理系統的一個例子。計算物理系統中有一些嵌入的設備,這些 設備運行可感知環境並作出反應的軟件和通信協議。
用於 SPOT 的應用程序是根據 Java ME MIDlet 編程模型編寫的。這意味著每 個 SPOT 上的 JVM 以類似於 Java EE 下管理 servlet 和 Enterprise JavaBeans(EJBs)的方式來管理 MIDlet 的生命周期。但是,由於 MIDlet 運行 環境的限制,CLDC 以 JDK 1.3.1 作為開始的基礎,剝離所有不必要的部分。因 此,SPOT 程序不能訪問文件流;沒有反射,沒有串行化,沒有本地方法,沒有正 則表達式,沒有 Swing,只有有限的數據類型。唯一可用的集合數據結構是向量 棧、枚舉和 hash 表。有些特定於 CLDC 的連接類被添加到這個子集中,但是編 程過程中仍然要受很多限制。
為 SPOT 編寫、構建和部署代碼
為 SPOT 編寫、構建和部署代碼非常簡單,可以使用自己選擇的 IDE。例如, 若要在 Eclipse 中進行開發:
創建一個標准的 Java 項目,刪除默認的 JRE。
將 SPOT SDK 的 lib 文件夾中的以下 JAR 添加到 classpath:
transducer_device.jar
multihop_common.jar
spotlib_device.jar
spotlib_common.jar
squawk_device.jar
在 resources/META-INF 目錄中創建一個 MANIFEST.MF 文件。該文件包含 Squawk VM 用於運行應用程序的信息。例如,清單 1 是我的構建監視器的 manifest 文件:
清單 1. resources/META-INF/MANIFEST.MF 文件的內容
MIDlet-Name: BuildCanary

MIDlet-Version: 1.0.0

MIDlet-Vendor: Craig Caulfield

MIDlet-1: Build Canary, , speck.buildmonitor.BuildCanary

MicroEdition-Profile: IMP-1.0

MicroEdition-Configuration: CLDC-1.1

BaseStationAddress: 0014.4F01.0000.3A3C

PortNumber: 100
清單 1 中最重要的一行是:
MIDlet-1: Build Canary, , speck.buildmonitor.BuildCanary
第一個參數是應用程序的名稱,第三個參數是應用程序主類的完全限定類名。
可以在該文件中添加自己的屬性,並在運行時讀取這些屬性,例如:
String baseStationAddress = getAppProperty ("BaseStationAddress");
創建一個擴展 javax.microedition.midlet.MIDlet 的類,然後開始開發應用 程序。
當准備好部署代碼時,將代碼打包到一個 JAR 中,通過無線的方式將它發送 到 SPOT:
使用 USB 線將一個基站 SPOT 連接到工作站。
執行 SPOT SDK 安裝目錄中的 ant startbasestation,啟動基站。
執行以下命令部署 JAR:
ant -DremoteId=0014.4F01.0000.3A19 deploy
下載 中提供了 build-canary 應用程序的 Eclipse 項目,可以以此為基礎。
應用程序概述
圖 2 中的部署圖展示我如何設置構建監視器,以監視 CruiseControl 構建。
圖 2. 構建監視器的部署圖
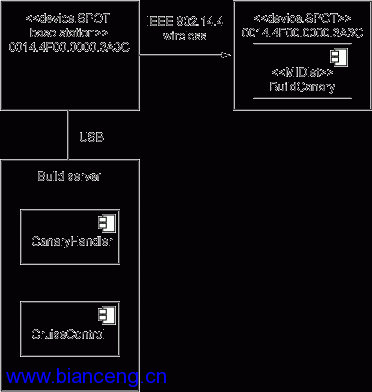
CruiseControl 循環構建在一個構建服務器上運行,該構建服務器有一個通過 USB 線連接的 SPOT 基站。每當構建的當前狀態(SUCCESS、FAILED 或 RUNNING )改變時,構建服務器上都會調用一個簡單的 Java SE 應用程序 — CanaryHandler 。然後,通過基站 SPOT 將一條無線消息發送到 BuildCanary — 遠程 SPOT 上運行的一個 MIDlet — 以更新該 SPOT 的 LED,從而反映構建的新 狀態。
CanaryHandler 代碼
為了讓 CanaryHandler 程序有一個良好的開端,我使用 Apache Commons CLI 解析命令行參數。CLI 負責收集和驗證參數,並提供方便的幫助功能。例如,如 果輸入 java CanaryHandler --help,可以看到清單 2 中的輸出:
清單 2. CanaryHandler 的幫助文本
usage: java CanaryHandler  (--running | --failed | --success) --spot

       "0014.4F01.xxxx.yyyy" --port 100 --serial COM4

This program connects with a remote Sun SPOT to set a  colour to denote the

current state of the Continuous Integration build process.

  -a,--spot <spot>  The IEEE wireless address (like

            0014.4F01.0000.30E0) of the SPOT (enclose  in double quotes).

  -c,--serial <serial>The serial port (e.g. COM4) to  which the SPOT base

            station is attached.

  -f,--failed     The build has failed.

  -h,--help      Print this usage information.

  -p,--port <port>  The port address (range 32 to  255) to be used for

             communicating with the SPOT.

  -r,--running    The building is running

  -s,--success    The building was successful.

For more instructions see the Javadoc in the docs/api  directory.
從 清單 2 中可以看到,CanaryHandler 接受 4 個參數:
構建的當前狀態,可能的值有:
Running(SPOT 的 LED 中顯示藍色流光)。
Failed(SPOT 的 LED 閃爍紅色)。
Successful(SPOT 的 LED 顯示為不動的綠條)。
一個遠程 SPOT 的地址。每個 SPOT 由一個 64 位的 IEEE 無線地址標識,該 地址以 0014.4F01 開頭,後面再加上兩個四位字節,從而惟一地標識 SPOT。
一個端口號,惟一地標識基站與遠程 SPOT 之間的連接。
一個串行端口,標識構建服務器上與基站連接的串行端口。
解析命令行參數後,CanaryHandler 打開與遠程 SPOT 的 radiostream 連接 ,如清單 3 所示:
清單 3. CanaryHandler 中的 main() 方法
/**

  * Respond to the state a continuous build process by  setting the LEDs on a

  * remote SPOT accordingly. This is done by writing a  simple message to an

  * output stream, on the end of which is a SPOT waiting  to read.

  *

  * @param args the command line arguments. See the  printUsage

  * method further down for a full description of the  parameters.

  */

public static void main(String[] args) throws IOException  {


   createCommandLineParser();

   StreamConnection connection = null;

   DataOutputStream dos = null;

   DataInputStream dis = null;


   try {


     CommandLine commandLine = parser.parse(options,  args);

     String spotAddress = commandLine.getOptionValue ("spot");

     String port = commandLine.getOptionValue("port");

     String spotConnection = "radiostream://" + spotAddress  + ':' + port;


     System.setProperty("SERIAL_PORT",  commandLine.getOptionValue("serial"));


     log.info("Setting address to " +  spotConnection);


     connection = (StreamConnection) Connector.open (spotConnection);

     dos = connection.openDataOutputStream();

     dis = connection.openDataInputStream();


     if (commandLine.hasOption("running")) {


       log.info("Setting build state to RUN.");

       dos.writeUTF("RUN");

       dos.flush();

       log.info("SPOT responded with: " + dis.readUTF ());


     } else if (commandLine.hasOption("failed")) {


       log.info("Setting build state to FAIL.");

       dos.writeUTF("FAIL");

       dos.flush();

       log.info("SPOT responded with " + dis.readUTF ());


     } else if (commandLine.hasOption("success")) {


       log.info("Setting build state to SUCCESS.");

       dos.writeUTF("SUCCESS");

       dos.flush();

       log.info("SPOT responded with " + dis.readUTF ());


     } else {


       printUsage(options);

       System.exit(1);


     }


   } catch (ParseException e) {


     // This will be thrown if the command line  arguments are malformed.

     printUsage(options);

     System.exit(1);


   } catch (NoRouteException nre) {


     log.severe("Couldn't get a connection to the remote  SPOT.");

     nre.printStackTrace();

     System.exit(1);


   } finally {


     if (connection != null) {

       connection.close();

     }


     System.exit(0);

   }

}
radiostream 協議類似於點對點套接字連接,它為基站與遠程 SPOT 之間提供 可靠、有緩沖的基於流的 I/O。另外,還打開數據輸入和輸出流。然後,一條關 於構建的簡單的消息被寫到輸出流,遠程 SPOT 讀取該消息,然後返回一條簡短 的確認消息。接著 CanaryHandler 結束,等待下一次構建狀態改變時再次被調用 。
BuildCanary 代碼
當 CanaryHandler 打開一個 radiostream 連接並發送一條關於構建的簡單消 息時,連接的另一端是 BuildCanary,它是部署在遠程 SPOT 上的一個 Java ME MIDlet。MIDlet 與 servlet 和 EJB 類似,也是實現一個專門的接口,運行時環 境負責在它的生命周期中的某些時候調用某些方法。
例如,MIDlet 的典型的入口點是 startApp() 方法。在 BuildCanary 中, startApp() 委托給另一個方法,後者又產生一個線程,以偵聽來自 CanaryHandler 的消息。清單 4 顯示 BuildCanary 的入口點的代碼:
清單 4. BuildCanary 的入口點
/**

  * MIDlet call to start our application.

  */

protected void startApp() throws MIDletStateChangeException  {

   run();

}


/**

  * Main application run loop which spawns a thread to  listen for updates

  * about the build status from the host.

  */

private void run() {


   // Spawn a thread to listen for messages from the  host.

   new Thread() {


     public void run() {

       try {


         updateBuildStatus();


       } catch (IOException ex) {


         try {

           if (connection != null) {

             connection.close();

           }


           if (dos != null) {

             dos.close();

           }


           if (dis != null) {

             dis.close();

           }


           ex.printStackTrace();

         } catch (IOException ex1) {

           // Can't do much now.

           ex1.printStackTrace();

         }

       }

     }

   }.start();

}
updateBuildStatus() 方法處理 MIDlet 的主要工作,如清單 5 所示:
清單 5. 偵聽 CanaryHandler 發送的消息的方法
/**

  * Reflect the status of the continuous build process  taking place on the

  * host PC by setting the colours of the SPOT's LEDs  appropriately.

  */

private void updateBuildStatus() throws IOException {


   setColour(LEDColor.WHITE, "");


   String baseStationAddress = getAppProperty ("BaseStationAddress");

   String portNumber = getAppProperty("PortNumber");

   String connectionString = "radiostream://" +  baseStationAddress + ':' +

       portNumber;


   // Open a connection to the base station.

   connection = (RadiostreamConnection) Connector.open (connectionString);

   dis = connection.openDataInputStream();

   dos = connection.openDataOutputStream();


   while (true) {


     // dis will block here forever until it has  something from the host

     // to read.

     String buildStatus = dis.readUTF();


     if (buildStatus.equals("RUN")) {


       setColour(LEDColor.BLUE, buildStatus);


     } else if (buildStatus.equals("SUCCESS")) {


       setColour(LEDColor.GREEN, buildStatus);


     } else if (buildStatus.equals("FAIL")) {


       setColour(LEDColor.RED, buildStatus);


     } else {

       throw new IllegalArgumentException("The build status  of " +

           buildStatus + " isn't recognised.");

     }


     dos.writeUTF("Build status updated to " +  buildStatus);

     dos.flush();

   }

}
該方法首先將所有 LED 變成白色,表示 SPOT 就緒。然後,與 CanaryHandler 類似,它打開一個 radiostream 連接以及數據輸入和輸出流。但 是,在這裡,它首先嘗試從輸入流讀一條消息,並阻塞直到收到消息。
如清單 6 所示,當收到一條消息時,setColour() 方法產生另一個線程,以 更新 SPOT 上的 LED 的顏色。然後,BuildCanary 回到 while 循環的頂端,等 待下一條消息。
清單 6. 產生一個設置顏色的新線程
/**

  * Set a colour for the LEDs to display.

  *

  * @param colour an LEDColor value.

  * @param buildStatus the current status if the build.

  */

private void setColour(final LEDColor colour, final String  buildStatus) {


   if (colourThread != null) {


     colourThread.interrupt();


   }


   setColour = new SetColour(colour, buildStatus);

   colourThread = new Thread(setColour);

   colourThread.start();

}
與此同時,真正操作 LED 是在 SetColour 類中,如清單 7 所示:
清單 7. 操作 LED 的內部類
/**

  * An inner class to handle the colour and behaviour  (flashing, solid,

  * running) of the LEDs of a SPOT.

  */

public class SetColour implements Runnable {


   /**

    * A reference to the SPOTs LEDs so they can be set  according to the

    * state of the build.

    */

   private ITriColorLED[] leds = EDemoBoard.getInstance ().getLEDs();


   /**

    * The RGB colour to set the LEDs to.

    */

   private LEDColor colour;


   /**

    * The current status of the build. This will be used  to set the

    * behaviour of the LEDs (flashing, solid, running).

    */

   private String buildStatus;


   public SetColour(LEDColor colour, final String buildStatus)  {


     this.colour = colour;

     this.buildStatus = buildStatus;

   }


   public void run() {


     try {


       if (buildStatus.equals("RUN")) {


      // Display running LEDs.

         while (true) {


           for (int i = 0; i < 8; i++)  {


             leds[i].setColor(colour);

             leds[i].setOn();

             Thread.sleep(200);

             leds[i].setOff();


           }

         }


       } else if (buildStatus.equals("FAIL")) {


      // Flash the LEDs on and off.

         while (true) {


           for (int i = 0; i < 8; i++ ) {

             leds[i].setColor(colour);

             leds[i].setOn();

            }


           Thread.sleep(250);


            for (int i = 0; i < 8; i++ )  {

             leds[i].setOff();


            }


           Thread.sleep(250);

         }


       } else {


      // Display the LEDs as a solid bar.

         for (int i = 0; i < 8; i++) {

           leds[i].setColor(colour);

           leds[i].setOn();

         }

       }


     } catch (InterruptedException ie) {

     // Do nothing. Just bail out so we can set the  LEDs to another colour.

     }

   }

}
清單 7 為 SPOT 的 8 個 LED 分別設置顏色,並根據構建的狀態打開或關閉 這些 LED。
下一步是將構建監視器附加到持續構建過程。
CruiseControl 配置
當 CruiseControl 開始時,它在一個連續循環中運行,周期性地檢查源代碼 庫,例如 Subversion,然後從頭開始構建和測試項目。然後,CruiseControl 可 以將構建成功或失敗的狀態發布到網站上,供所有人查看,並發出各種不同的消 息。
CruiseControl 循環的行為由一個 XML 配置文件 config.xml 表示,如清單 8 所示:
清單 8. CruiseControl 配置文件
<cruisecontrol>


   <property environment="env"/>

   <property name="local.directory"  value="C:\data\skills\development\builds"/>

   <property name="repository" value="http://kimba/svn"/>

   <property name="javaExecutable"  value="C:\applications\java\jdk1.6.0_14\bin\

             java.exe"/>

   <property name="workingDirectory"  value="C:\data\skills\development\java\micro\

                  netbeans\sunspots\CanaryHandler\dist"/>

   <property name="libraryPath" value="- Djava.library.path=C:\applications\Sun\

             SunSPOT\sdk-red-090706\lib"/>

   <property name="commonArguments" value="${libraryPath} -jar

             ${workingDirectory}\CanaryHandler.jar

             --spot "0014.4F01.0000.3A19"

             --port 100

             --serial COM4"/>


   <plugin name="log" dir="${logdir}"/>

   <plugin name="svn"  classname="net.sourceforge.cruisecontrol.sourcecontrols.SVN"

            username="cruise"

            password="catbert"/>


   <project name="developer-ci-build"  buildafterfailed="false">


<!-- Defines where CruiseControl looks for changes to decide  whether to run the build. -->

    <modificationset quietperiod="30">

      <svn  localWorkingCopy="${local.directory}/checkout/SunDeveloper"

           repositoryLocation="${repository}/DEVELOPER/trunk/SunDeveloper"/>

    </modificationset>


<!-- Check for modifications every 60 seconds -->

    <schedule interval="60">

      <composite>

      <exec command="${javaExecutable}" args="${commonArguments}

                --running"/>

      <maven2 mvnhome="${env.MAVEN_HOME}"

               pomfile="${local.directory}/checkout/SunDeveloper/pom.xml"

               goal="clean | scm:update |  compile"/>

      </composite>

    </schedule>


    <listeners>

      <currentbuildstatuslistener

            file="${local.directory}/logs/ ${project.name}/buildstatus.txt"/>

    </listeners>


<!-- The publishers are run when a build completes one way  or another. -->

    <publishers>

      <onsuccess>

       <execute command="${javaExecutable} ${commonArguments}

                --success"/>

      </onsuccess>

      <onfailure>

       <execute command="${javaExecutable} ${commonArguments}

                --failed"/>

      </onfailure>

    </publishers>

   </project>


</cruisecontrol>
在我的循環中,有一個項目 developer-ci-build — 這是在本地 Subversion 庫中注冊的一個 Apache Maven 項目。CruiseControl 每分鐘檢查一次這個庫, 看是否有修改;如果有改動,它執行一些 Maven 目標,以構建項目。但是,首先 它帶一個 --running 參數調用 CanaryHandler,以顯示構建正在進行。
構建要麼成功,要麼失敗,導致要麼調用 onsuccess 發布者,要麼調用 onfailure 發布者。在這些發布者中有更多對 CanaryHandler 的調用,用於設置 構建的狀態。
運行構建
現在,所有的塊已經就緒,接下來可以運行構建,看看遠程 spot 有何反應。
圖 3 顯示 SPOT 的開始狀態,所有 LED 被設為白色:
圖 3. 構建服務器上的構建監視器的初始狀態(LED 均為白色)
然後,故意將有錯的代碼提交到 Subversion 庫,等待 CruiseControl 檢測 到變化並開始構建。當構建開始時,構建監視器 SPOT 上的 LED 從全白變為藍色 流光,如圖 4 所示:
圖 4. 構建監視器顯示構建正在進行中(LED 顯示藍色流光)

不久後,構建如期失敗,LED 變成緊急閃爍的紅色,如圖 5 所示:
圖 5. 構建監視器顯示構建失敗(LED 閃爍紅色)
最後,將修正錯誤後的代碼提交到 Subversion。CruiseControl 再次開始構 建,這一次構建成功,LED 變成不動的綠條,如圖 6 所示:
圖 6. 構建監視器顯示構建成功
結束語
如果在持續集成系統上運行的構建失敗,那麼可以肯定失敗的原因出在最近的 更改中。越早知道失敗可以越快作出反應。本文描述的 SPOT 的構建監視器用於 提供高度可視的指示器,表明需要緊急修復項目代碼。
雖然 SPOT 仍然是一項實驗技術,但已經有一群積極的擁護者,並且他們以許 多激動人心的、有想象力的方式在使用該技術 — 從安裝在火箭上向高校學生演 示物理概念,到安裝在樹上監視火情,甚至被用作游戲控制器。請訪問 Sun SPOT World 上的論壇,觀看 YouTube 上的演示,了解各種不同的 SPOT 應用。
本文配套源碼