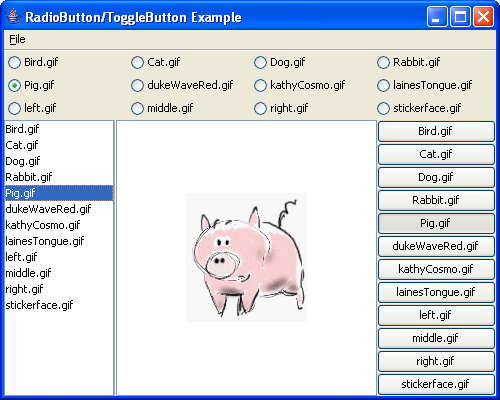
如果點擊在ListBox中的“Pig.gif”(或者選擇“Pig.gif”的RadioButton或ToggleButton),將出現下面的變化:
如果打開菜單,你將看到它也發生了同樣的變化:

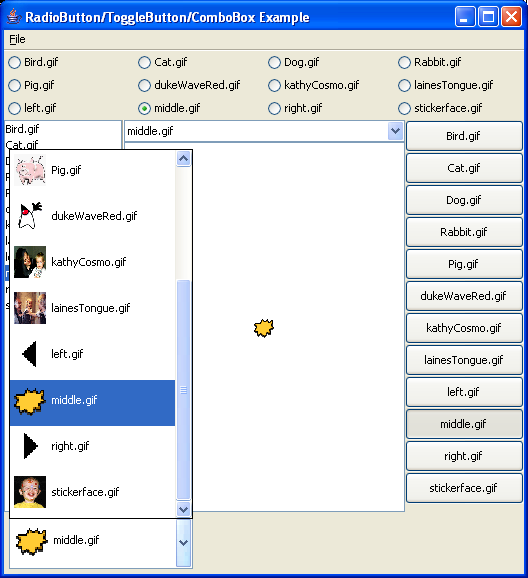
ComboBoxes(下列選擇框)
JavaFX ComboBox與Swing JComboBox組件相關。我們將在上一個示例中添加兩個組件來演示如何使用ComboBox。示例代碼如下:
class ExampleModel {

      attribute imageFiles: String*;

      attribute selectedImageIndex: Number;

      attribute selectedImageUrl: String;

    }

    var model = ExampleModel {

      var: self

      imageFiles: ["Bird.gif", "Cat.gif", "Dog.gif",

           "Rabbit.gif", "Pig.gif", "dukeWaveRed.gif",

           "kathyCosmo.gif", "lainesTongue.gif",

           "left.gif", "middle.gif", "right.gif",

           "stickerface.gif"]

      selectedImageUrl: bind "http://java.sun.com/docs/books/tutorial/uiswing/examples/components/SplitPaneDemoProject/src/components/images/{self.imageFiles[self.selectedImageIndex]}"

    };

    Frame {

      menubar: MenuBar {

        menus: Menu {

          text: "File"

          mnemonic: F

          var buttonGroup = ButtonGroup {

            selection: bind model.selectedImageIndex

          }

          function makeRadioButton(buttonGroup, imageName) {

            return RadioButtonMenuItem {

              buttonGroup: buttonGroup

              text: imageName

            };

          }

          items: foreach (imageName in model.imageFiles)

            makeRadioButton(buttonGroup, imageName)

        }

      }

      title: "RadioButton/ToggleButton/ComboBox Example"

      height: 400

      width: 500

      content: BorderPanel {

        top: GridPanel {

            rows: sizeof model.imageFiles / 4

            columns: sizeof model.imageFiles % 4

            var buttonGroup = ButtonGroup {

              selection: bind model.selectedImageIndex

            }

            cells: foreach (imageName in model.imageFiles)

              RadioButton {

                buttonGroup: buttonGroup

                text: imageName

              }

        }

        right: GridPanel {

            rows: sizeof model.imageFiles

            columns: 1

            var buttonGroup = ButtonGroup {

               selection: bind model.selectedImageIndex

            }

            cells: foreach (imageName in model.imageFiles)

               ToggleButton {

                 buttonGroup: buttonGroup

                 text: imageName

               }

        }

        center: SplitPane {

          orientation: HORIZONTAL

          content:

          [SplitView {

            weight: 0.30

            content: ListBox {

              selection: bind model.selectedImageIndex

              cells: bind foreach (imageName in model.imageFiles)

                ListCell {

                  text: bind imageName

                }

            }

          },

          SplitView {

             weight: 0.70

             content: BorderPanel {

              top: ComboBox {

                selection: bind model.selectedImageIndex

                cells: bind foreach (imageName in model.imageFiles)

                  ComboBoxCell {

                    text: bind imageName

                  }

              }

              center: ScrollPane {

                view: CenterPanel {

                  background: white

                  content: SimpleLabel {

                    icon: Image {url: bind model.selectedImageUrl}

                  }

                }

              }

            }

          }]

        }

        bottom: FlowPanel {

           alignment: LEADING

           content: ComboBox {

             selection: bind model.selectedImageIndex

             cells: bind foreach (imageName in model.imageFiles)

               ComboBoxCell {

                 text: bind "<html>

                      <table>

                       <tr>

                        <td>

                          <img src='http://java.sun.com/docs/books/tutorial/uiswing/examples/components/SplitPaneDemoProject/src/components/images/{imageName}' height='32' width='32'></img>

                        </td>

                        <td>

                          {imageName}

                        </td>

                       </tr>

                      </table>

                     </html>"

               }

          }

        }

      }

      visible: true

    }
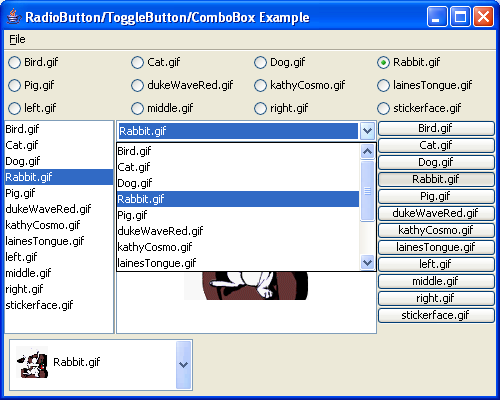
上例中有關ComboBox的代碼表示為粗體。我們通過將一組ComboBoxCell對象賦值給ComboBox的cells屬性,來為ComboBox賦予下拉列表項。ComboBoxCell的text屬性決定了下拉列表單元的外觀。當然,你還可以建立風格化文本或者圖片作為內容的下拉列表項:將包含這些風格化文本或者圖片的HTML代碼賦值給text屬性(就像示例中左下方的ComboBox展示的那樣)。ComboBox的selection屬性決定了哪個列表項被選擇。將一個整數(從0開始)索引賦值到這個屬性,將使這個索引對應位置的列表項被選中。在用戶選擇列表項的同時,被選擇的列表項的索引值將被隱含地賦值給selection屬性。在上例中的兩個ComboBox中,selection屬性都被綁定到同一個模型屬性。同樣的,ComboBox中的列表項(cells)也從同一個模型屬性“投影”出來。作為結果,你能夠通過ComboBox、listbox、button groups來選擇被顯示的圖片。
如果打開第二個ComboBox,示例程序將變為:
Trees(樹形)
JavaFX Tree類提供了一個封裝了Swing JTree組件的聲明式接口。首先,讓我們一起通過建立一個沒有動態行為的簡單示例來了解Tree的用法:
Frame {

      height: 400

      width: 300

      content: Tree {

        root: TreeCell {

          text: "Tree"

          cells:

          [TreeCell {

            text: "colors"

            cells:

            [TreeCell {

              text: "<html><font color='blue'>blue</font></html>"

            },

            TreeCell {

              text: "<html><font color='red'>red</font></html>"

            },

            TreeCell {

              text: "<html><font color='green'>green</font></html>"

            }]

          },

          TreeCell {

            text: "food"

            cells:

            [TreeCell {

              text: "hot dogs"

            },

            TreeCell {

              text: "pizza"

            },

            TreeCell {

              text: "ravioli"

            }]

          }]

        }

      }

      visible: true

    }
上面的代碼運行結果如下:
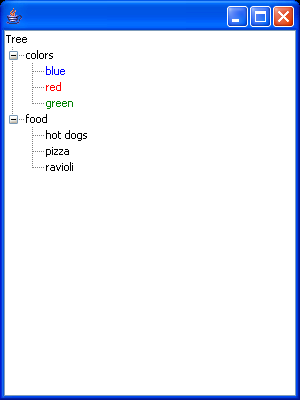
為了構造Tree,我們將一個返回TreeCell對象的表達式被賦值給它的root(根)屬性。TreeCell代表了Tree的一行。你可以將一組TreeCell對象賦值給它的cells屬性來描述某個TreeCell的子單元(child cells)。另外,每個TreeCell都具有一個決定其外觀的text屬性。你也可以將HTML代碼賦值給text屬性來建立一個風格化文本或者圖片作為內容的TreeCell。
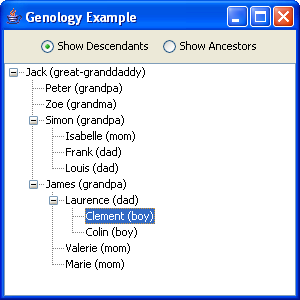
接下來,讓我們重建一個Swing教程中的示例(GenealogyExample),它顯示了某人的後代或者父輩情況。
當我們運行這個示例後,程序將顯示以下:

如果在Tree中選擇某人並點擊某個單選按鈕中,那麼這個被選擇的人將成為Tree的根。Tree將根據選擇將此人的父輩或者後代顯示在其子節點中。
下面是示例代碼。其中與Tree有關的代碼以粗體顯示。TreeCell具有一個selected屬性(Boolean類型),它決定了自身是否被選擇。與此同時,如果你通過程序將一個Boolean值賦值給這個屬性的話,相應的TreeCell將依照selected屬性值被選擇或者取消選擇。
在示例中,由於家譜是一個遞歸的數據結構,於是我們需要使用一個能夠被遞歸調用的表達式來定義TreeCell的cells屬性。請注意:在這裡我們使用了bind lazy操作符而不是在初始化cells屬性中使用的bind,因為它標識了lazy式求值。這意味著直到它左側表達式第一次被訪問到時,其右側表達式才被求值。因此,對descendantTree()和ancestorTree()函數的遞歸調用並非馬上執行,而是直到你展開Tree中的某個節點,Tree要求訪問子節點的cells時才被執行。
class GeneologyModel {

      attribute people: Person*;

      attribute selectedPerson: Person;

      attribute showDescendants: Boolean;

    }

    class Person {

      attribute selected: Boolean;

      attribute father: Person;

      attribute mother: Person;

      attribute children: Person*;

      attribute name: String;

    }

    // By defining these triggers I can populate the model

    // by just assigning the mother and father attributes of a Person

    trigger on Person.father = father {

      insert this into father.children;

    }

    trigger on Person.mother = mother {

      insert this into mother.children;

    }

    // Create and populate the model

    var model = GeneologyModel {

      var jack = Person {

        selected: true

        name: "Jack (great-granddaddy)"

      }

      var jean = Person {

        name: "Jean (great-granny)"

      }

      var albert = Person {

        name: "Albert (great-granddaddy)"

      }

      var rae = Person {

        name: "Rae (great-granny)"

      }

      var paul = Person {

        name: "Paul (great-granddaddy)"

      }

      var josie = Person {

        name: "Josie (great-granny)"

      }

      var peter = Person {

        father: jack

        mother: jean

        name: "Peter (grandpa)"

      }

      var zoe = Person {

        father: jack

        mother: jean

        name: "Zoe (grandma)"

      }

      var simon = Person {

        father: jack

        mother: jean

        name: "Simon (grandpa)"

      }

      var james = Person {

        father: jack

        mother: jean

        name: "James (grandpa)"

      }

      var bertha = Person {

        father: albert

        mother: rae

        name: "Bertha (grandma)"

      }

      var veronica = Person {

        father: albert

        mother: rae

        name: "Veronica (grandma)"

      }

      var anne = Person {

        father: albert

        mother: rae

        name: "Anne (grandma)"

      }

      var renee = Person {

        father: albert

        mother: rae

        name: "Renee (grandma)"

      }

      var joseph = Person {

        father: paul

        mother: josie

        name: "Joseph (grandpa)"

      }

      var isabelle = Person {

        father: simon

        mother: veronica

        name: "Isabelle (mom)"

      }

      var frank = Person {

        father: simon

        mother: veronica

        name: "Frank (dad)"

      }

      var louis = Person {

        father: simon

        mother: veronica

        name: "Louis (dad)"

      }

      var laurence = Person {

        father: james

        mother: bertha

        name: "Laurence (dad)"

      }

      var valerie = Person {

        father: james

        mother: bertha

        name: "Valerie (mom)"

      }

      var marie = Person {

        father: james

        mother: bertha

        name: "Marie (mom)"

      }

      var helen = Person {

        father: joseph

        mother: renee

        name: "Helen (mom)"

      }

      var mark = Person {

        father: joseph

        mother: renee

        name: "Mark (dad)"

      }

      var oliver = Person {

        father: joseph

        mother: renee

        name: "Oliver (dad)"

      }

      var clement = Person {

        father: laurence

        mother: helen

        name: "Clement (boy)"

      }

      var colin = Person {

        father: laurence

        mother: helen

        name: "Colin (boy)"

      }

      people: [jack, jean, albert, rae, paul, josie,

         peter, zoe, simon, james, bertha, anne,

         renee, joseph, frank, louis, laurence,

         valerie, marie, helen, mark, oliver,

         clement, colin]

      selectedPerson: jack

      showDescendants: true

    };

    // Tree generation functions:

    operation geneologyTree(p:Person, showDescendants:Boolean) {

      if (showDescendants) {

        return descendantTree(p);

      } else {

        return ancestorTree(p);

      }

    }

    function descendantTree(p:Person) {

      return TreeCell {

        selected: bind p.selected

        text: bind p.name

        cells:

          bind lazy

            foreach (c in p.children)

              descendantTree(c)

      };

    }

    function ancestorTree(p:Person) {

      return TreeCell {

        selected: bind p.selected

        text: bind p.name

        cells:

          bind lazy

            foreach (a in [p.father, p.mother])

              ancestorTree(a)

      };

    }

    Frame {

      title: "Genology Example"

      height: 300

      width: 300

      content: BorderPanel {

        top: FlowPanel {

          var buttonGroup = new ButtonGroup()

          content:

          [RadioButton {

            buttonGroup: buttonGroup

            text: "Show Descendants"

            selected: model.showDescendants

            onChange: operation(newValue:Boolean) {

               if (newValue) {

                 var selectedPerson = model.people[selected];

                 if (selectedPerson <> null) {

                   model.selectedPerson = selectedPerson;

                 }

                 model.showDescendants = true;

               }

            }

          },

          RadioButton {

            buttonGroup: buttonGroup

            text: "Show Ancestors"

            onChange: operation(newValue:Boolean) {

               if (newValue) {

                 var selectedPerson = model.people[selected];

                 if (selectedPerson <> null) {

                   model.selectedPerson = selectedPerson;

                 }

                 model.showDescendants = false;

               }

            }

          }]

        }

        center: Tree {

            showRootHandles: true

            root: bind geneologyTree(model.selectedPerson,

                          model.showDescendants)

        }

      }

      visible: true

    }
當所有節點都被展開並且選擇“Clement”節點時,Tree將形如下圖:
在點擊“Show Ancestors”後,Clement將成為根,他的雙親將顯示在他的下面:

Tables(表格)
JavaFX Table類封裝了Swing JTable組件。我們在這裡通過對Swing教程示例(SimpleTableDemo)進行微小的修改來示范如何使用Table:
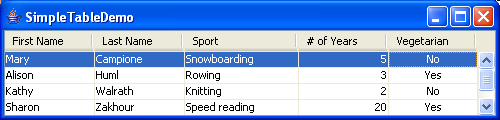
創建示例表格的代碼如下:
class Person {

      attribute firstName: String;

      attribute lastName: String;

      attribute sport: String;

      attribute numYears: Number;

      attribute vegetarian: Boolean;

      attribute selected: Boolean;

    }

    class TableDemoModel {

      attribute people: Person*;

    }

    var model = TableDemoModel {

      people:

      [Person {

        firstName: "Mary"

        lastName: "Campione"

        sport: "Snowboarding"

        numYears: 5

        vegetarian: false

      },

      Person {

        firstName: "Alison"

        lastName: "Huml"

        sport: "Rowing"

        numYears: 3

        vegetarian: true

      },

      Person {

        firstName: "Kathy"

        lastName: "Walrath"

        sport: "Knitting"

        numYears: 2

        vegetarian: false

      },

      Person {

        firstName: "Sharon"

        lastName: "Zakhour"

        sport: "Speed reading"

        numYears: 20

        vegetarian: true

      },

      Person {

        firstName: "Philip"

        lastName: "Milne"

        sport: "Pool"

        numYears: 10

        vegetarian: false

      }]

    };

    Frame {

      height: 120

      width: 500

      title: "SimpleTableDemo"

      content: Table {

        columns:

        [TableColumn {

          text: "First Name"

        },

        TableColumn {

          text: "Last Name"

        },

        TableColumn {

          text: "Sport"

          width: 100

        },

        TableColumn {

          text: "# of Years"

          alignment: TRAILING

        },

        TableColumn {

          text: "Vegetarian"

          alignment: CENTER

        }]

        cells: bind foreach (p in model.people)

          [TableCell {

            text:bind p.firstName

            selected: bind p.selected

          },

          TableCell {

            text:bind p.lastName

          },

          TableCell {

            text: bind p.sport

          },

          TableCell {

            text: bind "{p.numYears}"

          },

          TableCell {

            text: bind if p.vegetarian then "Yes" else "No"

            toolTipText: bind "{p.firstName} {p.lastName} {if not p.vegetarian then "eats" else "does not eat"} meat"

          }]

      }

      visible: true

    }
上例與table相關的代碼表示為粗體。為了建立Table,我們需要將一組TableColumn對象賦值給Table的columns屬性,並把一組TableCell對象賦值給它的cells屬性。在上例中,由於我們把五個TableColumn賦值給了Table,所以table中顯示了五列。同理,由於我們為每個person賦值了五個TableCell(分別對應person的5個屬性),從而使每個person的信息正好完整地顯示在每一行。TableColumn的text屬性決定了列頭部單元格的內容。它的width和alignment屬性決定了該列的首選寬度和水平對齊。
由於JavaFX Table是一個ScrollableWidget部件,因此你無需給它添加滑動面板。
Text Components(文本組件)
我們在這裡通過對Swing教程示例進行微小的修改來示范如何使用文本組件:
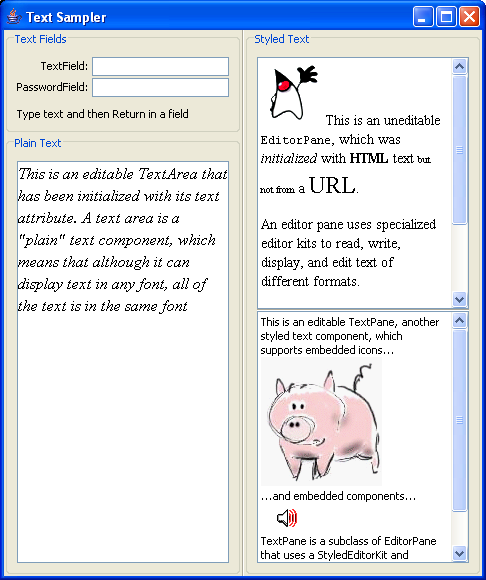
JavaFX文本組件與Swing組件之間的對應關系如下:
JavaFX部件 Swing組件 TextField JFormattedTextField PasswordField JPasswordField TextArea JTextArea EditorPane JEditorPane TextPane JTextPaneclass TextSamplerModel {
attribute textFieldInput: String?;
}
var model = TextSamplerModel {
};
Frame {
title: "Text Sampler"
visible: true
content: SplitPane {
orientation: HORIZONTAL
content:
[SplitView {
weight: 0.5
content:
BorderPanel {
top: GridBagPanel {
border: CompoundBorder {
borders:
[TitledBorder {
title: "Text Fields"
},
EmptyBorder {
top: 5
left: 5
bottom: 5
right: 5
}]
}
cells:
[GridCell {
anchor: EAST
gridx: 0
gridy: 0
content: SimpleLabel {
text: "TextField: "
}
},
GridCell {
anchor: WEST
fill: HORIZONTAL
weightx: 1
gridx: 1
gridy: 0
content: TextField {
action: operation(value:String) {
model.textFieldInput = value;
}
}
},
GridCell {
anchor: EAST
gridx: 0
gridy: 1
insets: {top: 2}
content: SimpleLabel {
text: "PasswordField: "
}
},
GridCell {
gridx: 1
gridy: 1
fill: HORIZONTAL
weightx: 1
insets: {top: 2}
content: PasswordField {
action: operation(value:String) {
model.textFieldInput = value;
}
}
},
GridCell {
anchor: WEST
weightx: 1.0
gridx: 0
gridy: 2
gridwidth: 2
fill: HORIZONTAL
content: SimpleLabel {
border: EmptyBorder {
top: 10
}
text: bind if model.textFieldInput == null then "Type text and then Return in a field" else "You typed "{model.textFieldInput}""
}
}]
}
center: BorderPanel {
border: CompoundBorder {
borders:
[TitledBorder {
title: "Plain Text"
},
EmptyBorder {
top: 5
left: 5
bottom: 5
right: 5
}]
}
center: TextArea {
font: new Font("Serif", Font.ITALIC, 16)
lineWrap: true
wrapStyleWord: true
text: "This is an editable TextArea that has been initialized with its text attribute. A text area is a "plain" text component, which means that although it can display text in any font, all of the text is in the same font"
}
}
}
},
SplitView {
weight: 0.5
content: SplitPane {
border: CompoundBorder {
borders:
[TitledBorder {
title: "Styled Text"
},
EmptyBorder {
top: 5
left: 5
bottom: 5
right: 5
}]
}
orientation: VERTICAL
content:
[SplitView {
weight: 0.5
content: EditorPane {
opaque: true
preferredSize: {height: 250 width: 250}
contentType: HTML
editable: false
text: "<html>
<body>
<img src='http://java.sun.com/docs/books/tutorial/uiswing/examples/components/SplitPaneDemoProject/src/components/images/dukeWaveRed.gif' width='64' height='64'>
This is an uneditable <code>EditorPane</code>,
which was <em>initialized</em>
with <strong>HTML</strong> text <font size='-2'>but not from</font> a
<font size='+2'>URL</font>.
<p>
An editor pane uses specialized editor kits
to read, write, display, and edit text of
different formats.
</p>
<p>
The Swing text package includes editor kits
for plain text, HTML, and RTF.
</p>
<p>
You can also develop
custom editor kits for other formats.
</p>
</body></html>"
}
},
SplitView {
weight: 0.5
content: TextPane {
preferredSize: {height: 250 width: 250}
editable: true
content:
["This is an editable TextPane, another styled text component, which supports embedded icons...n",
Image {url: "http://java.sun.com/docs/books/tutorial/uiswing/components/example-swing/images/Pig.gif"},
"n...and embedded components...n",
Button {
contentAreaFilled: false
icon: Image {url: "http://java.sun.com/docs/books/tutorial/uiswing/components/example-swing/images/sound.gif"}
},
"nTextPane is a subclass of EditorPane that uses a StyledEditorKit and StyledDocument,n and provides cover methods for interacting with those objects."]
}
}]
}
}]
}
}
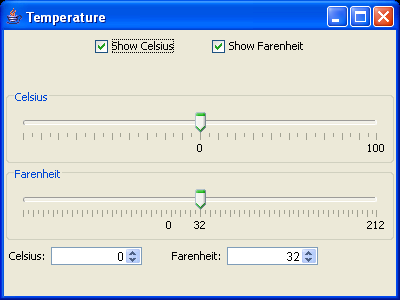
Spinners(微調控制器)和Sliders(滑動條)
JavaFX Spinner和Slider類與Swing組件之間對應關系如下:
JavaFX部件 Swing組件 Spinner JSpinner讓我們通過建立一個展示攝氏和華氏之間換算關系的、簡單的應用來演示如何使用它們吧:
class Temp {

      attribute celsius: Number;

      attribute farenheit: Number;

      attribute showCelsius: Boolean;

      attribute showFarenheit: Boolean;

    }

    trigger on Temp.celsius = value {

      farenheit = (9/5 * celsius + 32);

    }

    trigger on Temp.farenheit = value {

      celsius = ((farenheit - 32) * 5/9);

    }

    Frame {

      var temp = Temp {

        farenheit: 32

        showFarenheit: true

        showCelsius: true

      }

      height: 300

      width: 400

      title: "Temperature"

      content: Box {

        orientation: VERTICAL

        content:

        [FlowPanel {

          content:

          [CheckBox {

            text: "Show Celsius"

            selected: bind temp.showCelsius

          },

          RigidArea {

            width: 20

          },

          CheckBox {

            text: "Show Farenheit"

            selected: bind temp.showFarenheit

          }]

        },

        Slider {

          visible: bind temp.showCelsius

          min: -100

          max: 100

          border: TitledBorder {title: "Celsius"}

          value: bind temp.celsius

          minorTickSpacing: 5

          majorTickSpacing: 10

          paintTicks: true

          paintLabels: true

          labels:

          [SliderLabel {

             value: 0

             label: SimpleLabel {

               text: "0"

             }

          },

          SliderLabel {

             value: 100

             label: SimpleLabel {

               text: "100"

             }

          }]

        },

        Slider {

          visible: bind temp.showFarenheit

          border: TitledBorder {title: "Farenheit"}

          min: -148

          max: 212

          paintTicks: true

          minorTickSpacing: 5

          majorTickSpacing: 10

          value: bind temp.farenheit

          paintLabels: true

          labels:

          [SliderLabel {

             value: 0

             label: SimpleLabel {

              text: "0"

             }

          },

          SliderLabel {

             value: 32

             label: SimpleLabel {

               text: "32"

             }

          },

          SliderLabel {

             value: 212

             label: SimpleLabel {

               text: "212"

             }

          }]

        },

        FlowPanel {

           alignment: LEADING

           content:

           [SimpleLabel {

             visible: bind temp.showCelsius

             alignmentX: 1

             text: "Celsius:"

           },

           Spinner {

             visible: bind temp.showCelsius

             min: -100

             max: 100

             value: bind temp.celsius

           },

           RigidArea {

             width: 20

           },

           SimpleLabel {

             visible: bind temp.showFarenheit

             alignmentX: 1

             text: "Farenheit:"

           },

           Spinner {

             visible: bind temp.showFarenheit

             min: -148

             max: 212

             value: bind temp.farenheit

           }]

         }]

      }

      visible: true

    }
示例代碼中與Spinner和Slider相關的部分以粗體表示。Spinner和Slider都具有min和max屬性,這些屬性決定了它們的取值范圍,而value屬性則是其當前取值。
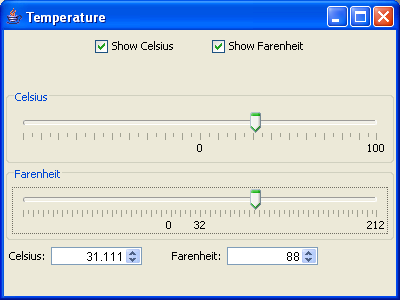
在上面示例采用攝氏溫度的Spinner和Slider中,它們的value屬性綁定為模型的celsius屬性。而在采用華氏溫度的Spinner和Slider中,value屬性綁定為模型的farenheit屬性。並且在模型的celsius和farenheit屬性上定義了觸發器,無論這兩個屬性值中哪個發生變化,都將相應地更新另一個屬性。因此,無論移動slider或者修改spinner,相關的數據都將發生變化。
例如,如果我們將溫度設置為88華氏度:
Slider還具有一些決定如何顯示浮標行的屬性。另外,通過將一組SliderLabel賦值給Slider的labels,我們可以為特定的數值加標簽。在本例中,冰點(freezing)和沸點(boiling)、0華氏度就是這樣做的。
關於譯者
cleverpig:BJUG成員,Java社區——Matrix與Java共舞負責人之一,曾參與Buffalo的文檔工作、Fielding的《Architectural Styles and the Design of Network-based Software Architectures》中文化研究(還要感謝Tin、Nicholas的大力相助),關注一切新技術,業余時間研究Guru並准備得道升天,但是苦於沒有得法,目前還在苦苦追尋……
Tin:中文名“田樂”,BJUG成員,現就職於Sina。曾經在Java Web項目中擔任軟件架構師和Web設計,注重使用輕量級解決方案和敏捷方法。目前主要做基於Javascript的RIA開發,喜歡研究新技術並進行思考,業余時間繼續關注Java和Ruby,並與朋友一起翻譯Selenium文檔。