入門
本文將演示如何使用向導把新文件添加到已有 Eclipse 項目中。當內置模板功能不足時,Eclipse 向導是定義可重復文件類型模板的優秀方法。閱讀完本文後,您應當能夠在 Eclipse 中實現自己的向導以創建新文件。
為了發揮本文的最大功效,您必須熟悉如何構建 Java™ 編程語言類,並且還應當熟悉繼承和使用接口。您應當能夠啟動 Eclipse,但是本文假定您並不精通 Eclipse。
Eclipse 向導概覽
我喜歡 Eclipse IDE 的很多特性。其中之一就是可擴展性。通過添加提供功能的插件(包括自動創建類、接口、項目、其他資源的向導),可以輕松地自定義 IDE。此特性對於大型企業來說非常重要,在這類企業中可以基於 Eclipse IDE 流線化地構建和分發插件,使許多人都可以自動利用功能。
在任何企業中,讓團隊以相同的樣式構建應用程序可以提供許多優點。如果應用程序是以一致的樣式構建的,則應用程序將更易於維護。一致性可以幫助減少錯誤。此外,由於應用程序是以相同的樣式構建的,因此團隊成員可以更輕松地完成一個又一個項目。
能夠為 Eclipse 框架創建自定義向導使企業可以構建企業專有的向導,這些向導將給團隊提供使用一致的最佳實踐創建應用程序的機會。
創建新向導
本文中構建的自定義向導位於 Eclipse 的插件項目中。開始創建自定義向導十分簡單,這要感謝為您開始編寫代碼提供前期幫助的其他向導。在接下來的步驟中,將使用 Plug-in Project 向導創建插件的開頭部分。
要構建新插件項目,請執行以下步驟:
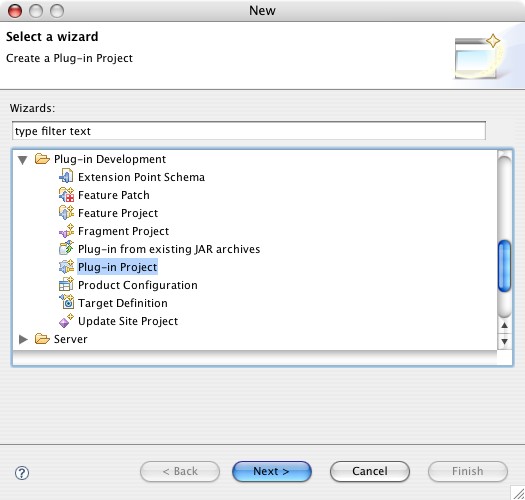
選擇 File > New > Project 以選擇項目向導。
在 Plug-in Development 下選擇 Plug-in Project,如下所示:
單擊 Next 前進到下一步。
圖 1. 選擇插件項目
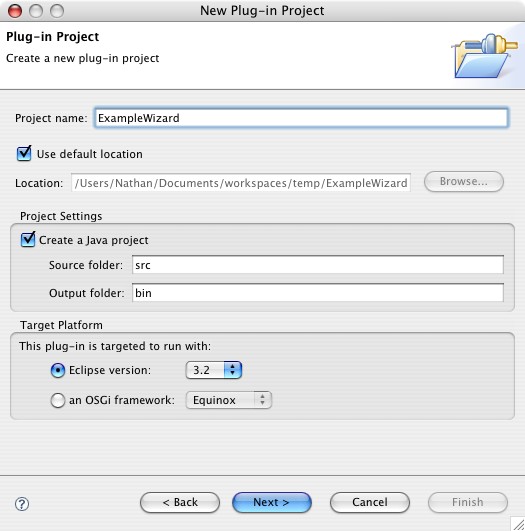
添加項目名稱(在本文中,該名稱為 ExampleWizard(不是那麼有創造性),如圖 2 所示)。如果沒有特殊原因,請使用默認位置。單擊 Next。
圖 2. 新插件項目
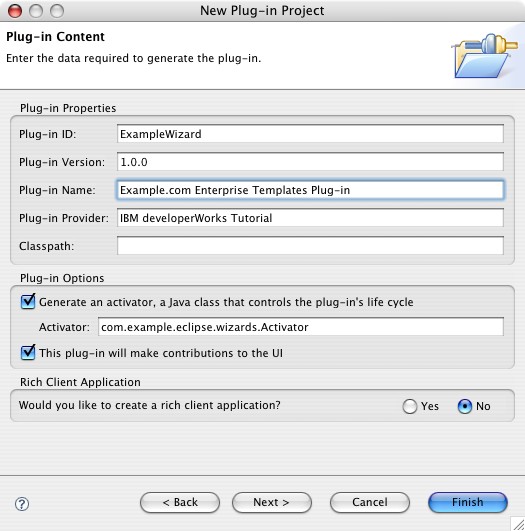
在 Plug-in Version 中輸入版本號,並添加插件名稱和插件提供者的名稱(可能是您,也可能是協作的團隊)。請一定要更新 Activator 的包名稱,它默認為小寫版本的項目名稱。最好使用符合您公司標准的包名稱:例如 com.example.eclipse.wizards。當您填寫完下圖中所示的信息後,單擊 Next。
圖 3. 選擇插件項目
選擇 Custom plug-in wizard,因為使用此選項可以讓您對所包括的組件進行微調。如果您以前從未創建過新插件項目,那麼現在最好看看其他模板的描述以了解可用信息。單擊 Next。
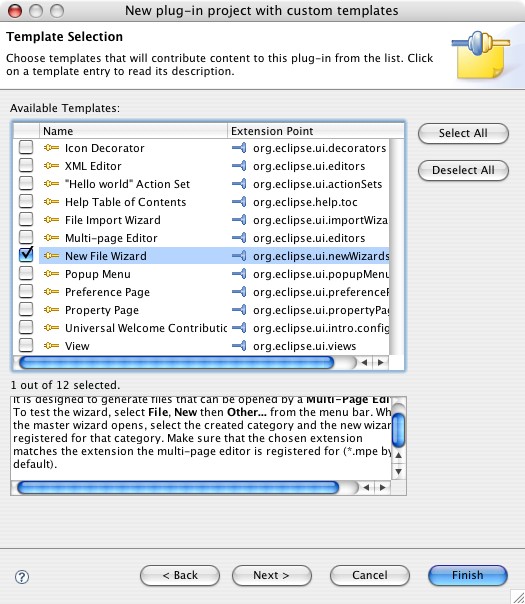
在 Template Selection 窗口中,單擊 Deselect All 取消選中所有選項。然後,選擇 New File Wizard,如下所示。單擊 Next。
圖 4. 選擇模板
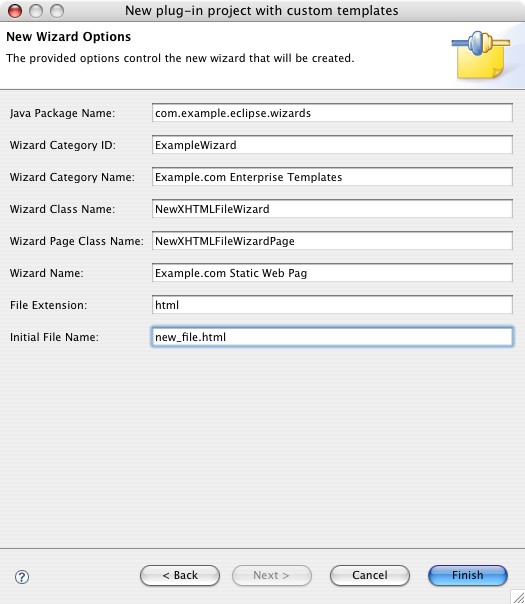
Eclipse 向導將給您提示一些關於正在創建的新向導的信息(參見圖 5)。確保更新包名稱,理想情況下將其更新為 Activator 所使用的相同名稱 (com.example.eclipse.wizards)。將 Wizard Category Name 更新為新向導文件夾的名稱。該值的使用方法與 圖 1 中的 Plug-in Development 類別相同。Wizard Class Name 是從 Wizard 繼承的類的 Java 類名,該類將實現 INewWizard 接口。Wizard Page Class Name 將擴展 WizardPage 類。
圖 5. New Wizard Options 窗口
單擊 Finish。Eclipse 將給新項目添加必要的類和庫。
雖然還沒完成,但是已經有了很好的開端並且准備好開始在向導背後添加一些實現。
Wizard 類和 INewWizard 接口
現在項目中有三個類:NewXHTMLFileWizard、NewXHTMLFileWizardPage 和 Activator。下面的部分將處理 NewXHTMLFileWizard 類。該類如清單 1 所示,不過沒有顯示方法中的所有代碼。
清單 1. NewXHTMLFileWizard 類public class NewXHTMLFileWizard extends Wizard implements INewWizard {
private NewXHTMLFileWizardPage page;
private ISelection selection;
public NewXHTMLFileWizard() {
// snipped...
}
public void addPages() {
// snipped...
}
public boolean performFinish() {
// snipped...
}
private void doFinish(
// snipped...
}
private InputStream openContentStream() {
// snipped...
}
private void throwCoreException(String message) throws CoreException {
// snipped...
}
public void init(IWorkbench workbench, IStructuredSelection selection) {
// snipped...
}
}
實現 INewWizard 接口必須使用最後一個方法 init()。接下來,本文將介紹此方法以及此模板中自動包括的其余方法。
addPages() 方法
addPages() 方法將把頁面添加到向導中。清單 2 中所示的方法將把單個頁面添加到向導 NewXHTMLFileWizardPage 中。
清單 2. addPages() 方法將把頁面添加到向導中
/**

* Adding the page to the wizard.

*/

public void addPages() {

page = new NewXHTMLFileWizardPage(selection);

// You can add more pages here...

addPage(page);

}
NewXHTMLFileWizardPage 類包含為用戶提供指定頁面名稱功能的控件。您可以稍後把控件添加到頁面中,使最終用戶可以輸入更多信息。
performFinish() 方法
當用戶單擊向導中的 Finish 按鈕時將調用 performFinish() 方法。在執行一些檢查之後,它將使用 IRunnableWithProgress 接口調用 doFinish() 方法。使用此接口意味著在執行 doFinish() 方法時(在本例中需要花很長時間運行)不必編寫顯示進度條的所有 UI 元素。下面完整地列出了該方法。
清單 3. performFinish() 方法/**
* This method is called when 'Finish' button is pressed in
* the wizard. We will create an operation and run it
* using wizard as execution context.
*/
public boolean performFinish() {
final String containerName = page.getContainerName();
final String fileName = page.getFileName();
IRunnableWithProgress op = new IRunnableWithProgress() {
public void run(IProgressMonitor monitor) throws InvocationTargetException {
try {
doFinish(containerName, fileName, monitor);
} catch (CoreException e) {
throw new InvocationTargetException(e);
} finally {
monitor.done();
}
}
};
try {
getContainer().run(true, false, op);
} catch (InterruptedException e) {
return false;
} catch (InvocationTargetException e) {
Throwable realException = e.getTargetException();
MessageDialog.openError(getShell(), "Error", realException.getMessage());
return false;
}
return true;
}
doFinish() 方法
如下所示,doFinish() 方法將創建新文件並通過 IDE 中的編輯器打開新文件。將調用 openContentStream() 方法以獲得給新文件填充內容的輸入流。
清單 4. 初始的 doFinish() 方法/**
* The worker method. It will find the container, create the
* file if missing or just replace its contents, and open
* the editor on the newly created file.
*/
private void doFinish(
String containerName,
String fileName,
IProgressMonitor monitor)
throws CoreException {
// create a sample file
monitor.beginTask("Creating " + fileName, 2);
IWorkspaceRoot root = ResourcesPlugin.getWorkspace().getRoot();
IResource resource = root.findMember(new Path(containerName));
if (!resource.exists() || !(resource instanceof IContainer)) {
throwCoreException("Container \"" + containerName + "\" does not exist.");
}
IContainer container = (IContainer) resource;
final IFile file = container.getFile(new Path(fileName));
try {
InputStream stream = openContentStream();
if (file.exists()) {
file.setContents(stream, true, true, monitor);
} else {
file.create(stream, true, monitor);
}
stream.close();
} catch (IOException e) {
}
monitor.worked(1);
monitor.setTaskName("Opening file for editing...");
getShell().getDisplay().asyncExec(new Runnable() {
public void run() {
IWorkbenchPage page =
PlatformUI.getWorkbench().getActiveWorkbenchWindow().getActivePage();
try {
IDE.openEditor(page, file, true);
} catch (PartInitException e) {
}
}
});
monitor.worked(1);
}
openContentStream() 方法
如下所示,openContentStream() 方法將返回包含生成的靜態字符串作為模板一部分的 ByteArrayInputStream。對於本文,字符串將被替換為模板文件的內容。
此方法中的代碼是首先必須更改的,這樣才能在創建時允許把更多有用的內容添加到新文件中。
清單 5. openContentStream() 方法/**
* Initialize file contents with a sample text.
*/
private InputStream openContentStream() {
String contents =
"This is the initial file contents for *.html " +
"file that should be word-sorted in the Preview " +
"page of the multi-page editor";
return new ByteArrayInputStream(contents.getBytes());
}
添加基本內容
新文件的內容不使用靜態字符串值,您可以使用 getResourceAsStream() 方法把文件的內容載入到 InputStream 中,並且 doFinish() 方法可以用它來填充新文件。請做出如下所示的修改。
清單 6. 從資源獲得輸入流/**
* Initialize the file contents to contents of the
* given resource.
*/
private InputStream openContentStream() {
return this.getClass()
.getResourceAsStream("templates/index-xhtml-template.resource");
}
index-xhtml-template.resource 文件中是有效的可擴展超文本標記語言(Extensible Hypertext Markup Language,XHTML)V1.0 Strict Web 頁面。它有針對一組模擬企業樣式表和 JavaScript 文件的一些基本標記和點。該文件列於清單 7 中。此文件與 NewXHTMLFileWizard 類在同一個包中,因此在本文中此文件位於 com.example.eclipse.wizards 包中。如果需要將文件放在其他包中,則可以像訪問目錄內的文件一樣訪問它(即,com.example.resources 是 /com/example/resources)。
清單 7. index-xhtml-template.resource 文件<!DOCTYPE html PUBLIC "-//W3C//DTD XHTML 1.0 Strict//EN"
"http://www.w3.org/TR/xhtml1/DTD/xhtml1-strict.dtd">
<html xmlns="http://www.w3.org/1999/xhtml">
<head>
<title>This is an Example.com Web page</title>
<link rel="stylesheet" href=
"http://www.example.com/enterprise/styles/main.css" type=
"text/css" />
<script type="text/javascript" language="JavaScript" src=
"http://www.example.com/scripts/main.js">
</script>
</head>
<body>
<div id="search">
<form id="searchForm" name="searchForm" action=
"http://www.example.com/search.jsp">
<input type="text" name="searchText" /> <input type="button"
value="Search Example.com" />
</form>
</div>
<div id="mainMenu">
<p class="menu">Main menu</p>
<ul class="mainMenu">
<li><a href="http://www.bianceng.cn/index.php#home">Home</a></li>
<li><a href="http://www.bianceng.cn/index.php#item1">Item 1</a></li>
</ul>
</div><!-- Put the body of your page here -->
<div id="body"></div>
</body>
</html>
現在,您可以運行 Eclipse 插件來查看該插件的內容。
測試新向導
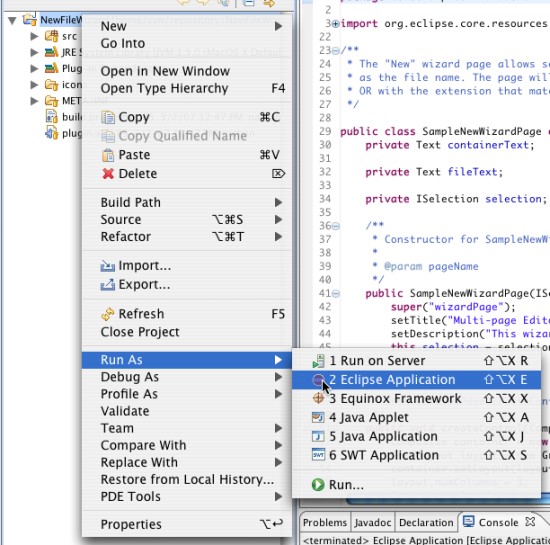
在 Eclipse 創建向導所使用的三個類之後,您可以在閱讀本文的過程中隨時啟動另一個 Eclipse 實例來運行和測試插件。要啟動插件項目,請在項目上右擊,並選擇 Run As > Eclipse Application,如圖 6 所示。Eclipse 的新實例將啟動。
圖 6. 將項目作為 Eclipse 應用程序來運行
現在需要創建包含新文件的臨時項目。項目的名稱無關緊要 —— 諸如 “temp” 之類的名稱即可。當新項目已在工作區中後,請通過選擇 File > New > Other 來添加新模板。
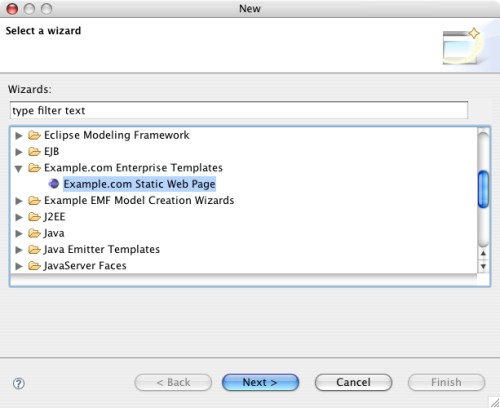
如果一切按預期運行正常,則新類別將列於您為向導定義的類別下的 Select a Wizard 窗口中。我使用了 Example.com 企業模板,如下所示:
圖 7. 使用新模板
當您完成向導的其余部分後,Eclipse 將創建包含定義內容的新文件。如果此簡單功能就是模板所需的全部功能,則可以止於此處。但是,可能還需要提示用戶提供一些用來整合文件內容的輸入。
自定義向導頁面
初始 NewXHTMLFileWizardPage 的表單中只有兩個控件:一個用於容器(項目或文件夾)的名稱,而另一個用於創建新文件時使用的名稱。createControl() 方法(完整的方法代碼如清單 8 所示)負責創建這些控件和將其添加到對話框中。
清單 8. createControl() 方法/**
* @see IDialogPage#createControl(Composite)
*/
public void createControl(Composite parent) {
Composite container = new Composite(parent, SWT.NULL);
GridLayout layout = new GridLayout();
container.setLayout(layout);
layout.numColumns = 3;
layout.verticalSpacing = 9;
Label label = new Label(container, SWT.NULL);
label.setText("&Container:");
containerText = new Text(container, SWT.BORDER | SWT.SINGLE);
GridData gd = new GridData(GridData.FILL_HORIZONTAL);
containerText.setLayoutData(gd);
containerText.addModifyListener(new ModifyListener() {
public void modifyText(ModifyEvent e) {
dialogChanged();
}
});
Button button = new Button(container, SWT.PUSH);
button.setText("Browse...");
button.addSelectionListener(new SelectionAdapter() {
public void widgetSelected(SelectionEvent e) {
handleBrowse();
}
});
label = new Label(container, SWT.NULL);
label.setText("&File name:");
fileText = new Text(container, SWT.BORDER | SWT.SINGLE);
gd = new GridData(GridData.FILL_HORIZONTAL);
fileText.setLayoutData(gd);
fileText.addModifyListener(new ModifyListener() {
public void modifyText(ModifyEvent e) {
dialogChanged();
}
});
initialize();
dialogChanged();
setControl(container);
}
必須先在文件的頂部聲明新控件和其他控件,然後才可以將新控件添加到此方法中。
清單 9. 聲明新控件public class NewXHTMLFileWizardPage extends WizardPage {
/* Newly added for the page title */
private Text titleText;
// the rest of the class...
}
現在添加文本的 getter。NewXHTMLFileWizard 類將在構建新文件時使用此 getter。getTitle() 方法如下所示:
清單 10. getTitle() 方法/**
* Gets the HTML title for the new file
*/
public String getTitle() {
return titleText.getText();
}
修改 createControl() 方法以添加標題的新輸入控件和標簽。新代碼如下所示:
清單 11. 修改後的 createControl() 方法/**
* @see IDialogPage#createControl(Composite)
*/
public void createControl(Composite parent) {
Composite container = new Composite(parent, SWT.NULL);
GridLayout layout = new GridLayout();
container.setLayout(layout);
layout.numColumns = 3;
layout.verticalSpacing = 9;
Label label = new Label(container, SWT.NULL);
label.setText("&Container:");
containerText = new Text(container, SWT.BORDER | SWT.SINGLE);
GridData gd = new GridData(GridData.FILL_HORIZONTAL);
containerText.setLayoutData(gd);
containerText.addModifyListener(new ModifyListener() {
public void modifyText(ModifyEvent e) {
dialogChanged();
}
});
Button button = new Button(container, SWT.PUSH);
button.setText("Browse...");
button.addSelectionListener(new SelectionAdapter() {
public void widgetSelected(SelectionEvent e) {
handleBrowse();
}
});
label = new Label(container, SWT.NULL);
label.setText("&File name:");
fileText = new Text(container, SWT.BORDER | SWT.SINGLE);
gd = new GridData(GridData.FILL_HORIZONTAL);
fileText.setLayoutData(gd);
fileText.addModifyListener(new ModifyListener() {
public void modifyText(ModifyEvent e) {
dialogChanged();
}
});
/* Need to add empty label so the next two controls
* are pushed to the next line in the grid. */
label = new Label(container, SWT.NULL);
label.setText("");
/* Adding the custom control here */
label = new Label(container, SWT.NULL);
label.setText("&Title:");
titleText = new Text(container, SWT.BORDER | SWT.SINGLE);
gd = new GridData(GridData.FILL_HORIZONTAL);
titleText.setLayoutData(gd);
titleText.addModifyListener(new ModifyListener() {
public void modifyText(ModifyEvent e) {
dialogChanged();
}
});
/* Finished adding the custom control */
initialize();
dialogChanged();
setControl(container);
}
在將代碼添加到 NewXHTMLFileWizard 類中之前,請通過執行先前概述的步驟測試到目前為止的更改。
驗證用戶輸入
用戶在新向導的 Title 字段中輸入的文本將用作新 HTML 文件的 <title> 元素中的文本。出於本文的目的,該值是必需的,因此需要添加檢查輸入的代碼以確保用戶輸入的內容是沒有問題的。
對 dialogChanged() 方法的修改如下所示:
清單 12. 檢驗 dialogChanged() 中的輸入/**
* Ensures that both text fields are set.
*/
private void dialogChanged() {
IResource container = ResourcesPlugin.getWorkspace().getRoot()
.findMember(new Path(getContainerName()));
String fileName = getFileName();
String titleText = getTitle();
if (getContainerName().length() == 0) {
updateStatus("File container must be specified");
return;
}
if (container == null
|| (container.getType() & (IResource.PROJECT | IResource.FOLDER)) == 0) {
updateStatus("File container must exist");
return;
}
if (!container.isAccessible()) {
updateStatus("Project must be writable");
return;
}
if (fileName.length() == 0) {
updateStatus("File name must be specified");
return;
}
if (fileName.replace('\\', '/').indexOf('/', 1) > 0) {
updateStatus("File name must be valid");
return;
}
int dotLoc = fileName.lastIndexOf('.');
if (dotLoc != -1) {
String ext = fileName.substring(dotLoc + 1);
if (ext.equalsIgnoreCase("html") == false) {
updateStatus("File extension must be \"html\"");
return;
}
}
if (titleText.length() ==0 )
{
updateStatus("Title must be specified");
return;
}
updateStatus(null);
}
完成這些更改後,如果不輸入 Title 值,向導將提供錯誤消息。此外,Finish 按鈕將被禁用,直至為 Title 指定了值為止。通過使用先前概述的步驟運行插件項目來檢驗此功能。
添加自定義內容
向導頁面 NewXHTMLFileWizardPage 現在將捕捉用戶輸入的 HTML 標題的值,但是它尚未把該值合並到文件中。要開始將該值添加到文件中,首先需要編輯 index-xhtml-template.resource 文件使其包含該值的占位符。您可以將 <title> 元素更改為 <title>${title}</title>,這樣可以更輕松地包含占位符。
修改 performFinish() 方法以從向導頁面獲得標題並將標題傳遞給 doFinish() 方法以及其余值。
清單 13. 最終的 performFinish() 方法/**
* This method is called when 'Finish' button is pressed in the wizard. We
* will create an operation and run it using wizard as execution context.
*/
public boolean performFinish() {
final String containerName = page.getContainerName();
final String fileName = page.getFileName();
final String title = page.getTitle();
IRunnableWithProgress op = new IRunnableWithProgress() {
public void run(IProgressMonitor monitor)
throws InvocationTargetException {
try {
doFinish(containerName, fileName, title, monitor);
} catch (CoreException e) {
throw new InvocationTargetException(e);
} finally {
monitor.done();
}
}
};
try {
getContainer().run(true, false, op);
} catch (InterruptedException e) {
return false;
} catch (InvocationTargetException e) {
Throwable realException = e.getTargetException();
MessageDialog.openError(getShell(), "Error", realException
.getMessage());
return false;
}
return true;
}
接下來,略微修改 doFinish() 方法使其接受標題作為參數並將其傳遞給 openContentStream() 方法。
清單 14. 接受標題作為參數的最終 doFinish() 方法/**
* The worker method. It will find the container, create the file if missing
* or just replace its contents, and open the editor on the newly created
* file.
*/
private void doFinish(String containerName, String fileName, String title,
IProgressMonitor monitor) throws CoreException {
monitor.beginTask("Creating " + fileName, 2);
IWorkspaceRoot root = ResourcesPlugin.getWorkspace().getRoot();
IResource resource = root.findMember(new Path(containerName));
if (!resource.exists() || !(resource instanceof IContainer)) {
throwCoreException("Container \"" + containerName
+ "\" does not exist.");
}
IContainer container = (IContainer) resource;
final IFile file = container.getFile(new Path(fileName));
try {
InputStream stream = openContentStream(title);
try {
if (file.exists()) {
file.setContents(stream, true, true, monitor);
} else {
file.create(stream, true, monitor);
}
} finally {
stream.close();
}
} catch (IOException e) {
}
monitor.worked(1);
monitor.setTaskName("Opening file for editing...");
getShell().getDisplay().asyncExec(new Runnable() {
public void run() {
IWorkbenchPage page = PlatformUI.getWorkbench()
.getActiveWorkbenchWindow().getActivePage();
try {
IDE.openEditor(page, file, true);
} catch (PartInitException e) {
}
}
});
monitor.worked(1);
}
最後,需要修改 openContentStream() 方法的很大一部分才能夠將文件中的 $title 值替換為用戶提供的值(參見清單 15)。在配有大量不同值的模板中,您可以使用更精確的解決方案,例如擴展 FilterInputStream 並替換一整組不同值的新類。
清單 15. 最終的 openContentStream() 方法/**
* Initialize the file contents to contents of the given resource.
*/
private InputStream openContentStream(String title
)
throws CoreException {
final String newline = "\n"; // System.getProperty("line.separator");
String line;
StringBuffer sb = new StringBuffer();
try {
InputStream input = this.getClass().getResourceAsStream(
"index-xhtml-template.resource");
BufferedReader reader = new BufferedReader(new InputStreamReader(
input));
try {
while ((line = reader.readLine()) != null) {
line = line.replaceAll("\\$\\{title\\}", title);
sb.append(line);
sb.append(newline);
}
} finally {
reader.close();
}
} catch (IOException ioe) {
IStatus status = new Status(IStatus.ERROR, "ExampleWizard", IStatus.OK,
ioe.getLocalizedMessage(), null);
throw new CoreException(status);
}
return new ByteArrayInputStream(sb.toString().getBytes());
}
openContentStream() 方法的功能現在不僅限於裝入資源文件的內容和將其作為 InputStream 返回。新代碼將迭代流,使用 InputStreamReader 讀取流,並替換每行中的值 $title。結果將以 ByteArrayInputStream 的形式返回,這與首次生成 NewXHTMLFileWizard 類時使用的流對象相同。
創建新項目向導
如果您從頭閱讀了文本,則應當有一個在已有項目中創建新文件的向導。但是為什麼不到此為止呢?因為在諸如 XHTML 文件之類的資源中企業可能需要遵循一些約定,項目布局可能也有相應的約定。
通過向已有項目中添加相對較少的內容,就可以構建將整個項目連同文件夾和一些初始文件添加到工作區中的向導。向導將為 Web 站點 Example.com 創建新文件夾並創建 images 文件夾和 styles 文件夾。在 styles 文件夾中,向導將創建名為 site.css 的層疊樣式表(Cascading Style Sheet,CSS)文件。向導最後通過重用 NewXHTMLFileWizard 類中的方法來添加新的 XHTML 文件,該文件的初始名稱是新項目的名稱附帶一些新文本。
構建新 NewSiteProjectWizard
由於有一個插件項目已經設置並正在運行,因此無需使用向導構建新類。相反,您自己可以通過創建擴展自 Wizard 並且實現兩個接口 INewWizard 和 IExecutableExtension 的新類來構建新向導。
把 NewSiteProjectWizard 新類添加到 NewXHTMLFileWizard 類所在的包中。查看清單 16 中的 NewSiteProjectWizard 類聲明,並確保擴展 Wizard 類。同時添加 INewWizard 和 IExecutableExtension 接口。
由於 NewSiteProjectWizard 類擴展同一個類並且實現由 NewXHTMLFileWizard 類實現的一個接口,因此如果將兩者相比較,您會發現共有方法。清單 16 中顯示了 NewSiteProjectWizard,這裡為了簡短起見省略了方法的內容(您將稍後在本文中看到這些內容)。
清單 16. NewSiteProjectWizard 類import java.io.IOException;
import java.io.InputStream;
import java.lang.reflect.InvocationTargetException;
import java.net.URI;
import org.eclipse.core.resources.IContainer;
import org.eclipse.core.resources.IFile;
import org.eclipse.core.resources.IFolder;
import org.eclipse.core.resources.IProject;
import org.eclipse.core.resources.IProjectDescription;
import org.eclipse.core.resources.IResource;
import org.eclipse.core.resources.IWorkspace;
import org.eclipse.core.resources.ResourcesPlugin;
import org.eclipse.core.runtime.CoreException;
import org.eclipse.core.runtime.IConfigurationElement;
import org.eclipse.core.runtime.IExecutableExtension;
import org.eclipse.core.runtime.IProgressMonitor;
import org.eclipse.core.runtime.IStatus;
import org.eclipse.core.runtime.OperationCanceledException;
import org.eclipse.core.runtime.Path;
import org.eclipse.core.runtime.Status;
import org.eclipse.core.runtime.SubProgressMonitor;
import org.eclipse.jface.dialogs.MessageDialog;
import org.eclipse.jface.viewers.IStructuredSelection;
import org.eclipse.jface.wizard.Wizard;
import org.eclipse.ui.INewWizard;
import org.eclipse.ui.IWorkbench;
import org.eclipse.ui.actions.WorkspaceModifyOperation;
import org.eclipse.ui.dialogs.WizardNewProjectCreationPage;
import org.eclipse.ui.wizards.newresource.BasicNewProjectResourceWizard;
public class NewSiteProjectWizard extends Wizard implements INewWizard,
IExecutableExtension {
/*
* Use the WizardNewProjectCreationPage, which is provided by the Eclipse
* framework.
*/
private WizardNewProjectCreationPage wizardPage;
private IConfigurationElement config;
private IWorkbench workbench;
private IStructuredSelection selection;
private IProject project;
/**
* Constructor
*/
public NewSiteProjectWizard() {
super();
}
public void addPages() {
// snipped...
}
@Override
public boolean performFinish() {
// snipped...
}
/**
* This creates the project in the workspace.
*
* @param description
* @param projectHandle
* @param monitor
* @throws CoreException
* @throws OperationCanceledException
*/
void createProject(IProjectDescription description, IProject proj,
IProgressMonitor monitor) throws CoreException,
OperationCanceledException {
// snipped...
}
/*
* (non-Javadoc)
*
* @see org.eclipse.ui.IWorkbenchWizard#init(org.eclipse.ui.IWorkbench,
* org.eclipse.jface.viewers.IStructuredSelection)
*/
public void init(IWorkbench workbench, IStructuredSelection selection) {
// snipped...
}
/**
* Sets the initialization data for the wizard.
*/
public void setInitializationData(IConfigurationElement config,
String propertyName, Object data) throws CoreException {
// snipped...
}
/**
* Adds a new file to the project.
*
* @param container
* @param path
* @param contentStream
* @param monitor
* @throws CoreException
*/
private void addFileToProject(IContainer container, Path path,
InputStream contentStream, IProgressMonitor monitor)
throws CoreException {
// snipped
}
}
修改 plugin.xml
在添加新類之後在 Eclipse 中將其作為向導執行之前,需要對位於項目庫中的 plugin.xml 文件進行一些更改。
清單 17. plugin.xml 文件<?xml version="1.0" encoding="UTF-8"?>
<?eclipse version="3.2"?>
<plugin>
<extension
point="org.eclipse.ui.newWizards">
<category
name="Example.com Enterprise Templates"
id="ExampleWizard">
</category>
<wizard
name="Example.com Static Web Page"
icon="icons/sample.gif"
category="ExampleWizard"
class="com.example.eclipse.wizards.NewXHTMLFileWizard"
id="com.example.eclipse.wizards.NewXHTMLFileWizard">
</wizard>
<wizard
category="ExampleWizard"
class="com.example.eclipse.wizards.NewSiteProjectWizard"
icon="icons/sample.gif"
id="com.example.eclipse.wizards.NewSiteProjectWizard"
name="Example.com Static Web Site"
project="true">
</wizard>
</extension>
</plugin>
更改 plugin.xml 的目的是讓 Eclipse 知道 NewSiteProjectWizard 類是可以由 Eclipse 調用的向導。它也被歸到先前討論的 NewXHTMLFileWizard 類所在的類別下。project="true" 屬性告訴 Eclipse 它是一個項目,因此它將被顯示在相應的上下文中。
addPages() 方法
Eclipse API 包括一些向導類和向導頁面類,如果您要執行基本功能並且不需要進行定制,則這些類將十分有用。從技術上講,NewSiteProjectWizard 可以擴展 BasicNewProjectResourceWizard —— 用於創建基本項目的已有項目向導 —— 雖然設計者在 JavaDoc 中注明不適於創建該類的子類。要獲得基本的項目信息(如項目名稱),可以使用 BasicNewProjectResourceWizard 所使用的同一個向導頁面 —— WizardNewProjectCreationPage 類,如下所示:
清單 18. addPages() 方法public void addPages() {
/*
* Unlike the custom new wizard, we just add the pre-defined one and
* don't necessarily define our own.
*/
wizardPage = new WizardNewProjectCreationPage(
"NewExampleComSiteProject");
wizardPage.setDescription("Create a new Example.com Site Project.");
wizardPage.setTitle("New Example.com Site Project");
addPage(wizardPage);
}
此方法將創建頁面類的新實例,設定描述和標題,然後將其添加為向導頁面。
performFinish() 方法
像 NewXHTMLFileWizard 類一樣,NewSiteProjectWizard 也有 performFinish() 方法(如清單 19 所示),該方法將在用戶完成向導中的步驟並單擊了 Finish 時執行。此方法將調用執行 createProject() 方法的過程,該方法將執行大部分繁瑣的創建工作,如創建項目、文件夾和文件。
清單 19. performFinish() 方法@Override
public boolean performFinish() {
if (project != null) {
return true;
}
final IProject projectHandle = wizardPage.getProjectHandle();
URI projectURI = (!wizardPage.useDefaults()) ? wizardPage
.getLocationURI() : null;
IWorkspace workspace = ResourcesPlugin.getWorkspace();
final IProjectDescription desc = workspace
.newProjectDescription(projectHandle.getName());
desc.setLocationURI(projectURI);
/*
* Just like the ExampleWizard, but this time with an operation object
* that modifies workspaces.
*/
WorkspaceModifyOperation op = new WorkspaceModifyOperation() {
protected void execute(IProgressMonitor monitor)
throws CoreException {
createProject(desc, projectHandle, monitor);
}
};
/*
* This isn't as robust as the code in the BasicNewProjectResourceWizard
* class. Consider beefing this up to improve error handling.
*/
try {
getContainer().run(true, true, op);
} catch (InterruptedException e) {
return false;
} catch (InvocationTargetException e) {
Throwable realException = e.getTargetException();
MessageDialog.openError(getShell(), "Error", realException
.getMessage());
return false;
}
project = projectHandle;
if (project == null) {
return false;
}
BasicNewProjectResourceWizard.updatePerspective(config);
BasicNewProjectResourceWizard.selectAndReveal(project, workbench
.getActiveWorkbenchWindow());
return true;
}
performFinish() 方法將在調用 createProject() 創建文件和文件夾之後調用兩個靜態方法更新當前透視圖並選擇在 IDE 中新創建的項目。
createProject() 方法
清單 20 中所示的 createProject() 方法將創建並打開新項目。然後,方法將向項目中添加兩個新文件和兩個新文件夾。文件都是由名為 addFileToProject() 的私有方法添加的,該方法的作用是保持 createProject() 相對整潔。
清單 20. createProject() 方法/**
* This creates the project in the workspace.
*
* @param description
* @param projectHandle
* @param monitor
* @throws CoreException
* @throws OperationCanceledException
*/
void createProject(IProjectDescription description, IProject proj,
IProgressMonitor monitor) throws CoreException,
OperationCanceledException {
try {
monitor.beginTask("", 2000);
proj.create(description, new SubProgressMonitor(monitor, 1000));
if (monitor.isCanceled()) {
throw new OperationCanceledException();
}
proj.open(IResource.BACKGROUND_REFRESH, new SubProgressMonitor(
monitor, 1000));
/*
* Okay, now we have the project and we can do more things with it
* before updating the perspective.
*/
IContainer container = (IContainer) proj;
/* Add an XHTML file */
addFileToProject(container, new Path("index.html"),
NewXHTMLFileWizard.openContentStream("Welcome to "
+ proj.getName()), monitor);
/* Add the style folder and the site.css file to it */
final IFolder styleFolder = container.getFolder(new Path("styles"));
styleFolder.create(true, true, monitor);
InputStream resourceStream = this.getClass().getResourceAsStream(
"templates/site-css-template.resource");
addFileToProject(container, new Path(styleFolder.getName()
+ Path.SEPARATOR + "style.css"),
resourceStream, monitor);
resourceStream.close();
/*
* Add the images folder, which is an official Exmample.com standard
* for static web projects.
*/
IFolder imageFolder = container.getFolder(new Path("images"));
imageFolder.create(true, true, monitor);
} catch (IOException ioe) {
IStatus status = new Status(IStatus.ERROR, "ExampleWizard", IStatus.OK,
ioe.getLocalizedMessage(), null);
throw new CoreException(status);
} finally {
monitor.done();
}
}
addFileToProject() 方法
您可能會發現 addFileToProject() 方法中的大部分代碼基本上與清單 14 中所示的 doFinish() 方法中代碼相同。方法的簽名差別很大:它已被修改為接受參數以使其在 createProject() 方法的上下文內具有更好的可重用性。
清單 21. addFileToProject() 方法/**
* Adds a new file to the project.
*
* @param container
* @param path
* @param contentStream
* @param monitor
* @throws CoreException
*/
private void addFileToProject(IContainer container, Path path,
InputStream contentStream, IProgressMonitor monitor)
throws CoreException {
final IFile file = container.getFile(path);
if (file.exists()) {
file.setContents(contentStream, true, true, monitor);
} else {
file.create(contentStream, true, monitor);
}
}
如果文件已存在,則文件的內容將被設為傳遞到方法中的 contentStream 的內容。如果文件尚不存在,則以文件中的內容創建文件。
完整的 NewSiteProjectWizard 類包含在本文的下載中。在添加了此處的方法實現及 INewWizard 和 IExecutableExtension 接口的實現後,您可以如先前所示把項目作為 Eclipse 應用程序來運行。這一次,除了可以用 NewXHTMLFileWizard 創建新文件之外,還可以創建新項目。
故障檢修
當部署 wizard .jar 文件(此處稱為 NewFileWizard_1.0.0.jar)時,將其放入 plugin 文件夾中。轉到 plugin.xml 文件,在 Eclipse 中雙擊該文件,導航到 Overview 附簽並單擊右邊的 Export Wizard 鏈接,從而創建 .jar 文件。然後將 .jar 移到 Eclipse plugin 文件夾中,不要對它解包。
如果啟動 Eclipse 時遇到 “Plugin does not have a valid identifier” 或 “Plugin does not have a valid version” 錯誤,請嘗試在命令行使用 -clean 參數啟動 Eclipse。
如果遇到錯誤,可以在調試時把項目作為 Eclipse 插件來運行。我喜歡使用 Eclipse IDE 中的 Debug Perspective。選擇 Run > Debug Last Launched 在逐步浏覽代碼時開始運行 Eclipse 中的插件。
您很有可能需要在 performFinish() 方法的第一行中設置一個斷點,因為那是操作的起點。一旦您單擊了向導中的 Finish,調試器就應當停在斷點處(只要錯誤不出現在斷點之前)。
結束語
Eclipse IDE 最優秀的特性之一是通過創建用於添加創建新文件的新向導的插件輕松地提供擴展功能。使用企業專有的向導來創建文件將使企業可以快速一致地開發應用程序。
本文配套源碼