以前簡單使用過spring的文件上傳,當時沒深入研究,以為spring只能實現單個文件的上傳,所以後來就又大致學了下commons fileupload組件。在最近的工作中,有同事提出,他在把commons fileupload組件集成到spring中時總是出錯,然後我大致看了一下,發現是spring DispatcherServlet的緣故。然後google了一下,發現sping本身就包裝了commons fileupload,並且很好用。
一、前台頁面
我們的目標是要實現多文件上傳,並且預先我並不知道客戶要上傳多少個文件。我們先寫個jsp頁面吧!要實現可以動態控制上傳多少文件,基本代碼如下:
<form method="post" action="./upload.do" enctype="multipart/form-data">

<div id="uploadDiv">

<input type="file" name="file1" />

</div>

<input type="button" value="繼續上傳" onclick="javascript:btn_click();">

<input type="hidden" id="fileCount" name="fileCount" value="1">

<input type="submit" value="上傳" />

</form>
要實現動態控制上傳文件個數,我們需要使用javascript了。
function btn_click()...{

var fileNo=Number(document.getElementById('fileCount').value)+1;

newDiv=document.createElement("div")

newDiv.id="divFile"+fileNo;

document.getElementById('uploadDiv').appendChild(newDiv)

document.getElementById('fileCount').value=fileNo;

newDiv.innerHTML="<input type='file' name='file"+fileNo+"'>";

}
ok,現在我們的界面如下:
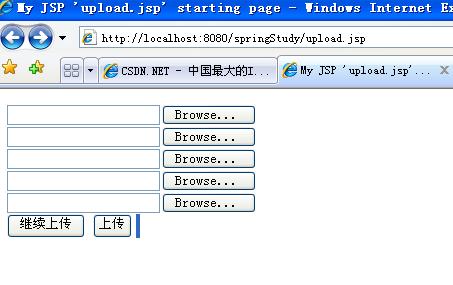
圖1
二、後台實現
1.前台我們搞定了,現在考慮一下後台處理吧!我寫了一個Command Bean,非常簡單,如下:
public class FUploadBean ...{

private byte[] file;

public byte[] getFile() ...{

return file;

}

public void setFile(byte[] file) ...{

this.file = file;

}

}
在spring Web MVC模式中,必須定義一個Command對象,將其和Form表單綁定。這個command class需要在spring上下文中進行配置,可以作為controller的property進行配置。一會會在配置文件中看到相關配置。
2.然後就是一個Controller
public class FUploadController extends SimpleFormController ...{

public ModelAndView onSubmit(HttpServletRequest request,

HttpServletResponse res, Object obj, BindException errors)

throws Exception ...{

MultipartHttpServletRequest multipartRequest =

(MultipartHttpServletRequest) request;

int fileCount = Integer.parseInt(request.getParameter("fileCount"));

for (int i = 1; i <= fileCount; i++) ...{

CommonsMultipartFile cFile = (CommonsMultipartFile)

multipartRequest.getFile("file" + i);

File uploadedFile = new File("E:/upload" + "/"+ cFile.getOriginalFilename());

FileCopyUtils.copy(cFile.getBytes(), uploadedFile);

}

return null;

}

// 注冊一個spring的編輯器非常重要,沒有這個方法,上傳將不能進行

protected void initBinder(HttpServletRequest request,

ServletRequestDataBinder binder) throws ServletException ...{

binder.registerCustomEditor(byte[].class,

new ByteArrayMultipartFileEditor());

}

}
注意:必須定義initBinder方法。
三、配置文件
接下來就是配置文件了,熟悉spring的人應該很容易看懂了。
1.web.xml
<servlet>

<servlet-name>springStudy</servlet-name>

<servlet-class>

org.springframework.web.servlet.DispatcherServlet

</servlet-class>

<load-on-startup>1</load-on-startup>

</servlet>

<servlet-mapping>

<servlet-name>springStudy</servlet-name>

<url-pattern>*.do</url-pattern>

</servlet-mapping>
2.springStudy-servlet.xml
<bean id="multipartResolver"

class="org.springframework.web.multipart.commons.CommonsMultipartResolver">

<property name="maxUploadSize" value="50000000" />

<property name="defaultEncoding" value="utf-8" />

</bean>

<bean id="urlMapping"

class="org.springframework.web.servlet.handler.SimpleUrlHandlerMapping">

<property name="mappings">

<props>

<prop key="/upload.do">uploadServlet</prop>

</props>

</property>

</bean>

<bean id="uploadServlet"

class="chb.spring.study.web.FUploadController">

<property name="commandClass"

value="chb.spring.study.web.FUploadBean" />

</bean>
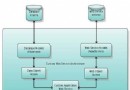
注意:需要注意的是,在spring中要實現文件上傳,必須在spring的上下文中定義MultipartResolver,這樣spring在發現該表單請求是mutipart時,就會使用spring定義的解析器去解析。這裡我們使用的是CommonsMultipartResolver,也就是會轉化為commons fileupload。CommonsMultipartResolver繼承自CommonsFileUploadSupport,而CommonsFileUploadSupport是對commons fileupload組件的包裝,所以我們可以在定義multipartResolver時設置相關參數,比如最大允許上傳文件數,字符編碼等。這裡設置<property name="defaultEncoding" value="utf-8" />就是為了解決中文問題。