在可視化編程時代,大多數可視化的GUI開發工具都提供了按一定規則排列Form中的控件的功能。但是對於Java來說,支持可視化開發的工具並不多,雖然有一些這樣的工具,但它們大多是第三方的產品,穩定性方面有一些欠缺。因此,在很多時候使用Java編寫GUI程序時,就要使用布局(Layout)來控制Form上的控件的位置。
本文主要討論如何使用SWT中提供的布局來安排控件的位置,並通過實例來演示這一過程。在SWT中提供了5種布局:FillLayout, RowLayout, GridLayout, FormLayout, and StackLayout。下面我將詳細討論這5種布局的使用。
FillLayout
FillLayout是最簡單的布局。它可以將控件橫向或縱向進行排列,並且其中每個控件都有同樣的寬度或高度。使用FillLayout一般分為2步。
1. 建立一個FillLayout對象。
2. 使用setLayout方法設置Shell對象的布局。
下面代碼使用FillLayout在Shell上放了3個按鈕,代碼如下:
package layout;

import org.eclipse.swt.SWT;

import org.eclipse.swt.widgets.*;

import org.eclipse.swt.layout.*;

public class TestFillLayout

{

 public static void main(String[] args)

 {

  Display display = new Display();

  Shell shell = new Shell(display, SWT.DIALOG_TRIM);

  shell.setText("FillLayout演示");

  shell.setSize(400, 300);

  // 設置shell的布局

  FillLayout layout = new FillLayout();

  shell.setLayout(layout);

  // 向shell添加控件

  Button button1 = new Button(shell, SWT.PUSH);

  button1.setText("按鈕1");

  Button button2 = new Button(shell, SWT.PUSH);

  button2.setText("按鈕2");

  Button button3 = new Button(shell, SWT.PUSH);

  button3.setText("按鈕3");

  shell.open();

  while (!shell.isDisposed())

  {

   if (!display.readAndDispatch())

   {

    display.sleep();

   }

  }

  display.dispose();

 }

}
界面如圖1所示。

圖 1 使用橫向FillLayout的Shell界面
如果想要Shell上的控件縱向排列,可以在建立布局時將type屬性設置成SWT.VERTICAL。代碼如下:
FillLayout layout = new FillLayout();

layout.type = SWT.VERTICAL;

shell.setLayout(layout);
圖2是控件縱向排列的效果圖

圖 2 使用縱向FillLayout的Shell界面
FillLayout的構造函數重載了2次。其中一個構造函數有一個參數,這個參數就是type。因此,我們也可以通過FillLayout的構造函數對type賦值。
shell.setLayout(new FillLayout(SWT.VERTICAL));
RowLayout
RowLayout的功能和FillLayout差不多。只是它和FillLayout的最大區別是每個控件並不一定是一樣大小。而且RowLayout是按行排列,這一點和FillLayout是不同的。在一行排滿後,就從下一行開始排列。和RowLayout配合使用的還有一個RowData類。這個類可以設置每一個控件的大小。下面代碼是一個使用RowLayout的小例子。
package layout;

import org.eclipse.swt.SWT;

import org.eclipse.swt.widgets.*;

import org.eclipse.swt.layout.*;

public class TestRowLayout

{

 public static void main(String[] args)

 {

  Display display = new Display();

  Shell shell = new Shell(display, SWT.DIALOG_TRIM);

  shell.setText("RowLayout演示");

  shell.setSize(220, 200);

  // 將Shell的布局設置成RowLayout

  RowLayout layout = new RowLayout(SWT.HORIZONTAL);

  layout.spacing = 30;

  layout.marginLeft = 30;

  layout.marginTop = 30;

  shell.setLayout(layout);

  RowData rowData = new RowData();

  rowData.height = 50;

  rowData.width = 100;

  // 向shell添加控件

  Button button1 = new Button(shell, SWT.PUSH);

  button1.setText("按鈕1");

  button1.setLayoutData(rowData);

  Button button2 = new Button(shell, SWT.PUSH);

  button2.setText("按鈕2");

  Button button3 = new Button(shell, SWT.PUSH);

  button3.setText("按鈕3");

  shell.open();

  while (!shell.isDisposed())

  {

   if (!display.readAndDispatch())

   {

    display.sleep();

   }

  }

  display.dispose();

 }

}
圖3是使用RowLayout的效果圖
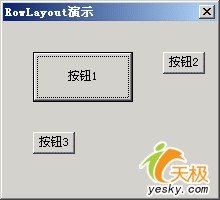
圖3 RowLayout效果圖
可以在兩個地方設置和RowLayout相關的數據,一個是RowData,它可以設置控件的大小。另外一個就是RowLayout本身,它可以設置控件開始排列的起點坐標(marginLeft和marginTop)、以及控件之間的間距等信息(spacing)。在RowLayout中有個很重要的屬性justify。這個屬性默認是false。當它為true時,將自動調整行或整列的控件,使其盡量占滿一行或一列。
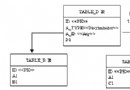
GridLayout
GridLayout是SWT中最重要的布局。這個布局十分強大,它可以滿足大多數的需要。而且它的網絡可以通過Composite對象進行嵌套。GridLayout有兩個構造函數。一個是默認的構造函數public GridLayout()。另外一個需要兩個函數public GridLayout(int numColumns, boolean makeColumnsEqualWidth)。其中numColumns是這個網格的列數,而另外一個參數將使每一列等寬。下面的代碼是一個完整的關於GridLayout的例子。
package layout;

import org.eclipse.swt.SWT;

import org.eclipse.swt.widgets.*;

import org.eclipse.swt.layout.*;

public class TestGridLayout

{

 public static void main(String[] args)

 {

  Display display = new Display();

  Shell shell = new Shell(display);

  shell.setText("GridLayout演示");

  GridLayout layout = new GridLayout();

  layout.numColumns = 3;

  layout.makeColumnsEqualWidth = true;

  shell.setLayout(layout);

  // 建立左上角的按鈕

  GridData data = new GridData(GridData.FILL_BOTH);

  data.widthHint = 200; //按鈕的初始寬度為200

  Button one = new Button(shell, SWT.PUSH);

  one.setText("按鈕1");

  one.setLayoutData(data);

  // 建立一個Composite對象,並在上面放三個按鈕

  Composite composite = new Composite(shell, SWT.NONE);

  data = new GridData(GridData.FILL_BOTH);

  data.horizontalSpan = 2; // Composite的占兩個Cell

  composite.setLayoutData(data);

  layout = new GridLayout();

  layout.numColumns = 1;

  layout.marginHeight = 15;

  layout.marginRight = 150;

  composite.setLayout(layout);


  // 建立第二個按鈕

  data = new GridData(GridData.FILL_BOTH);

  Button two = new Button(composite, SWT.PUSH);

  two.setText("按鈕2");

  two.setLayoutData(data);

  // 建立第三個按鈕

  data = new GridData(GridData.HORIZONTAL_ALIGN_END);

  Button three = new Button(composite, SWT.PUSH);

  three.setText("按鈕3");

  three.setLayoutData(data);

  // 建立第四個按鈕

  data = new GridData(GridData.HORIZONTAL_ALIGN_BEGINNING);

  Button four = new Button(composite, SWT.PUSH);

  four.setText("按鈕4");

  four.setLayoutData(data);

  // 建立下面的一個長按鈕

  data = new GridData();

  data.horizontalAlignment = GridData.FILL;

  data.grabExcessHorizontalSpace = true;

  data.horizontalSpan = 3;

  data.verticalSpan = 2;

  data.heightHint = 150;

  Button five = new Button(shell, SWT.PUSH);

  five.setText("按鈕5");

  five.setLayoutData(data);

  shell.pack();

  shell.open();

  while (!shell.isDisposed())

  {

   if (!display.readAndDispatch())

   {

    display.sleep();

   }

  }

  display.dispose();

 }

}
上面的例子將網格設成3列,在第一行的第一列放置了第一個按鈕。然後將一個Composite對象放到第一行第二、三列(data.horizontalSpan = 2),在這個對象上放到個按鈕。最後在下面建立了第5個按鈕。
FormLayout
FormLayout是SWT中最復雜的布局。在這一部分我將詳細討論FormLayout。這個布局雖然復雜,但它確可以對控件進行更多的控制。
FormLayout和其它的布局類似,也有一個FormData類用於設置布局信息。但我其它的布局不同的是FormLayout使用另外一個類來控制控件的大小和位置,這個類是FormAttachment。控件的上、下、左、右分別要4個FormAttachment對象來控制。通過這些FormAttachment對象可以控制當前控件如何在它的父窗口中顯示,以及和其它控件的相對位置。
在FormLayout中,描述位置的4個屬性(left、top、right、bottom)都是一個FormAttachment對象。而並不是一個簡單的值。在FormAttachment中比較常用的屬性是numerator,這個屬性描述控件的4個邊距Shell的邊緣的距離。
按百分比放置控件
可以通過FormAttachment的numerator屬性設置百分比。下面的代碼將一個按鈕在它的父窗口的寬度的40%處放置按鈕。當Shell的盡寸改變後,按鈕的位置也隨之變化,但按鈕的大小並不改變。
Button button = new Button(shell, SWT.PUSH);

button.setText("按鈕");

FormData data = new FormData();

data.left = new FormAttachment(40);

button.setLayoutData(data);
但如果同時設置data的left和right屬性又如何呢?如果是這樣的話,那麼這個按鈕的尺寸就會改變。下面的例子將一個按鈕放到水平方向中心的位置。我們可以將left的比例設計為40%,而right的比例設置60%。如果這樣設置,無論窗體如何變化,這個按鈕始終在水平方向的中心。這是一個簡單的數學計算。如果一個按鈕的左邊在40%的位置,而右邊在60%的位置,也就是說,按鈕的右邊距窗體的右邊也是40%。這樣可以算出,按鈕的寬度占窗體的20%(哈哈,要想使用FormLayout,可要有一定的數學基礎啊!)。
Button button = new Button(shell, SWT.PUSH);

button.setText("按鈕");

FormData data = new FormData();

data.left = new FormAttachment(40);

data.right = new FormAttachment(60);

button.setLayoutData(data);
不過在使用FormAttachment同時給left和right或top和bottom賦值時,不能將這兩個比例設成一樣的,要不就將按鈕壓扁了(按鈕看不到了,寬或高為0)。如果想要按鈕在中心位置,這兩個比例的和必須是100。而且left(top)的比例要小於right(bottom)的比例。
設置控件的偏移量
SWT之所以提供了布局,目的就是讓你盡量少使用絕對坐標來設置控件。但在有時,我們又必須使用絕對坐標。如果是這樣的話,你可以使用控件的setLocation來設置,也可以使用FormAttachment提供的偏移量去達到同樣的效果。
FormData data = new FormData();

data.left = new FormAttachment(0, 20);

data.top = new FormAttachment(0, 40);

button.setLayoutData(data);
上面的代碼相當於setLocation(20, 40),即將按鈕設置的位置設置成(20, 40)。
根據其它控件的調整位置
一般在窗體上都有不只一個控件,這些控件之間都是有一定關系的,它們的位置也是相對的。因此,FormLayout為我們提供了根據其它控件設置當控件位置的方法。如根據另外一個控件設置當前控件左邊或右邊的位置。
下面的例子將根據一個按鈕的位置設置另外一個按鈕的位置。有兩個按鈕,第二個按鈕根據第一個按鈕的底邊設置自己的位置。
Button button1 = new Button(shell, SWT.PUSH);

button1.setText("按鈕1");

FormData data1 = new FormData();

data1.top = new FormAttachment(20);

data1.left = new FormAttachment(40);

data1.right = new FormAttachment(50);

button1.setLayoutData(data1);

// 第二個按鈕

Button button2 = new Button(shell, SWT.PUSH);

button2.setText("按鈕2");

FormData data2 = new FormData();

data2.left = new FormAttachment(button1, 0, SWT.CENTER);

data2.top = new FormAttachment(button1);

button2.setLayoutData(data2);
上面的"按鈕2"將根據"按鈕1"將自己水平方向的位置設置成"按鈕1"的中心位置。
StackLayout
我們在最後一部分來討論StackLayout,並不是因為StackLayout在這5種布局中最復雜,而是這個布局並不在org.eclipse.swt.layout中,而在org.eclipse.swt.custom中。從這個布局的名子可看出,它是將許多SWT控件放到一個集合中,這些控件有同樣的尺寸和位置。但只有在最上面的控件才能被顯示。
StackLayout只有一個空的構造函數,它只有一個屬性topControl,這個屬必確定了哪一個控件可以被顯示。這個屬性默認值是null,也就是說,如果不設置它,那將沒有控件被顯示在窗體上。但要注意的是,設置topControl並不會將StackLayout中控件刪除。
package layout;

import org.eclipse.swt.events.*;

import org.eclipse.swt.widgets.*;

import org.eclipse.swt.custom.StackLayout;

import org.eclipse.swt.SWT;

public class TestStackLayout

{

 public static void main(String[] args)

 {

  Display display = new Display();

  Shell shell = new Shell(display);

  StackLayout layout = new StackLayout();

  shell.setLayout(layout);

  StackLayoutSelectionAdapter adapter = new StackLayoutSelectionAdapter(shell, layout);

  Button one = new Button(shell, SWT.PUSH);

  one.setText("按鈕1");

  one.addSelectionListener(adapter);

  Button two = new Button(shell, SWT.PUSH);

  two.setText("按鈕2");

  two.addSelectionListener(adapter);

  Button three = new Button(shell, SWT.PUSH);

  three.setText("按鈕3");

  three.addSelectionListener(adapter);

  layout.topControl = one;

  shell.open();

  while (!shell.isDisposed())

  {

   if (!display.readAndDispatch())

   {

    display.sleep();

   }

  }

  display.dispose();

 }

}

class StackLayoutSelectionAdapter extends SelectionAdapter

{

 Shell shell;

 StackLayout layout;

 public StackLayoutSelectionAdapter(Shell shell, StackLayout layout)

 {

  this.shell = shell;

  this.layout = layout;

 }

 public void widgetSelected(SelectionEvent event)

 {

  Control control = layout.topControl;

  Control[] children = shell.getChildren();

  int i = 0;

  for (int n = children.length; i < n; i++)

  {

   Control child = children[i];

   if (child == control)

   {

    break;

   }

  }

  ++i;

  if (i >= children.length)

   i = 0;

  layout.topControl = children[i];

  shell.layout();

 }

}
上面這個例子在Shell上有三個按鈕,通過按最上面顯示的按鈕,這三個按鈕循環交替顯示。