本篇將對定義在 XMl 文件中的 bean,從靜態的的定義到變成可以使用的對象的過程,即 bean 的加載和獲取的過程進行一個整體的了解,不去深究,點到為止,只求對 Spring IOC 的實現過程有一個整體的感知,具體實現細節留到後面用針對性的篇章進行講解。
首先我們來引入一個 Spring 入門使用示例,假設我們現在定義了一個類 org.zhenchao.framework.MyBean ,我們希望利用 Spring 來管理類對象,這裡我們利用 Spring 經典的 XMl 配置文件形式進行配置:
<?xml version="1.0" encoding="UTF-8"?>
<beansxmlns="http://www.springframework.org/schema/beans"
    xmlns:xsi="http://www.w3.org/2001/XMLSchema-instance"
    xsi:schemaLocation="http://www.springframework.org/schema/beans http://www.springframework.org/schema/beans/spring-beans.xsd">

  <!-- bean的基本配置 -->
  <beanname="myBean"class="org.zhenchao.framework.MyBean"/>

</beans>
我們將上面的配置文件命名為 spring-core.xml,則對象的最原始的獲取和使用示例如下:
// 1. 定義資源
Resource resource = new ClassPathResource("spring-core.xml");
// 2. 利用XmlBeanFactory解析並注冊bean定義
XmlBeanFactory beanFactory = new XmlBeanFactory(resource);
// 3. 從IOC容器加載獲取bean
MyBean myBean = (MyBean) beanFactory.getBean("myBean");
// 4. 使用bean
myBean.sayHello();
上面 demo 雖然簡單,但麻雀雖小,五髒俱全,完整的讓 Spring 執行了一遍配置文件加載,並獲取 bean 的過程。雖然從 Spring 3.1 開始 XmlBeanFactory 已經被置為 Deprecated ,但是 Spring 並沒有定義出更加高級的基於 XML 加載 bean 的 BeanFactory,而是推薦采用更加原生的方式,即組合使用 DefaultListableBeanFactory 和 XmlBeanDefinitionReader 來完成上訴過程:
Resource resource = new ClassPathResource("spring-core.xml");
DefaultListableBeanFactory beanFactory = new DefaultListableBeanFactory();
XmlBeanDefinitionReader reader = new XmlBeanDefinitionReader(beanFactory);
reader.loadBeanDefinitions(resource);
MyBean myBean = (MyBean) beanFactory.getBean("myBean");
myBean.sayHello();
後面的分析你將會看到 XmlBeanFactory 實際上是對 DefaultListableBeanFactory 和 XmlBeanDefinitionReader 組合使用方式的封裝,所以這裡我們仍然將繼續分析基於 XmlBeanFactory 加載 bean 的過程。
一. Bean的解析和注冊
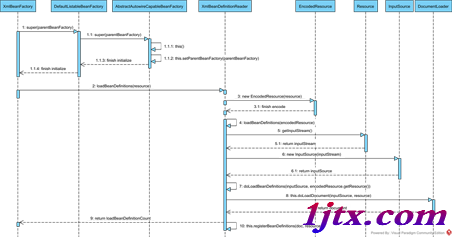
Bean的加載過程,主要是對配置文件的解析,並注冊 bean 的過程,上圖是加載過程的時序圖,當我們 new XmlBeanFactory(resource) 的時候,已經完成將配置文件包裝成了 Spring 定義的資源,並觸發解析和注冊。 new XmlBeanFactory(resource) 調用的是下面的構造方法:
publicXmlBeanFactory(Resource resource)throwsBeansException{
  this(resource, null);
}
這個構造方法本質上還是繼續調用了:
publicXmlBeanFactory(Resource resource, BeanFactory parentBeanFactory)throwsBeansException{
  super(parentBeanFactory);
  // 加載xml資源
  this.reader.loadBeanDefinitions(resource);
}
在這個構造方法裡面先是調用了父類構造函數,即 org.springframework.beans.factory.support.DefaultListableBeanFactory 類,這是一個非常核心的類,它包含了基本 IOC 容器所具有的重要功能,是一個 IOC 容器的基本實現。然後是調用了 this.reader.loadBeanDefinitions(resource) ,從這裡開始加載配置文件。
Spring 在設計采用了許多程序設計的基本原則,比如迪米特法則、開閉原則,以及接口隔離原則等等,這樣的設計為後續的擴展提供了靈活性,也增強了模塊的復用性,這也是我看 Spring 源碼的動力之一,希望通過閱讀學習的過程來提升自己接口設計的能力。Spring 使用了專門的資源加載器對資源進行加載,這裡的 reader 就是 org.springframework.beans.factory.xml.XmlBeanDefinitionReader 對象,專門用來加載基於 XML 文件配置的 bean。這裡的加載過程為:
1.利用 EncodedResource 二次包裝資源文件
采用 org.springframework.core.io.support.EncodedResource 對resource 進行二次封裝.
2.獲取資源輸入流,並構造 InputSource 對象
對資源進行編碼封裝之後,開始真正進入 this.loadBeanDefinitions(new EncodedResource(resource)) 的過程,該方法源碼如下:
publicintloadBeanDefinitions(EncodedResource encodedResource)throwsBeanDefinitionStoreException{
  Assert.notNull(encodedResource, "EncodedResource must not be null");
  if (logger.isInfoEnabled()) {
    logger.info("Loading XML bean definitions from " + encodedResource.getResource());
  }

  // 標記正在加載的資源,防止循環引用
  Set<EncodedResource> currentResources = this.resourcesCurrentlyBeingLoaded.get();
  if (currentResources == null) {
    currentResources = new HashSet<EncodedResource>(4);
    this.resourcesCurrentlyBeingLoaded.set(currentResources);
  }
  if (!currentResources.add(encodedResource)) {
    throw new BeanDefinitionStoreException("Detected cyclic loading of " + encodedResource + " - check your import definitions!");
  }

  try {
    // 獲取資源的輸入流
    InputStream inputStream = encodedResource.getResource().getInputStream();
    try {
      // 構造InputSource對象
      InputSource inputSource = new InputSource(inputStream);
      if (encodedResource.getEncoding() != null) {
        inputSource.setEncoding(encodedResource.getEncoding());
      }
      // 真正開始從XML文件中加載Bean定義
      return this.doLoadBeanDefinitions(inputSource, encodedResource.getResource());
    } finally {
      inputStream.close();
    }
  } catch (IOException ex) {
    throw new BeanDefinitionStoreException("IOException parsing XML document from " + encodedResource.getResource(), ex);
  } finally {
    currentResources.remove(encodedResource);
    if (currentResources.isEmpty()) {
      this.resourcesCurrentlyBeingLoaded.remove();
    }
  }
}
需要知曉的是 org.xml.sax.InputSource 不是 Spring 中定義的類,這個類來自 jdk,是 java 對 XML 實體提供的原生支持。這個方法主要還是做了一些准備工作,按照 Spring 方法的命名相關,真正干活的方法一般都是以 “do” 開頭的,這裡的 this.doLoadBeanDefinitions(inputSource, encodedResource.getResource()) 就是真正開始加載 XMl 的入口,該方法源碼如下:
protectedintdoLoadBeanDefinitions(InputSource inputSource, Resource resource)throwsBeanDefinitionStoreException{
  try {

    // 1. 加載xml文件,獲取到對應的Document(包含獲取xml文件的實體解析器和驗證模式)
    Document doc = this.doLoadDocument(inputSource, resource);

    // 2. 解析Document對象,並注冊bean
    return this.registerBeanDefinitions(doc, resource);

  } catch (BeanDefinitionStoreException ex) {
    // 這裡是連環catch,省略
  }
}
方面裡面的邏輯還是很清晰的,第一步獲取 org.w3c.dom.Document 對象,第二步由該對象解析得到 BeanDefinition 對象,並注冊到 IOC 容器中。
3.獲取 XML 文件的實體解析器和驗證模式
this.doLoadDocument(inputSource, resource) 包含了獲取實體解析器、驗證模式,以及 Document 對象的邏輯,源碼如下:
protectedDocumentdoLoadDocument(InputSource inputSource, Resource resource)throwsException{
  return this.documentLoader.loadDocument(
      inputSource,
      this.getEntityResolver(), // 獲取實體解析器
      this.errorHandler,
      this.getValidationModeForResource(resource), // 獲取驗證模式
      this.isNamespaceAware());
}
XML 是半結構化數據,XML 的驗證模式用於保證結構的正確性,常見的驗證模式有 DTD 和 XSD 兩種,獲取驗證模式的源碼如下:
protectedintgetValidationModeForResource(Resource resource){
  int validationModeToUse = this.getValidationMode();
  if (validationModeToUse != VALIDATION_AUTO) {
    // 手動指定了驗證模式
    return validationModeToUse;
  }

  // 沒有指定驗證模式,則自動檢測
  int detectedMode = this.detectValidationMode(resource);
  if (detectedMode != VALIDATION_AUTO) {
    return detectedMode;
  }

  // 檢測驗證模式失敗,默認采用XSD驗證
  return VALIDATION_XSD;
}
上面源碼描述了獲取驗證模式的執行流程,如果沒有手動指定,那麼 Spring 會去自動檢測。對於 XML 文件的解析,SAX 首先會讀取 XML 文件頭聲明,以獲取對應驗證文件地址,並下載對應的文件,如果網絡不正常,則會影響下載過程,這個時候可以通過注冊一個實體解析來實現尋找驗證文件的過程。
4.加載 XML 文件,獲取對應的 Document 對象
獲取對應的驗證模式和解析器,解析去就可以加載 Document 對象了,這裡本質上調用的是 org.springframework.beans.factory.xml.DefaultDocumentLoader 的 loadDocument() 方法,源碼如下:
publicDocumentloadDocument(InputSource inputSource, EntityResolver entityResolver,
               ErrorHandler errorHandler, int validationMode, boolean namespaceAware) throws Exception {

  DocumentBuilderFactory factory = this.createDocumentBuilderFactory(validationMode, namespaceAware);
  if (logger.isDebugEnabled()) {
    logger.debug("Using JAXP provider [" + factory.getClass().getName() + "]");
  }
  DocumentBuilder builder = this.createDocumentBuilder(factory, entityResolver, errorHandler);
  return builder.parse(inputSource);
}
整個過程類似於我們平常解析 XML 文件的流程。
5.由 Document 對象解析並注冊 bean
完成了對 XML 文件的到 Document 對象的解析,我們終於可以解析 Document 對象,並注冊 bean 了,這一過程發生在 this.registerBeanDefinitions(doc, resource) 中,源碼如下:
publicintregisterBeanDefinitions(Document doc, Resource resource)throwsBeanDefinitionStoreException{
  // 使用DefaultBeanDefinitionDocumentReader構造
  BeanDefinitionDocumentReader documentReader = this.createBeanDefinitionDocumentReader();

  // 記錄之前已經注冊的BeanDefinition個數
  int countBefore = this.getRegistry().getBeanDefinitionCount();

  // 加載並注冊bean
  documentReader.registerBeanDefinitions(doc, createReaderContext(resource));

  // 返回本次加載的bean的數量
  return getRegistry().getBeanDefinitionCount() - countBefore;
}
這裡方法的作用是創建對應的 BeanDefinitionDocumentReader,並計算返回了過程中新注冊的 bean 的數量,而具體的注冊過程,則是由 BeanDefinitionDocumentReader 來完成的,具體的實現位於子類 DefaultBeanDefinitionDocumentReader 中:
publicvoidregisterBeanDefinitions(Document doc, XmlReaderContext readerContext){
  this.readerContext = readerContext;
  logger.debug("Loading bean definitions");

  // 獲取文檔的root結點
  Element root = doc.getDocumentElement();

  this.doRegisterBeanDefinitions(root);
}
還是按照 Spring 命名習慣,doRegisterBeanDefinitions 才是真正干活的地方,這也是真正開始解析配置的核心所在:
protectedvoiddoRegisterBeanDefinitions(Element root){
  BeanDefinitionParserDelegate parent = this.delegate;
  this.delegate = this.createDelegate(getReaderContext(), root, parent);

  if (this.delegate.isDefaultNamespace(root)) {
    // 處理profile標簽(其作用類比pom.xml中的profile)
    String profileSpec = root.getAttribute(PROFILE_ATTRIBUTE);
    if (StringUtils.hasText(profileSpec)) {
      String[] specifiedProfiles =
          StringUtils.tokenizeToStringArray(profileSpec, BeanDefinitionParserDelegate.MULTI_VALUE_ATTRIBUTE_DELIMITERS);
      if (!this.getReaderContext().getEnvironment().acceptsProfiles(specifiedProfiles)) {
        if (logger.isInfoEnabled()) {
          logger.info("Skipped XML bean definition file due to specified profiles [" + profileSpec + "] not matching: " + getReaderContext().getResource());
        }
        return;
      }
    }
  }

  // 解析預處理,留給子類實現
  this.preProcessXml(root);

  // 解析並注冊BeanDefinition
  this.parseBeanDefinitions(root, this.delegate);

  // 解析後處理,留給子類實現
  this.postProcessXml(root);

  this.delegate = parent;
}
方法中顯示處理了 標簽,這個屬性在 Spring 中不是很常用,不過在 maven 的 pom.xml 中則很常見,意義也是相同的,就是配置多套環境,從而在部署的時候可以根據具體環境來選擇使用哪一套配置。方法中會先去檢測是否配置了 profile,如果配置了就需要從上下文環境中確認當前激活了哪一套 profile。
方法在解析並注冊 BeanDefinition 前後各設置一個模板方法,留給子類擴展實現,而在 this.parseBeanDefinitions(root, this.delegate) 中執行解析和注冊邏輯:
protectedvoidparseBeanDefinitions(Element root, BeanDefinitionParserDelegate delegate){
  if (delegate.isDefaultNamespace(root)) {
    // 解析默認標簽
    NodeList nl = root.getChildNodes();
    for (int i = 0; i < nl.getLength(); i++) {
      Node node = nl.item(i);
      if (node instanceof Element) {
        Element ele = (Element) node;
        if (delegate.isDefaultNamespace(ele)) {
          // 解析默認標簽
          this.parseDefaultElement(ele, delegate);
        } else {
          // 解析自定義標簽
          delegate.parseCustomElement(ele);
        }
      }
    }
  } else {
    // 解析自定義標簽
    delegate.parseCustomElement(root);
  }
}
方法中判斷當前標簽是默認標簽還是自定義標簽,並按照不同的策略去解析,這是一個復雜的過程,後面用文章進行針對性講解,這裡不在往下細究。
到這裡我們已經完成了靜態配置到動態 BeanDefinition 的解析,這個時候 bean 的定義已經處於內存中,解析去將是探究如何獲取並使用 bean 的過程。
二. Bean的獲取
在完成了 Bean 的加載過程之後,我們可以調用 beanFactory.getBean("myBean") 方法來獲取目標對象,這裡本質上調用的是 org.springframework.beans.factory.support.AbstractBeanFactory 的 getBean() 方法,源碼如下:
publicObjectgetBean(String name)throwsBeansException{
  return this.doGetBean(name, null, null, false);
}
這裡調用 this.doGetBean(name, null, null, false) 來實現具體邏輯,也符合我們的預期,該方法可以看做是獲取 bean 的整體框架,一個函數完成了整個過程的模塊調度,還是挺復雜的:
protected <T> TdoGetBean(
    final String name, final Class<T> requiredType, final Object[] args, boolean typeCheckOnly) throws BeansException {

  /*
   * 轉化對應的beanName
   *
   * 傳入的參數可能是alias,也可能是FactoryBean,所以需要進行解析,主要包含以下內容:
   * 1. 去除FactoryBean的修飾符“&”
   * 2. 取指定alias對應的最終的name
   */
  final String beanName = this.transformedBeanName(name);

  Object bean;

  /*
   * 檢查緩存或者實例工廠中是否有對應的實例
   *
   * 為什麼會一開始就進行檢查?
   * 因為在創建單例bean的時候會存在依賴注入的情況,而在創建依賴的時候為了避免循環依賴
   * Spring創建bean的原則是不等bean創建完成就會將創建bean的ObjectFactory提前曝光,即將對應的ObjectFactory加入到緩存
   * 一旦下一個bean創建需要依賴上一個bean,則直接使用ObjectFactory
   */
  Object sharedInstance = this.getSingleton(beanName); // 獲取單例
  if (sharedInstance != null && args == null) {
    // 實例已經存在
    if (logger.isDebugEnabled()) {
      if (this.isSingletonCurrentlyInCreation(beanName)) {
        logger.debug("Returning eagerly cached instance of singleton bean '" + beanName + "' that is not fully initialized yet - a consequence of a circular reference");
      } else {
        logger.debug("Returning cached instance of singleton bean '" + beanName + "'");
      }
    }
    // 返回對應的實例
    bean = this.getObjectForBeanInstance(sharedInstance, name, beanName, null);
  } else {
    // 單例實例不存在
    if (this.isPrototypeCurrentlyInCreation(beanName)) {
      /*
       * 只有在單例模式下才會嘗試解決循環依賴問題
       * 對於原型模式,如果存在循環依賴,也就是滿足this.isPrototypeCurrentlyInCreation(beanName),拋出異常
       */
      throw new BeanCurrentlyInCreationException(beanName);
    }

    BeanFactory parentBeanFactory = this.getParentBeanFactory();
    if (parentBeanFactory != null && !this.containsBeanDefinition(beanName)) {
      // 如果在beanDefinitionMap中(即所有已經加載的類中)不包含目標bean,則嘗試從parentBeanFactory中檢測
      String nameToLookup = this.originalBeanName(name);
      if (args != null) {
        // 遞歸到BeanFactory中尋找
        return (T) parentBeanFactory.getBean(nameToLookup, args);
      } else {
        return parentBeanFactory.getBean(nameToLookup, requiredType);
      }
    }

    // 如果不僅僅是做類型檢查,則創建bean
    if (!typeCheckOnly) {
      this.markBeanAsCreated(beanName);
    }

    try {
      /*
       * 將存儲XML配置的GenericBeanDefinition轉換成RootBeanDefinition
       * 如果指定了beanName是子bean的話,同時會合並父類的相關屬性
       */
      final RootBeanDefinition mbd = this.getMergedLocalBeanDefinition(beanName);
      this.checkMergedBeanDefinition(mbd, beanName, args);

      // 獲取當前bean依賴的bean
      String[] dependsOn = mbd.getDependsOn();
      if (dependsOn != null) {
        // 存在依賴,遞歸實例化依賴的bean
        for (String dep : dependsOn) {
          if (this.isDependent(beanName, dep)) {
            throw new BeanCreationException(mbd.getResourceDescription(), beanName, "Circular depends-on relationship between '" + beanName + "' and '" + dep + "'");
          }
          // 緩存依賴調用
          this.registerDependentBean(dep, beanName);
          this.getBean(dep);
        }
      }

      // 實例化依賴的bean後,實例化mbd自身
      if (mbd.isSingleton()) {
        // scope == singleton
        sharedInstance = this.getSingleton(beanName, new ObjectFactory<Object>() {
          @Override
          publicObjectgetObject()throwsBeansException{
            try {
              return createBean(beanName, mbd, args);
            } catch (BeansException ex) {
              // Explicitly remove instance from singleton cache: It might have been put there
              // eagerly by the creation process, to allow for circular reference resolution.
              // Also remove any beans that received a temporary reference to the bean.
              destroySingleton(beanName);
              throw ex;
            }
          }
        });
        bean = this.getObjectForBeanInstance(sharedInstance, name, beanName, mbd);
      } else if (mbd.isPrototype()) {
        // scope == prototype
        Object prototypeInstance;
        try {
          this.beforePrototypeCreation(beanName);
          prototypeInstance = this.createBean(beanName, mbd, args);
        } finally {
          this.afterPrototypeCreation(beanName);
        }
        // 返回對應的實例
        bean = this.getObjectForBeanInstance(prototypeInstance, name, beanName, mbd);
      } else {
        // 其它scope
        String scopeName = mbd.getScope();
        final Scope scope = this.scopes.get(scopeName);
        if (scope == null) {
          throw new IllegalStateException("No Scope registered for scope name '" + scopeName + "'");
        }
        try {
          Object scopedInstance = scope.get(beanName, new ObjectFactory<Object>() {
            @Override
            publicObjectgetObject()throwsBeansException{
              beforePrototypeCreation(beanName);
              try {
                return createBean(beanName, mbd, args);
              } finally {
                afterPrototypeCreation(beanName);
              }
            }
          });
          // 返回對應的實例
          bean = this.getObjectForBeanInstance(scopedInstance, name, beanName, mbd);
        } catch (IllegalStateException ex) {
          throw new BeanCreationException(beanName, "Scope '" + scopeName + "' is not active for the current thread; consider defining a scoped proxy for this bean if you intend to refer to it from a singleton", ex);
        }
      }
    } catch (BeansException ex) {
      cleanupAfterBeanCreationFailure(beanName);
      throw ex;
    }
  }

  // 檢查需要的類型是否符合bean的實際類型,對應getBean時指定的requireType
  if (requiredType != null && bean != null && !requiredType.isAssignableFrom(bean.getClass())) {
    try {
      return this.getTypeConverter().convertIfNecessary(bean, requiredType);
    } catch (TypeMismatchException ex) {
      if (logger.isDebugEnabled()) {
        logger.debug("Failed to convert bean '" + name + "' to required type '" + ClassUtils.getQualifiedName(requiredType) + "'", ex);
      }
      throw new BeanNotOfRequiredTypeException(name, requiredType, bean.getClass());
    }
  }
  return (T) bean;
}
以上就是本文的全部內容,希望對大家的學習有所幫助,也希望大家多多支持。