Spring Boot 集成MyBatis 教程詳解。本站提示廣大學習愛好者:(Spring Boot 集成MyBatis 教程詳解)文章只能為提供參考,不一定能成為您想要的結果。以下是Spring Boot 集成MyBatis 教程詳解正文
Spring Boot是由Pivotal團隊提供的全新框架,其設計目的是用來簡化新Spring應用的初始搭建以及開發過程。該框架使用了特定的方式來進行配置,從而使開發人員不再需要定義樣板化的配置。通過這種方式,Spring Boot致力於在蓬勃發展的快速應用開發領域(rapid application development)成為領導者。
在集成MyBatis前,我們先配置一個druid數據源。
Spring Boot 系列
1.Spring Boot 入門
2.Spring Boot 屬性配置和使用
3.Spring Boot 集成MyBatis
4.Spring Boot 靜態資源處理
5.Spring Boot - 配置排序依賴技巧
Spring Boot 集成druid
druid有很多個配置選項,使用spring Boot 的配置文件可以方便的配置druid。
在application.yml配置文件中寫上:
spring:
datasource:
  name: test
  url: jdbc:mysql://192.168.16.137:3306/test
  username: root
  password:
  # 使用druid數據源
  type: com.alibaba.druid.pool.DruidDataSource
  driver-class-name: com.mysql.jdbc.Driver
  filters: stat
  maxActive: 20
  initialSize: 1
  maxWait: 60000
  minIdle: 1
  timeBetweenEvictionRunsMillis: 60000
  minEvictableIdleTimeMillis: 300000
  validationQuery: select 'x'
  testWhileIdle: true
  testOnBorrow: false
  testOnReturn: false
  poolPreparedStatements: true
  maxOpenPreparedStatements: 20
這裡通過type: com.alibaba.druid.pool.DruidDataSource配置即可!
Spring Boot 集成MyBatis
Spring Boot 集成MyBatis有兩種方式,一種簡單的方式就是使用MyBatis官方提供的:
mybatis-spring-boot-starter
另外一種方式就是仍然用類似mybatis-spring的配置方式,這種方式需要自己寫一些代碼,但是可以很方便的控制MyBatis的各項配置。
一、mybatis-spring-boot-starter方式
在pom.xml中添加依賴:
<dependency>
 <groupId>org.mybatis.spring.boot</groupId>
 <artifactId>mybatis-spring-boot-starter</artifactId>
 <version>1.0.0</version>
</dependency>
mybatis-spring-boot-starter依賴樹如下:
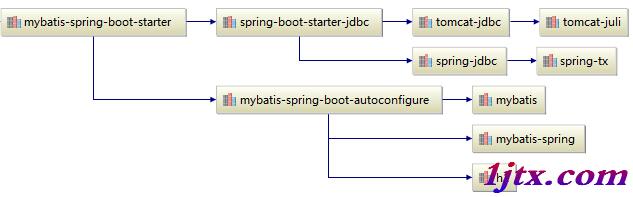
其中mybatis使用的3.3.0版本,可以通過:
<mybatis.version>3.3.0</mybatis.version>屬性修改默認版本。
mybatis-spring使用版本1.2.3,可以通過:
<mybatis-spring.version>1.2.3</mybatis-spring.version>修改默認版本。
在application.yml中增加配置:
mybatis:
mapperLocations: classpath:mapper/*.xml
typeAliasesPackage: tk.mapper.model
除了上面常見的兩項配置,還有:
mybatis.config:mybatis-config.xml配置文件的路徑 mybatis.typeHandlersPackage:掃描typeHandlers的包 mybatis.checkConfigLocation:檢查配置文件是否存在 mybatis.executorType:設置執行模式(SIMPLE, REUSE, BATCH),默認為SIMPLE二、mybatis-spring方式
這種方式和平常的用法比較接近。需要添加mybatis依賴和mybatis-spring依賴。
然後創建一個MyBatisConfig配置類:
/**
 * MyBatis基礎配置
 *
 * @author liuzh
 * @since 2015-12-19 10:11
 */
@Configuration
@EnableTransactionManagement
public class MyBatisConfig implements TransactionManagementConfigurer {
 @Autowired
 DataSource dataSource;
 @Bean(name = "sqlSessionFactory")
 public SqlSessionFactory sqlSessionFactoryBean() {
  SqlSessionFactoryBean bean = new SqlSessionFactoryBean();
  bean.setDataSource(dataSource);
  bean.setTypeAliasesPackage("tk.mybatis.springboot.model");
  //分頁插件
  PageHelper pageHelper = new PageHelper();
  Properties properties = new Properties();
  properties.setProperty("reasonable", "true");
  properties.setProperty("supportMethodsArguments", "true");
  properties.setProperty("returnPageInfo", "check");
  properties.setProperty("params", "count=countSql");
  pageHelper.setProperties(properties);
  //添加插件
  bean.setPlugins(new Interceptor[]{pageHelper});
  //添加XML目錄
  ResourcePatternResolver resolver = new PathMatchingResourcePatternResolver();
  try {
   bean.setMapperLocations(resolver.getResources("classpath:mapper/*.xml"));
   return bean.getObject();
  } catch (Exception e) {
   e.printStackTrace();
   throw new RuntimeException(e);
  }
 }
 @Bean
 public SqlSessionTemplate sqlSessionTemplate(SqlSessionFactory sqlSessionFactory) {
  return new SqlSessionTemplate(sqlSessionFactory);
 }
 @Bean
 @Override
 public PlatformTransactionManager annotationDrivenTransactionManager() {
  return new DataSourceTransactionManager(dataSource);
 }
}
上面代碼創建了一個SqlSessionFactory和一個SqlSessionTemplate,為了支持注解事務,增加了@EnableTransactionManagement注解,並且反回了一個PlatformTransactionManagerBean。
另外應該注意到這個配置中沒有MapperScannerConfigurer,如果我們想要掃描MyBatis的Mapper接口,我們就需要配置這個類,這個配置我們需要單獨放到一個類中。
/**
 * MyBatis掃描接口
 *
 * @author liuzh
 * @since 2015-12-19 14:46
 */
@Configuration
//TODO 注意,由於MapperScannerConfigurer執行的比較早,所以必須有下面的注解
@AutoConfigureAfter(MyBatisConfig.class)
public class MyBatisMapperScannerConfig {
 @Bean
 public MapperScannerConfigurer mapperScannerConfigurer() {
  MapperScannerConfigurer mapperScannerConfigurer = new MapperScannerConfigurer();
  mapperScannerConfigurer.setSqlSessionFactoryBeanName("sqlSessionFactory");
  mapperScannerConfigurer.setBasePackage("tk.mybatis.springboot.mapper");
  return mapperScannerConfigurer;
 }
}
這個配置一定要注意@AutoConfigureAfter(MyBatisConfig.class),必須有這個配置,否則會有異常。原因就是這個類執行的比較早,由於sqlSessionFactory還不存在,後續執行出錯。
做好上面配置以後就可以使用MyBatis了。
關於分頁插件和通用Mapper集成
分頁插件作為插件的例子在上面代碼中有。
通用Mapper配置實際就是配置MapperScannerConfigurer的時候使用tk.mybatis.spring.mapper.MapperScannerConfigurer即可,配置屬性使用Properties。
Spring Boot集成MyBatis的基礎項目
我上傳到github一個采用第二種方式的集成項目,並且集成了分頁插件和通用Mapper,項目包含了簡單的配置和操作,僅作為參考。
項目地址:https://github.com/abel533/MyBatis-Spring-Boot
分頁插件和通用Mapper的相關信息可以通過上面地址找到。
相關參考:
Spring Boot 快速入門指南
Spring Boot 快速入門教程
以上所述是小編給大家介紹的Spring Boot 集成MyBatis 教程詳解,希望對大家有所幫助,如果大家有任何疑問請給我留言,小編會及時回復大家的。在此也非常感謝大家對網站的支持!