Mybatis實戰教程之入門到精曉(經典)。本站提示廣大學習愛好者:(Mybatis實戰教程之入門到精曉(經典))文章只能為提供參考,不一定能成為您想要的結果。以下是Mybatis實戰教程之入門到精曉(經典)正文
甚麼是mybatis
MyBatis是支撐通俗SQL查詢,存儲進程和高等映照的優良耐久層框架。MyBatis清除了簡直一切的JDBC代碼和參數的手工設置和成果集的檢索。MyBatis應用簡略的XML或注解用於設置裝備擺設和原始映照,將接口和Java的POJOs(Plan Old Java Objects,通俗的Java對象)映照成數據庫中的記載.
orm對象的根本思惟
不管是用過的hibernate,mybatis,你都可以法相他們有一個配合點:
1. 從設置裝備擺設文件(平日是XML設置裝備擺設文件中)獲得 sessionfactory.
2. 由sessionfactory 發生 session
3. 在session 中完成對數據的增刪改查和事務提交等.
4. 在用完以後封閉session 。
5. 在java 對象和 數據庫之間有做mapping 的設置裝備擺設文件,也平日是xml 文件。
mybatis實戰教程(mybatis in action)之一:開辟情況搭建
mybatis 的開辟情況搭建,選擇: eclipse j2ee 版本,mysql 5.1 ,jdk 1.7,mybatis3.2.0.jar包。這些軟件對象都可以到各自的官方網站高低載。
起首樹立一個名字為 MyBaits 的 dynamic web project
1. 現階段,你可以直接樹立java 工程,但普通都是開辟web項目,這個系列教程最初也是web的,所以一開端就樹立web工程。
2. 將 mybatis-3.2.0-SNAPSHOT.jar,mysql-connector-java-5.1.22-bin.jar 拷貝到 web工程的lib目次.
3. 創立mysql 測試數據庫和用戶表,留意,這裡采取的是 utf-8 編碼
創立用戶表,並拔出一條測試數據
法式代碼
Create TABLE `user` (
`id` int(11) NOT NULL AUTO_INCREMENT,
`userName` varchar(50) DEFAULT NULL,
`userAge` int(11) DEFAULT NULL,
`userAddress` varchar(200) DEFAULT NULL,
PRIMARY KEY (`id`)
) ENGINE=InnoDB AUTO_INCREMENT=2 DEFAULT CHARSET=utf8;
Insert INTO `user` VALUES ('1', 'summer', '100', 'shanghai,pudong');
到此為止,後期預備任務就完成了。上面開端真正設置裝備擺設mybatis項目了。
1. 在MyBatis 外面創立兩個源碼目次,分離為 src_user,test_src, 用以下方法樹立,鼠標右鍵點擊 JavaResource.
2. 設置mybatis 設置裝備擺設文件:Configuration.xml, 在src_user目次下樹立此文件,內容以下:
法式代碼
< ?xml version="1.0" encoding="UTF-8" ?>
< !DOCTYPE configuration PUBLIC "-//mybatis.org//DTD Config 3.0//EN"
"http://mybatis.org/dtd/mybatis-3-config.dtd">
< configuration>
<typeAliases>
<typeAlias alias="User" type="com.yihaomen.mybatis.model.User"/>
</typeAliases>
<environments default="development">
<environment id="development">
<transactionManager type="JDBC"/>
<dataSource type="POOLED">
<property name="driver" value="com.mysql.jdbc.Driver"/>
<property name="url" value="jdbc:mysql://127.0.0.1:3306/mybatis" />
<property name="username" value="root"/>
<property name="password" value="password"/>
</dataSource>
</environment>
</environments>
<mappers>
<mapper resource="com/yihaomen/mybatis/model/User.xml"/>
</mappers>
< /configuration>
3. 樹立與數據庫對應的 java class,和映照文件.
在src_user下樹立package:com.yihaomen.mybatis.model ,並在這個 package 下樹立 User 類:
法式代碼
package com.yihaomen.mybatis.model;
public class User {
private int id;
private String userName;
private String userAge;
private String userAddress;
public int getId() {
return id;
}
public void setId(int id) {
this.id = id;
}
public String getUserName() {
return userName;
}
public void setUserName(String userName) {
this.userName = userName;
}
public String getUserAge() {
return userAge;
}
public void setUserAge(String userAge) {
this.userAge = userAge;
}
public String getUserAddress() {
return userAddress;
}
public void setUserAddress(String userAddress) {
this.userAddress = userAddress;
}
}
同時樹立這個User 的映照文件 User.xml:
法式代碼
< ?xml version="1.0" encoding="UTF-8" ?>
< !DOCTYPE mapper PUBLIC "-//mybatis.org//DTD Mapper 3.0//EN"
"http://mybatis.org/dtd/mybatis-3-mapper.dtd">
< mapper namespace="com.yihaomen.mybatis.models.UserMapper">
<select id="selectUserByID" parameterType="int" resultType="User">
select * from `user` where id = #{id}
</select>
< /mapper>
上面對這幾個設置裝備擺設文件說明下:
1.Configuration.xml 是 mybatis 用來樹立 sessionFactory 用的,外面重要包括了數據庫銜接相干器械,還有 java 類所對應的別號,好比 <typeAlias alias="User" type="com.yihaomen.mybatis.model.User"/> 這個體名異常主要,你在 詳細的類的映照中,好比User.xml 中 resultType 就是對應這裡的。要堅持分歧,固然這裡的 resultType 還有別的零丁的界說方法,前面再說。
2. Configuration.xml 外面 的<mapper resource="com/yihaomen/mybatis/model/User.xml"/>是包括要映照的類的xml設置裝備擺設文件。
3. 在User.xml 文件外面 重要是界說各類SQL 語句,和這些語句的參數,和要前往的類型等.
開端測試
在test_src 源碼目次下樹立com.yihaomen.test這個package,並樹立測試類Test:
法式代碼
package com.yihaomen.test;
import java.io.Reader;
import org.apache.ibatis.io.Resources;
import org.apache.ibatis.session.SqlSession;
import org.apache.ibatis.session.SqlSessionFactory;
import org.apache.ibatis.session.SqlSessionFactoryBuilder;
import com.yihaomen.mybatis.model.User;
public class Test {
private static SqlSessionFactory sqlSessionFactory;
private static Reader reader;
static{
try{
reader = Resources.getResourceAsReader("Configuration.xml");
sqlSessionFactory = new SqlSessionFactoryBuilder().build(reader);
}catch(Exception e){
e.printStackTrace();
}
}
public static SqlSessionFactory getSession(){
return sqlSessionFactory;
}
public static void main(String[] args) {
SqlSession session = sqlSessionFactory.openSession();
try {
User user = (User) session.selectOne("com.yihaomen.mybatis.models.UserMapper.selectUserByID", 1);
System.out.println(user.getUserAddress());
System.out.println(user.getUserName());
} finally {
session.close();
}
}
}
如今運轉這個法式,是否是獲得查詢成果了。祝賀你,情況搭建設置裝備擺設勝利,接上去第二章,將講述基於接口的操作方法,增刪改查。
全部工程目次構造以下:
mybatis實戰教程(mybatis in action)之二:以接口的方法編程
後面一章,曾經搭建好了eclipse,mybatis,mysql的情況,而且完成了一個簡略的查詢。請留意,這類方法是用SqlSession實例來直接履行已映照的SQL語句:
session.selectOne("com.yihaomen.mybatis.models.UserMapper.selectUserByID", 1)
其實還有更簡略的辦法,並且是更好的辦法,應用公道描寫參數和SQL語句前往值的接口(好比IUserOperation.class),如許如今便可以致此誰人更簡略,更平安的代碼,沒有輕易產生的字符串文字和轉換的毛病.上面是具體進程:
在src_user源碼目次下樹立 com.yihaomen.mybatis.inter 這個包,並樹立接口類 IUserOperation , 內容以下:
法式代碼
package com.yihaomen.mybatis.inter;
import com.yihaomen.mybatis.model.User;
public interface IUserOperation {
public User selectUserByID(int id);
}
請留意,這外面有一個辦法名 selectUserByID 必需與 User.xml 外面設置裝備擺設的 select 的id 對應(<select id="selectUserByID")
重寫測試代碼
public static void main(String[] args) {
SqlSession session = sqlSessionFactory.openSession();
try {
IUserOperation userOperation=session.getMapper(IUserOperation.class);
User user = userOperation.selectUserByID(1);
System.out.println(user.getUserAddress());
System.out.println(user.getUserName());
} finally {
session.close();
}
}
全部工程構造圖如今以下:
運轉這個測試法式,便可以看到成果了。
mybatis實戰教程(mybatis in action)之三:完成數據的增刪改查
後面曾經講到用接口的方法編程。這類方法,要留意的一個處所就是。在User.xml 的設置裝備擺設文件中,mapper namespace="com.yihaomen.mybatis.inter.IUserOperation" ,定名空間異常主要,不克不及有錯,必需與我們界說的package 和 接口分歧。假如紛歧致就會失足,這一章重要在上一講基於接口編程的基本上完成以下工作:
1. 用 mybatis 查詢數據,包含列表
2. 用 mybatis 增長數據
3. 用 mybatis 更新數據.
4. 用 mybatis 刪除數據.
查詢數據,後面曾經講過簡略的,重要看查詢出列表的
查詢出列表,也就是前往list, 在我們這個例子中也就是 List<User> , 這類方法前往數據,須要在User.xml 外面設置裝備擺設前往的類型 resultMap, 留意不是 resultType, 而這個resultMap 所對應的應當是我們本身設置裝備擺設的
法式代碼
< !-- 為了前往list 類型而界說的returnMap -->
<resultMap type="User" id="resultListUser">
<id column="id" property="id" />
<result column="userName" property="userName" />
<result column="userAge" property="userAge" />
<result column="userAddress" property="userAddress" />
</resultMap>
查詢列表的語句在 User.xml
法式代碼
< !-- 前往list 的select 語句,留意 resultMap 的值是指向後面界說好的 -->
<select id="selectUsers" parameterType="string" resultMap="resultListUser">
select * from user where userName like #{userName}
</select>
在 IUserOperation 接口中增長辦法:public List<User> selectUsers(String userName);
如今在 Test 類中做測試
法式代碼
public void getUserList(String userName){
SqlSession session = sqlSessionFactory.openSession();
try {
IUserOperation userOperation=session.getMapper(IUserOperation.class);
List<User> users = userOperation.selectUsers(userName);
for(User user:users){
System.out.println(user.getId()+":"+user.getUserName()+":"+user.getUserAddress());
}
} finally {
session.close();
}
}
如今在main 辦法中可以測試:
法式代碼
public static void main(String[] args) {
Test testUser=new Test();
testUser.getUserList("%");
}
可以看到,成果勝利查詢出來。假如是查詢單個數據的話,用第二講用過的辦法便可以了。
用mybatis 增長數據
在 IUserOperation 接口中增長辦法:public void addUser(User user);
在 User.xml 中設置裝備擺設
法式代碼
< !--履行增長操作的SQL語句。id和parameterType
分離與IUserOperation接口中的addUser辦法的名字和
參數類型分歧。以#{name}的情勢援用Student參數
的name屬性,MyBatis將應用反射讀取Student參數
的此屬性。#{name}中name年夜小寫敏感。援用其他
的gender等屬性與此分歧。seGeneratedKeys設置
為"true"注解要MyBatis獲得由數據庫主動生成的主
鍵;keyProperty="id"指定把獲得到的主鍵值注入
到Student的id屬性-->
<insert id="addUser" parameterType="User"
useGeneratedKeys="true" keyProperty="id">
insert into user(userName,userAge,userAddress)
values(#{userName},#{userAge},#{userAddress})
</insert>
然後在 Test 中寫測試辦法:
法式代碼
/**
* 測試增長,增長後,必需提交事務,不然不會寫入到數據庫.
*/
public void addUser(){
User user=new User();
user.setUserAddress("國民廣場");
user.setUserName("飛鳥");
user.setUserAge(80);
SqlSession session = sqlSessionFactory.openSession();
try {
IUserOperation userOperation=session.getMapper(IUserOperation.class);
userOperation.addUser(user);
session.commit();
System.out.println("以後增長的用戶 id為:"+user.getId());
} finally {
session.close();
}
}
用mybatis 更新數據
辦法相似,先在 IUserOperation 中增長辦法:public void addUser(User user);
然後設置裝備擺設 User.xml
法式代碼
<update id="updateUser" parameterType="User" >
update user set userName=#{userName},userAge=#{userAge},userAddress=#{userAddress} where id=#{id}
</update>
Test 類總的測試辦法以下:
法式代碼
public void updateUser(){
//先獲得用戶,然後修正,提交。
SqlSession session = sqlSessionFactory.openSession();
try {
IUserOperation userOperation=session.getMapper(IUserOperation.class);
User user = userOperation.selectUserByID(4);
user.setUserAddress("本來是魔都的浦東立異園區");
userOperation.updateUser(user);
session.commit();

} finally {
session.close();
}
}
用mybatis 刪除數據
同理,IUserOperation 增長辦法:public void deleteUser(int id);
設置裝備擺設User.xml
法式代碼
<delete id="deleteUser" parameterType="int">
delete from user where id=#{id}
</delete>
然後在Test類中寫測試辦法:
法式代碼
/**
* 刪除數據,刪除必定要 commit.
* @param id
*/
public void deleteUser(int id){
SqlSession session = sqlSessionFactory.openSession();
try {
IUserOperation userOperation=session.getMapper(IUserOperation.class);
userOperation.deleteUser(id);
session.commit();
} finally {
session.close();
}
}
如許,一切增刪改查都完成了,留意在增長,更改,刪除的時刻要挪用session.commit(),如許才會真正對數據庫停止操作,不然是沒有提交的。
到此為止,簡略的單表操作,應當都邑了,接上去的時光了,我會講多表結合查詢,和成果集的拔取。
mybatis實戰教程(mybatis in action)之四:完成聯系關系數據的查詢
有了後面幾章的基本,對一些簡略的運用是可以處置的,但在現實項目中,常常是聯系關系表的查詢,好比最多見到的多對一,一對多等。這些查詢是若何處置的呢,這一講就講這個成績。我們起首創立一個Article 這個表,並初始化數據.
法式代碼
Drop TABLE IF EXISTS `article`;
Create TABLE `article` (
`id` int(11) NOT NULL auto_increment,
`userid` int(11) NOT NULL,
`title` varchar(100) NOT NULL,
`content` text NOT NULL,
PRIMARY KEY (`id`)
) ENGINE=InnoDB AUTO_INCREMENT=5 DEFAULT CHARSET=utf8;

-- ----------------------------
-- 添加幾條測試數據
-- ----------------------------
Insert INTO `article` VALUES ('1', '1', 'test_title', 'test_content');
Insert INTO `article` VALUES ('2', '1', 'test_title_2', 'test_content_2');
Insert INTO `article` VALUES ('3', '1', 'test_title_3', 'test_content_3');
Insert INTO `article` VALUES ('4', '1', 'test_title_4', 'test_content_4');
你應當發明了,這幾個文章對應的userid都是1,所以須要用戶表user外面有id=1的數據。可以修正成知足本身前提的數據.依照orm的規矩,表曾經創立了,那末確定須要一個對象與之對應,所以我們增長一個 Article 的class
法式代碼
package com.yihaomen.mybatis.model;
public class Article {
private int id;
private User user;
private String title;
private String content;
public int getId() {
return id;
}
public void setId(int id) {
this.id = id;
}
public User getUser() {
return user;
}
public void setUser(User user) {
this.user = user;
}
public String getTitle() {
return title;
}
public void setTitle(String title) {
this.title = title;
}
public String getContent() {
return content;
}
public void setContent(String content) {
this.content = content;
}
}
留意一下,文章的用戶是怎樣界說的,是直接界說的一個User對象。而不是int類型。
多對一的完成
場景:在讀取某個用戶揭橥的一切文章。固然照樣須要在User.xml 外面設置裝備擺設 select 語句, 但重點是這個 select 的resultMap 對應甚麼樣的數據呢。這是重點,這裡要引入 association 看界說以下:
法式代碼
< !-- User 結合文章停止查詢 辦法之一的設置裝備擺設 (多對一的方法) -->
<resultMap id="resultUserArticleList" type="Article">
<id property="id" column="aid" />
<result property="title" column="title" />
<result property="content" column="content" />
<association property="user" javaType="User">
<id property="id" column="id" />
<result property="userName" column="userName" />
<result property="userAddress" column="userAddress" />
</association>
</resultMap>
< select id="getUserArticles" parameterType="int" resultMap="resultUserArticleList">
select user.id,user.userName,user.userAddress,article.id aid,article.title,article.content from user,article
where user.id=article.userid and user.id=#{id}
</select>
如許設置裝備擺設以後,便可以了,將select 語句與resultMap 對應的映照聯合起來看,就明確了。用association 來獲得聯系關系的用戶,這是多對一的情形,由於一切的文章都是統一個用戶的。
還有別的一種處置方法,可以復用我們後面曾經界說好的 resultMap ,後面我們界說過一個 resultListUser ,看這第二種辦法若何完成:
法式代碼
<resultMap type="User" id="resultListUser">
<id column="id" property="id" />
<result column="userName" property="userName" />
<result column="userAge" property="userAge" />
<result column="userAddress" property="userAddress" />
</resultMap>
<!-- User 結合文章停止查詢 辦法之二的設置裝備擺設 (多對一的方法) -->
<resultMap id="resultUserArticleList-2" type="Article">
<id property="id" column="aid" />
<result property="title" column="title" />
<result property="content" column="content" />
<association property="user" javaType="User" resultMap="resultListUser" />
</resultMap>
<select id="getUserArticles" parameterType="int" resultMap="resultUserArticleList">
select user.id,user.userName,user.userAddress,article.id aid,article.title,article.content from user,article
where user.id=article.userid and user.id=#{id}
</select>
將 association 中對應的映照自力抽掏出來,可以到達復用的目標。
好了,如今在Test 類中寫測試代碼:
法式代碼
public void getUserArticles(int userid){
SqlSession session = sqlSessionFactory.openSession();
try {
IUserOperation userOperation=session.getMapper(IUserOperation.class);
List<Article> articles = userOperation.getUserArticles(userid);
for(Article article:articles){
System.out.println(article.getTitle()+":"+article.getContent()+
":作者是:"+article.getUser().getUserName()+":地址:"+
article.getUser().getUserAddress());
}
} finally {
session.close();
}
}
漏失落了一點,我們必定要在 IUserOperation 接口中,參加 select 對應的id 稱號雷同的辦法:
public List<Article> getUserArticles(int id);
然後運轉便可以測試。
mybatis實戰教程(mybatis in action)之五:與spring3集成
在這一系列文章中,後面講到純潔用mybatis 銜接數據庫,然後 停止增刪改查,和多表結合查詢的的例子,但現實項目中,平日會用 spring 這個沾合劑來治理 datasource 等。充足應用spring 基於接口的編程,和aop ,ioc 帶來的便利。用spring 來治理 mybatis 與治理hibernate 有許多相似的處所。明天的重點就是數據源治理和 bean的設置裝備擺設。
你可以下載源碼後,比較著看,源代碼沒有帶jar包,太年夜了,空間無限. 有截圖,你可以看到用到哪些jar包,源碼在本文最初.
1. 起首對後面的工程構造做一點轉變,在src_user源代碼目次下樹立文件夾config ,並將本來的 mybatis 設置裝備擺設文件 Configuration.xml 挪動到這個文件夾中, 並在config 文家夾中樹立 spring 設置裝備擺設文件:applicationContext.xml ,這個設置裝備擺設文件裡最重要的設置裝備擺設:
法式代碼
< !--本示例采取DBCP銜接池,應事後把DBCP的jar包復制到工程的lib目次下。 -->
<bean id="dataSource" class="org.apache.commons.dbcp.BasicDataSource">
<property name="driverClassName" value="com.mysql.jdbc.Driver"/>
<property name="url" value="jdbc:mysql://127.0.0.1:3306/mybatis?characterEncoding=utf8"/>
<property name="username" value="root"/>
<property name="password" value="password"/>
</bean>
<bean id="sqlSessionFactory" class="org.mybatis.spring.SqlSessionFactoryBean">
<!--dataSource屬性指定要用到的銜接池-->
<property name="dataSource" ref="dataSource"/>
<!--configLocation屬性指定mybatis的焦點設置裝備擺設文件-->
<property name="configLocation" value="config/Configuration.xml"/>
</bean>
<bean id="userMapper" class="org.mybatis.spring.mapper.MapperFactoryBean">
<!--sqlSessionFactory屬性指定要用到的SqlSessionFactory實例-->
<property name="sqlSessionFactory" ref="sqlSessionFactory" />
<!--mapperInterface屬性指定映照器接口,用於完成此接口並生成映照器對象-->
<property name="mapperInterface" value="com.yihaomen.mybatis.inter.IUserOperation" />
</bean>
[b]這外面的重點就是 org.mybatis.spring.SqlSessionFactoryBean 與 org.mybatis.spring.mapper.MapperFactoryBean[b] 完成了 spring 的接口,並發生對象。具體可以檢查 mybatis-spring 代碼。(http://code.谷歌.com/p/mybatis/),假如僅僅應用,固定形式,如許設置裝備擺設就好。
然後寫測試法式
package com.yihaomen.test;
import java.util.List;
import org.springframework.context.ApplicationContext;
import org.springframework.context.support.ClassPathXmlApplicationContext;
import com.yihaomen.mybatis.inter.IUserOperation;
import com.yihaomen.mybatis.model.Article;
import com.yihaomen.mybatis.model.User;
public class MybatisSprintTest {
private static ApplicationContext ctx;
static
{
ctx = new ClassPathXmlApplicationContext("config/applicationContext.xml");
}
public static void main(String[] args)
{
IUserOperation mapper = (IUserOperation)ctx.getBean("userMapper");
//測試id=1的用戶查詢,依據數據庫中的情形,可以改成你本身的.
System.out.println("獲得用戶id=1的用戶信息");
User user = mapper.selectUserByID(1);
System.out.println(user.getUserAddress());
//獲得文章列表測試
System.out.println("獲得用戶id為1的一切文章列表");
List<Article> articles = mapper.getUserArticles(1);
for(Article article:articles){
System.out.println(article.getContent()+"--"+article.getTitle());
}
}
}
運轉便可獲得響應的成果.
工程圖:
用到的jar包,以下圖:
mybatis實戰教程(mybatis in action)之六:與Spring MVC 的集成
後面幾篇文章曾經講到了mybatis與spring 的集成。但這個時刻,一切的工程還不是web工程,固然我一向是創立的web 工程。明天將直接用mybatis與Spring mvc 的方法集成起來,源碼在本文開頭處下載.重要有以下幾個方面的設置裝備擺設
1. web.xml 設置裝備擺設 spring dispatchservlet ,好比為:mvc-dispatcher
2. mvc-dispatcher-servlet.xml 文件設置裝備擺設
3. spring applicationContext.XML文件設置裝備擺設(與數據庫相干,與mybatis sqlSessionFaction 整合,掃描一切mybatis mapper 文件等.)
4. 編寫controller 類
5. 編寫頁面代碼.
先有個年夜概映像,全部工程圖以下:
1. web.xml 設置裝備擺設 spring dispatchservlet ,好比為:mvc-dispatcher
法式代碼 法式代碼
<context-param>
<param-name>contextConfigLocation</param-name>
<param-value>classpath*:config/applicationContext.xml</param-value>
</context-param>
<listener>
<listener-class>org.springframework.web.context.ContextLoaderListener</listener-class>
</listener>
<listener>
<listener-class>
org.springframework.web.context.ContextCleanupListener</listener-class>
</listener>
<servlet>
<servlet-name>mvc-dispatcher</servlet-name>
<servlet-class>org.springframework.web.servlet.DispatcherServlet</servlet-class>
<load-on-startup>1</load-on-startup>
</servlet>
<servlet-mapping>
<servlet-name>mvc-dispatcher</servlet-name>
<url-pattern>/</url-pattern>
</servlet-mapping>
2. 在web.xml 同目次下設置裝備擺設 mvc-dispatcher-servlet.xml 文件,這個文件名後面部門必需與你在web.xml外面設置裝備擺設的DispatcherServlet 的servlet名字對應.其內容為:
法式代碼
<beans xmlns="http://www.springframework.org/schema/beans"
xmlns:context="http://www.springframework.org/schema/context"
xmlns:mvc="http://www.springframework.org/schema/mvc" xmlns:xsi="http://www.w3.org/2001/XMLSchema-instance"
xsi:schemaLocation="
http://www.springframework.org/schema/beans
http://www.springframework.org/schema/beans/spring-beans-3.0.xsd
http://www.springframework.org/schema/context
http://www.springframework.org/schema/context/spring-context-3.0.xsd
http://www.springframework.org/schema/mvc
http://www.springframework.org/schema/mvc/spring-mvc-3.0.xsd">
<context:component-scan base-package="com.yihaomen.controller" />
<mvc:annotation-driven />
<mvc:resources mapping="/static/**" location="/WEB-INF/static/"/>
<mvc:default-servlet-handler/>
<bean
class="org.springframework.web.servlet.view.InternalResourceViewResolver">
<property name="prefix">
<value>/WEB-INF/pages/</value>
</property>
<property name="suffix">
<value>.jsp</value>
</property>
</bean>
< /beans>
3. 在源碼目次 config 目次下設置裝備擺設 spring 設置裝備擺設文件 applicationContext.xml
法式代碼
< !--本示例采取DBCP銜接池,應事後把DBCP的jar包復制到工程的lib目次下。 -->
<context:property-placeholder location="classpath:/config/database.properties" />
<bean id="dataSource" class="org.apache.commons.dbcp.BasicDataSource"
destroy-method="close" p:driverClassName="com.mysql.jdbc.Driver"
p:url="jdbc:mysql://127.0.0.1:3306/mybatis?characterEncoding=utf8"
p:username="root" p:password="password"
p:maxActive="10" p:maxIdle="10">
</bean>
<bean id="transactionManager" class="org.springframework.jdbc.datasource.DataSourceTransactionManager">
<property name="dataSource" ref="dataSource" />
</bean>
<bean id="sqlSessionFactory" class="org.mybatis.spring.SqlSessionFactoryBean">
<!--dataSource屬性指定要用到的銜接池-->
<property name="dataSource" ref="dataSource"/>
<!--configLocation屬性指定mybatis的焦點設置裝備擺設文件-->
<property name="configLocation" value="classpath:config/Configuration.xml" />
<!-- 一切設置裝備擺設的mapper文件 -->
<property name="mapperLocations" value="classpath*:com/yihaomen/mapper/*.xml" />
</bean>
<bean class="org.mybatis.spring.mapper.MapperScannerConfigurer">
<property name="basePackage" value="com.yihaomen.inter" />
</bean>
不曉得為何,一旦我用了 MapperScannerConfigurer 去掃描一切的mapper 接口時,數據庫設置裝備擺設datasource 就不克不及用讀取database.properties文件了。報錯: Cannot load JDBC driver class '${jdbc.driverClassName}',網上有人說在spring 3.1.1 下用 sqlSessionFactionBean 注入可以處理,但我用 spring 3.1.3 照樣有成績,所以只好把數據庫銜接信息直接設置裝備擺設在了XML 文件外面。
4. 編寫 controller 層
法式代碼
package com.yihaomen.controller;
import java.util.List;
import javax.servlet.http.HttpServletRequest;
import javax.servlet.http.HttpServletResponse;
import org.springframework.beans.factory.annotation.Autowired;
import org.springframework.stereotype.Controller;
import org.springframework.web.bind.annotation.RequestMapping;
import org.springframework.web.servlet.ModelAndView;
import com.yihaomen.inter.IUserOperation;
import com.yihaomen.model.Article;
@Controller
@RequestMapping("/article")
public class UserController {
@Autowired
IUserOperation userMapper;
@RequestMapping("/list")
public ModelAndView listall(HttpServletRequest request,HttpServletResponse response){
List<Article> articles=userMapper.getUserArticles(1);
ModelAndView mav=new ModelAndView("list");
mav.addObject("articles",articles);
return mav;
}
}
5. 頁面文件:
< c:forEach items="${articles}" var="item">
${item.id }--${item.title }--${item.content }<br />
</c:forEach>
運轉成果:
固然還有 mybatis 的Configure.xml 設置裝備擺設文件,與上一講的差不多,獨一分歧的就是不消再設置裝備擺設相似以下的: <mapper resource="com/yihaomen/mapper/User.xml"/> ,一切這些都交給 在設置裝備擺設 sqlSessionFactory 的時刻,由 <property name="mapperLocations" value="classpath*:com/yihaomen/mapper/*.xml" /> 去導入了。
數據庫下載:
下載文件spring mvc 數據庫測試文件
mybatis實戰教程(mybatis in action)之七:完成mybatis分頁(源碼下載)
上一篇文章裡曾經講到了mybatis與spring MVC的集成,而且做了一個列表展現,顯示出一切article 列表,但沒有效到分頁,在現實的項目中,分頁是確定須要的。並且是物理分頁,不是內存分頁。關於物理分頁計劃,分歧的數據庫,有分歧的完成辦法,關於mysql 來講 就是應用 limit offset,pagesize 方法來完成的。oracle 是經由過程rownum 來完成的,假如你熟習相干數據庫的操作,是一樣的很好擴大,本文以mysql 為例子來說述.先看一下後果圖(源代碼在文章最初供給下載):
完成mybatis 物理分頁,一個最簡略的方法是,是在你的mapper的SQL語句中直接寫相似以下方法 :
法式代碼
<select id="getUserArticles" parameterType="Your_params" resultMap="resultUserArticleList">
select user.id,user.userName,user.userAddress,article.id aid,article.title,article.content from user,article
where user.id=article.userid and user.id=#{id} limit #{offset},#{pagesize}
</select>
請留意這裡的 parameterType 是你傳入的參數類,或許map ,外面包括了offset,pagesize ,和其他你須要的參數,用這類方法,確定可以完成分頁。這是簡略的一種方法。但更通用的一種方法是用 mybatis 插件的方法. 參考了網上的許多材料 ,mybatis plugin 方面的材料。寫本身的插件.
法式代碼
package com.yihaomen.util;
import java.lang.reflect.Field;
import java.sql.Connection;
import java.sql.PreparedStatement;
import java.sql.ResultSet;
import java.sql.SQLException;
import java.util.List;
import java.util.Map;
import java.util.Properties;
import javax.xml.bind.PropertyException;
import org.apache.ibatis.builder.xml.dynamic.ForEachSqlNode;
import org.apache.ibatis.executor.ErrorContext;
import org.apache.ibatis.executor.Executor;
import org.apache.ibatis.executor.ExecutorException;
import org.apache.ibatis.executor.statement.BaseStatementHandler;
import org.apache.ibatis.executor.statement.RoutingStatementHandler;
import org.apache.ibatis.executor.statement.StatementHandler;
import org.apache.ibatis.mapping.BoundSql;
import org.apache.ibatis.mapping.MappedStatement;
import org.apache.ibatis.mapping.ParameterMapping;
import org.apache.ibatis.mapping.ParameterMode;
import org.apache.ibatis.plugin.Interceptor;
import org.apache.ibatis.plugin.Intercepts;
import org.apache.ibatis.plugin.Invocation;
import org.apache.ibatis.plugin.Plugin;
import org.apache.ibatis.plugin.Signature;
import org.apache.ibatis.reflection.MetaObject;
import org.apache.ibatis.reflection.property.PropertyTokenizer;
import org.apache.ibatis.session.Configuration;
import org.apache.ibatis.session.ResultHandler;
import org.apache.ibatis.session.RowBounds;
import org.apache.ibatis.type.TypeHandler;
import org.apache.ibatis.type.TypeHandlerRegistry;
@Intercepts({ @Signature(type = StatementHandler.class, method = "prepare", args = { Connection.class }) })
public class PagePlugin implements Interceptor {
private static String dialect = "";
private static String pageSqlId = "";
@SuppressWarnings("unchecked")
public Object intercept(Invocation ivk) throws Throwable {
if (ivk.getTarget() instanceof RoutingStatementHandler) {
RoutingStatementHandler statementHandler = (RoutingStatementHandler) ivk
.getTarget();
BaseStatementHandler delegate = (BaseStatementHandler) ReflectHelper
.getValueByFieldName(statementHandler, "delegate");
MappedStatement mappedStatement = (MappedStatement) ReflectHelper
.getValueByFieldName(delegate, "mappedStatement");
if (mappedStatement.getId().matches(pageSqlId)) {
BoundSql boundSql = delegate.getBoundSql();
Object parameterObject = boundSql.getParameterObject();
if (parameterObject == null) {
throw new NullPointerException("parameterObject error");
} else {
Connection connection = (Connection) ivk.getArgs()[0];
String sql = boundSql.getSql();
String countSql = "select count(0) from (" + sql + ") myCount";
System.out.println("總數sql 語句:"+countSql);
PreparedStatement countStmt = connection
.prepareStatement(countSql);
BoundSql countBS = new BoundSql(
mappedStatement.getConfiguration(), countSql,
boundSql.getParameterMappings(), parameterObject);
setParameters(countStmt, mappedStatement, countBS,
parameterObject);
ResultSet rs = countStmt.executeQuery();
int count = 0;
if (rs.next()) {
count = rs.getInt(1);
}
rs.close();
countStmt.close();
PageInfo page = null;
if (parameterObject instanceof PageInfo) {
page = (PageInfo) parameterObject;
page.setTotalResult(count);
} else if(parameterObject instanceof Map){
Map<String, Object> map = (Map<String, Object>)parameterObject;
page = (PageInfo)map.get("page");
if(page == null)
page = new PageInfo();
page.setTotalResult(count);
}else {
Field pageField = ReflectHelper.getFieldByFieldName(
parameterObject, "page");
if (pageField != null) {
page = (PageInfo) ReflectHelper.getValueByFieldName(
parameterObject, "page");
if (page == null)
page = new PageInfo();
page.setTotalResult(count);
ReflectHelper.setValueByFieldName(parameterObject,
"page", page);
} else {
throw new NoSuchFieldException(parameterObject
.getClass().getName());
}
}
String pageSql = generatePageSql(sql, page);
System.out.println("page sql:"+pageSql);
ReflectHelper.setValueByFieldName(boundSql, "sql", pageSql);
}
}
}
return ivk.proceed();
}
private void setParameters(PreparedStatement ps,
MappedStatement mappedStatement, BoundSql boundSql,
Object parameterObject) throws SQLException {
ErrorContext.instance().activity("setting parameters")
.object(mappedStatement.getParameterMap().getId());
List<ParameterMapping> parameterMappings = boundSql
.getParameterMappings();
if (parameterMappings != null) {
Configuration configuration = mappedStatement.getConfiguration();
TypeHandlerRegistry typeHandlerRegistry = configuration
.getTypeHandlerRegistry();
MetaObject metaObject = parameterObject == null ? null
: configuration.newMetaObject(parameterObject);
for (int i = 0; i < parameterMappings.size(); i++) {
ParameterMapping parameterMapping = parameterMappings.get(i);
if (parameterMapping.getMode() != ParameterMode.OUT) {
Object value;
String propertyName = parameterMapping.getProperty();
PropertyTokenizer prop = new PropertyTokenizer(propertyName);
if (parameterObject == null) {
value = null;
} else if (typeHandlerRegistry
.hasTypeHandler(parameterObject.getClass())) {
value = parameterObject;
} else if (boundSql.hasAdditionalParameter(propertyName)) {
value = boundSql.getAdditionalParameter(propertyName);
} else if (propertyName
.startsWith(ForEachSqlNode.ITEM_PREFIX)
&& boundSql.hasAdditionalParameter(prop.getName())) {
value = boundSql.getAdditionalParameter(prop.getName());
if (value != null) {
value = configuration.newMetaObject(value)
.getValue(
propertyName.substring(prop
.getName().length()));
}
} else {
value = metaObject == null ? null : metaObject
.getValue(propertyName);
}
TypeHandler typeHandler = parameterMapping.getTypeHandler();
if (typeHandler == null) {
throw new ExecutorException(
"There was no TypeHandler found for parameter "
+ propertyName + " of statement "
+ mappedStatement.getId());
}
typeHandler.setParameter(ps, i + 1, value,
parameterMapping.getJdbcType());
}
}
}
}
private String generatePageSql(String sql, PageInfo page) {
if (page != null && (dialect !=null || !dialect.equals(""))) {
StringBuffer pageSql = new StringBuffer();
if ("mysql".equals(dialect)) {
pageSql.append(sql);
pageSql.append(" limit " + page.getCurrentResult() + ","
+ page.getShowCount());
} else if ("oracle".equals(dialect)) {
pageSql.append("select * from (select tmp_tb.*,ROWNUM row_id from (");
pageSql.append(sql);
pageSql.append(") tmp_tb where ROWNUM<=");
pageSql.append(page.getCurrentResult() + page.getShowCount());
pageSql.append(") where row_id>");
pageSql.append(page.getCurrentResult());
}
return pageSql.toString();
} else {
return sql;
}
}
public Object plugin(Object arg0) {
// TODO Auto-generated method stub
return Plugin.wrap(arg0, this);
}
public void setProperties(Properties p) {
dialect = p.getProperty("dialect");
if (dialect ==null || dialect.equals("")) {
try {
throw new PropertyException("dialect property is not found!");
} catch (PropertyException e) {
// TODO Auto-generated catch block
e.printStackTrace();
}
}
pageSqlId = p.getProperty("pageSqlId");
if (dialect ==null || dialect.equals("")) {
try {
throw new PropertyException("pageSqlId property is not found!");
} catch (PropertyException e) {
// TODO Auto-generated catch block
e.printStackTrace();
}
}
}
}
此插件有兩個幫助類:PageInfo,ReflectHelper,你可以下載源代碼參考。
寫了插件以後,固然須要在 mybatis 的設置裝備擺設文件Configuration.xml 裡設置裝備擺設這個插件
法式代碼
<plugins>
<plugin interceptor="com.yihaomen.util.PagePlugin">
<property name="dialect" value="mysql" />
<property name="pageSqlId" value=".*ListPage.*" />
</plugin>
</plugins>
請留意,這個插件界說了一個規矩,也就是在mapper中sql語句的id 必需包括ListPage能力被攔阻。不然將不會分頁處置.
插件寫好了,如今便可以在 spring mvc 中的controller 層中寫一個辦法來測試這個分頁:
法式代碼
@RequestMapping("/pagelist")
public ModelAndView pageList(HttpServletRequest request,HttpServletResponse response){
int currentPage = request.getParameter("page")==null?1:Integer.parseInt(request.getParameter("page"));
int pageSize = 3;
if (currentPage<=0){
currentPage =1;
}
int currentResult = (currentPage-1) * pageSize;
System.out.println(request.getRequestURI());
System.out.println(request.getQueryString());
PageInfo page = new PageInfo();
page.setShowCount(pageSize);
page.setCurrentResult(currentResult);
List<Article> articles=iUserOperation.selectArticleListPage(page,1);
System.out.println(page);
int totalCount = page.getTotalResult();
int lastPage=0;
if (totalCount % pageSize==0){
lastPage = totalCount % pageSize;
}
else{
lastPage =1+ totalCount / pageSize;
}
if (currentPage>=lastPage){
currentPage =lastPage;
}
String pageStr = "";
pageStr=String.format("<a href=\"%s\">上一頁</a> <a href=\"%s\">下一頁</a>",
request.getRequestURI()+"?page="+(currentPage-1),request.getRequestURI()+"?page="+(currentPage+1) );
//制訂視圖,也就是list.jsp
ModelAndView mav=new ModelAndView("list");
mav.addObject("articles",articles);
mav.addObject("pageStr",pageStr);
return mav;
}
然後運轉法式,進入分頁頁面,你便可以看到成果了:
相干jar 包下載,請到下載這裡例子中的jar
http://www.yihaomen.com/article/java/318.htm (文章最初有源代碼下載,外面有jar 包,拷貝到下面源代碼外面所須要的lib 目次下.)
別的,你還得在後面提到的數據庫artilce內外面,多拔出一些記載,分頁後果就更好。
mybatis實戰教程(mybatis in action)之八:mybatis 靜態sql語句
mybatis 的靜態sql語句是基於OGNL表達式的。可以便利的在 sql 語句中完成某些邏輯. 整體說來mybatis 靜態SQL 語句重要有以下幾類:
1. if 語句 (簡略的前提斷定)
2. choose (when,otherwize) ,相當於java 說話中的 switch ,與 jstl 中的choose 很相似.
3. trim (對包括的內容加上 prefix,或許 suffix 等,前綴,後綴)
4. where (重要是用來簡化sql語句中where前提斷定的,能智能的處置 and or ,不用擔憂過剩招致語法毛病)
5. set (重要用於更新時)
6. foreach (在完成 mybatis in 語句查詢時特殊有效)
上面分離引見這幾種處置方法
1. mybaits if 語句處置
法式代碼
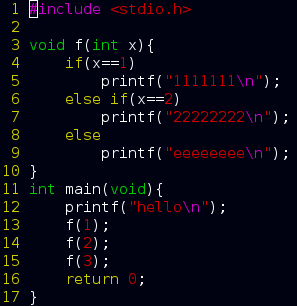
<select id="dynamicIfTest" parameterType="Blog" resultType="Blog">
select * from t_blog where 1 = 1
<if test="title != null">
and title = #{title}
</if>
<if test="content != null">
and content = #{content}
</if>
<if test="owner != null">
and owner = #{owner}
</if>
</select>
這條語句的意思異常簡略,假如你供給了title參數,那末就要知足title=#{title},異樣假如你供給了Content和Owner的時刻,它們也須要知足響應的前提,以後就是前往知足這些前提的一切Blog,這長短常有效的一個功效,以往我們應用其他類型框架或許直接應用JDBC的時刻, 假如我們要到達異樣的選擇後果的時刻,我們就須要拼SQL語句,這是極端費事的,比起來,上述的靜態SQL就要簡略多了
2.2. choose (when,otherwize) ,相當於java 說話中的 switch ,與 jstl 中的choose 很相似
法式代碼
<select id="dyamicChooseTest" parameterType="Blog" resultType="Blog">
select * from t_blog where 1 = 1
<choose>
<when test="title != null">
and title = #{title}
</when>
<when test="content != null">
and content = #{content}
</when>
<otherwise>
and owner = "owner1"
</otherwise>
</choose>
</select>
when元素表現當when中的前提知足的時刻就輸入個中的內容,跟JAVA中的switch後果差不多的是依照前提的次序,當when中有前提知足的時刻,就會跳出choose,即一切的when和otherwise前提中,只要一個會輸入,當一切的我很前提都不知足的時刻就輸入otherwise中的內容。所以上述語句的意思異常簡略, 當title!=null的時刻就輸入and titlte = #{title},不再往下斷定前提,當title為空且content!=null的時刻就輸入and content = #{content},當一切前提都不知足的時刻就輸入otherwise中的內容。
3.trim (對包括的內容加上 prefix,或許 suffix 等,前綴,後綴)
法式代碼
<select id="dynamicTrimTest" parameterType="Blog" resultType="Blog">
select * from t_blog
<trim prefix="where" prefixOverrides="and |or">
<if test="title != null">
title = #{title}
</if>
<if test="content != null">
and content = #{content}
</if>
<if test="owner != null">
or owner = #{owner}
</if>
</trim>
</select>
trim元素的重要功效是可以在本身包括的內容前加上某些前綴,也能夠在厥後加上某些後綴,與之對應的屬性是prefix和suffix;可以把包括內容的首部某些內容籠罩,即疏忽,也能夠把尾部的某些內容籠罩,對應的屬性是prefixOverrides和suffixOverrides;正由於trim有如許的功效,所以我們也能夠異常簡略的應用trim來取代where元素的功效
4. where (重要是用來簡化sql語句中where前提斷定的,能智能的處置 and or 前提
法式代碼
<select id="dynamicWhereTest" parameterType="Blog" resultType="Blog">
select * from t_blog
<where>
<if test="title != null">
title = #{title}
</if>
<if test="content != null">
and content = #{content}
</if>
<if test="owner != null">
and owner = #{owner}
</if>
</where>
</select>
where元素的感化是會在寫入where元素的處所輸入一個where,別的一個利益是你不須要斟酌where元素外面的前提輸入是甚麼模樣的,MyBatis會智能的幫你處置,假如一切的前提都不知足那末MyBatis就會查出一切的記載,假如輸入後是and 開首的,MyBatis會把第一個and疏忽,固然假如是or開首的,MyBatis也會把它疏忽;另外,在where元素中你不須要斟酌空格的成績,MyBatis會智能的幫你加上。像上述例子中,假如title=null, 而content != null,那末輸入的全部語句會是select * from t_blog where content = #{content},而不是select * from t_blog where and content = #{content},由於MyBatis會智能的把首個and 或 or 給疏忽。
5.set (重要用於更新時)
法式代碼
<update id="dynamicSetTest" parameterType="Blog">
update t_blog
<set>
<if test="title != null">
title = #{title},
</if>
<if test="content != null">
content = #{content},
</if>
<if test="owner != null">
owner = #{owner}
</if>
</set>
where id = #{id}
</update>
set元素重要是用在更新操作的時刻,它的重要功效和where元素實際上是差不多的,重要是在包括的語句前輸入一個set,然後假如包括的語句是以逗號停止的話將會把該逗號疏忽,假如set包括的內容為空的話則會失足。有了set元素我們便可以靜態的更新那些修正了的字段
6. foreach (在完成 mybatis in 語句查詢時特殊有效)
foreach的重要用在構建in前提中,它可以在SQL語句中停止迭代一個聚集。foreach元素的屬性重要有item,index,collection,open,separator,close。item表現聚集中每個元素停止迭代時的別號,index指定一個名字,用於表現在迭代進程中,每次迭代到的地位,open表現該語句以甚麼開端,separator表現在每次停止迭代之間以甚麼符號作為分隔符,close表現以甚麼停止,在應用foreach的時刻最症結的也是最輕易失足的就是collection屬性,該屬性是必需指定的,然則在分歧情形下,該屬性的值是紛歧樣的,重要有一下3種情形:
假如傳入的是單參數且參數類型是一個List的時刻,collection屬性值為list
假如傳入的是單參數且參數類型是一個array數組的時刻,collection的屬性值為array
假如傳入的參數是多個的時刻,我們就須要把它們封裝成一個Map了,固然單參數也能夠封裝成map,現實上假如你在傳入參數的時刻,在MyBatis外面也是會把它封裝成一個Map的,map的key就是參數名,所以這個時刻collection屬性值就是傳入的List或array對象在本身封裝的map外面的key
1.1.單參數List的類型
法式代碼
<select id="dynamicForeachTest" resultType="Blog">
select * from t_blog where id in
<foreach collection="list" index="index" item="item" open="(" separator="," close=")">
#{item}
</foreach>
</select>
上述collection的值為list,對應的Mapper是如許的
法式代碼
public List<Blog> dynamicForeachTest(List<Integer> ids);
測試代碼
@Test
public void dynamicForeachTest() {
SqlSession session = Util.getSqlSessionFactory().openSession();
BlogMapper blogMapper = session.getMapper(BlogMapper.class);
List<Integer> ids = new ArrayList<Integer>();
ids.add(1);
ids.add(3);
ids.add(6);
List<Blog> blogs = blogMapper.dynamicForeachTest(ids);
for (Blog blog : blogs)
System.out.println(blog);
session.close();
}
2.數組類型的參數
法式代碼
<select id="dynamicForeach2Test" resultType="Blog">
select * from t_blog where id in
<foreach collection="array" index="index" item="item" open="(" separator="," close=")">
#{item}
</foreach>
</select>
對應mapper
法式代碼
public List<Blog> dynamicForeach2Test(int[] ids);
3. Map 類型的參數
法式代碼
<select id="dynamicForeach3Test" resultType="Blog">
select * from t_blog where title like "%"#{title}"%" and id in
<foreach collection="ids" index="index" item="item" open="(" separator="," close=")">
#{item}
</foreach>
</select>
mapper 應當是如許的接口:
法式代碼
public List<Blog> dynamicForeach3Test(Map<String, Object> params);
經由過程以上辦法,就可以完成普通的mybatis 的 靜態SQL 語句.最經常使用的就是 if where foreach這幾個,必定要重點控制.
mybatis實戰教程(mybatis in action)之九:mybatis 代碼生成對象的應用
mybatis 運用法式,須要年夜量的設置裝備擺設文件,關於一個成百上千的數據庫表來講,完整手工設置裝備擺設,這是一個很恐懼的任務量. 所以mybatis 官方也推出了一個mybatis代碼生成對象的jar包. 明天花了一點時光,依照 mybatis generator 的doc 文檔參考,初步設置裝備擺設出了一個可使用的版本,我把源代碼也供給下載,mybatis 代碼生成對象,重要有一下功效:
1.生成pojo 與 數據庫構造對應
2.假如有主鍵,能婚配主鍵
3.假如沒有主鍵,可以用其他字段去婚配
4.靜態select,update,delete 辦法
5.主動生成接口(也就是之前的dao層)
6.主動生成sql mapper,增刪改查各類語句設置裝備擺設,包含靜態where語句設置裝備擺設
7.生成Example 例子供參考
上面引見下具體進程
1. 創立測試工程,並設置裝備擺設mybatis代碼生成jar包
下載地址:http://code.谷歌.com/p/mybatis/downloads/list?can=3&q=Product%3DGenerator
mysql 驅動下載:http://dev.mysql.com/downloads/connector/j/
這些jar包,我也會包括在源代碼外面,可以在文章末尾處,下載源代碼,參考。
用 eclipse 樹立一個dynamic web project。
解壓下載後的 mybatis-generator-core-1.3.2-bundle.zip 文件,個中有兩個目次:一個目次是文檔目次docs,重要引見這個代碼生成對象若何應用,另外一個是lib目次,外面的內容重要是jar 包,這裡我們須要 mybatis-generator-core-1.3.2.jar,這個 jar 包. 將它拷貝到我們方才創立的 web工程的 WebContent/WEB-INF/lib 目次下.在這個目次下也放入 mysql 驅動jar包.由於用 mysql 做測試的.
2.在數據庫中創立測試表
在mybatis數據庫中創立 用來測試的category表(假如沒有mybatis這個數據庫,要創立,這是基於後面這個系列文章而寫的,曾經有了mybatis 這個數據庫)
法式代碼
Drop TABLE IF EXISTS `category`;
Create TABLE `category` (
`id` int(11) NOT NULL AUTO_INCREMENT,
`catname` varchar(50) NOT NULL,
`catdescription` varchar(200) DEFAULT NULL,
PRIMARY KEY (`id`)
) ENGINE=InnoDB DEFAULT CHARSET=utf8;
3. 設置裝備擺設mybatis 代碼生成對象的設置裝備擺設文件
在創立的web工程中,創立響應的package 好比 :
com.yihaomen.inter 用來寄存mybatis 接口對象.
com.yihaomen.mapper用來寄存sql mapper對應的映照,sql語句等.
com.yihaomen.model 用來寄存與數據庫對應的model 。
在用mybatis 代碼生成對象之前,這些目次必需先創立好,作為一個好的運用法式,這些目次的創立也是有紀律的。
依據mybatis代碼生成對象文檔,須要一個設置裝備擺設文件,這裡定名為:mbgConfiguration.xml 放在src 目次下. 設置裝備擺設文件內容以下:
法式代碼
< ?xml version="1.0" encoding="UTF-8"?>
< !DOCTYPE generatorConfiguration
PUBLIC "-//mybatis.org//DTD MyBatis Generator Configuration 1.0//EN"
"http://mybatis.org/dtd/mybatis-generator-config_1_0.dtd">
< generatorConfiguration>
<!-- 設置裝備擺設mysql 驅動jar包途徑.用了相對途徑 -->
<classPathEntry location="D:\Work\Java\eclipse\workspace\myBatisGenerator\WebContent\WEB-INF\lib\mysql-connector-java-5.1.22-bin.jar" />
<context id="yihaomen_mysql_tables" targetRuntime="MyBatis3">
<!-- 為了避免生成的代碼中有許多正文,比擬好看,參加上面的設置裝備擺設掌握 -->
<commentGenerator>
<property name="suppressAllComments" value="true" />
<property name="suppressDate" value="true" />
</commentGenerator>
<!-- 正文掌握終了 -->
<!-- 數據庫銜接 -->
<jdbcConnection driverClass="com.mysql.jdbc.Driver"
connectionURL="jdbc:mysql://127.0.0.1:3306/mybatis?characterEncoding=utf8"
userId="root"
password="password">
</jdbcConnection>
<javaTypeResolver >
<property name="forceBigDecimals" value="false" />
</javaTypeResolver>
<!-- 數據表對應的model 層 -->
<javaModelGenerator targetPackage="com.yihaomen.model" targetProject="src">
<property name="enableSubPackages" value="true" />
<property name="trimStrings" value="true" />
</javaModelGenerator>
<!-- sql mapper 影射設置裝備擺設文件 -->
<sqlMapGenerator targetPackage="com.yihaomen.mapper" targetProject="src">
<property name="enableSubPackages" value="true" />
</sqlMapGenerator>
<!-- 在ibatis2 中是dao層,但在mybatis3中,其實就是mapper接口 -->
<javaClientGenerator type="XMLMAPPER" targetPackage="com.yihaomen.inter" targetProject="src">
<property name="enableSubPackages" value="true" />
</javaClientGenerator>
<!-- 要對那些數據表停止生成操作,必需要有一個. -->
<table schema="mybatis" tableName="category" domainObjectName="Category"
enableCountByExample="false" enableUpdateByExample="false"
enableDeleteByExample="false" enableSelectByExample="false"
selectByExampleQueryId="false">
</table>
</context>
< /generatorConfiguration>
用一個main 辦法來測試可否用mybatis 成生成方才創立的`category`表對應的model,sql mapper等外容.
創立一個com.yihaomen.test 的package ,並在此package 上面樹立一個測試的類GenMain:
法式代碼
package com.yihaomen.test;
import java.io.File;
import java.io.IOException;
import java.sql.SQLException;
import java.util.ArrayList;
import java.util.List;
import org.mybatis.generator.api.MyBatisGenerator;
import org.mybatis.generator.config.Configuration;
import org.mybatis.generator.config.xml.ConfigurationParser;
import org.mybatis.generator.exception.InvalidConfigurationException;
import org.mybatis.generator.exception.XMLParserException;
import org.mybatis.generator.internal.DefaultShellCallback;
public class GenMain {
public static void main(String[] args) {
List<String> warnings = new ArrayList<String>();
boolean overwrite = true;
String genCfg = "/mbgConfiguration.xml";
File configFile = new File(GenMain.class.getResource(genCfg).getFile());
ConfigurationParser cp = new ConfigurationParser(warnings);
Configuration config = null;
try {
config = cp.parseConfiguration(configFile);
} catch (IOException e) {
e.printStackTrace();
} catch (XMLParserException e) {
e.printStackTrace();
}
DefaultShellCallback callback = new DefaultShellCallback(overwrite);
MyBatisGenerator myBatisGenerator = null;
try {
myBatisGenerator = new MyBatisGenerator(config, callback, warnings);
} catch (InvalidConfigurationException e) {
e.printStackTrace();
}
try {
myBatisGenerator.generate(null);
} catch (SQLException e) {
e.printStackTrace();
} catch (IOException e) {
e.printStackTrace();
} catch (InterruptedException e) {
e.printStackTrace();
}
}
}
到此為止,eclipse項目工程圖應當以下:
4.運轉測試的main 辦法,生成mybatis 相干代碼
運轉GenMain類裡的main辦法,並刷新 工程,你會發明 各自package 目次下曾經呼應生成了對應的文件,完整相符mybatis 規矩,後果圖以下:
5.留意事項
假如你想生成example 之類的器械,須要在<table></table>外面去失落
法式代碼
enableCountByExample="false" enableUpdateByExample="false"
enableDeleteByExample="false" enableSelectByExample="false"
selectByExampleQueryId="false"
這部門設置裝備擺設,這是生成Example而用的,普通來講對項目沒有效.
別的生成的sql mapper 等,只是對單表的增刪改查,假如你有多表join操作,你便可以手動設置裝備擺設,假如挪用存儲進程,你也須要手工設置裝備擺設. 這時候任務量曾經少許多了。
假如你想用敕令行方法處置,也是可以的.
法式代碼
好比:
java -jar mybatis-generator-core-1.3.2.jar -mbgConfiguration.xm -overwrite
這時候,要用相對途徑才行. 別的mbgConfiguration.xml 設置裝備擺設文件中targetProject 的設置裝備擺設也必需是相對途徑了。
mybatis SqlSessionDaoSupport的應用
後面的系列mybatis 文章,曾經根本講到了mybatis的操作,但都是基於mapper影射操作的,在mybatis 3中這個mapper 接口貌似充任了之前在ibatis 2中的 DAO 層的感化。但現實上,假如有這個mapper接口不克不及完成的任務,或許須要更龐雜的擴大的時刻,你就須要本身的DAO 層. 現實上 mybatis 3 也是支撐DAO 層設計的,相似於ibatis 2 .上面引見下.
起首創立一個com.yihaomen.dao的package.然後在外面分離創立接口UserDAO,和完成該接口的UserDAOImpl
法式代碼
package com.yihaomen.dao;
import java.util.List;
import com.yihaomen.model.Article;
public interface UserDAO {
public List<Article> getUserArticles(int userid);
}
法式代碼
package com.yihaomen.dao;
import java.util.List;
import org.mybatis.spring.support.SqlSessionDaoSupport;
import org.springframework.stereotype.Repository;
import com.yihaomen.model.Article;
@Repository
public class UserDAOImpl extends SqlSessionDaoSupport implements UserDAO {
@Override
public List<Article> getUserArticles(int userid) {
return this.getSqlSession().selectList("com.yihaomen.inter.IUserOperation.getUserArticles",userid);
}
}
履行的SQL 語句采取了定名空間+sql 語句id的方法,前面是參數.
留意繼續了 "SqlSessionDaoSupport" ,應用辦法 getSqlSession() 可以獲得 SqlSessionTemplate ,從而可以履行各類sql語句,相似於hibernatetemplate一樣,至多思緒一樣.
假如與spring 3 mvc 集成要用 autowire的話,在daoimpl 類上 加上注解 “@Repository” ,別的還須要在spring 設置裝備擺設文件中參加<context:component-scan base-package="com.yihaomen.dao" /> 如許在須要挪用的處所,便可以應用autowire主動注入了。
固然,你也能夠按普通法式的思緒,創立一個service 的package, 用service 去挪用 dao層,我這裡就沒有做了,由於比擬簡略,用相似的辦法,也機留意主動注入時,也要設置裝備擺設 <context:component-scan base-package="com.yihaomen.service" /> 等如許的。
在controller層中測試,直接挪用dao層辦法
在controller中參加辦法:
法式代碼
@Autowired
UserDAO userDAO;
.......
@RequestMapping("/daolist")
public ModelAndView listalldao(HttpServletRequest request,HttpServletResponse response){
List<Article> articles=userDAO.getUserArticles(1);
//制訂視圖,也就是list.jsp
ModelAndView mav=new ModelAndView("list");
mav.addObject("articles",articles);
return mav;
}
如許可以獲得異樣的成果,並且知足了普通法式的設計辦法.代碼構造以下:
以上所述是本文給年夜家引見的Mybatis實戰教程之入門到精曉(經典)的相干常識,願望對年夜家有所贊助。