首先得知道什麼是線程?
線程是一組指令的集合,或者是程序的特殊段,它可以在程序裡獨立執行。也可以把它理解為代碼運行的上下文。所以線程基本上是輕量級的進程,它負責在單個程序裡執行多任務。通常由操作系統負責多個線程的調度和執行。


多線程是這樣一種機制,它允許在程序中並發執行多個指令流,每個指令流都稱為一個線程,彼此間互相獨立。線程又稱為輕量級進程,它和進程一樣擁有獨立的執行控制,由操作系統負責調度。


多線程是多任務的特殊形式。通常,有兩種類型的多任務:基於進程和基於線程的多任務。進程本質上是正在執行的程序。

因此,基於進程的多任務就是允許您的計算機同時運行兩個或者更多程序的特性。例如,基於進程的多任務允許您在使用電子制表軟件或者浏覽Internet的同時運行文字處理程序。在基於進程的多任務中,程序是調度程序可以分派的最小代碼單元。


多線程是為了使得多個線程並行的工作以完成多項任務,以提高系統的效率。線程是在同一時間需要完成多項任務的時候被實現的。
線程創建的四種方式:
代碼:
 1 class Mythread extends Thread{
 2     @Override
 3     public void run(){
 4         System.out.println("this :"+this);
 5         System.out.println("Thread.currentThread:"+Thread.currentThread());
 6     }
 7 }
 8 public class practice2 {
 9    public static void main(String[] args){
10        Mythread mythread = new Mythread();
11        mythread.start();
12    }
13 }
運行:

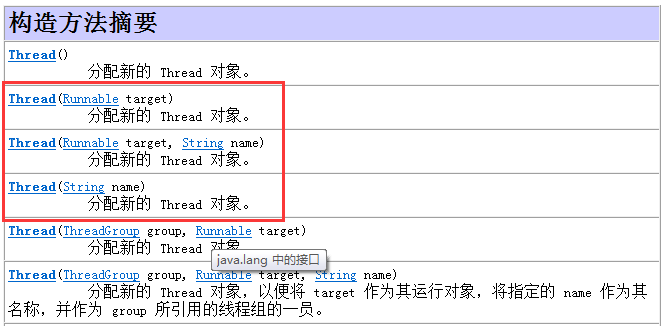
這種方式是在Java中推薦使用的,因為經常使用,所以詳談,在API文檔中是這麼說的:
Runnable 接口應該由那些打算通過某一線程執行其實例的類來實現。類必須定義一個稱為 run 的無參數方法。
設計該接口的目的是為希望在活動時執行代碼的對象提供一個公共協議。例如,Thread 類實現了 Runnable。激活的意思是說某個線程已啟動並且尚未停止。
此外,Runnable 為非 Thread 子類的類提供了一種激活方式。通過實例化某個 Thread 實例並將自身作為運行目標,就可以運行實現 Runnable 的類而無需創建 Thread 的子類。大多數情況下,如果只想重寫 run() 方法,而不重寫其他 Thread 方法,那麼應使用 Runnable 接口。這很重要,因為除非程序員打算修改或增強類的基本行為,否則不應為該類創建子類。
運用:
1 class Test implements Runnable{
2 private int count = 100;
3 @Override
4 public void run(){
5 while(true){
6 synchronized(this){
7 try {
8 Thread.sleep(400); //為了方便查看,這裡給線程睡眠一下,不然時間太短一下就執行完了看不了效果
9 } catch (InterruptedException e) {
10 // TODO Auto-generated catch block
11 e.printStackTrace();
12 }
13 count -=10;
14 if(count<0)break;
15 else{
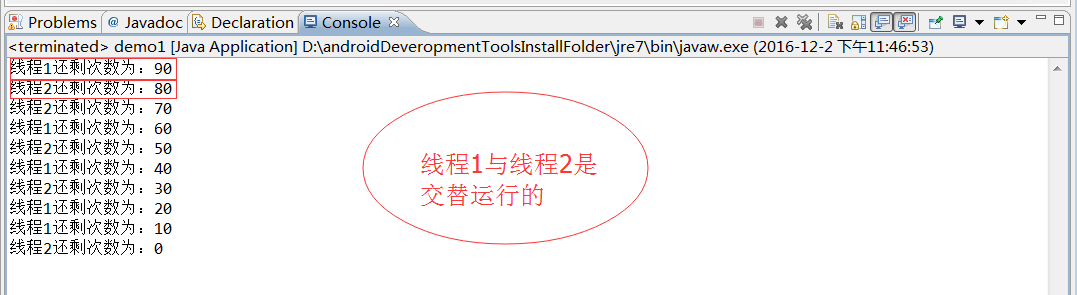
16 System.out.println(Thread.currentThread().getName()+"還剩次數為:"+count);
17 }
18 }
19 }
20 }
21 }
22 public class demo1 {
23 public static void main(String[] args){
24 Test test = new Test();
25 Thread t1 = new Thread(test,"線程1");
26 t1.start();
27 Thread t2 = new Thread(test,"線程2");
28 t2.start();
29 }
30 }
運行結果:
如果把第5行代碼與第6行代碼互換一下位置,如:
 1 class Test implements Runnable{
 2      private int count = 100;
 3      @Override
 4      public void run(){
 5          synchronized(this){
 6              while(true){
 7                  try {
 8                     Thread.sleep(400); //為了方便查看,這裡給線程睡眠一下,不然時間太短一下就執行完了看不了效果
 9                 } catch (InterruptedException e) {
10                     // TODO Auto-generated catch block
11                     e.printStackTrace();
12                 }
13              count -=10;
14              if(count<0)break;
15              else{
16                  System.out.println(Thread.currentThread().getName()+"還剩次數為:"+count);
17              }
18            }
19          }
20      }
21  }
22 public class demo1 {
23    public static void main(String[] args){
24        Test test  = new Test();
25        Thread t1 = new Thread(test,"線程1");
26        t1.start();
27        Thread t2 = new Thread(test,"線程2");
28        t2.start();
29    }
30 }
運行結果:
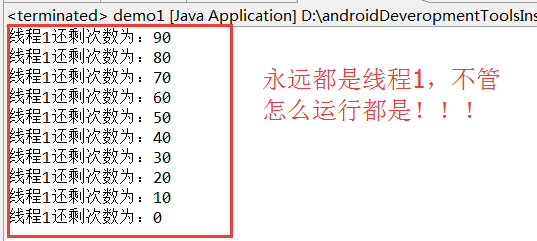
解析:
因為 用start方法來啟動線程,真正實現了多線程運行,這時無需等待run方法體代碼執行完畢而直接繼續執行下面的代碼。通過調用Thread類的 start()方法來啟動一個線程,這時此線程處於就緒(可運行)狀態,並沒有運行,具體什麼時候運行是CPU來決定的,一旦得到spu時間片,就開始執行run()方法,這裡方法 run()稱為線程體,它包含了要執行的這個線程的內容,Run方法運行結束,此線程隨即終止。又因為我們加了synchronized()同步鎖,線程要依次執行,就緒狀態的要排隊等在synchronized的前面,如圖:

因為實現Runable的接口類並不是Thread的對象,並不能開啟線程,只能在創建線程的時候把這個實現類作為參數傳遞過去,在線程內部就會判斷傳進去的target(該實現類)是否為空,不為空的話說才去調用實現類的裡面的run方法,所說就必須要把接口實現類傳遞給Thread才能開啟線程。
釋例代碼:
 1 //test
 2 class Test implements Runnable{
 3     public void run(){
 4         System.out.println("Thread.currentThread:"+Thread.currentThread());
 5         System.out.println("this :"+this);
 6     }
 7 }
 8 public class practice1 {
 9     public static void main(String[] args){
10     //create test instance
11     Test test = new Test();
12     //創建一個線程對象
13     Thread t = new Thread(test,"線程1");
14     //開啟線程
15     t.start();
16     }
17 }
運行結果:

很顯然:當前的this指的是test這個對象,而Thread.currentThread()指的是t這個線程對象,並且再想想, .currentThread()這個方法是個靜態方法,類方法也不可能是this對象調用的,因為它們都不屬於同一類。
知識點:
1、如果是一個非靜態的函數,同步函數的鎖對象就是調用方法的對象(this對象),如果是一個靜態函數同步函數的鎖對象是當前函數所屬類的字節碼文件(.Class對象)
2、同步鎖的鎖定的對象全局必須是唯一的,不然添加鎖就沒意義。
代碼如下:
1 /**
2 * 思路:
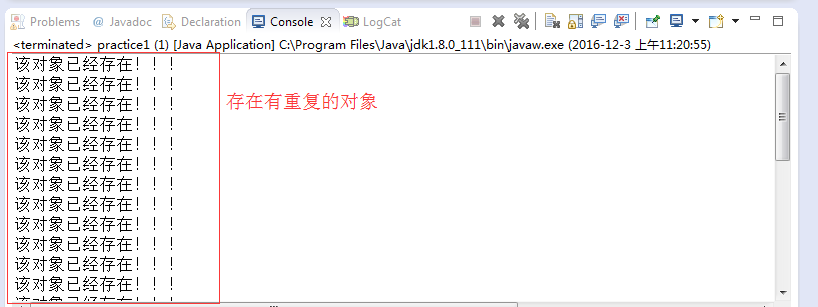
3 * 創建三個線程,count = 5000,來執行count-=10;把每次的結果都存在arrayList的可變列表中,每次進來都判斷是否已經慧慧,如
4 * 果存在就打印"該對象已經存在",如果沒有count到零時就正常退出。注意:程序有可能(極少)拋出異常,還不完善,但不影響結果!!僅作測試用!
5 */
6 import java.util.ArrayList;
7 //驗證同步函數與靜態函數的鎖對象
8 class Test implements Runnable{
9 private static int count = 5000;
10 //創建一個可變的列表,將count的值每次都加入,每次相加前都判斷,有重復的就終止程序!!
11 static ArrayList arrayList = new ArrayList();
12 static boolean flag = false; //等於零時就退出
13 public void run(){
14 while(true){
15 show();
16 synchronized(this){
17 if(arrayList.indexOf(new Integer(count))!=-1){
18 System.out.println("該對象已經存在!!!");
19 }
20 if(flag)return;
21 if(count==0){
22 flag = true;
23 return;
24 }
25 arrayList.add(new Integer(count));
26 count -= 10;
27 }
28 }
29 }
30 public synchronized void show(){ //同步函數
31 if(arrayList.indexOf(new Integer(count))!=-1){
32 System.out.println("該對象已經存在!!!");
33 }
34 if(flag)return;
35 if(count==0){
36 flag = true;
37 }
38 arrayList.add(new Integer(count));
39 count -= 10;
40 }
41 }
42 public class practice1 {
43 public static void main(String[] args){
44 //create test instance
45 Test test = new Test();
46 //創建一個線程對象
47 Thread t1 = new Thread(test,"線程1");
48 //開啟線程
49 t1.start();
50 //同上
51 Thread t2 = new Thread(test,"線程2");
52 t2.start();
53 Thread t3 = new Thread(test,"線程3");
54 t3.start();
55 }
56 }
不管運行多少遍,永遠都沒有重復的元素,如:
將30行的代碼改成public synchronized static void show(){ 如下:
1 public synchronized static void show(){ //同步函數
運行:
說明此時線程不是同步的了,鎖的並不是this這個對象,將16行的代碼改成:synchronized(Test.class){ 如:
synchronized(Test.class){ //synchronized(this.getClass){ // 也可以這樣獲取當前的.class類對象,
運行了好:
實際上java的每個類被編譯成.class文件的時候,java虛擬機(叫jvm)會自動為這個類生成一個類對象,這個對象保存了這個類的所有信息(成員變量,方法,構造器等),以後這個類要想實例化(也就是創建類的實例或創建類的對象)那麼都要以這個class對象為藍圖(或模版)來創建這個類的實例。例如 class<?> c=Class.forName("com.pojo.User"); c就是User的類對象,而 User u=new User();這個u就是以c為模版創建的,其實就相當於u=c.newInstance();
結論:
如果是一個非靜態的函數,同步函數的鎖對象就是調用方法的對象(this對象),如果是一個靜態函數同步函數的鎖對象是當前函數所屬類的字節碼文件(.Class對象)
因為少用,所以只介紹怎麼用,代碼:
 1 /**
 2  *使用匿名內部類創建 一個線程
 3  */
 4 public class practice2 {
 5    public static void main(String[] args){
 6       Thread thread = new Thread(){
 7           @Override
 8           public void run(){
 9               System.out.println(Thread.currentThread().getName());
10               System.out.println(this);
11           }
12       };
13       thread.start();
14    }
15 }
運行:

1 public class demo1 {
2    public static void main(String[] args){
3        System.out.println(Thread.currentThread());
4        Thread t = new Thread(); //創建一個線程對象
5        t.start();//開啟當前的子線程
6        System.out.println(t); //打印子線程對象
7    }
8 }
運行:
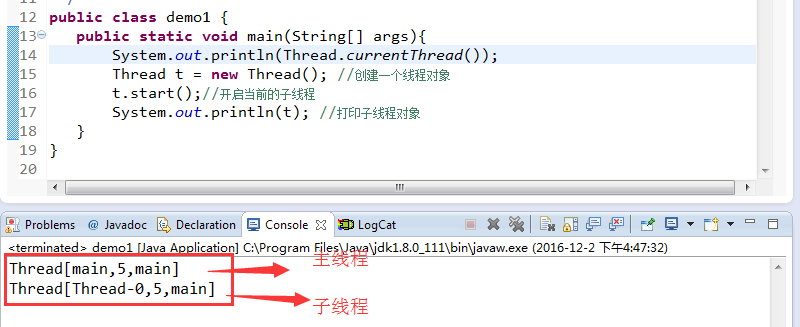
其中:Thread[main,5,main]
第一個參數:表示線程的名稱,如果沒有給定的話是系統默認的,如main、Thread-0(從0開始的都子線程)
第二個參數:表示線程的優先級,默認是5
第三個參數: 表示當前線程是在主線各中輸出的
run方法在默認情況下是這樣實現的:
  @Override
    public void run() {
        if (target != null) {
            target.run();
        }
    }
所以如果你直接Thread thread = new Thread();創建對象,語法上沒有錯的,也是在子線程運行的,但是run()方法是系統默認的,也不是你自己想定義的線程中的方法,那這個線程有什麼意義呢?
Start:
用start方法來啟動線程,真正實現了多線程運行,這時無需等待run方法體代碼執行完畢而直接繼續執行下面的代碼。通過調用Thread類的 start()方法來啟動一個線程,這時此線程處於就緒(可運行)狀態,並沒有運行,一旦得到spu時間片,就開始執行run()方法,這裡方法 run()稱為線程體,它包含了要執行的這個線程的內容,Run方法運行結束,此線程隨即終止。
Run:
run()方法只是類的一個普通方法而已,如果直接調用Run方法,程序中依然只有主線程這一個線程,其程序執行路徑還是只有一條,還是要順序執行,還是要等待run方法體執行完畢後才可繼續執行下面的代碼,這樣就沒有達到寫線程的目的。
總結:調用start方法方可啟動線程,而run方法只是thread的一個普通方法調用,還是在主線程裡執行線程的啟動是比較復雜的,需要為線程分配資源,它的START方法被調用時系統才會為線程分配資源。調用線程的run方法只能算普通的方法調用一樣,得運行完run裡面的代碼整個程序才能往下進行,而如果調用start方法,線程和MAIN方法就會 搶資源,打印的語句會交替出現,
start()的源代碼:
 1    public synchronized void start() {
 2         /**
 3          * This method is not invoked for the main method thread or "system"
 4          * group threads created/set up by the VM. Any new functionality added
 5          * to this method in the future may have to also be added to the VM.
 6          *
 7          * A zero status value corresponds to state "NEW".
 8          */
 9         if (threadStatus != 0)
10             throw new IllegalThreadStateException();
11
12         /* Notify the group that this thread is about to be started
13          * so that it can be added to the group's list of threads
14          * and the group's unstarted count can be decremented. */
15         group.add(this);
16
17         boolean started = false;
18         try {
19             start0();
20             started = true;
21         } finally {
22             try {
23                 if (!started) {
24                     group.threadStartFailed(this);
25                 }
26             } catch (Throwable ignore) {
27                 /* do nothing. If start0 threw a Throwable then
28                   it will be passed up the call stack */
29             }
30         }
31     }
32
33     private native void start0();
線程的運行不是像其他方法那麼簡單的額調用一下就運行的。想要運行一個線程,肯定是要和操作系統打交道,告訴操作系統我要添加一個線程,run方法只是個簡單的方法,裡面就是你要運行的代碼。


start方法裡面會調用一個native方法,這個方法才是真正和操作系統交流的
分兩種,分別是:
1、餓漢模式 2、懶漢模式(這裡只介紹懶漢,因為面試經常問,但不常用,因為線程不安全的,所以這裡說該怎麼改成線程安全的.)
平常寫的懶漢模式代碼是這樣的,然後我們加入三個線程,看看效果,如:
/**
 * 單例設計模式:懶漢模式
 */
class Singleton{
    private static Singleton s = null;
    public static Singleton getInstance(){
        if(s==null){
            s = new Singleton();
        }
        return s;
    }
}
class Custom implements Runnable{
    public void run(){
        Singleton s = Singleton.getInstance();
        System.out.println("Thread.currentThread():"+Thread.currentThread().getName()+"--Singleton:"+s);
    }
}
public class test {
public static void main(String[] args){
       Custom t = new Custom();
       Thread thread1 = new Thread(t,"線程1");
       Thread thread2 = new Thread(t,"線程2");
       Thread thread3 = new Thread(t,"線程3");
       thread1.start();
       thread2.start();
       thread3.start();
   }
}
運行:

所以為了安全起見,將代碼加上synchronized(),如:
 1 /**
 2  * 單例設計模式:懶漢模式
 3  */
 4 class Singleton{
 5     private static Singleton s = null;
 6     public static Singleton getInstance(){
 7         synchronized ("lock") { //加上同步鎖後,就安全了,但是效率變低了
 8          if(s==null){
 9             s = new Singleton();
10         }
11         return s;
12       }
13    }
14 }
15 class Custom implements Runnable{
16     public void run(){
17         Singleton s = Singleton.getInstance();
18         System.out.println("Thread.currentThread():"+Thread.currentThread().getName()+"--Singleton:"+s);
19     }
20 }
21 public class test {
22 public static void main(String[] args){
23        Custom t = new Custom();
24        Thread thread1 = new Thread(t,"線程1");
25        Thread thread2 = new Thread(t,"線程2");
26        Thread thread3 = new Thread(t,"線程3");
27        thread1.start();
28        thread2.start();
29        thread3.start();
30    }
31 }
不管運行多少遍,都是打印同一個地址:

上面代碼雖然可以,但是效率太低,也是面試被經常問到的,為了提高效率,得加個雙重if判斷,以下代碼才是最終版本:
 1 /**
 2  * 單例設計模式:懶漢模式
 3  */
 4 class Singleton{
 5     private static Singleton s = null;
 6     public static Singleton getInstance(){
 7         if(s==null){
 8          synchronized ("lock") { //加上同步鎖後,就安全了,但是效率變低了
 9            if(s==null){
10             s = new Singleton();
11          }
12         }
13       }
14         return s;
15     }
16 }
17 class Custom implements Runnable{
18     public void run(){
19         Singleton s = Singleton.getInstance();
20         System.out.println("Thread.currentThread():"+Thread.currentThread().getName()+"--Singleton:"+s);
21     }
22 }
23 public class test {
24 public static void main(String[] args){
25        Custom t = new Custom();
26        Thread thread1 = new Thread(t,"線程1");
27        Thread thread2 = new Thread(t,"線程2");
28        Thread thread3 = new Thread(t,"線程3");
29        thread1.start();
30        thread2.start();
31        thread3.start();
32    }
33 }
sleep()方法導致了程序暫停執行指定的時間,讓出cpu該其他線程,但是他的監控狀態依然保持者,當指定的時間到了又會自動恢復運行狀態。
在調用sleep()方法的過程中,線程不會釋放對象鎖。
而當調用wait()方法的時候,線程會放棄對象鎖,進入等待此對象的等待鎖定池,只有針對此對象調用notify()方法後本線程才進入對象鎖定池准備
獲取對象鎖進入運行狀態。
1. setPriority( ): 設置線程的優先權;
2. yield( ): 暫停線程的執行,給其它具有相同優先權的線程執行的機會,若此時沒有其它線程執行,則此線程繼續執行。這個函數並不會釋放鎖住的對象。
3. join( ): 等待加入的線程執行完畢才會執行下一個線程。加入的線程wait()後需要通過interrupt( )來喚醒。
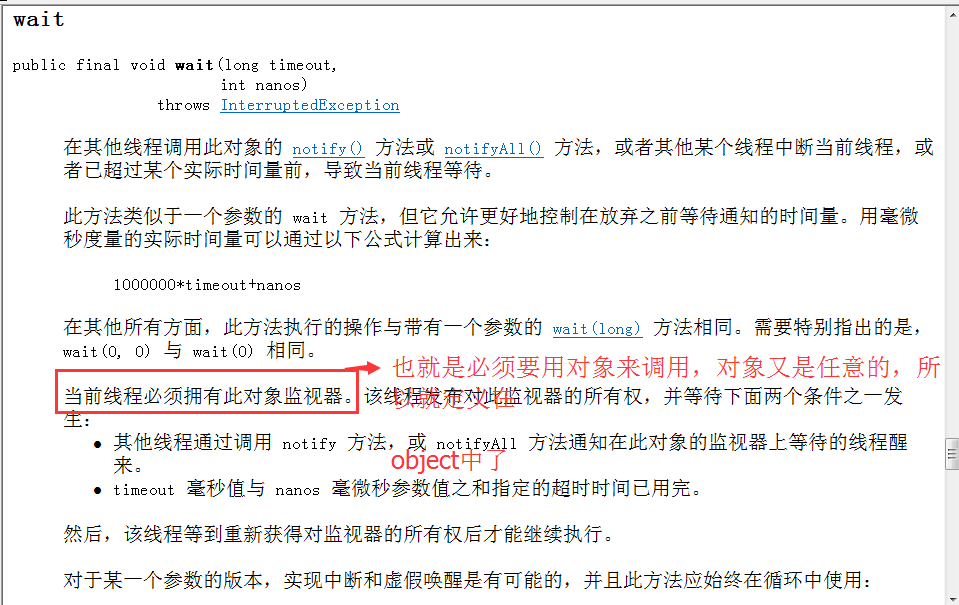
4. wait( ): 類似sleep( ), 不同的是,wait( )會先釋放鎖住的對象,然後再執行等待的動作。注意,這個函數屬於Object類。另外,由於wait( )所等待的對象必須先鎖 住,因此,它只能用在同步化程序段或者同步化方法內,否則,會拋出異常IllegalMonitorStateException.
5.notify();喚醒 隨機喚醒線程池中的一個線程。 notifyAll(); 喚醒所有等待的線程
wait和notify的使用注意點 :
1.wait方法和notify方法是屬性Object對象
2.wait方法和notify方法必須在同步線程中執行
3.wait方法和notify方法必須有鎖對象來調用
因為鎖是任意對象,一個程序中可以有多個同步鎖,a對象的所屬的線程需要wati()/notify是靠a對象來調用的。也就是是說哪個對象的線程等待了,就行用哪個對象來喚醒,其他對象不能喚醒。
不知大家有沒有和我一樣想過這樣的一個問題?假設有兩條線程,如果當前的線程不等待,直接喚醒另一條已經在處於等待狀態的線程,那麼到底會運行哪個線程呢?
還是運行當前的線程,雖然另一條線程被喚醒了,只是表明它處於就緒狀態,但是仍無法獲得obj鎖。直到當前線程wait()後退出synchronized塊,釋放obj鎖後,另一條線程才會執行。
stop方法現在已經過時了。在API中文檔中的是這麼說的:
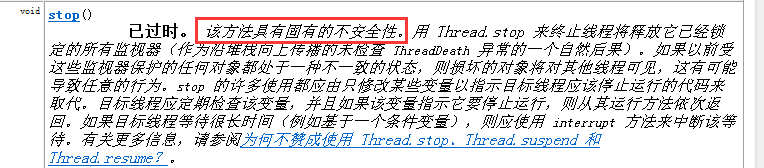
既然stop()方法不能使用了,那如何停止線程?
所以只有一種,run方法結束。
開啟多線程運行,運行代碼通常是循環結構。只要控制住循環,就可以讓run方法結束,也就是線程結束。
注意特殊情況:
當線程處於了凍結狀態(也就是調用了sleep()、wait()後)。就不會讀取到標記。那麼線程就不會結束。
當沒有指定的方式讓凍結的線程恢復到運行狀態是,這時需要對凍結進行清除。
強制讓線程恢復到運行狀態中來。這樣就可以操作標記讓線程結束。
Thread類提供該方法 interrupt()與interrupted(),以下是兩者的區別:
interrupt()是用來設置中斷狀態的。返回true說明中斷狀態被設置了而不是被清除了。我們調用sleep、wait等此類可中斷(throw InterruptedException)方法時,一旦方法拋出InterruptedException,當前調用該方法的線程的中斷狀態就會被jvm自動清除了,就是說我們調用該線程的isInterrupted 方法時是返回false。如果你想保持中斷狀態,可以再次調用interrupt方法設置中斷狀態。這樣做的原因是,java的中斷並不是真正的中斷線程,而只設置標志位(中斷位)來通知用戶。如果你捕獲到中斷異常,說明當前線程已經被中斷,不需要繼續保持中斷位,所以要清除!。
interrupted是靜態方法,返回的是當前線程的中斷狀態。例如,如果當前線程被中斷(沒有拋出中斷異常,否則中斷狀態就會被清除),你調用interrupted方法,第一次會返回true。然後,當前線程的中斷狀態被方法內部清除了。第二次調用時就會返回false。如果你剛開始一直調用isInterrupted,則會一直返回true,除非中間線程的中斷狀態被其他操作清除了。
總結:如果一個線程處於了阻塞狀態(如線程調用了thread.sleep、thread.join、thread.wait、1.5中的condition.await、以及可中斷的通道上的 I/O 操作方法後可進入阻塞狀態),則在線程在檢查中斷標示時如果發現中斷標示為true,則會在這些阻塞方法(sleep、join、wait、1.5中的condition.await及可中斷的通道上的 I/O 操作方法)調用處拋出InterruptedException異常,並且在拋出異常後立即將線程的中斷標示位清除,即重新設置為false。拋出異常是為了線程從阻塞狀態醒過來,並在結束線程前讓程序員有足夠的時間來處理中斷請求。
查看API文檔介紹:
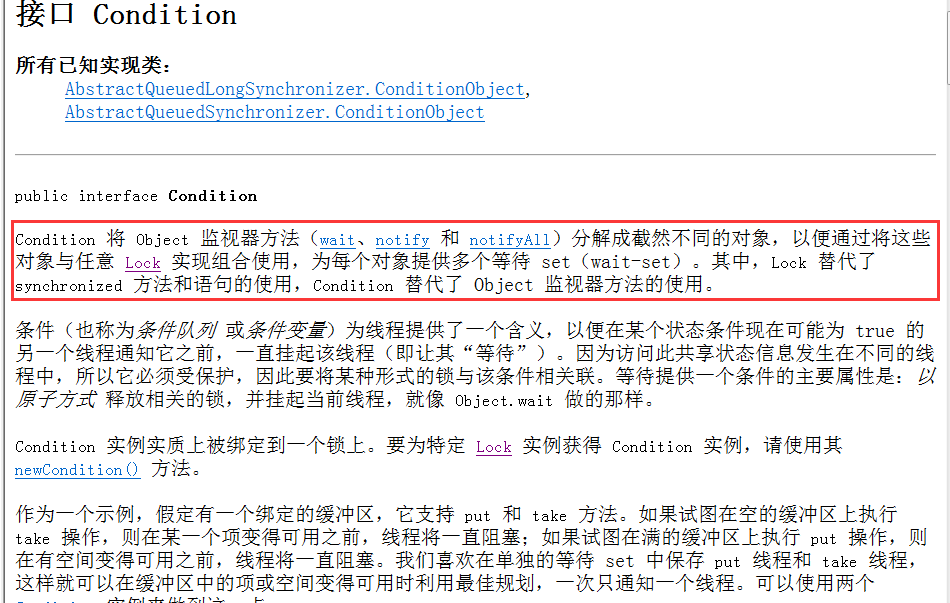
 1 /*
 2 JDK1.5 中提供了多線程升級解決方案。
 3 將同步Synchronized替換成現實Lock操作。
 4 將Object中的wait,notify notifyAll,替換了Condition對象。
 5 該對象可以Lock鎖 進行獲取。
 6 該示例中,實現了本方只喚醒對方操作。
 7
 8 Lock:替代了Synchronized
 9     lock
10     unlock
11
12 創建一個Condition對象
13 lock.newCondition()     //其中lock是Lock的實例
14
15 Condition:替代了Object wait notify notifyAll
16     await();     等待
17     signal();    喚醒
18     signalAll();  全部喚醒
19
20     好處:在多個線程訪問同一個資源的情況下,如多個生產者與消費者,如果是使用notifyAll的話就全部喚醒了在當前等待的線程,
21     這樣雖然可以,但是效率過低,Condition可以直接喚醒任何一方
22 */