James是Apache的一個開源項目,純Java實現,Apache james Server作為一個企業級的郵件服務器,對SMTP,POP3,IMAP等郵件協議提供完整的支持。
1.搭建James服務器
Apache James 的官方網站為:http://james.apache.org/,當前 Server 的最新版為 2.3.2版. 安裝非常簡單,下載後得到apache-james-2.3.2.zip 文件,解壓後即可。
在James的bin目錄中包含兩個重要文件run.bat和run.sh,運行run.bat就可以輕松地啟動James郵件服務器。
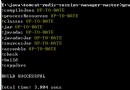
啟動後能在控制台看到如下信息,說明啟動成功:
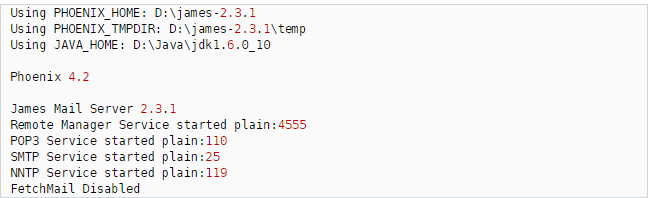
說明:啟動前請確保您的JDK環境變量如JAVA_HOME等已經設置好;James 啟動時,其SMTP 服務默認在 25 端口啟動,POP3 服務默認在 110 端口啟動, NNTP 服務默認在 119 端口啟動, 請確保這些端口未被占用。比如本系統下就已經安裝了Microsoft的 SMTP 服務,造成 James無法啟動,解決方法為:開始--->設置--->控制面板--->管理工具--->服務,打開後找到“Simple Mail Transport Protocol(SMTP)”服務項,關閉即可。
5。配置服務
服務器啟動後會在本機配置一個默認的服務,這可以用來在本機上本服務器范圍內收發郵件,但是郵件發不到163等外網郵箱。我們這裡關注的重點就是配置一個能發到外網如163這樣的郵箱的郵件,這樣才有價值。不過由於本人是在本機上測試,一時不能獲取公司的域名參數,無法測試接收外網郵箱(如163)的郵件,見晾,不過做法都是一樣的,至少我們可以向外網郵箱發送郵件,局域網內可以收、發郵件。
打開D:\james-2.3.1\apps\james\SAR-INF 下的 config.xml 文件,初次啟動James之前,不會有這個文件,只有當James服務啟動一次之後才自動構件該文件。
<postmaster>Postmaster@localhost</postmaster>
……
<servernames autodetect="true" autodetectIP="true">
    <servername>localhost</servername>
</servernames>
把localhost該成你自己想要的郵箱域名, 把自動探測IP屬性設置為“false”這裡假設改成 mail.com ,那麼他的郵件地址就是 mail.com修改結果如下:
<postmaster>Postmaster@zhaipuhong.com</postmaster>
……
<servernames autodetect="false" autodetectIP="false">
    <servername>mail.com</servername>
</servernames>
3.創建郵件帳號
使用telnet連接James的Remote Administration Tool。打開一個控制台窗口,輸入telnet smtp.163.com
JAMES Remote Administration Tool 2.3.1
Please enter your login and password
Login id:
root
Password:
root
Welcome root. HELP for a list of commands
創建新用戶的命令是:adduser username password
提示用戶可以通過“HELP”命令來查詢suo9支持的所有命令
help display this help 顯示幫助信息
listusers display existing accounts 顯示現有賬戶
countusers display the number of existing accounts 顯示現有賬戶數量
adduser [username] [password] add a new user 添加一個新用戶
verify [username] verify if specified user exist 核實指定用戶是否存在
deluser [username] delete existing user 刪除存在的用戶
setpassword [username] [password] sets a user's password 設置用戶密碼
setalias [user] [alias] locally forwards all email for 'user' to 'alias' 設置郵箱別名
showalias [username] shows a user's current email alias 顯示別名
unsetalias [user] unsets an alias for 'user' 刪除用戶別名
setforwarding [username] [emailaddress] forwards a user's email to another email address 轉發用戶的電子郵件地址到另一個電子郵件地址
showforwarding [username] shows a user's current email forwarding 顯示用戶的當前郵件轉發
unsetforwarding [username] emoves a forward 刪除轉發
user [repositoryname] change to another user repository 改變另一個用戶庫
shutdown kills the current JVM (convenient when James is run as a daemon)關閉當前的服務
quit close connection 關閉連接
示例:
public class Mail {
  private String mailServer,from,to,mailSubject,mailContent;
  private String username,password;
  public Mail(){
      //設置郵件信息
      //進行認證登錄的用戶名
      username="123@163.com";
      //認證密碼
      password="456";
      //認證的郵箱對應的郵件服務器
      mailServer="smtp.163.com";
      //發件人信息
      from="123@163.com";
      //收件人信息
      to="xxx@126.com";
      //郵件標題
      mailSubject="嘿嘿";
      //郵件內容
      mailContent="天不錯!";
  }
  //設置郵件服務器
  @SuppressWarnings("static-access")
public  void send(){
      Properties prop=System.getProperties();
      //指定郵件server
      prop.put("mail.smtp.host", mailServer);
      //是否開啟認證
      prop.put("mail.smtp.auth", "true");
      //smtp協議的
      prop.put("mail.smtp.port", "25");
      //產生Session服務
      EmailAuthenticator mailauth=new EmailAuthenticator(username, password);
      Session mailSession=Session.getInstance(prop,(Authenticator)mailauth);
       try {
           //封裝Message對象
           Message message=new MimeMessage(mailSession);

           message.setFrom(new InternetAddress(from)); //發件人
           message.setRecipient(Message.RecipientType.TO, new InternetAddress(to));//收件人
           message.setSubject(mailSubject);
           //設置內容(設置字符集處理亂碼問題)
           message.setContent(mailContent,"text/html;charset=gbk");
           message.setSentDate(new Date());
           //創建Transport實例,發送郵件
           Transport tran=mailSession.getTransport("smtp");
           tran.send(message,message.getAllRecipients());
           tran.close();

        } catch (Exception e) {
            e.printStackTrace();
        }
  }
}
使用Spring發送電子郵件
創建SimpleMailMessage
SimpleMailMessage是MailMessage接口的實現類之一。
import org.springframework.mail.MailSender;
import org.springframework.mail.SimpleMailMessage;

public class Mail {
    private MailSender mailSender;
    public void setMailSender(MailSender mailSender) {
        this.mailSender = mailSender;
    }
    public void send(){
        SimpleMailMessage message = new SimpleMailMessage();
        message.setFrom("dzw@mail.com");
        message.setTo("tom");
        message.setSubject("問好");
        message.setText("好久不見,最近好嗎?");
        mailSender.send(message);
    }
}
applicationContext.xml
<bean id="mailSender" class="org.springframework.mail.javamail.JavaMailSenderImpl">
        <property name="host" value="192.168.15.22"></property><!-- 服務器 -->
        <property name="port" value="25"></property><!-- 端口 -->
        <property name="username" value="dzw@mail.com"></property><!-- 用戶名 -->
        <property name="password" value="dzw"></property><!-- 密碼 -->
        <property name="protocol" value="smtp" ></property><!-- 協議 -->
        <property name="defaultEncoding" value="utf-8"></property><!-- 默認編碼 -->
        <property name="javaMailProperties">
            <props>
                <!-- 設置SMTP服務器需要用戶驗證  -->
                <prop key="mail.smtp.auth">true</prop>
            </props>
        </property>
    </bean>

    <bean id="mail" class="cn.bdqn.Mail">
        <property name="mailSender" ref="mailSender"></property>
    </bean>

    <bean id="mailWithAttachment" class="cn.bdqn.MailWithAttachment">
        <property name="mailSender" ref="mailSender"></property>
    </bean>

    <bean id="mailWithHtml" class="cn.bdqn.MailWithHTML">
        <property name="mailSender" ref="mailSender"></property>
    </bean>

</beans>
發送HTML格式的電子郵件
HTMl格式的文本屬於MIME類型,需要MimeMessageHelper類的支持
public class MailWithHTML {
private JavaMailSender mailSender; //必須使用 JavaMailSender
public void setMailSender(JavaMailSender mailSender) {
this.mailSender = mailSender;
}
public void send() throws MessagingException,IOException{
MimeMessage mimeMessage = mailSender.createMimeMessage();
MimeMessageHelper helper = new MimeMessageHelper(mimeMessage, true, "UTF-8");
helper.setFrom("dzw@mail.com");
helper.setTo("tom");
helper.setSubject("歡迎來到員工社區");
StringBuffer sb = new StringBuffer();
sb.append("<html><head>");
sb.append("<meta http-equiv=\"content-type\" content=\"text/html;charset=utf-8\">");
sb.append("<head><body>");
sb.append("<font color='blue' size='5' face='Arial'>");
sb.append("尊敬的jerry您好:</font><br/><br/>");
sb.append(" ");
sb.append("<font color='black' size='4' face='Arial'>");
sb.append("恭喜您在員工社區注冊賬號成功!請妥善保管您的賬號," +
"如果登錄時忘記密碼,可以在網站登錄頁找回。<br/>");
sb.append("<br/><br/>系統管理員</font>");
//增加內嵌圖片設置
sb.append("<br/><img src=\"cid:photo\"></img>");
sb.append("</body></html>");
helper.setText(sb.toString(),true);
//增加內嵌文件
ClassPathResource file = new ClassPathResource("/cn/bdqn/attachfiles/Quartz.png");
helper.addInline("photo", file);
mailSender.send(mimeMessage);
}
}
通過setText()設置html參數為true,郵件內容就可以顯示HTML頁面。在HTML頁面中,需要設置content屬性,通過“text/html;charset=utf-8”
public class MailWithAttachment {
    private JavaMailSender mailSender; //必須使用 JavaMailSender
    public void setMailSender(JavaMailSender mailSender) {
        this.mailSender = mailSender;
    }

    public void send() throws MessagingException,IOException{
        MimeMessage mimeMessage = mailSender.createMimeMessage();
        MimeMessageHelper helper = new MimeMessageHelper(mimeMessage, true, "UTF-8");
        helper.setFrom("dzw@mail.com");
        helper.setTo("tom");

        helper.setSubject("問好");
        helper.setText("好久不見,最近好嗎?");
        //添加附件1
        ClassPathResource file1 = new ClassPathResource(
                                        "/cn/bdqn/attachfiles/test.doc");
        helper.addAttachment(file1.getFilename(), file1.getFile());
        //添加附件2:附件的文件名為中文時,需要對文件名進行編碼轉換,解決亂碼問題
        ClassPathResource file2 = new ClassPathResource(
                                        "/cn/bdqn/attachfiles/附件測試文件.doc");
        helper.addAttachment(MimeUtility.encodeWord(file2.getFilename()),file2.getFile());
        mailSender.send(mimeMessage);
    }
}
測試類
public class MailTest {
    public static void main(String[] args){
        ApplicationContext context = new ClassPathXmlApplicationContext("applicationContext.xml");
        /*測試簡單郵件*/
        Mail mail = (Mail)context.getBean("mail");
        mail.send();

        /*測試帶附件的郵件*/
        try{
            MailWithAttachment mailWithAttach = (MailWithAttachment)context.getBean("mailWithAttachment");
            mailWithAttach.send();
        }catch(Exception e){
            System.out.print(e.toString());
        }

        /*測試HTML格式的郵件*/
        try{
            MailWithHTML mailWithHtml = (MailWithHTML)context.getBean("mailWithHtml");
            mailWithHtml.send();
        }catch(Exception e){
            System.out.print(e.toString());
        }
    }
}