Spring MVC屬於SpringFrameWork的後續產品,它提供了構建 Web 應用程序的全功能 MVC 模塊,與Struts2一樣是一種優秀MVC框架,不同的是自Spring2.5引入了注解式controller及Spring 3以後的不斷完善,使得采用Spring MVC框架開發結構清晰明了,效率大大提高。
度娘說:Spring MVC屬於SpringFrameWork的後續產品,已經融合在Spring Web Flow裡面。Spring 框架提供了構建 Web 應用程序的全功能 MVC 模塊。使用 Spring 可插入的 MVC 架構,從而在使用Spring進行WEB開發時,可以選擇使用Spring的SpringMVC框架或集成其他MVC開發框架,如Struts1,Struts2等。
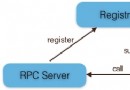
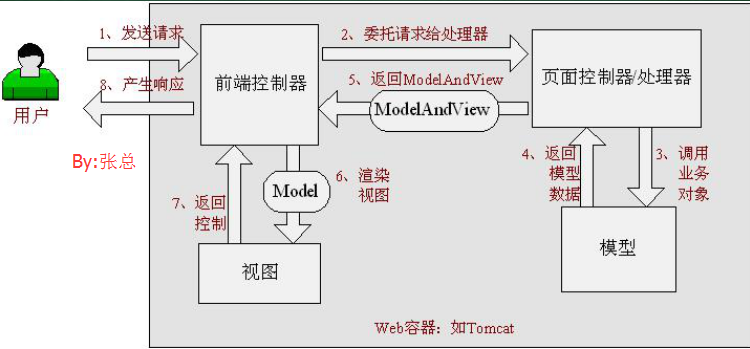
圖一:
圖二:
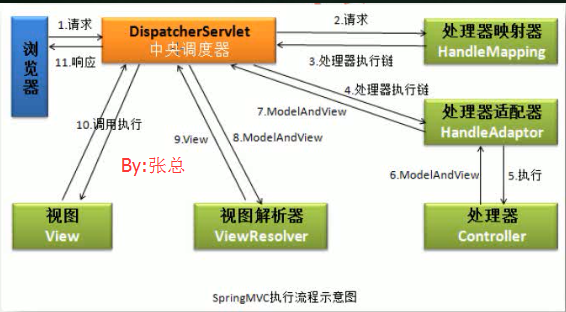
Spring MVC中前端的控制器就是DispatcherServlet這個Servlet來掌管著用戶的請求及最後的系統回應。這個DispatcherServlet同具體的業務邏輯一點都不著邊,而是把所有的事情委派給控制器去做(Controller),當然DispatcherServlet是知道該把當前的事情交個那個控制器去做;然後當控制器把事情都做完了後,這個時候輪到視圖(View)上場了,簡單的理解好比我們做PPT,那麼這裡的視圖好比PPT裡面的模板,它可以把數據以不同的展現形式交給客戶,可以是jsp、xml、json等等。
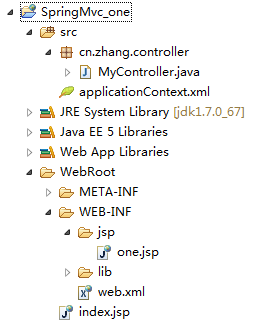
步驟與源碼介紹:
1.引入我們需要的jar包
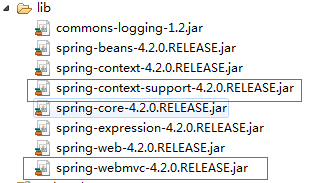
在原有Spring jar包基礎上添加2個jar包
1.
包含支持UI模板,郵件服務,緩存Cache等方面的類
2.
對Spring mvc的實現(Spring MVC的核心包)
2.在web.xml中配置前端控制器

<?xml version="1.0" encoding="UTF-8"?>
<web-app version="2.5" xmlns="http://java.sun.com/xml/ns/javaee"
    xmlns:xsi="http://www.w3.org/2001/XMLSchema-instance"
    xsi:schemaLocation="http://java.sun.com/xml/ns/javaee
    http://java.sun.com/xml/ns/javaee/web-app_2_5.xsd">
    <display-name></display-name>

    <servlet>
        <!-- 注冊中央調度器 -->
        <servlet-name>springmvc</servlet-name>
        <servlet-class>org.springframework.web.servlet.DispatcherServlet</servlet-class>
        <!-- 指定訪問 applicationContext.xml的地方 -->
        <init-param>
            <param-name>contextConfigLocation</param-name>
            <param-value>classpath:applicationContext.xml</param-value>
        </init-param>
        <!-- 在Tomcat啟動就初始化 -->
        <load-on-startup>1</load-on-startup>
    </servlet>
    <servlet-mapping>
        <servlet-name>springmvc</servlet-name>
        <url-pattern>*.do</url-pattern>
    </servlet-mapping>
</web-app>
View Code
3.定義自己的處理器
package cn.zhang.controller;
//定義自己的處理器
import javax.servlet.http.HttpServletRequest;
import javax.servlet.http.HttpServletResponse;
import org.springframework.web.servlet.ModelAndView;
import org.springframework.web.servlet.mvc.Controller;

public class MyController implements Controller  {

    public ModelAndView handleRequest(HttpServletRequest request,
            HttpServletResponse response) throws Exception {
        ModelAndView mv=new ModelAndView();
        mv.addObject("m","呵呵");
        mv.setViewName("WEB-INF/jsp/one.jsp");
        //返回model或視圖
        return mv;
    }

}
View Code
4.在applicationContext.xml中配置視圖解析器
<?xml version="1.0" encoding="UTF-8"?>
<beans xmlns="http://www.springframework.org/schema/beans"
    xmlns:xsi="http://www.w3.org/2001/XMLSchema-instance" xmlns:context="http://www.springframework.org/schema/context"
    xmlns:aop="http://www.springframework.org/schema/aop" xmlns:tx="http://www.springframework.org/schema/tx"
    xsi:schemaLocation="
        http://www.springframework.org/schema/beans http://www.springframework.org/schema/beans/spring-beans.xsd
        http://www.springframework.org/schema/context http://www.springframework.org/schema/context/spring-context.xsd
        http://www.springframework.org/schema/aop http://www.springframework.org/schema/aop/spring-aop.xsd
        http://www.springframework.org/schema/tx http://www.springframework.org/schema/tx/spring-tx.xsd">
    <!-- 配置視圖解析器 -->
    <bean id="/hello.do" class="cn.zhang.controller.MyController"></bean>

</beans>
View Code
5.在WEB-INF/jsp/one.jsp
<%@ page language="java" import="java.util.*" pageEncoding="utf-8"%>
<%
String path = request.getContextPath();
String basePath = request.getScheme()+"://"+request.getServerName()+":"+request.getServerPort()+path+"/";
%>
<!DOCTYPE HTML PUBLIC "-//W3C//DTD HTML 4.01 Transitional//EN">
<html>
  <head>
    <base href="<%=basePath%>">
    <title>我的第一個SpringMVC</title>
  </head>
  <body>
    Hello!friends!
  </body>
</html>
View Code
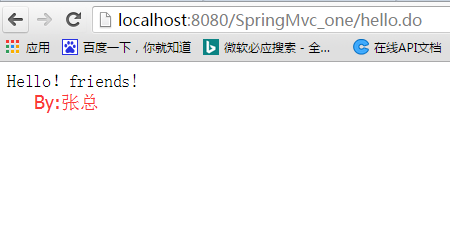
6.在浏覽器輸入http://localhost:8080/SpringMvc_one/hello.do訪問
效果: