添加支持
我先介紹的是MyEclipse9的自帶框架支持搭建過程:(完全的步驟 傻瓜式的學習。。~)
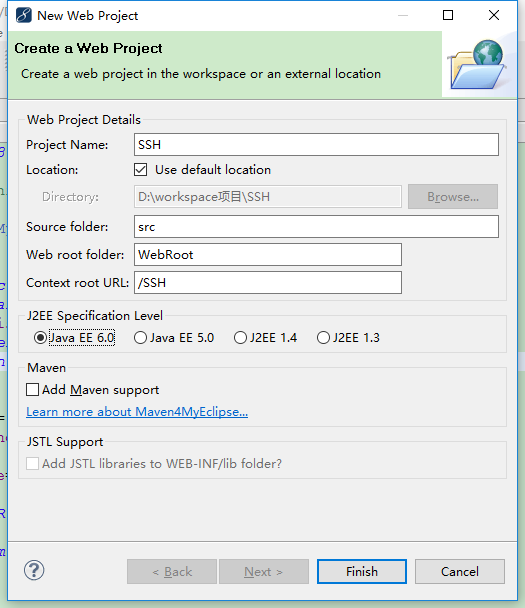
首先我們來搭建一個Web項目:
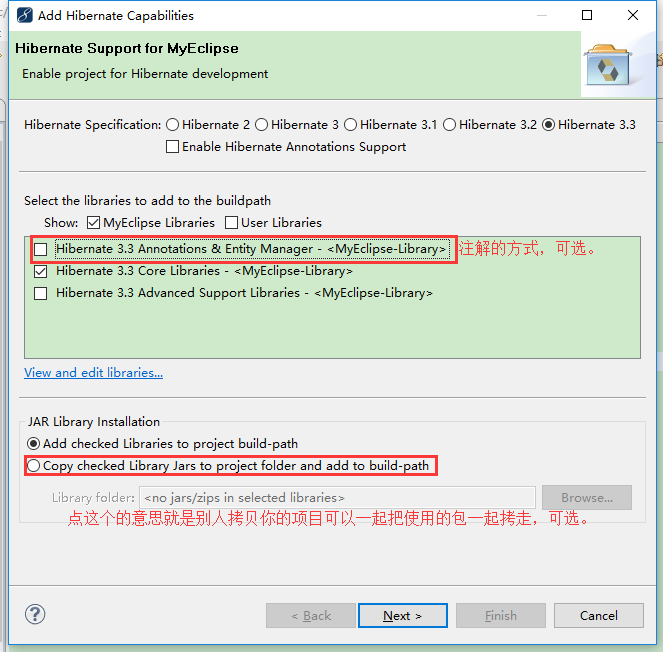
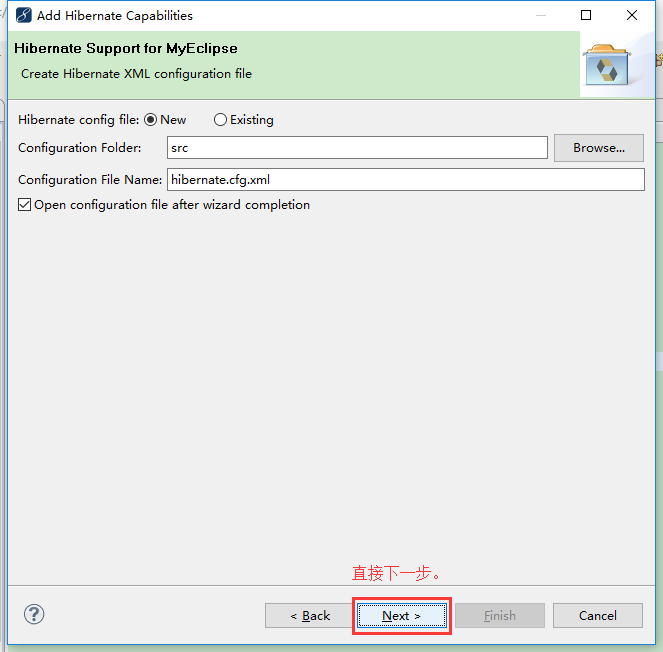
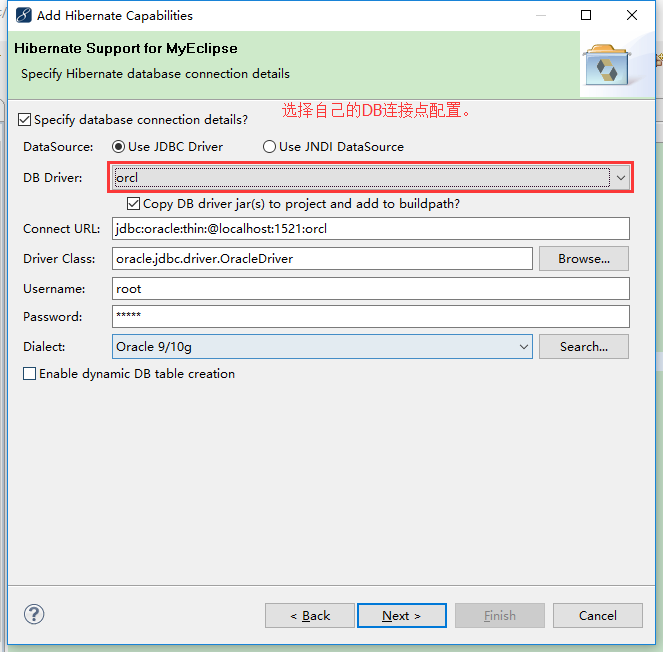
一、Hibernate(數據層)的搭建:
相關描述
Ⅰ.服務器與數據庫之間的交互
Ⅱ. Hibernate封裝了一系列的JDBC代碼,提供相應的方法我們使用,使我們的開發變得簡單快捷,效率大大提高
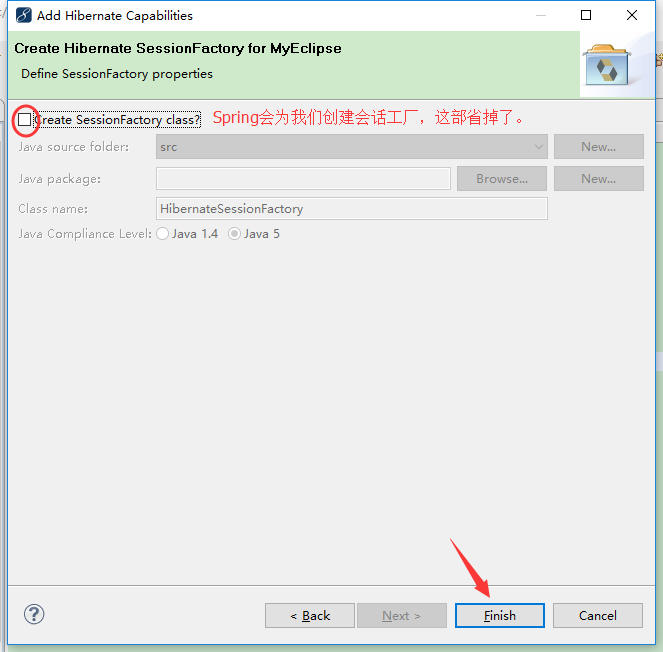
實現流程
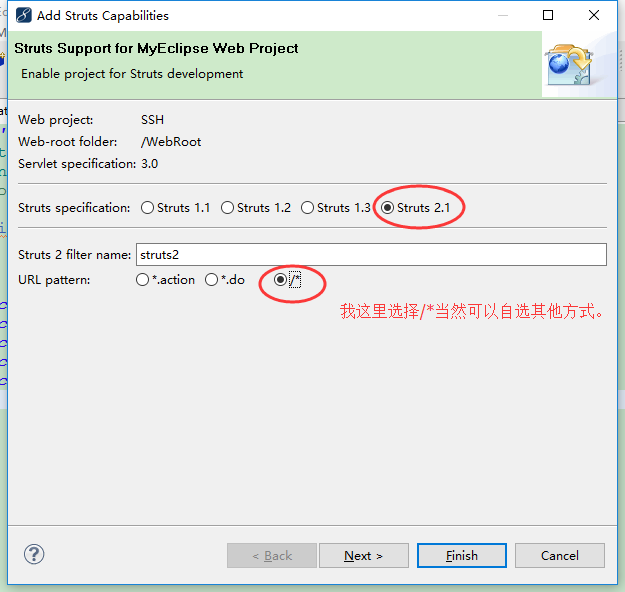
二、Struts2(MVC)的搭建:
相關描述
Ⅰ.本質上相當於一個Servlet
Ⅱ.不需要手動獲取傳遞參數 (只需要定義聲明屬性名和設置get、set的方法)、也不需要手動跳轉(只需要struts.xml配置相關的路徑)
Ⅲ.對項目的分包(例如:dao、service、entity等等),實現MVC模式的開發
Ⅳ.MVC: Action屬於Model,而JSP是View頁面的展示,其中過濾器起到了Controller的作用
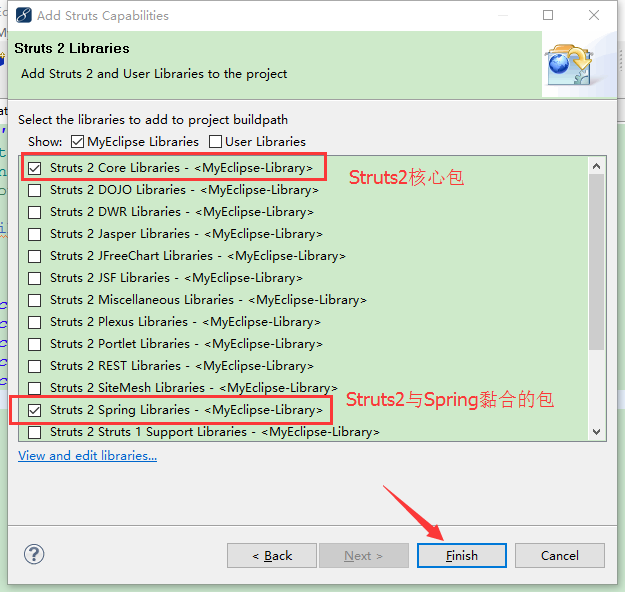
實現流程
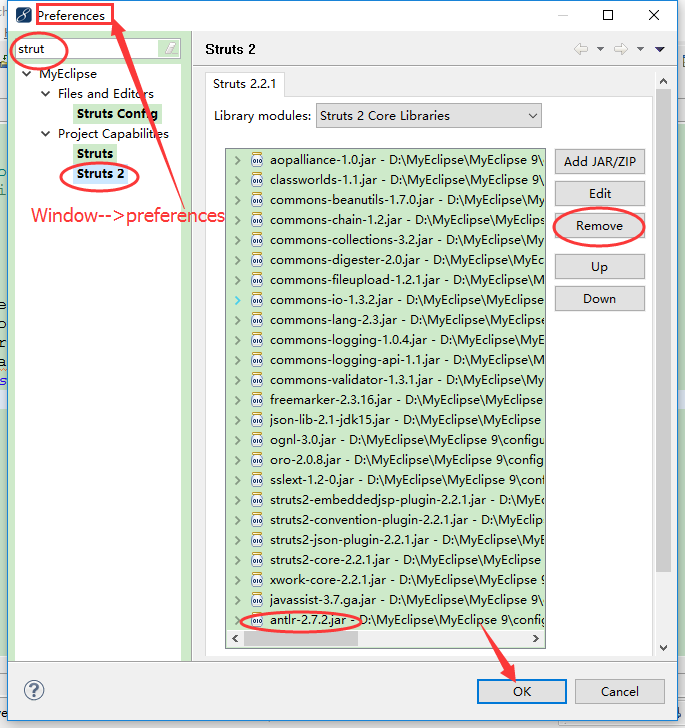
這裡注意一點問題:
Struts2與Hibernate在一起搭建,antlr包,有沖突。MyEclipse9中有這樣問題。朋友的MyEclipse10中沒有這個問題。
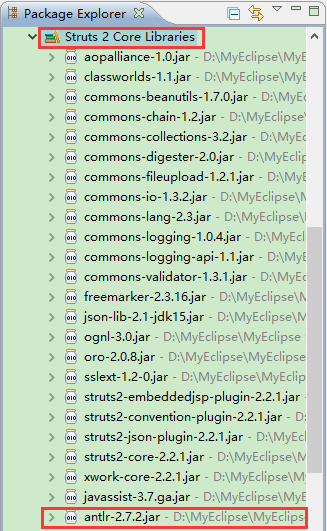
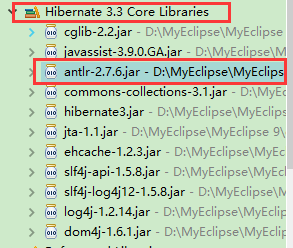
我選擇把Struts中antlr包去掉。
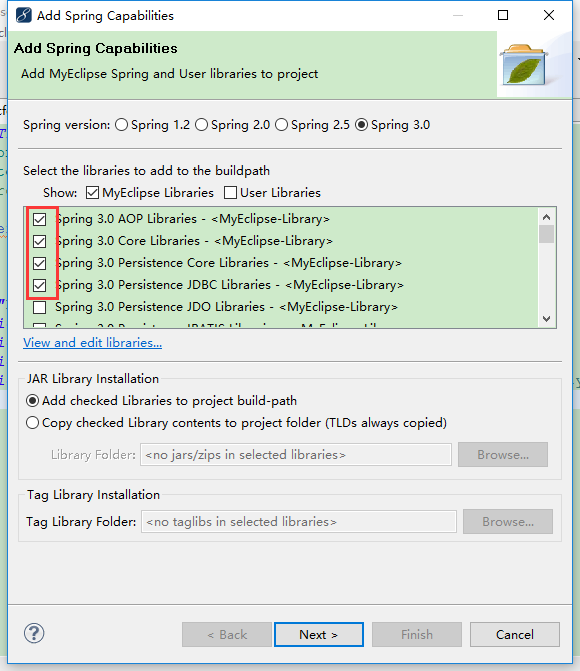
三、Spring(注入實例)的使用:
相關描述
Ⅰ.每一層的代碼之間的耦合改為模塊(分離/解耦),代碼之間互不影響
Ⅱ.不再關注具體的實現類的實例
Ⅲ.更換不同的技術(模塊),不需要改動代碼,只需要修改applicationContext.xml的相關配置信息
Ⅳ.主要功能IOC(控制反轉)松耦合、AOP (面向切面)內聚性
實現流程

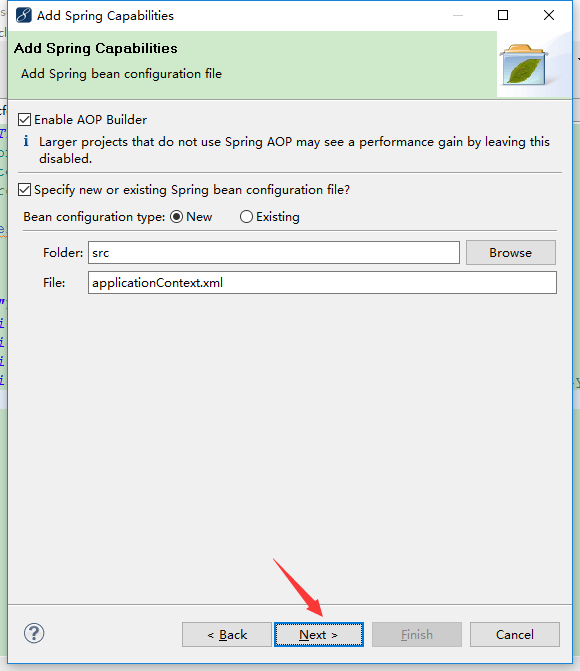

編輯web.xml文件:
<?xml version="1.0" encoding="UTF-8"?>
<web-app version="3.0" xmlns="http://java.sun.com/xml/ns/javaee"
    xmlns:xsi="http://www.w3.org/2001/XMLSchema-instance"
    xsi:schemaLocation="http://java.sun.com/xml/ns/javaee
    http://java.sun.com/xml/ns/javaee/web-app_3_0.xsd">
    <display-name></display-name>

    <!-- 這是一只攔路虎 -->
    <welcome-file-list>
        <welcome-file>index.jsp</welcome-file>
    </welcome-file-list>

    <!-- 讀取applicationContext.xml文件 不寫默認Spring需要讀取 WebContent\WEB-INF\applicationContext.xml -->
    <context-param>
        <param-name>contextConfigLocation</param-name>
        <!-- 改變默認讀取路徑為src目錄下的 applicationContext.xml 在改變的路徑下還是沒找到,便自動到默認路徑查找 -->
        <param-value>classpath:applicationContext.xml</param-value>
    </context-param>

    <!-- 定義Spring監聽器 class: spring 3.0 Web Libraries 下可以找到。 -->
    <listener>
        <listener-class>org.springframework.web.context.ContextLoaderListener</listener-class>
    </listener>

    <!-- Struts2過濾器 -->
    <filter>
        <filter-name>struts2</filter-name>
        <filter-class>
            org.apache.struts2.dispatcher.ng.filter.StrutsPrepareAndExecuteFilter</filter-class>
    </filter>
    <filter-mapping>
        <filter-name>struts2</filter-name>
        <url-pattern>/*</url-pattern>
    </filter-mapping>
</web-app>
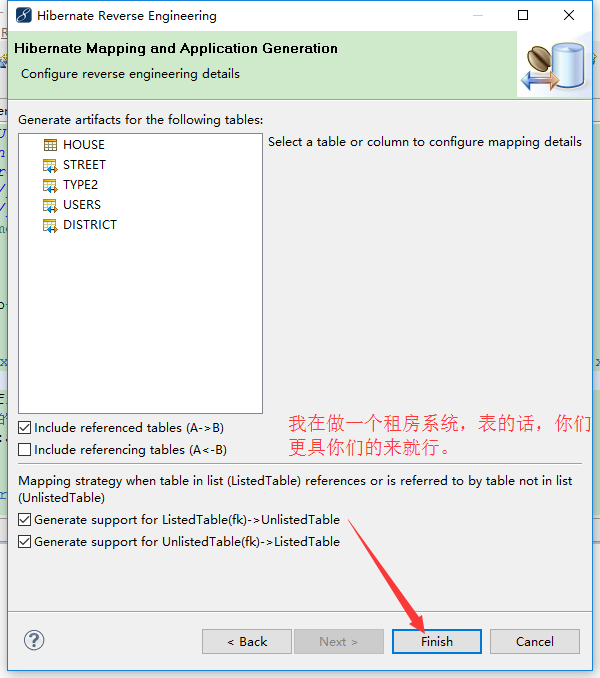
DB Browser中反轉實體類:


數據訪問層dao接口
package com.dao;

import com.entity.Users;

/**
 * 用戶接口
 * @author asus
 *
 */
public interface UsersDao {

    /** 登陸驗證 */
    Users loginCheck(Users user);
}
數據訪問層dao.impl實現類
1)繼承HibernateDaoSupport類實現增刪改查
package com.dao.impl;

import java.util.List;

import org.springframework.orm.hibernate3.HibernateTemplate;
import org.springframework.orm.hibernate3.support.HibernateDaoSupport;

import com.dao.UsersDao;
import com.entity.Users;
/**
 * 用戶接口實現類
 * @author asus
 *HibernateTemplate、HibernateDaoSupport兩種方法實現增刪改查
 *一種方法:
        Dao實現類繼承HibernateDaoSupport類,該類是抽象類,
        該類中有一個HibernateTemplate的屬性,通過this.getHibernateTemplate()可獲得一個HibernateTemplate類的模板對象。
 */
public class UsersDaoImpl extends HibernateDaoSupport implements UsersDao {

    @Override
    public Users loginCheck(Users user) {
        //得到此類提供的模板實現增刪改查
        HibernateTemplate ht = this.getHibernateTemplate();

        //得到一個集合
        List<Users> list = ht.find("from Users where name=? and password=? ",user.getName(),user.getPassword());

        //使用三元運算符,防止list.get(0)時報空指針。
        return (Users) (list.size()>0?list.get(0):null);
    }

}
2)定義HibernateTemplate模板對象屬性
package com.dao.impl;

import java.util.List;

import org.springframework.orm.hibernate3.HibernateTemplate;
import org.springframework.orm.hibernate3.support.HibernateDaoSupport;

import com.dao.UsersDao;
import com.entity.Users;
/**
 * 用戶接口實現類
 * @author asus
 *HibernateTemplate、HibernateDaoSupport兩種方法實現增刪改查
 *第二種方法:
    在dao類中定義一個HibernateTemplate類的對象,用該對象調用HibernateTemplate模板封裝好的方法,如下:
 */
public class UsersDaoImpl implements UsersDao {

    //定義一個模板對象
    HibernateTemplate hibernateTemplate;

    @Override
    public Users loginCheck(Users user) {

        //得到一個集合
        List<Users> list = hibernateTemplate.find("from Users where name=? and password=? ",user.getName(),user.getPassword());

        //使用三元運算符,防止list.get(0)時報空指針。
        return (Users) (list.size()>0?list.get(0):null);
    }

    //生成Get'Set方法
    public HibernateTemplate getHibernateTemplate() {
        return hibernateTemplate;
    }

    public void setHibernateTemplate(HibernateTemplate hibernateTemplate) {
        this.hibernateTemplate = hibernateTemplate;
    }
}
業務邏輯層接口service
package com.service;

import com.entity.Users;

/**
 * 用戶業務邏輯層
 * @author asus
 *
 */
public interface UsersService {

    /** 登陸驗證 */
    Users loginCheck(Users user);
}
業務邏輯層接口實現類service.impl
package com.service.impl;

import com.dao.UsersDao;
import com.entity.Users;
import com.service.UsersService;
/**
 * 用戶業務邏輯層實現類
 * @author asus
 *
 */
public class UsersServiceImpl implements UsersService {

    //這裡以前是new的,現在不需要了,交給Spring來實例
    private UsersDao udd;
    @Override
    public Users loginCheck(Users user) {

        return udd.loginCheck(user);
    }
    //生成Get'Set
    public UsersDao getUdd() {
        return udd;
    }
    public void setUdd(UsersDao udd) {
        this.udd = udd;
    }

}
控制器類Action
package com.action;

import com.entity.Users;
import com.opensymphony.xwork2.ActionSupport;
import com.service.UsersService;
/**
 * 用戶控制器類
 * @author asus
 *
 */
public class UsersAction extends ActionSupport {

    //接收頁面的值
    private Users user;
    //一樣交給Spring實例
    private UsersService uss;
    public String execute(){

        return SUCCESS;
    }
    /** 判斷用戶輸入的賬號密碼 */
    public String login(){
        if(user!=null){
            Users checkResult = uss.loginCheck(user);
            if(checkResult!=null){
                return SUCCESS;
            }
        }

        return LOGIN;
    }

    //生成Get'Set
    public Users getUser() {
        return user;
    }

    public void setUser(Users user) {
        this.user = user;
    }

    public UsersService getUss() {
        return uss;
    }

    public void setUss(UsersService uss) {
        this.uss = uss;
    }
}
登陸頁面
  <body>
        <form action="loginUser.action" method="post" >
            用戶名:<input type="text" name="user.name" />
            密碼:   <input type="password" name="user.password" />
            <input type="submit" value="登錄按鈕" >
        </form>
  </body>
成功頁面
  <body>
        登錄成功!
  </body>
配置applicationContext.xml
<?xml version="1.0" encoding="UTF-8"?>
<beans xmlns="http://www.springframework.org/schema/beans"
    xmlns:xsi="http://www.w3.org/2001/XMLSchema-instance" xmlns:p="http://www.springframework.org/schema/p"
    xsi:schemaLocation="http://www.springframework.org/schema/beans http://www.springframework.org/schema/beans/spring-beans-3.0.xsd">


    <bean id="sessionFactory"
        class="org.springframework.orm.hibernate3.LocalSessionFactoryBean">
        <property name="configLocation" value="classpath:hibernate.cfg.xml">
        </property>
    </bean>


    <!-- UsersBean配置 -->
    <!-- 第一種方法:Dao實現類繼承HibernateDaoSupport類的配置 -->
    <bean id="userDaoImpl" class="com.dao.impl.UsersDaoImpl">
        <property name="sessionFactory" ref="sessionFactory"></property>
    </bean>
    <!-- 第二種方法:在dao類中定義一個模板對象
    <bean id="hibernateTemplate" class="org.springframework.orm.hibernate3.HibernateTemplate" >
        <property name="sessionFactory" ref="sessionFactory" ></property>
    </bean>
    <bean id="userDaoImpl" class="com.dao.impl.UsersDaoImpl">
        <property name="hibernateTemplate" ref="hibernateTemplate"></property>
    </bean> -->

    <bean id="userServiceImpl" class="com.service.impl.UsersServiceImpl">
        <property name="udd" ref="userDaoImpl" />
    </bean>

    <bean id="userSturts" class="com.action.UsersAction">
        <property name="uss" ref="userServiceImpl" />
    </bean>

</beans>
配置Struts.xml
<?xml version="1.0" encoding="UTF-8" ?>
<!DOCTYPE struts PUBLIC "-//Apache Software Foundation//DTD Struts Configuration 2.1//EN" "http://struts.apache.org/dtds/struts-2.1.dtd">
<struts>
   <package name="struts2" namespace="/" extends="struts-default">
      <action name="*User" class="userSturts" method="{1}" >
         <result name="success">/success.jsp</result>
         <result name="login">/login.jsp</result>
      </action>
   </package>
</struts>
end:基本的登陸現在已經做好,現在我們開始做添加事務。
添加事務
數據訪問層dao接口
package com.dao;

import com.entity.District;

/**
 * 區域接口
 * @author asus
 *
 */
public interface DistrictDao {

    /** 添加區域  */
    int addReg (District district);
}
數據訪問層dao.impl實現類
定義HibernateTemplate模板對象屬性
package com.dao.impl;

import org.springframework.dao.DataAccessException;
import org.springframework.orm.hibernate3.HibernateTemplate;

import com.dao.DistrictDao;
import com.entity.District;
/**
 * 區域接口實現類
 * @author asus
 *HibernateTemplate、HibernateDaoSupport兩種方法實現增刪改查
 *第二種方法:
    在dao類中定義一個HibernateTemplate類的對象,用該對象調用HibernateTemplate模板封裝好的方法,如下:
 */
public class DistrictDaoImpl implements DistrictDao {

    //定義一個模板對象
    private HibernateTemplate hibernateTemplate;

    @Override
    public int addReg(District district) {
        try {
            hibernateTemplate.save(district);
            return 1;
        } catch (DataAccessException e) {
            e.printStackTrace();
        }
        return 0;
    }

    //生成Get'Set方法
    public HibernateTemplate getHibernateTemplate() {
        return hibernateTemplate;
    }
    public void setHibernateTemplate(HibernateTemplate hibernateTemplate) {
        this.hibernateTemplate = hibernateTemplate;
    }
}
業務邏輯層接口service
package com.service;

import com.entity.District;

/**
 * 地區業務邏輯類接口
 * @author asus
 *
 */
public interface DistrictService {

    /**
     *  配置事務的話注意方法的命名規范以什麼開頭。
     * @param district
     */
    int addReg(District district);
}
業務邏輯層接口實現類service.impl
package com.service.impl;

import com.dao.DistrictDao;
import com.entity.District;
import com.service.DistrictService;
/**
 * 區域業務邏輯層接口實現類
 *
 * @author asus
 *
 */
public class DistrictServiceImpl implements DistrictService {

    //聲明接口由Spring來實例
    private DistrictDao ddd;

    @Override
    public int addReg(District district) {

        return ddd.addReg(district);
    }

    //聲明Get'Set方法
    public DistrictDao getDdd() {
        return ddd;
    }
    public void setDdd(DistrictDao ddd) {
        this.ddd = ddd;
    }

}
控制器類Action
package com.action;

import com.entity.District;
import com.opensymphony.xwork2.ActionSupport;
import com.service.DistrictService;
/**
 * 控制器類
 * 作用:添加區域
 * @author asus
 *
 */
public class DistrictAction extends ActionSupport {

    //屬性
    private District district;
    private DistrictService dss;

    //處理添加請求
    public String add(){

        int addReg = dss.addReg(district);

        if(addReg>0){
            return SUCCESS;
        }
        return "index";
    }

    //生成Get'Set方法
    public DistrictService getDss() {
        return dss;
    }
    public void setDss(DistrictService dss) {
        this.dss = dss;
    }
    public District getDistrict() {
        return district;
    }
    public void setDistrict(District district) {
        this.district = district;
    }

}
添加頁面
  <body>
        <form action="addReg" method="post" >
            <input type="text" name="district.name" >
            <input type="submit" value="提交" >
        </form>
  </body>
成功頁面
  <body>
        登錄成功!
  </body>
配置applicationContext.xml(這裡還是比較重要的,其中夾雜前面Users的Bean)
<?xml version="1.0" encoding="UTF-8"?>
<!-- 配置事務第一步:需要導入的命名空間
        命名規范:
            xsi:架構實例
            beans:根節點
            aop:事務
            context:注解
            tx:事務管理
            xsi:schemaLocation
    協議(一個命名規范對應一個協議) 注:若不知道自己使用的框架版本,可以把協議後的版本號去掉,此處已經去掉。 -->
<beans xmlns="http://www.springframework.org/schema/beans"
    xmlns:xsi="http://www.w3.org/2001/XMLSchema-instance" xmlns:aop="http://www.springframework.org/schema/aop"
    xmlns:context="http://www.springframework.org/schema/context" xmlns:tx="http://www.springframework.org/schema/tx"
    xsi:schemaLocation="http://www.springframework.org/schema/beans http://www.springframework.org/schema/beans/spring-beans.xsd
        http://www.springframework.org/schema/aop http://www.springframework.org/schema/aop/spring-aop.xsd
        http://www.springframework.org/schema/context http://www.springframework.org/schema/context/spring-context.xsd
        http://www.springframework.org/schema/tx http://www.springframework.org/schema/tx/spring-tx.xsd">


    <bean id="sessionFactory"
        class="org.springframework.orm.hibernate3.LocalSessionFactoryBean">
        <property name="configLocation" value="classpath:hibernate.cfg.xml">
        </property>
    </bean>

    <!-- 配置事務第二步:配置事務管理器,將SessionFactory注入 -->
    <bean id="txManager"
        class="org.springframework.orm.hibernate3.HibernateTransactionManager">
        <property name="sessionFactory" ref="sessionFactory" />
    </bean>
    <!-- 配置事務第三步:事務通知
            tx:method: 管理事務的方法
            name:方法的名字是已什麼開頭的
            no-rollback-for="true":回滾
            read-only="true":只讀(默認false,是已非事務的方式來操作你的數據,比如查詢)
            propagation:事務是以哪種方式來操作    REQUIRED:必填
            (事務解釋:比如一個方法中執行添加兩張表的信息,第一個添加,沒有事務開啟一個事務,第二個添加加入第一個事務中,兩個方法都成功則成功,一個失敗全部回滾)

            name="*" :不在以上方法名開頭之內的,是以非事務的方式來操作

     -->
    <tx:advice id="txAdvice" transaction-manager="txManager">
        <tx:attributes>
            <tx:method name="get*" propagation="SUPPORTS" read-only="true" />
            <tx:method name="add*" propagation="REQUIRED" />
            <tx:method name="del*"  propagation="REQUIRED"/>
            <tx:method name="update*" propagation="REQUIRED"/>
            <tx:method name="*" propagation="SUPPORTS" read-only="true" />
        </tx:attributes>
    </tx:advice>
    <!-- 配置事務第四步:織入(以面相切面的方式編程) -->
    <aop:config>
        <!-- 切面
            expression:表達式\
                * com.service.impl.*.*(..):(星    空格    包名    點星(代表所有此包下所有的類)    點星(代表類下所有的方法)       括號點點(代表方法中不管帶有幾個參數,只要符合命名規范都納入事務管理))
         -->
        <aop:pointcut id="serviceMethod" expression="execution(* com.service.impl.*.*(..))" />
        <!-- 通知者
                   由切面和事務通知組成的通知者
        -->
        <aop:advisor pointcut-ref="serviceMethod" advice-ref="txAdvice"/>
    </aop:config>


    <!-- UsersBean配置 -->
    <!-- 第一種方法:Dao實現類繼承HibernateDaoSupport類的配置 -->
    <bean id="userDaoImpl" class="com.dao.impl.UsersDaoImpl">
        <property name="sessionFactory" ref="sessionFactory"></property>
    </bean>
    <!-- 第二種方法:在dao類中定義一個模板對象 <bean id="hibernateTemplate" class="org.springframework.orm.hibernate3.HibernateTemplate"
        > <property name="sessionFactory" ref="sessionFactory" ></property> </bean>
        <bean id="userDaoImpl" class="com.dao.impl.UsersDaoImpl"> <property name="hibernateTemplate"
        ref="hibernateTemplate"></property> </bean> -->

    <bean id="userServiceImpl" class="com.service.impl.UsersServiceImpl">
        <property name="udd" ref="userDaoImpl" />
    </bean>

    <bean id="userSturts" class="com.action.UsersAction">
        <property name="uss" ref="userServiceImpl" />
    </bean>


    <!-- DistrictBean配置 -->
    <bean id="hibernateTemplate" class="org.springframework.orm.hibernate3.HibernateTemplate">
        <property name="sessionFactory" ref="sessionFactory"></property>
    </bean>

    <bean id="DistrictDaoImpl" class="com.dao.impl.DistrictDaoImpl">
        <property name="hibernateTemplate" ref="hibernateTemplate"></property>
    </bean>

    <bean id="DistrictServiceImpl" class="com.service.impl.DistrictServiceImpl">
        <property name="ddd" ref="DistrictDaoImpl"></property>
    </bean>

    <bean id="DistrictAction" class="com.action.DistrictAction">
        <property name="dss" ref="DistrictServiceImpl"></property>
    </bean>
</beans>
優化SessionFacatory,使用Spring創建最原始的JDBC數據源
優化JDBC為C3P0數據源連接池
(注:代碼確與上面有重復,我走的是步驟路線雖然代碼重復太多,只為更容易理解)
配置applicationContext.xml
<?xml version="1.0" encoding="UTF-8"?>
<!-- 配置事務第一步:需要導入的命名空間
命名規范:
xsi:架構實例
beans:根節點
aop:事務
context:注解
tx:事務管理
xsi:schemaLocation
協議(一個命名規范對應一個協議) 注:若不知道自己使用的框架版本,可以把協議後的版本號去掉,此處已經去掉。 -->
<beans xmlns="http://www.springframework.org/schema/beans"
xmlns:xsi="http://www.w3.org/2001/XMLSchema-instance" xmlns:aop="http://www.springframework.org/schema/aop"
xmlns:context="http://www.springframework.org/schema/context" xmlns:tx="http://www.springframework.org/schema/tx"
xsi:schemaLocation="http://www.springframework.org/schema/beans http://www.springframework.org/schema/beans/spring-beans.xsd
http://www.springframework.org/schema/aop http://www.springframework.org/schema/aop/spring-aop.xsd
http://www.springframework.org/schema/context http://www.springframework.org/schema/context/spring-context.xsd
http://www.springframework.org/schema/tx http://www.springframework.org/schema/tx/spring-tx.xsd">
<!-- 倒數第二步:這個sessionFactory使用的還是最原始的,可以優化,真正實際開發不會去用,測試可用。
<bean id="sessionFactory"
class="org.springframework.orm.hibernate3.LocalSessionFactoryBean">
<property name="configLocation" value="classpath:hibernate.cfg.xml">
</property>
</bean>-->
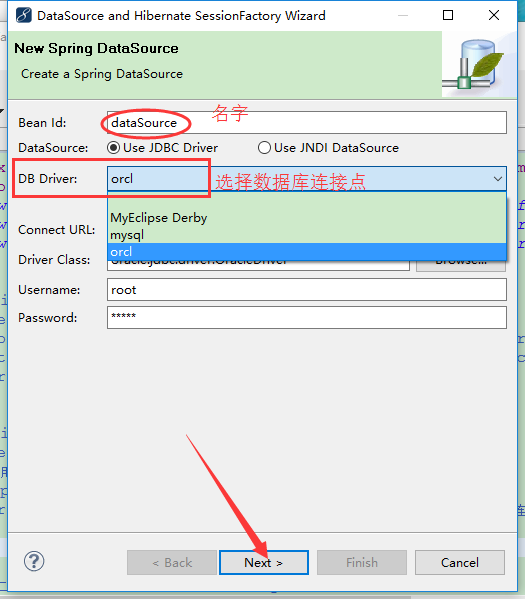
<!-- 最後一步:優化sessionFactory:
hibernate.cfg.xml中數據庫連接方式可以由Spring來創建與管理
操作步驟:使用Spring創建數據源:
右鍵Spring——>New DataSource and SessionFactory(有圖解)
(Spring提供的是最原始的JDBC數據源連接池的寫法,當然可以再成優化C3P0,DBCP數據源連接池)
-->
<!-- dataSource創建的:
JDBC數據源寫法(將C3P0數據源連接池寫法注釋掉就可用此數據源,它的HTML注釋太多就先注釋此..)
<bean id="dataSource"
class="org.apache.commons.dbcp.BasicDataSource">
<property name="driverClassName"
value="oracle.jdbc.driver.OracleDriver">
</property>
<property name="url"
value="jdbc:oracle:thin:@localhost:1521:orcl">
</property>
<property name="username" value="root"></property>
<property name="password" value="admin"></property>
</bean> -->
<!-- C3P0數據源連接池寫法 -->
<bean id="dataSource" class="com.mchange.v2.c3p0.ComboPooledDataSource">
<property name="driverClass" value="oracle.jdbc.driver.OracleDriver"></property>
<property name="jdbcUrl" value="jdbc:oracle:thin:@localhost:1521:orcl"></property>
<property name="user" value="root" />
<property name="password" value="admin" />
<!--初始化時獲取的連接數,取值應在minPoolSize與maxPoolSize之間。Default: 3 -->
<property name="initialPoolSize" value="1" />
<!--連接池中保留的最小連接數。 -->
<property name="minPoolSize" value="1" />
<!--連接池中保留的最大連接數。Default: 15 -->
<property name="maxPoolSize" value="300" />
<!--最大空閒時間,60秒內未使用則連接被丟棄。若為0則永不丟棄。Default: 0 -->
<property name="maxIdleTime" value="60" />
<!--當連接池中的連接耗盡的時候c3p0一次同時獲取的連接數。Default: 3 -->
<property name="acquireIncrement" value="5" />
<!--每60秒檢查所有連接池中的空閒連接。Default: 0 -->
<property name="idleConnectionTestPeriod" value="60" />
</bean>
<!-- session的創建方式 -->
<bean id="sessionFactory"
class="org.springframework.orm.hibernate3.LocalSessionFactoryBean">
<property name="dataSource">
<ref bean="dataSource" />
</property>
<property name="hibernateProperties">
<props>
<prop key="hibernate.dialect">
org.hibernate.dialect.Oracle9Dialect
</prop>
<prop key="hibernate.show_sql">true</prop>
<prop key="hiberenate.format_sql">true</prop>
</props>
</property>
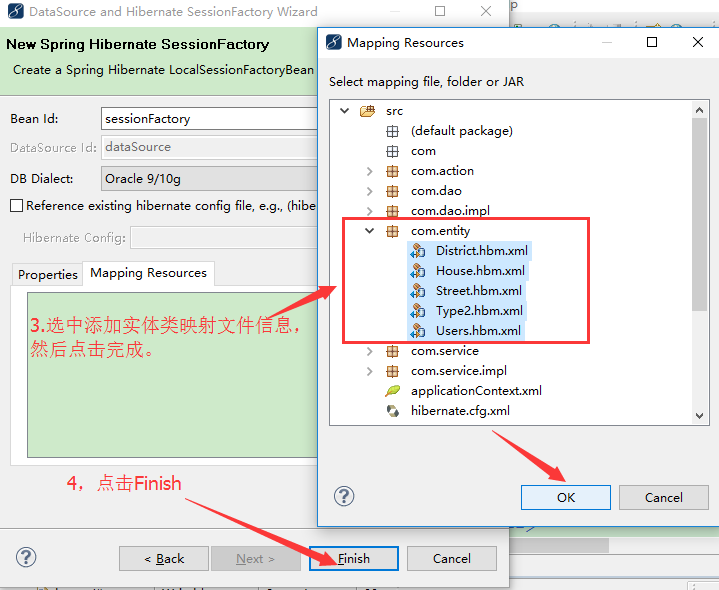
<property name="mappingResources">
<list>
<value>com/entity/District.hbm.xml</value>
<value>com/entity/House.hbm.xml</value>
<value>com/entity/Street.hbm.xml</value>
<value>com/entity/Type2.hbm.xml</value>
<value>com/entity/Users.hbm.xml</value>
</list>
</property>
</bean>
<!-- 配置事務第二步:配置事務管理器,將SessionFactory注入 -->
<bean id="txManager"
class="org.springframework.orm.hibernate3.HibernateTransactionManager">
<property name="sessionFactory" ref="sessionFactory" />
</bean>
<!-- 配置事務第三步:事務通知
tx:method: 管理事務的方法
name:方法的名字是已什麼開頭的
no-rollback-for="true":回滾
read-only="true":只讀(默認false,是已非事務的方式來操作你的數據,比如查詢)
propagation:事務是以哪種方式來操作 REQUIRED:必填
(事務解釋:比如一個方法中執行添加兩張表的信息,第一個添加,沒有事務開啟一個事務,第二個添加加入第一個事務中,兩個方法都成功則成功,一個失敗全部回滾)
name="*" :不在以上方法名開頭之內的,是以非事務的方式來操作
-->
<tx:advice id="txAdvice" transaction-manager="txManager">
<tx:attributes>
<tx:method name="get*" propagation="SUPPORTS" read-only="true" />
<tx:method name="add*" propagation="REQUIRED" />
<tx:method name="del*" propagation="REQUIRED"/>
<tx:method name="update*" propagation="REQUIRED"/>
<tx:method name="*" propagation="SUPPORTS" read-only="true" />
</tx:attributes>
</tx:advice>
<!-- 配置事務第四步:織入(以面相切面的方式編程) -->
<aop:config>
<!-- 切面
expression:表達式\
* com.service.impl.*.*(..):(星 空格 包名 點星(代表所有此包下所有的類) 點星(代表類下所有的方法) 括號點點(代表方法中不管帶有幾個參數,只要符合命名規范都納入事務管理))
-->
<aop:pointcut id="serviceMethod" expression="execution(* com.service.impl.*.*(..))" />
<!-- 通知者
由切面和事務通知組成的通知者
-->
<aop:advisor pointcut-ref="serviceMethod" advice-ref="txAdvice"/>
</aop:config>
<!-- UsersBean配置 -->
<!-- 第一種方法:Dao實現類繼承HibernateDaoSupport類的配置 -->
<bean id="userDaoImpl" class="com.dao.impl.UsersDaoImpl">
<property name="sessionFactory" ref="sessionFactory"></property>
</bean>
<!-- 第二種方法:在dao類中定義一個模板對象 <bean id="hibernateTemplate" class="org.springframework.orm.hibernate3.HibernateTemplate"
> <property name="sessionFactory" ref="sessionFactory" ></property> </bean>
<bean id="userDaoImpl" class="com.dao.impl.UsersDaoImpl"> <property name="hibernateTemplate"
ref="hibernateTemplate"></property> </bean> -->
<bean id="userServiceImpl" class="com.service.impl.UsersServiceImpl">
<property name="udd" ref="userDaoImpl" />
</bean>
<bean id="userSturts" class="com.action.UsersAction">
<property name="uss" ref="userServiceImpl" />
</bean>
<!-- DistrictBean配置 -->
<bean id="hibernateTemplate" class="org.springframework.orm.hibernate3.HibernateTemplate">
<property name="sessionFactory" ref="sessionFactory"></property>
</bean>
<bean id="DistrictDaoImpl" class="com.dao.impl.DistrictDaoImpl">
<property name="hibernateTemplate" ref="hibernateTemplate"></property>
</bean>
<bean id="DistrictServiceImpl" class="com.service.impl.DistrictServiceImpl">
<property name="ddd" ref="DistrictDaoImpl"></property>
</bean>
<bean id="DistrictAction" class="com.action.DistrictAction">
<property name="dss" ref="DistrictServiceImpl"></property>
</bean>
</beans>
附Spring創建JDBC數據源圖: