How Tomcat works — 七、tomcat發布webapp,tomcatwebapp
目錄
- 什麼叫發布
- webapp發布方式
- reload
- 總結
什麼叫發布
發布就是讓tomcat知道我們的程序在哪裡,並根據我們的配置創建Context,進行初始化、啟動,如下:
- 程序所在的位置
- 創建Context,添加到Host
- 初始化(創建解析webxml的digester)
- 啟動(初始化filter、listener、servlet)
webapp發布方式
在tomcat 中發布webapp的方式不同會導致app啟動的先後順序不一樣(這裡按照啟動順序或者時機不同進行劃分):
其實兩種發布方式只是在啟動順序上稍有不同,啟動過程完全一致,先以在server.xml中配置說明
在server.xml進行配置
這情況在我們使用eclipse等工具進行開發發布的時候,eclipse會幫我們在server.xml的Host標簽內添加Context,如下:

![]()
<?xml version="1.0" encoding="UTF-8"?>
<!--
Licensed to the Apache Software Foundation (ASF) under one or more
contributor license agreements. See the NOTICE file distributed with
this work for additional information regarding copyright ownership.
The ASF licenses this file to You under the Apache License, Version 2.0
(the "License"); you may not use this file except in compliance with
the License. You may obtain a copy of the License at
http://www.apache.org/licenses/LICENSE-2.0
Unless required by applicable law or agreed to in writing, software
distributed under the License is distributed on an "AS IS" BASIS,
WITHOUT WARRANTIES OR CONDITIONS OF ANY KIND, either express or implied.
See the License for the specific language governing permissions and
limitations under the License.
--><!-- Note: A "Server" is not itself a "Container", so you may not
define subcomponents such as "Valves" at this level.
Documentation at /docs/config/server.html
--><Server port="8006" shutdown="SHUTDOWN">
<Listener className="org.apache.catalina.startup.VersionLoggerListener"/>
<!-- Security listener. Documentation at /docs/config/listeners.html
<Listener className="org.apache.catalina.security.SecurityListener" />
-->
<!--APR library loader. Documentation at /docs/apr.html -->
<Listener SSLEngine="on" className="org.apache.catalina.core.AprLifecycleListener"/>
<!--Initialize Jasper prior to webapps are loaded. Documentation at /docs/jasper-howto.html -->
<Listener className="org.apache.catalina.core.JasperListener"/>
<!-- Prevent memory leaks due to use of particular java/javax APIs-->
<Listener className="org.apache.catalina.core.JreMemoryLeakPreventionListener"/>
<Listener className="org.apache.catalina.mbeans.GlobalResourcesLifecycleListener"/>
<Listener className="org.apache.catalina.core.ThreadLocalLeakPreventionListener"/>
<!-- Global JNDI resources
Documentation at /docs/jndi-resources-howto.html
-->
<GlobalNamingResources>
<!-- Editable user database that can also be used by
UserDatabaseRealm to authenticate users
-->
<Resource auth="Container" description="User database that can be updated and saved" factory="org.apache.catalina.users.MemoryUserDatabaseFactory" name="UserDatabase" pathname="conf/tomcat-users.xml" type="org.apache.catalina.UserDatabase"/>
</GlobalNamingResources>
<!-- A "Service" is a collection of one or more "Connectors" that share
a single "Container" Note: A "Service" is not itself a "Container",
so you may not define subcomponents such as "Valves" at this level.
Documentation at /docs/config/service.html
-->
<Service name="Catalina">
<!--The connectors can use a shared executor, you can define one or more named thread pools-->
<!--
<Executor name="tomcatThreadPool" namePrefix="catalina-exec-"
maxThreads="150" minSpareThreads="4"/>
-->
<!-- A "Connector" represents an endpoint by which requests are received
and responses are returned. Documentation at :
Java HTTP Connector: /docs/config/http.html (blocking & non-blocking)
Java AJP Connector: /docs/config/ajp.html
APR (HTTP/AJP) Connector: /docs/apr.html
Define a non-SSL HTTP/1.1 Connector on port 8080
-->
<Connector connectionTimeout="20000" port="8888" protocol="HTTP/1.1" redirectPort="8445"/>
<!-- A "Connector" using the shared thread pool-->
<!--
<Connector executor="tomcatThreadPool"
port="8080" protocol="HTTP/1.1"
connectionTimeout="20000"
redirectPort="8443" />
-->
<!-- Define a SSL HTTP/1.1 Connector on port 8443
This connector uses the BIO implementation that requires the JSSE
style configuration. When using the APR/native implementation, the
OpenSSL style configuration is required as described in the APR/native
documentation -->
<!--
<Connector port="8443" protocol="org.apache.coyote.http11.Http11Protocol"
maxThreads="150" SSLEnabled="true" scheme="https" secure="true"
clientAuth="false" sslProtocol="TLS" />
-->
<!-- Define an AJP 1.3 Connector on port 8009 -->
<Connector port="8019" protocol="AJP/1.3" redirectPort="8443"/>
<!-- An Engine represents the entry point (within Catalina) that processes
every request. The Engine implementation for Tomcat stand alone
analyzes the HTTP headers included with the request, and passes them
on to the appropriate Host (virtual host).
Documentation at /docs/config/engine.html -->
<!-- You should set jvmRoute to support load-balancing via AJP ie :
<Engine name="Catalina" defaultHost="localhost" jvmRoute="jvm1">
-->
<Engine defaultHost="localhost" name="Catalina">
<!--For clustering, please take a look at documentation at:
/docs/cluster-howto.html (simple how to)
/docs/config/cluster.html (reference documentation) -->
<!--
<Cluster className="org.apache.catalina.ha.tcp.SimpleTcpCluster"/>
-->
<!-- Use the LockOutRealm to prevent attempts to guess user passwords
via a brute-force attack -->
<Realm className="org.apache.catalina.realm.LockOutRealm">
<!-- This Realm uses the UserDatabase configured in the global JNDI
resources under the key "UserDatabase". Any edits
that are performed against this UserDatabase are immediately
available for use by the Realm. -->
<Realm className="org.apache.catalina.realm.UserDatabaseRealm" resourceName="UserDatabase"/>
</Realm>
<Host appBase="webapps" autoDeploy="true" name="localhost" unpackWARs="true">
<!-- SingleSignOn valve, share authentication between web applications
Documentation at: /docs/config/valve.html -->
<!--
<Valve className="org.apache.catalina.authenticator.SingleSignOn" />
-->
<!-- Access log processes all example.
Documentation at: /docs/config/valve.html
Note: The pattern used is equivalent to using pattern="common" -->
<Valve className="org.apache.catalina.valves.AccessLogValve" directory="logs" pattern="%h %l %u %t "%r" %s %b" prefix="localhost_access_log." suffix=".txt"/>
<Context docBase="/var/tomcat-test/webapps/TestTomcat" path="/TestTomcat" reloadable="true" source="org.eclipse.jst.jee.server:TestTomcat"/>
</Host>
</Engine>
</Service>
</Server>
View Code
在新建server的時候會解析server.xml,同時也會根據我們上面的配置新建StandardContext,而且會將StandardContext作為Host的一個Child(可以在Catalina.createStartDigester方法中查看怎麼解析server.xml),在tomcat的啟動過程中context是由父容器host啟動的
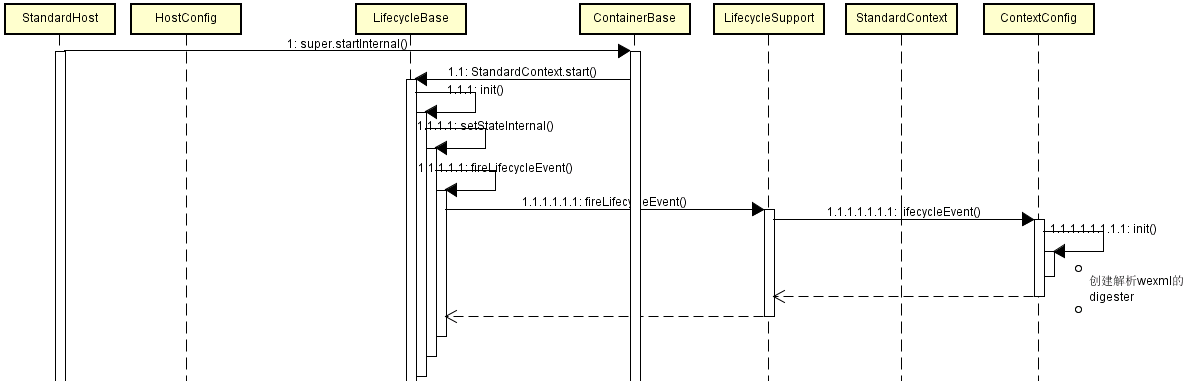
額,看到這張圖發現似曾相識,對滴,就是Context的初始化,因為在tomcat中一個context實例就代表一個webapp,所以其實應用程序webapp的發布本身就是context的初始化和啟動,再看看context的啟動
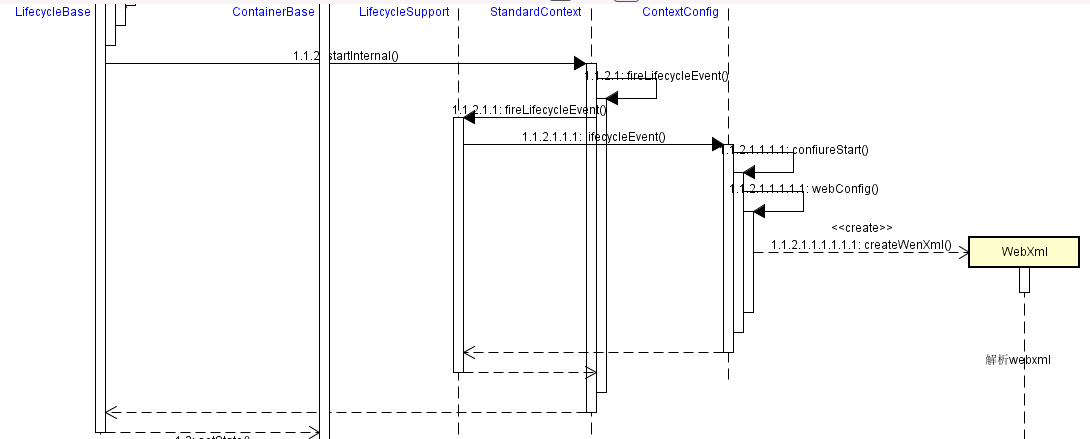
以上已經完整展示了一個webapp的發布過程,也就是在server.xml的配置的webapp發布過程,接著來看看在webapps目錄下的發布過程。
在webapps目錄下
在StandardHost的startInternal方法中調用了父類的ContainerBase.startInternal方法,在StandardHost發布完在server.xml中配置的app之後,會調用setState來切換自身的狀態,這個時候就會觸發listener HostConfig的lifecycleEvent方法
@Override
protected synchronized void startInternal() throws LifecycleException {

    // Start our subordinate components, if any
    if ((loader != null) && (loader instanceof Lifecycle))
        ((Lifecycle) loader).start();
    logger = null;
    getLogger();
    if ((manager != null) && (manager instanceof Lifecycle))
        ((Lifecycle) manager).start();
    if ((cluster != null) && (cluster instanceof Lifecycle))
        ((Lifecycle) cluster).start();
    Realm realm = getRealmInternal();
    if ((realm != null) && (realm instanceof Lifecycle))
        ((Lifecycle) realm).start();
    if ((resources != null) && (resources instanceof Lifecycle))
        ((Lifecycle) resources).start();

    // Start our child containers, if any
   // 因為在解析server.xml的時候已經新建了Context,這裡就可以直接start
    Container children[] = findChildren();
    List<Future<Void>> results = new ArrayList<Future<Void>>();
    for (int i = 0; i < children.length; i++) {
        results.add(startStopExecutor.submit(new StartChild(children[i])));
    }

    boolean fail = false;
    for (Future<Void> result : results) {
        try {
            result.get();
        } catch (Exception e) {
            log.error(sm.getString("containerBase.threadedStartFailed"), e);
            fail = true;
        }

    }
    if (fail) {
        throw new LifecycleException(
                sm.getString("containerBase.threadedStartFailed"));
    }

    // Start the Valves in our pipeline (including the basic), if any
    if (pipeline instanceof Lifecycle)
        ((Lifecycle) pipeline).start();

   // 調用lifecycleEvent方法,觸發StandardHost的start事件,觸發監聽器HostConfig的start方法,所有在webapps下面的都在start方法中發布
    setState(LifecycleState.STARTING);

    // Start our thread
    threadStart();

}
調用過程如下:
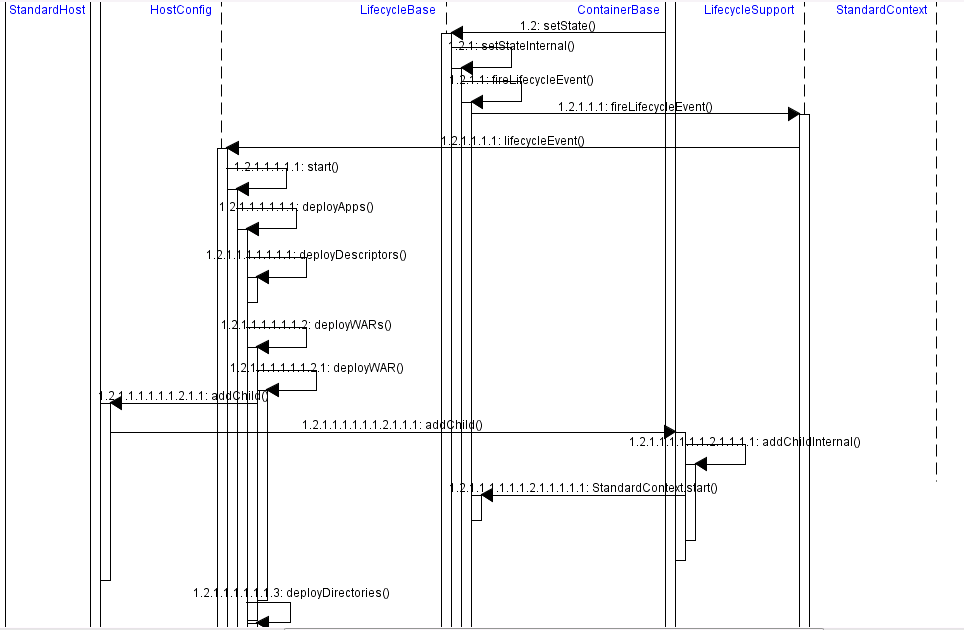
(上圖中主要畫出了deployWars的調用過程,其他兩個deploy方法也類似)
在HostConfig.deployApps方法中主要進行了:
- 調用deployDescriptors:發布所有使用xml配置的webapp,因為可能有多個xml,所以在該方法內部又調用了deployDescriptor來發布每個xml對應的webapp
- 調用deployWars:發布所有在webapps目錄下的war包,也可能存在多個
- 調用deployDirectories:發布所有直接部署在webapps目錄下的應用程序
前面說過了,發布webapp就是新建一個context對象並初始化、啟動,上面三個方法中主要的作用為:
Class<?> clazz = Class.forName(host.getConfigClass());
LifecycleListener listener =
    (LifecycleListener) clazz.newInstance();
context.addLifecycleListener(listener);

context.setName(cn.getName());
context.setPath(cn.getPath());
context.setWebappVersion(cn.getVersion());
context.setDocBase(cn.getBaseName() + ".war");
host.addChild(context);
- 構建一個StandardContext
- 將context添加到host中,在Container.addChildInternal方法中會調用context.start
接下來的步驟就和上面在server.xml配置的webapp啟動一致了。
reload
在我們使用tomcat開發web的時候經常會用到“熱加載”(熱部署)功能,那麼原理究竟是什麼呢?上面介紹了webapp發布,因為reload功能也是從HostConfig開始的,所以繼續介紹reload功能
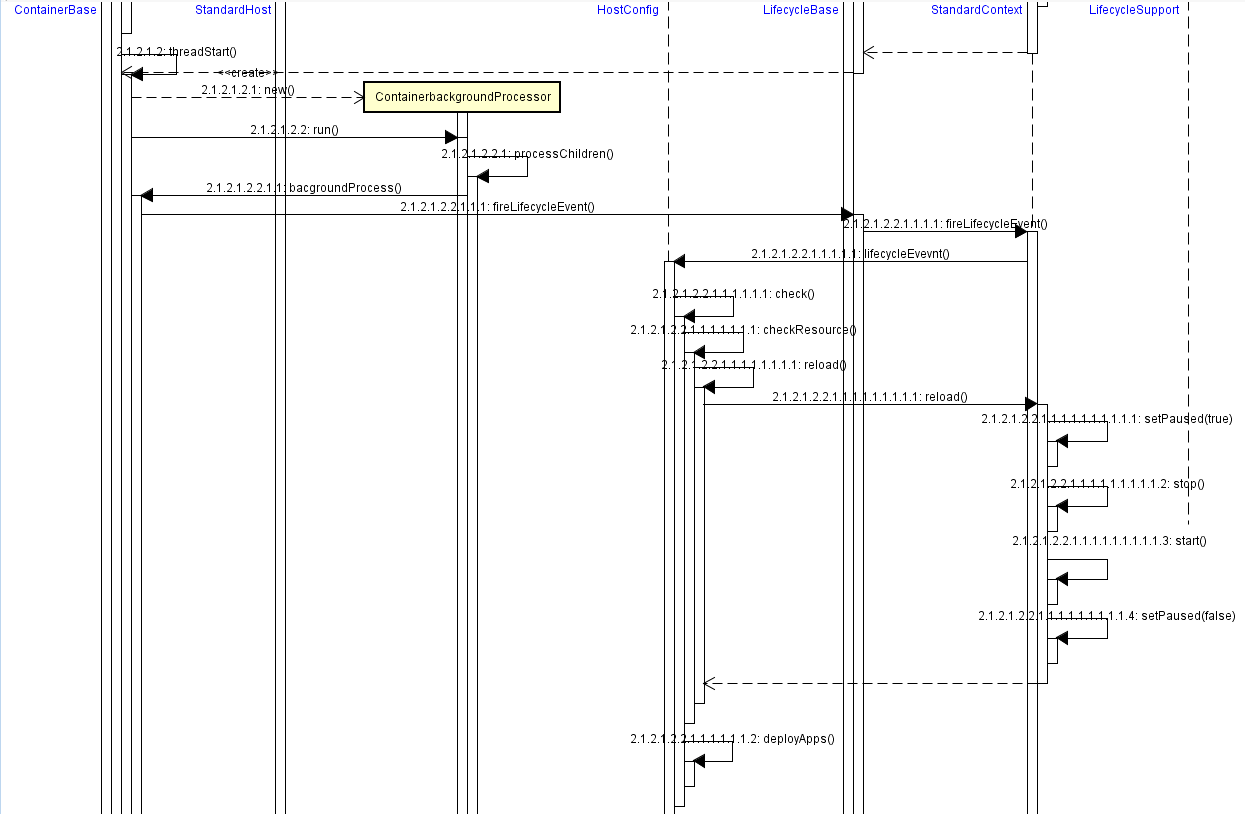
上面的ContainerBase.startInternal是由StandardEngine.startInternal方法調用的,啟動了一個daemon線程定時檢測webapp是否發生變化(文件是否被修改),如果被修改了則會重新啟動StandardContext。
總結
像tomcat部署和發布,我們天天都在用,可是不知道究竟原理怎麼樣的,在學習了tomcat源碼之後,對這一切都更加明了。知其然,知其所以然。