最近自己通過視頻與相關書籍的學習,對action裡面接收參數做一些總結與自己的理解,希望各位技術大牛們能多多指教。
0.0、接收參數的(主要)方法
1.1、使用Action的屬性接收參數
本文以最簡單的表單提交為例:
1.1.1.建立login.jsp頁面
<%@ page language="java" contentType="text/html; charset=UTF-8"
    pageEncoding="UTF-8"%>
<!DOCTYPE html PUBLIC "-//W3C//DTD HTML 4.01 Transitional//EN" "http://www.w3.org/TR/html4/loose.dtd">
<html>
<head>
<meta http-equiv="Content-Type" content="text/html; charset=UTF-8">
<title>Insert title here</title>
</head>
<body>
<form action="loginAction.action" method="post">
    用戶名:<input type="text" name="username">
    密碼:<input type="password" name="password">
    <input type="submit">
</form>
</body>
</html>
1.1.2.創建loginAction
package com.zzh.action;


import com.opensymphony.xwork2.ActionSupport;

public class loginAction extends ActionSupport {

    private static final long serialVersionUID = 1L;


    private String username;
    private String password;

    public String getUsername() {
        return username;
    }

    public void setUsername(String username) {
        this.username = username;
    }

    public String getPassword() {
        return password;
    }

    public void setPassword(String password) {
        this.password = password;
    }


    public String login(){
        System.out.println(username);
        return SUCCESS;
    }
}
注意:System.out.println(username);後面可以做一些邏輯處理
1.1.3.配置struts.xml文件
<?xml version="1.0" encoding="UTF-8"?>
<!DOCTYPE struts PUBLIC
    "-//Apache Software Foundation//DTD Struts Configuration 2.3//EN"
    "http://struts.apache.org/dtds/struts-2.3.dtd">
    <struts>
        <package name="login" extends="struts-default" namespace="/">
            <action name="loginAction" method="login" class="com.zzh.action.loginAction">
                <result name="success">/success.jsp</result>
            </action>
        </package>
    </struts>
1.1.4.創建success.jsp頁面
<%@ page language="java" contentType="text/html; charset=UTF-8"
    pageEncoding="UTF-8"%>
<!DOCTYPE html PUBLIC "-//W3C//DTD HTML 4.01 Transitional//EN" "http://www.w3.org/TR/html4/loose.dtd">
<html>
<head>
<meta http-equiv="Content-Type" content="text/html; charset=UTF-8">
<title>Insert title here</title>
</head>
<body>
你好!六月的余晖
</body>
</html>
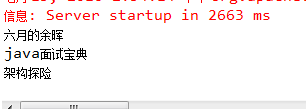
1.1.5.啟動tomcat服務器,測試是否能接收
打開網頁輸入http://localhost:8080/zzh/login.jsp
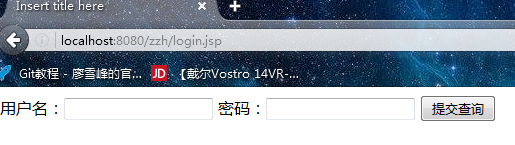
輸入用戶名與密碼提交。。。
這時後台顯示用戶名
頁面跳轉為

1.2、使用DomainModel接收參數
對於java而言,它是一種面向對象的語言,我們會發現將大量的屬性直接放在loginaction中顯得太過臃腫,於是,我們需要用一個對象來作為這些屬性的容器,也就是將這些屬性放在對象中,這時我們便可以使用DomainModel來進行。
1.2.1.新建對象User
將loginaction.java中的屬性username與password刪去,相應的getter和setter方法也刪去。
然後在User.java中
package com.zzh.us;


public class User {

    private String username;

    private String password;


    public String getUsername() {
        return username;
    }
    public void setUsername(String username) {
        this.username = username;
    }
    public String getPassword() {
        return password;
    }
    public void setPassword(String password) {
        this.password = password;
    }

}
接著在LoginAction中聲明User
注意login()方法中要用user.getUsername()
package com.zzh.action;


import com.zzh.us.User;

import com.opensymphony.xwork2.ActionSupport;

public class loginAction extends ActionSupport{

    private static final long serialVersionUID = 1L;

    private User user;

    public User getUser() {
        return user;
    }

    public void setUser(User user) {
        this.user = user;
    }

    public String login(){
        System.out.println(user.getUsername());
        return SUCCESS;
    }
}
1.2.2.指定login.jsp頁面需要明確屬性所屬對象
當我們有多個對象時,每個對象都有參數,而login.jsp傳過來的參數沒有明確對象,這時便會出現混亂。
所以我們在login.jsp中必須明確對象。
<%@ page language="java" contentType="text/html; charset=UTF-8"
    pageEncoding="UTF-8"%>
<!DOCTYPE html PUBLIC "-//W3C//DTD HTML 4.01 Transitional//EN" "http://www.w3.org/TR/html4/loose.dtd">
<html>
<head>
<meta http-equiv="Content-Type" content="text/html; charset=UTF-8">
<title>Insert title here</title>
</head>
<body>
<form action="loginAction.action" method="post">
    用戶名:<input type="text" name="user.username">
    密碼:<input type="password" name="user.password">
    <input type="submit">
</form>
</body>
</html>
1.2.3.重啟服務器,測試
結果與上個方法所得 一致。
1.3、使用ModelDriven接收參數
ModelDriven也叫模型驅動,通過實現ModelDriven接口來接收表單數據,首先Action類必須實現ModelDriven接口,同樣把表單傳過來的數據封裝起來,Acting類中必須實例化該對象,並且要重寫getModel()方法,這個方法返回的就是Action所使用的數據模型對象。
1.3.1.Action類中實現ModelDriven接口
實現ModelDriven接口,將我們需要賦值轉換的類(User)設置為ModelDriven的泛型,然後添加實現此接口的方法getModel()。此時,getModel()中返回的是我們需要轉換的對象(user)。當然,使用了ModelDriven,我們的對於user對象的getter,setter方法需要去掉,並將user對象實例化即:user = new User();
package com.zzh.action;


import com.zzh.us.User;
import com.opensymphony.xwork2.ActionSupport;
import com.opensymphony.xwork2.ModelDriven;

public class loginAction extends ActionSupport implements ModelDriven<User>{

    private static final long serialVersionUID = 1L;


    private User user = new User();

    public String login(){
        System.out.println(user.getUsername());
        System.out.println(user.getBookList().get(0).getUsername());
        System.out.println(user.getBookList().get(1).getUsername());
        return SUCCESS;
    }

    @Override
    public User getModel() {

        return user;
    }

}
1.3.2.login.jsp中去除屬性前綴
注意:使用了ModelDriven的方式,一個Action只能對應一個Model,因此在login.jsp中不需要添加user前綴,頁面上的username對應到這個Model的username屬性。
<%@ page language="java" contentType="text/html; charset=UTF-8"
    pageEncoding="UTF-8"%>
<!DOCTYPE html PUBLIC "-//W3C//DTD HTML 4.01 Transitional//EN" "http://www.w3.org/TR/html4/loose.dtd">
<html>
<head>
<meta http-equiv="Content-Type" content="text/html; charset=UTF-8">
<title>Insert title here</title>
</head>
<body>
<form action="loginAction.action" method="post">
    用戶名:<input type="text" name="username">
    密碼:<input type="password" name="password">
    <input type="submit">
</form>
</body>
</html>
1.3.2.重啟服務器,測試
結果與前面一致。
2.0 傳遞數據集
在通常情況下,我們需要傳遞的參數不只是單一的字符串,更多的是數據集。
2.0.1.User中添加屬性List<String>
package com.zzh.us;

import java.util.List;

public class User {
    private String username;

        private String password;


    private List<String> bookList;


    public List<String> getBookList() {
        return bookList;
    }
    public void setBookList(List<String> bookList) {
        this.bookList = bookList;
    }


    public String getUsername() {
        return username;
    }
    public void setUsername(String username) {
        this.username = username;
    }
    public String getPassword() {
        return password;
    }
    public void setPassword(String password) {
        this.password = password;
    }

}
2.0.2.login.jsp中增加兩條記錄給List<String>賦值
我們可以通過booklist[0]與booklist[1]來作為name。
<%@ page language="java" contentType="text/html; charset=UTF-8"
    pageEncoding="UTF-8"%>
<!DOCTYPE html PUBLIC "-//W3C//DTD HTML 4.01 Transitional//EN" "http://www.w3.org/TR/html4/loose.dtd">
<html>
<head>
<meta http-equiv="Content-Type" content="text/html; charset=UTF-8">
<title>Insert title here</title>
</head>
<body>
<form action="loginAction.action" method="post">
    用戶名:<input type="text" name="username">
    密碼:<input type="password" name="password">
    書籍1:<input type="text" name="bookList[0]">
    書籍2:<input type="text" name="bookList[1]">
    <input type="submit">
</form>
</body>
</html>
2.0.3.在Action類中添加後台打印驗證接收到的參數
package com.zzh.action;


import com.zzh.us.User;
import com.opensymphony.xwork2.ActionSupport;
import com.opensymphony.xwork2.ModelDriven;

public class loginAction extends ActionSupport implements ModelDriven<User>{

    private static final long serialVersionUID = 1L;


    private User user = new User();

    public String login(){
        System.out.println(user.getUsername());
        System.out.println(user.getBookList().get(0));
        System.out.println(user.getBookList().get(1));
        return SUCCESS;
    }

    @Override
    public User getModel() {

        return user;
    }

}
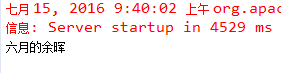
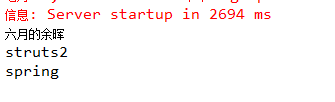
2.0.4.重啟服務器,驗證後台是否接收

跳轉至 你好!六月的余晖頁面,控制台輸出:
2.1.1.User中添加屬性List<User>
如果將泛型中的字符串改為對象,也就是說不再是一個簡單的類型
package com.zzh.us;

import java.util.List;

public class User {
    private String username;

    private String password;

    private List<User> bookList;

    public List<User> getBookList() {
        return bookList;
    }
    public void setBookList(List<User> bookList) {
        this.bookList = bookList;
    }

    public String getUsername() {
        return username;
    }
    public void setUsername(String username) {
        this.username = username;
    }
    public String getPassword() {
        return password;
    }
    public void setPassword(String password) {
        this.password = password;
    }

}
2.1.1.更改login.jsp頁面的name值
此時的bookList【】中已經不是字符串,而是一個對象,也就是說書籍的名稱在bookList中的一個屬性,所以需要加後綴.username
<%@ page language="java" contentType="text/html; charset=UTF-8"
    pageEncoding="UTF-8"%>
<!DOCTYPE html PUBLIC "-//W3C//DTD HTML 4.01 Transitional//EN" "http://www.w3.org/TR/html4/loose.dtd">
<html>
<head>
<meta http-equiv="Content-Type" content="text/html; charset=UTF-8">
<title>Insert title here</title>
</head>
<body>
<form action="loginAction.action" method="post">
    用戶名:<input type="text" name="username">
    密碼:<input type="password" name="password">
    書籍1:<input type="text" name="bookList[0].username">
    書籍2:<input type="text" name="bookList[1].username">
    <input type="submit">
</form>
</body>
</html>
2.1.2.Action類中的後台輸出
此時後台輸出user.getBookList().get(0)得到的是User對象,所以還需要增加後綴.getUsername()。
package com.zzh.action;


import com.zzh.us.User;
import com.opensymphony.xwork2.ActionSupport;
import com.opensymphony.xwork2.ModelDriven;

public class loginAction extends ActionSupport implements ModelDriven<User>{

    private static final long serialVersionUID = 1L;


    private User user = new User();

    public String login(){
        System.out.println(user.getUsername());
        System.out.println(user.getBookList().get(0).getUsername());
        System.out.println(user.getBookList().get(1).getUsername());
        return SUCCESS;
    }

    @Override
    public User getModel() {

        return user;
    }


}
2.1.3.啟動服務器,測試
3.小結 總之三種方法給有優缺點,應根據不同情況選擇使用。總算是寫完了,自己第一篇博客,由於本人只是大二的學生,如果有理解不到位或者理解錯的地方,歡迎廣大園友指正!