接著上一篇博客《Spring整合MyBatis(Maven+MySQL)一》繼續。
Spring的開放性和擴張性在J2EE應用領域得到了充分的證明,與其他優秀框架無縫的集成是Spring最為強大的功能。Spring類似電腦的主板,可以將許多部件集成在一起協調工作。
一、在Web項目中啟動Spring容器
在Web項目中當Web容器啟動時我們要同時啟動Spring容器,有三種辦法,第一種使用監聽器啟動,第二使用Servlet啟動,第三使用MVC框架的擴展點啟動,這裡主要選擇第一種,因為監聽器的啟動時機早於Servlet。強烈建議使用辦法一。
1.1、使用監聽器啟動Spring容器
我們需要使用到Spring定義好的一個監聽器:org.springframework.web.context.ContextLoaderListener,該監聽器在包Spring-web.x.x.x.jar下,修改pom.xml文件,添加依賴:
        <dependency>
            <groupId>org.springframework</groupId>
            <artifactId>spring-web</artifactId>
            <version>${spring.version}</version>
        </dependency>
修改web.xml文件,新增監聽器聲明,代碼如下:
    <listener>
        <description>Spring容器啟動監聽器</description>
        <listener-class>org.springframework.web.context.ContextLoaderListener</listener-class>
    </listener>
當監聽器在啟動Spring容器時會自動查找Web-INF/lib目錄下名為applicationContext.xml配置文件,當然也可以設置參數指定配置文件的具體位置,特別是有多個配置文件的情況,指定辦法如下:
    <listener>
        <description>Spring容器加載監聽器</description>
        <listener-class>org.springframework.web.context.ContextLoaderListener</listener-class>
    </listener>
    <context-param>
        <param-name>contextConfigLocation</param-name>
        <param-value>classpath*:applicationContext.xml</param-value>
    </context-param>
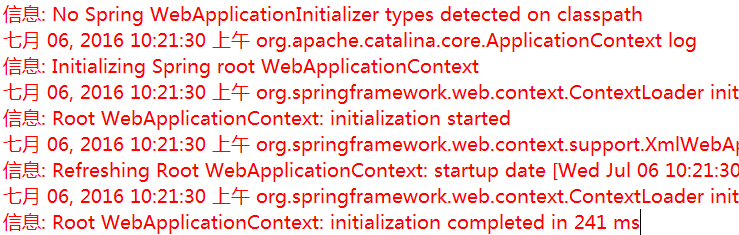
如果有多個配置文件則可以通過逗號分開。怎麼判斷是否啟動成功,則可以參考本文第二點,獲得ApplicationContext實例,也可以查看tomcat啟動時的信息,如果沒有出現錯誤且能找到如下說明基本成功。
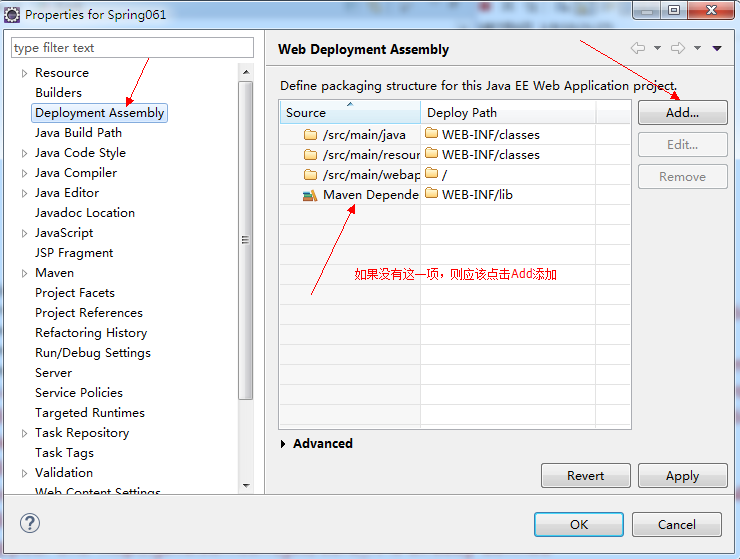
啟動失敗也有幾種可能,如applicationContext.xml文件的路徑錯誤;找不到類ContextLoaderListener;如果提示找不到類,很可能是因為沒有將Maven依賴的包發布出去,可以在項目屬性中設置,如下所示:
1.2、使用Servlet方式啟動Spring容器
方法與1.1基本相同,只是配置有小的區別,修改web.xml的具體內容如下:
<servlet>
    <servlet-name>context</servlet-name>
    <servlet-class>org.springframework.web.context.ContextLoaderServlet</servlet-class>
    <load-on-startup>1</load-on-startup>
</ servlet >
<context-param>
    <param-name>contextConfigLocation</param-name>
       <!-- 多個配置文件之間以“,”隔開 -->
    <param-value>
           classpath:beans1.xml,classpath:beans2.xml...
     </param-value>
  </context-param>
需要注意的是兩者都是繼承類ContextLoader,但從Spring3.0開始已經移除了ContextLoaderServlet,用ContextLoaderListener的方式替代。第3種啟動方式只有在特定的框架中才有效,所以不多用。
二、獲取ApplicationContext實例
當web容器啟動時Spring容器如果也成功啟動了,則可以在整個web應用程序中獲得ApplicationContext完成IOC、AOP及Spring的其它功能,獲得ApplicationContext的常用方法有兩種:
2.1、使用工具類WebApplicationContextUtils獲得Spring容器
2.1.1、定義一個Service類,BookTypeService代碼如下:
package com.zhangguo.Spring61.service;

import java.util.List;

import javax.annotation.Resource;

import org.springframework.stereotype.Service;
import com.zhangguo.Spring61.entities.BookType;
import com.zhangguo.Spring61.mapping.BookTypeDAO;

/*
 * 圖書類型服務
 */
@Service
public class BookTypeService {

    @Resource
    BookTypeDAO bookTypeDAO;

    public List<BookType> getAllBookTypes() {
        System.err.println("一些被省去的業務");
        return bookTypeDAO.getAllBookTypes();
    }
}
@Service表示Spring容器將自動管理BookTypeService實例,@Resource表示自動裝配,會自動從Spring容器中找到類型為BookTypeDAO的Bean完成bookTypeDAO字段的初始化。
2.1.2、定義一個Servlet,BookTypeList Servlet代碼如下:
package com.zhangguo.Spring61.action;

import java.io.IOException;
import java.io.PrintWriter;

import javax.servlet.ServletException;
import javax.servlet.annotation.WebServlet;
import javax.servlet.http.HttpServlet;
import javax.servlet.http.HttpServletRequest;
import javax.servlet.http.HttpServletResponse;

import org.springframework.web.context.WebApplicationContext;
import org.springframework.web.context.support.WebApplicationContextUtils;

import com.zhangguo.Spring61.service.BookTypeService;

@WebServlet("/BookTypeList.do")
public class BookTypeList extends HttpServlet {
    private static final long serialVersionUID = 1L;

     BookTypeService bookTypeService;

    @Override
    public void init() throws ServletException {
      //在當前上下文中獲得Spring容器
      WebApplicationContext ctx=WebApplicationContextUtils.getWebApplicationContext(getServletContext());
      //從容器中獲得bean
      bookTypeService=ctx.getBean(BookTypeService.class);
    }

    protected void doGet(HttpServletRequest request, HttpServletResponse response) throws ServletException, IOException {
        PrintWriter writer=response.getWriter();
        writer.print(bookTypeService.getAllBookTypes().size());
    }

    protected void doPost(HttpServletRequest request, HttpServletResponse response) throws ServletException, IOException {
        doGet(request, response);
    }

}
在Servlet中我們重寫了父類的init方法,注意如果重寫帶參數的那個init方法init(ServletConfig config),則一定要記得調用父類的init方法完成參數的初始化,即不要刪除super.init(config),如果不這樣將獲不到servlet下上文;在init方法中我們通過WebApplicationContextUtils類獲得得了Spring容器。
此時的applicationContext.xml文件如下:

運行結果:

2.2、實現接口ApplicationContextAware
當一個類實現了org.springframework.context.ApplicationContextAware接口時且實現該接口的類被Spring容器管理,則Spring容器會自動意識到需要調用接口中的方法setApplicationContext設置當前的Spring上下文。通俗說實現這個接口可以方便獲得Spring上下文。該接口如下:
為了達到目的,我們現在創建一個名為CtxUtil.java的類,實現該接口,代如下:
package com.zhangguo.Spring61.action;

import org.springframework.beans.BeansException;
import org.springframework.context.ApplicationContext;
import org.springframework.context.ApplicationContextAware;
import org.springframework.stereotype.Component;

@Component
public class CtxUtil implements ApplicationContextAware {

    public static ApplicationContext springCtx;

    @Override
    public void setApplicationContext(ApplicationContext applicationContext) throws BeansException {
        springCtx=applicationContext;
    }

    //根據名稱獲得容器中的bean
    public static Object getBean(String name){
        return springCtx.getBean(name);
    }

    //根據類型獲得容器中的bean
    public static <T> T getBean(Class<T> clazz){
        return springCtx.getBean(clazz);
    }

}
為了讓Spring容器在加載時能掃描到該類,我們在類上注解了@Component;其實也可以直接在ApplicationContext.xml中新增一個bean,如下所示:
    <bean id="ctxUtil" class="com.zhangguo.Spring61.action.CtxUtil"></bean>

    <!--自動掃描組件 -->
    <context:component-scan base-package="com.zhangguo.Spring61">
        <context:exclude-filter type="aspectj" expression="com.zhangguo.Spring61.dao.*"/>
    </context:component-scan>
測試代碼如下:
運行結果同2.1。
3、基於注解的聲明式事務管理配置
MyBatis-Spring利用了存在於Spring中的DataSourceTransactionManager管理事務。
一旦Spring的PlatformTransactionManager配置好了,你可以在Spring中以你通常的做法來配置事務。@Transactional注解和AOP方式的配置都是支持的。在事務處理期間,一個單獨的SqlSession對象將會被創建和使用。當事務完成時,這個session會以合適的方式提交或回滾。一旦事務創建之後,MyBatis-Spring將會透明的管理事務。在你的DAO類中就不需要額外的代碼了。
我們先使用一個簡單的示例,證明沒有事務時的狀態:
        PrintWriter writer=response.getWriter();
        BookType entity1=new BookType();
        entity1.setTypeName("中國文學");

        BookType entity2=new BookType();
        entity1.setTypeName("外國文學");  //請注意這是是entity1
        writer.print(bookTypeService.addDouble(entity1, entity2));
當運行時會發現有異常,因為entity2的typeName屬性是null,報異常了;按照事務的特性兩條記錄要麼都添加成功要麼都添加不成功。但查看數據庫會發現,有一個對象的數據被添加成功了,另一個則失敗了,這不符合原子特性。

為了解決上面的問題,我們引入Spring中的事務與MyBatis-Spring的事務管理。一定要記得添加Spring-tx.jar的依賴。修改ApplicationContext.xml如下所示:
<?xml version="1.0" encoding="UTF-8"?>
<beans xmlns="http://www.springframework.org/schema/beans"
    xmlns:xsi="http://www.w3.org/2001/XMLSchema-instance"
    xmlns:p="http://www.springframework.org/schema/p"
    xmlns:aop="http://www.springframework.org/schema/aop"
    xmlns:context="http://www.springframework.org/schema/context"
    xmlns:tx="http://www.springframework.org/schema/tx"
    xsi:schemaLocation="http://www.springframework.org/schema/beans
        http://www.springframework.org/schema/beans/spring-beans.xsd
        http://www.springframework.org/schema/context
        http://www.springframework.org/schema/context/spring-context-4.3.xsd
        http://www.springframework.org/schema/aop
        http://www.springframework.org/schema/aop/spring-aop-4.3.xsd
        http://www.springframework.org/schema/tx
        http://www.springframework.org/schema/tx/spring-tx-4.3.xsd">

    <!--屬性占位文件引入,可以通過${屬性名}獲得屬性文件中的內容 -->
    <context:property-placeholder location="classpath:db.properties" />

    <!--定義一個jdbc數據源,創建一個驅動管理數據源的bean -->
    <bean id="jdbcDataSource" class="com.mchange.v2.c3p0.ComboPooledDataSource"
        destroy-method="close">
        <property name="driverClass" value="${jdbc.driver}" />
        <property name="jdbcUrl" value="${jdbc.url}" />
        <property name="user" value="${jdbc.uid}" />
        <property name="password" value="${jdbc.pwd}" />
        <property name="acquireIncrement" value="5"></property>
        <property name="initialPoolSize" value="10"></property>
        <property name="minPoolSize" value="5"></property>
        <property name="maxPoolSize" value="20"></property>
    </bean>

    <!--定義一個jdbc數據源,創建一個驅動管理數據源的bean -->
    <bean id="jdbcDataSourceBak"
        class="org.springframework.jdbc.datasource.DriverManagerDataSource">
        <property name="driverClassName" value="${jdbc.driver}" />
        <property name="url" value="${jdbc.url}" />
        <property name="username" value="${jdbc.uid}" />
        <property name="password" value="${jdbc.pwd}" />
    </bean>

    <!--創建一個sql會話工廠bean,指定數據源 -->
    <bean id="sqlSessionFactory" class="org.mybatis.spring.SqlSessionFactoryBean">
        <!-- 指定數據源 -->
        <property name="dataSource" ref="jdbcDataSource" />
        <!--類型別名包,默認引入com.zhangguo.Spring61.entities下的所有類 -->
        <property name="typeAliasesPackage" value="com.zhangguo.Spring61.entities"></property>
        <!--指定sql映射xml文件的路徑 -->
        <property name="mapperLocations"
            value="classpath:com/zhangguo/Spring61/mapping/*Mapper.xml"></property>
    </bean>

    <!--自動掃描映射接口 -->
    <bean class="org.mybatis.spring.mapper.MapperScannerConfigurer">
        <!-- 指定sql會話工廠,在上面配置過的 -->
        <property name="sqlSessionFactoryBeanName" value="sqlSessionFactory"></property>
        <!-- 指定基礎包,即自動掃描com.zhangguo.Spring61.mapping這個包以及它的子包下的所有映射接口類 -->
        <property name="basePackage" value="com.zhangguo.Spring61.mapping"></property>
    </bean>

    <!-- 創建一個sqlSession對象 -->
    <bean id="sqlSession" class="org.mybatis.spring.SqlSessionTemplate">
        <constructor-arg index="0" ref="sqlSessionFactory" />
    </bean>

    <bean id="ctxUtil" class="com.zhangguo.Spring61.action.CtxUtil"></bean>

    <!--聲明式事務管理 -->
    <bean id="txManager" class="org.springframework.jdbc.datasource.DataSourceTransactionManager">
        <property name="dataSource" ref="jdbcDataSource"></property>
    </bean>
    <!--聲明支持使用注解管理事務 -->
    <tx:annotation-driven transaction-manager="txManager"/>

    <!--自動掃描組件 -->
    <context:component-scan base-package="com.zhangguo.Spring61">
        <context:exclude-filter type="aspectj" expression="com.zhangguo.Spring61.dao.*"/>
    </context:component-scan>
    <aop:aspectj-autoproxy proxy-target-class="true"></aop:aspectj-autoproxy>
</beans>
請注意,加粗字體的部分是新增的。 修改後的BookTypeDAO接口如下:
package com.zhangguo.Spring61.mapping;

import java.util.List;

import com.zhangguo.Spring61.entities.BookType;

/**
 * 圖書類型數據訪問接口
 *
 */
public interface BookTypeDAO {
    /*
     * 獲得所有圖書類型
     */
    public List<BookType> getAllBookTypes();

    /**
     * 添加新的圖書類型
     */
    public int add(BookType entity);
}
修改後的BookTypeMapper.xml映射文件如下:
<?xml version="1.0" encoding="UTF-8"?>
<!DOCTYPE mapper PUBLIC "-//mybatis.org//DTD Mapper 3.0//EN" "http://mybatis.org/dtd/mybatis-3-mapper.dtd">
<!--命名空間應該是對應接口的包名+類名 -->
<mapper namespace="com.zhangguo.Spring61.mapping.BookTypeDAO">
    <!--id應該是接口中的方法,結果類型如沒有配置別名則應該使用全名稱 -->
    <select id="getAllBookTypes" resultType="BookType">
        select id,typeName from booktypes
    </select>

    <insert id="add" parameterType="BookType">
        insert into booktypes(typeName) values(#{typeName})
    </insert>
</mapper>
修改後的BookTypeService類如下:
package com.zhangguo.Spring61.service;

import java.util.List;
import javax.annotation.Resource;
import org.springframework.stereotype.Service;
import org.springframework.transaction.annotation.Transactional;
import com.zhangguo.Spring61.entities.BookType;
import com.zhangguo.Spring61.mapping.BookTypeDAO;

/*
 * 圖書類型服務
 */
@Service
public class BookTypeService {

    @Resource
    BookTypeDAO bookTypeDAO;

    public List<BookType> getAllBookTypes() {
        System.err.println("一些被省去的業務");
        return bookTypeDAO.getAllBookTypes();
    }

    @Transactional
    public int addDouble(BookType entity1,BookType entity2){
        int rows=0;
        rows+=bookTypeDAO.add(entity1);
        rows+=bookTypeDAO.add(entity2);
        return rows;
    }
}
在方法addDouble上增加了一個注解@Transactional,用於顯式聲明該方法需要事務處理,如果把該注解移除則不會擁有事務特性。
測試的Servlet代碼如下:
package com.zhangguo.Spring61.action;

import java.io.IOException;
import java.io.PrintWriter;

import javax.servlet.ServletConfig;
import javax.servlet.ServletException;
import javax.servlet.annotation.WebServlet;
import javax.servlet.http.HttpServlet;
import javax.servlet.http.HttpServletRequest;
import javax.servlet.http.HttpServletResponse;

import org.springframework.web.context.WebApplicationContext;
import org.springframework.web.context.support.WebApplicationContextUtils;

import com.zhangguo.Spring61.entities.BookType;
import com.zhangguo.Spring61.service.BookTypeService;

@WebServlet("/BookTypeAdd.do")
public class BookTypeAdd extends HttpServlet {
    private static final long serialVersionUID = 1L;

     BookTypeService bookTypeService;

    @Override
    public void init() throws ServletException {
      //從容器中獲得bean
      bookTypeService=CtxUtil.getBean(BookTypeService.class);
    }

    protected void doGet(HttpServletRequest request, HttpServletResponse response) throws ServletException, IOException {
        PrintWriter writer=response.getWriter();
        BookType entity1=new BookType();
        entity1.setTypeName("量子力學");

        BookType entity2=new BookType();
        entity1.setTypeName("天體物理");  //請注意這是是entity1,entity2的typeName屬性為空
        writer.print(bookTypeService.addDouble(entity1, entity2));
    }

    protected void doPost(HttpServletRequest request, HttpServletResponse response) throws ServletException, IOException {
        doGet(request, response);
    }

}
entity2因為沒有typeName屬性,添加時會異常,有事務存在,則數據庫並沒有變化,entity1與entity2都未添加到數據庫中。
除了使用聲明式事務管理,也可以使用AOP進行事務攔截,參考代碼如下:
    <!-- 攔截器方式配置事物 -->
    <tx:advice id="transactionAdvice" transaction-manager="transactionManager">
        <tx:attributes>
            <tx:method name="add*" propagation="REQUIRED" />
            <tx:method name="append*" propagation="REQUIRED" />
            <tx:method name="insert*" propagation="REQUIRED" />
            <tx:method name="save*" propagation="REQUIRED" />
            <tx:method name="update*" propagation="REQUIRED" />
            <tx:method name="modify*" propagation="REQUIRED" />
            <tx:method name="edit*" propagation="REQUIRED" />
            <tx:method name="delete*" propagation="REQUIRED" />
            <tx:method name="remove*" propagation="REQUIRED" />
            <tx:method name="repair" propagation="REQUIRED" />
            <tx:method name="delAndRepair" propagation="REQUIRED" />
            <tx:method name="get*" propagation="SUPPORTS" />
            <tx:method name="find*" propagation="SUPPORTS" />
            <tx:method name="load*" propagation="SUPPORTS" />
            <tx:method name="search*" propagation="SUPPORTS" />
            <tx:method name="datagrid*" propagation="SUPPORTS" />
            <tx:method name="*" propagation="SUPPORTS" />
        </tx:attributes>
    </tx:advice>
    <aop:config>
        <aop:pointcut id="transactionPointcut" expression="execution(* com.service..*Impl.*(..))" />
        <aop:advisor pointcut-ref="transactionPointcut" advice-ref="transactionAdvice" />
    </aop:config>
小結:聲明式事務管理需要根據實際情況編碼注解方法要不要事務處理,攔截方式配置事務則是根據方法名統一處理,一般查詢是不需要事務參與的。在上面的配置中REQUIRED則表示需要事務支持,而SUPPORTS則不需要事務支持。
示例下載