進度條效果圖
As a part of the process of decoupling Eclipse services from workbench, the Progress View has been extracted to a separate plug-in and refactored in order to be available for Eclipse4 applications.
ProgressView已經作為一個獨立的plug-in存在了
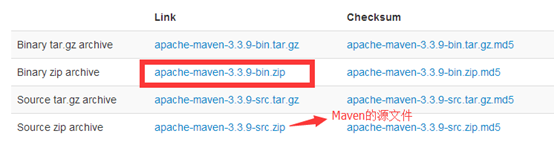
Currently, the Progress View plug-in is not shipped with Eclipse SDK packages, but it can be installed from update site: https://hudson.eclipse.org/platform/job/eclipse4-progress-view/lastSuccessfulBuild/artifact/releng/org.eclipse.e4.ui.progress.update/target/repository/
Step1: Add plug-in
URL is :
https://hudson.eclipse.org/platform/job/eclipse4-progress-view/lastSuccessfulBuild/artifact/releng/org.eclipse.e4.ui.progress.update/target/repository/
Step2: 新建Eclipse RCP項目ProgressViewModel
這裡只是測試ProgressView,check Create Simple Content
Step 3: 在項目中引入plug-in
Step 4:添加一個Add-ons,Class URI綁定為bundleclass://org.eclipse.e4.ui.progress/org.eclipse.e4.ui.progress.ProgressViewAddon(Find不到的話就直接寫上去)
讓它隨項目的啟動而初始化
Step5: 添加一個Part, URI綁定為:bundleclass://org.eclipse.e4.ui.progress/org.eclipse.e4.ui.progress.ProgressView(Find不到的話就直接寫上去),讓它顯示進度條
Step6: 實例化一個Job,Code as follows,至於Job應該研究一下(http://www.vogella.com/tutorials/EclipseJobs/article.html#prerequisite)
button.addSelectionListener(new SelectionListener() {

            @Override
            public void widgetSelected(SelectionEvent arg0) {
                Job job = Job.create("Runing Job", monitor -> {
                    SubMonitor subMonitor = SubMonitor.convert(monitor);

                    subMonitor.beginTask("Beging Task...", 5000);

                    for (int i = 0; i < 50; i++) {
                        try {
                            Thread.sleep(500L);
                        } catch (Exception e) {
                            e.printStackTrace();
                        }
                        subMonitor.worked(100);
                    }

                    return Status.OK_STATUS;
                });

                job.schedule();
            }

            @Override
            public void widgetDefaultSelected(SelectionEvent arg0) {}
        });
效果如下: