書接上回 構建 struts2 spring3 mybatis 的maven項目 構建 pom.xml
繼續在原有框架下 融合shiro ,具體shiro是啥 這裡就不解釋了,恩 反正功能挺強大的
本著先會用再深入的原則,還是嘗試著將shiro融入框架中
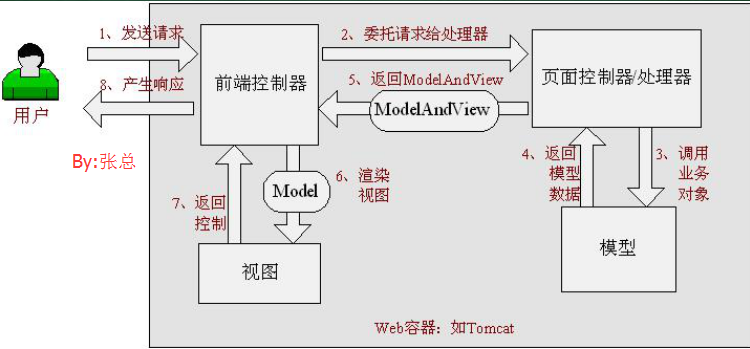
0 首先上下這個項目的整體結構圖
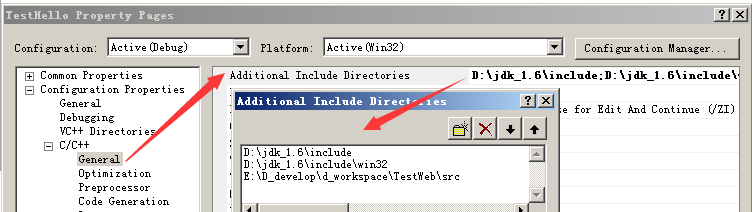
1 在導入shiro的jar包 在pom.xml中添加shiro的配置
...
   <shiro.version>1.2.1</shiro.version>
...
  <dependency>
    <groupId>org.apache.shiro</groupId>
    <artifactId>shiro-core</artifactId>
    <version>${shiro.version}</version>
  </dependency>
  <dependency>
    <groupId>org.apache.shiro</groupId>
    <artifactId>shiro-web</artifactId>
    <version>${shiro.version}</version>
  </dependency>
  <dependency>
    <groupId>org.apache.shiro</groupId>
    <artifactId>shiro-ehcache</artifactId>
    <version>${shiro.version}</version>
  </dependency>
  <dependency>
    <groupId>org.apache.shiro</groupId>
    <artifactId>shiro-spring</artifactId>
    <version>${shiro.version}</version>
  </dependency>
  </dependencies>
2 在web.xml中導入 shiro的過濾器
<filter>
        <filter-name>shiroFilter</filter-name>
        <filter-class>org.springframework.web.filter.DelegatingFilterProxy</filter-class>
        <init-param>
            <param-name>targetFilterLifecycle</param-name>
            <param-value>true</param-value>
        </init-param>
    </filter>
    <filter-mapping>
        <filter-name>shiroFilter</filter-name>
        <url-pattern>/*</url-pattern>
        <dispatcher>REQUEST</dispatcher>
        <dispatcher>FORWARD</dispatcher>
    </filter-mapping>
這裡要說明一下
shiro的過濾器是前置過濾器,需要添加在struts2的前面,如果放在struts2之後會報錯
然後是在spring的過濾配置中添加spring-shiro的配置文件
<listener>
    <listener-class>org.springframework.web.context.ContextLoaderListener</listener-class>
  </listener>
  <context-param>
    <param-name>contextConfigLocation</param-name>
    <param-value>
         classpath:applicationContext-*.xml
    </param-value>
  </context-param>
配置文件為applicationContext-shiro.xml, 因為這裡用了通配符 所以不用修改
3 然後 添加spring-shiro的配置文件
<?xml version="1.0" encoding="UTF-8"?>
<beans...>

   <description>Shiro安全配置   來源於: http://shiro.apache.org/spring.html </description>

    <bean id="securityManager" class="org.apache.shiro.web.mgt.DefaultWebSecurityManager">
        <property name="realm" ref="shiroDbRealm" />
    </bean>
    <bean id="shiroDbRealm" class="lqb.shiro.ShiroDbRealm" />
    <bean id="shiroFilter" class="org.apache.shiro.spring.web.ShiroFilterFactoryBean">
        <property name="securityManager" ref="securityManager" />
        <property name="loginUrl" value="/login_loginPage.do" /> <!-- 沒有權限或者失敗後跳轉的頁面 -->
        <property name="successUrl" value="/login_home.do" />
        <property name="unauthorizedUrl" value="/other_error.do"/>
        <property name="filterChainDefinitions">
            <value>

            /login_loginPage.do = anon

            /login_login.do = anon
            /login_home.do=authc
            /login_hello.do=authc

            /t1/**=roles[aa],perms[aaa]
            /t2/**=roles[bb],perms[baaa]
            /t3/**=roles[dd]

            </value>
        </property>
    </bean>

    <!-- 保證實現了Shiro內部lifecycle函數的bean執行 -->
    <bean id="lifecycleBeanPostProcessor" class="org.apache.shiro.spring.LifecycleBeanPostProcessor"/>


    <!-- AOP式方法級權限檢查 -->
    <bean class="org.springframework.aop.framework.autoproxy.DefaultAdvisorAutoProxyCreator" depends-on="lifecycleBeanPostProcessor">
         <property name="proxyTargetClass" value="true" />
    </bean>
    <bean class="org.apache.shiro.spring.security.interceptor.AuthorizationAttributeSourceAdvisor">
        <property name="securityManager" ref="securityManager"/>
    </bean>


</beans>
這裡需要就是下 filterChainDefinitions 的value
key 是 對應的跳轉路徑 這裡都是指定的struts2的跳轉 可以匹配通配符 *
value 是對應的過濾權限
anon 不需要驗證
authc 需要登錄驗證
roles[aa] 角色驗證 中括號內為指定的角色
perms[aaa] 權限驗證 中括號內衛指定的權限
4 添加shiro的緩存配置文件
<ehcache> <diskStore path="java.io.tmpdir/shiro-spring-sample"/> <defaultCache maxElementsInMemory="10000" eternal="false" timeToIdleSeconds="120" timeToLiveSeconds="120" overflowToDisk="false" diskPersistent="false" diskExpiryThreadIntervalSeconds="120" /> <cache name="shiro-activeSessionCache" maxElementsInMemory="10000" eternal="true" overflowToDisk="true" diskPersistent="true" diskExpiryThreadIntervalSeconds="600"/> <cache name="org.apache.shiro.realm.SimpleAccountRealm.authorization" maxElementsInMemory="100" eternal="false" timeToLiveSeconds="600" overflowToDisk="false"/> </ehcache> View Code
5 角色 權限 實現
因為只是一個demo 所以就沒有弄角色表和權限表 只是模擬了一下 用戶--角色--權限 的5表結構
用戶是查的表 角色和權限只是假實現
6 修改 struts.xml
<struts>
    <!-- 全局包設置 -->
    <package name="defalutGlobal" namespace="/" extends="json-default">

    </package>
    <!-- 自定義開發包 -->
    <package name="myDefault"  extends="defalutGlobal">
        <!--登錄Action -->
        <action name="login_*" class="loginAction" method="{1}" >
            <result name="loginPage">WEB-INF/pages/login.html</result>
            <result name="loginPageForm">WEB-INF/pages/login2.html</result>
            <result name="home">WEB-INF/pages/home.html</result>
            <result name="hello">WEB-INF/pages/hello.html</result>

            <result name="success" type="json">
                <param name="root">jsonResult</param>
            </result>

        </action>

        <action name="other_*" class="otherAction" method="{1}">
            <result name="error">WEB-INF/pages/other/error.html</result>
        </action>
    </package>

    <package name="t1"  extends="defalutGlobal" namespace="/t1">
        <action name="t1_*" class="test1Action" method="{1}">
            <result name="t1">/WEB-INF/pages/t1/t1.html</result>
            <result name="t2">/WEB-INF/pages/t1/t2.html</result>
            <result name="t3">/WEB-INF/pages/t1/t3.html</result>
            <result name="toT2" type="redirect" >/t2/t2_t2.do</result>

        </action>
    </package>
    <package name="t2"  extends="defalutGlobal" namespace="/t2">
        <action name="t2_*" class="test2Action" method="{1}">
            <result name="t1">/WEB-INF/pages/t2/t1.html</result>
            <result name="t2">/WEB-INF/pages/t2/t2.html</result>
            <result name="t3">/WEB-INF/pages/t2/t3.html</result>
        </action>
    </package>
    <package name="t3"  extends="defalutGlobal" namespace="/t3">
        <action name="t3_*" class="test3Action" method="{1}">
            <result name="t1">/WEB-INF/pages/t3/t1.html</result>
            <result name="t2">/WEB-INF/pages/t3/t2.html</result>
            <result name="t3">/WEB-INF/pages/t3/t3.html</result>
        </action>
    </package>

</struts>
這裡為了更好地測試shiro的權限角色控制 所以把 t1,t2,t3加了namespace
7 添加html
這裡就沒啥說的了 給個縮略圖吧
8 實現reaml
public class ShiroDbRealm extends AuthorizingRealm {

    @Autowired
    private UserService userService;
    @Autowired
    private RoleService roleService;
    @Autowired
    private PermissionService permissionService;

    /**
     * 認證回調函數,登錄時調用.
     */
    @Override
    protected AuthenticationInfo doGetAuthenticationInfo(
            AuthenticationToken authcToken) throws AuthenticationException {
        UsernamePasswordToken token = (UsernamePasswordToken) authcToken;
        User user = userService.getByUserName(token.getUsername());
        if (user != null) {
            return new SimpleAuthenticationInfo(new ShiroUser(user.getUsername(), user.getNickname()), user.getPassword(),getName());
        } else {
            return null;
        }
    }

    /**
     * 授權查詢回調函數, 進行鑒權但緩存中無用戶的授權信息時調用.
     */
    @Override
    protected AuthorizationInfo doGetAuthorizationInfo(
            PrincipalCollection principals) {
        ShiroUser shiroUser = (ShiroUser) principals.getPrimaryPrincipal();

        SimpleAuthorizationInfo info = new SimpleAuthorizationInfo();
        // 加載用戶的roles
        List<Role> roles = roleService.getByUserName(shiroUser.username);
        List<String> stringRoles = new ArrayList<String>(roles.size());
        for (Role role : roles) {
            stringRoles.add(role.getRolename());
        }
        info.addRoles(stringRoles);

        // 加載用戶的permissions
        List<Permission> permissions = permissionService.getByUserName(shiroUser.username);
        Set<String> stringPermissions = new HashSet<String>(permissions.size());
        for (Permission permission : permissions) {
            stringPermissions.add(permission.getPermissionname());
        }
        info.setStringPermissions(stringPermissions);

        return info;
    }

    /**
     * 自定義Authentication對象,使得Subject除了攜帶用戶的登錄名外還可以攜帶更多信息.
     */
    public static class ShiroUser implements Serializable {
        private static final long serialVersionUID = -1373760761780840081L;
        private String username;
        private String nickname;

        public ShiroUser(String username, String nickname) {
            this.username = username;
            this.nickname = nickname;
        }
    /**------getset略--------*/
    }
}
9 action
public class LoginAction extends BaseAction{

    private String username;
    private String password;
    @Autowired
    UserService userService;

    /**
     * 登錄頁面
     */
    public String loginPage(){return "loginPage";
    }


    /**
     * home頁面
     */
    public String home(){
        return "home";
    }

    /**
     * hello頁面
     */
    public String hello(){
        System.out.println(SecurityUtils.getSubject().hasRole("cc"));
        return "hello";
    }


    /**
     * 登錄
     */
    public String login(){
        Map<String,Object> map = new HashMap<String,Object>();
        User u=new User(getUsername(),getPassword());
        u=userService.check(u);
        if("0".equals(u.getRes())){
            map.put("res", "true");
            AuthenticationToken token = new UsernamePasswordToken(username,password);// username和password是從表單提交過來的
            Subject currentUser = SecurityUtils.getSubject();
            currentUser.login(token);

        }else{
            map.put("res", "false");
        }
        JSONObject json = JSONObject.fromObject(map);//將map對象轉換成json類型數據
        setJsonResult(json.toString());//給result賦值,傳遞給頁面
        return "success";
    }

    /**
     * 登錄頁面
     */
    public String loginPageForm(){
        String result="loginPageForm";
        return result;
    }
    /**
     * 登錄
     */
    public String loginForm(){
        System.out.println("loginForm");
        String result="loginPageForm";
        User u=new User(getUsername(),getPassword());
        u=userService.check(u);

        if("0".equals(u.getRes())){
            AuthenticationToken token = new UsernamePasswordToken(username,password);// username和password是從表單提交過來的
            Subject currentUser = SecurityUtils.getSubject();
            currentUser.login(token);
            result="home";
        }

        return result;
    }


    /**
     * 登出
     */
    public String logout(){
        Subject currentUser = SecurityUtils.getSubject();if (currentUser.isAuthenticated()) {
            currentUser.logout(); // session 會銷毀,在SessionListener監聽session銷毀,清理權限緩存
            if (LOG.isDebugEnabled()) {
                LOG.debug("用戶" + username + "退出登錄");
            }
        }return "loginPage";
    }

  /**--------getset略----------*/

}
這裡就只上LoginAction了 其他的action 只是實現的跳轉沒有啥實際操作 就略過了
如果先看其他action 就只能下源碼了
這裡還要說一下 登錄頁面寫了兩個 一個是ajax的一個是form 沒有啥特別的 只是為了之後學習shiro remberme功能 打個提前量
10 數據庫結果
create table base_user
(
   id                   int not null auto_increment,
   createtime           char(20),
   username                char(20),
   password                char(20),
   nickname                char(20),
   t1                   char(100),
   t2                    char(30),
   primary key (id)
);
好 完成 測試下 成功
最後總結下
1 不得不吐槽下 網上的關於shiro的教程雖然不算少 但大都是 springMVC的 關於struts2的還是比較少的
2 文檔還是官方的好 放一個中文的shiro參考手冊 下載
3 本人研究shiro時間不長 這裡只是作為一個入門參考 如果文中有錯誤的地方 盡情支出 歡迎技術噴子
4 下次打算把shiro的 rememberme等功能研究下 再寫一篇
5 本項目 下載