windows 環境下nginx + tomcat群 + redis 實現session共享,nginxredis
本例采用的是
nginx 1.9.13
tomcat 7.0.64
redis 2.8
操作步驟:
① 准備兩個tomcat,並修改端口,修改tomcat/webapps/ROOT中index.jsp內容為:
<%@ page language="java" contentType="text/html; charset=UTF-8"
    pageEncoding="UTF-8"%>
<%
    String username = request.getParameter("username");
    System.out.println("username:"+username);

    if(username!=null){
        session.setAttribute("userSession", username);
        System.out.println("value in session is :" + session.getAttribute("userSession"));
    }
%>
<!DOCTYPE html PUBLIC "-//W3C//DTD HTML 4.01 Transitional//EN" "http://www.w3.org/TR/html4/loose.dtd">
<html>
<head>
<meta http-equiv="Content-Type" content="text/html; charset=UTF-8">
<title>ngix+tomcat+redis session共享驗證</title>
</head>
<body>


<form action="index.jsp">
     <input type="text" name="username" value=""/>
     <br/>
     <input type="submit" value="保存信息到session"/>
</form>

<hr/>

<!-- 不同tomcat請使用不同mark 以便識別  -->
你訪問的tomcat 端口為:8898   tomcat001
<br/>
session值為: <%=session.getAttribute("userSession") %>
</body>
</html>
並保證兩個tomcat都能正常啟動,並能正常訪問
② 下載ngix並修改conf文件如下

![]()
#Nginx所用用戶和組
#user niumd niumd;
#工作的子進程數量(通常等於CPU數量或者2倍於CPU)
worker_processes 1;
#錯誤日志存放路徑
#error_log logs/error.log;
#error_log logs/error.log notice;
error_log logs/error.log info;
#指定pid存放文件
pid logs/nginx.pid;
events {
#使用網絡IO模型linux建議epoll,FreeBSD建議采用kqueue
#use epoll;
#允許最大連接數
worker_connections 1024;
}
http {
include mime.types;
default_type application/octet-stream;
#定義日志格式
#log_format main '$remote_addr - $remote_user [$time_local] $request '
# '"$status" $body_bytes_sent "$http_referer" '
# '"$http_user_agent" "$http_x_forwarded_for"';
#access_log off;
access_log logs/access.log;
client_header_timeout 3m;
client_body_timeout 3m;
send_timeout 3m;
client_header_buffer_size 1k;
large_client_header_buffers 4 4k;
sendfile on;
tcp_nopush on;
tcp_nodelay on;
#keepalive_timeout 75 20;
include gzip.conf;
upstream localhost {
#ip_hash
#ip_hash; #測試時請不要打開ip_hash 否則不會在不同server間跳轉,第一次訪問的哪一個就會一直訪問哪一個server
#下面為配置的server列表,weight表示權重,值越大分配到的請求就越多,默認為1.
server localhost:8898 weight=1;
server localhost:8899 weight=1;
}
server {
listen 8888; #8888為監聽的端口,所以訪問時就要通過 ip:8888來訪問
server_name localhost;
location / {
proxy_connect_timeout 3;
proxy_send_timeout 30;
proxy_read_timeout 30;
proxy_pass http://localhost; #這裡的名字要和上面upstream後面跟的名字一致
}
}
}
View Code
③ cmd窗口中啟動nginx 停止用nginx -s stop命令
④下載redis並在cmd中執行server.exe啟動,可根據需要修改redis.conf中的端口 port 6379 ,默認端口為6379 停止使用 redis-cli shutdown
⑤ 新建maven工程並選擇和本地java_home版本一致的jdk,將https://github.com/jcoleman/tomcat-redis-session-manager 代碼加入依賴並打包
⑥ 修改tomcat/conf下context.xml為
![]()
<?xml version='1.0' encoding='utf-8'?>
<!--
Licensed to the Apache Software Foundation (ASF) under one or more
contributor license agreements. See the NOTICE file distributed with
this work for additional information regarding copyright ownership.
The ASF licenses this file to You under the Apache License, Version 2.0
(the "License"); you may not use this file except in compliance with
the License. You may obtain a copy of the License at
http://www.apache.org/licenses/LICENSE-2.0
Unless required by applicable law or agreed to in writing, software
distributed under the License is distributed on an "AS IS" BASIS,
WITHOUT WARRANTIES OR CONDITIONS OF ANY KIND, either express or implied.
See the License for the specific language governing permissions and
limitations under the License.
-->
<!-- The contents of this file will be loaded for each web application -->
<Context>
<!-- Default set of monitored resources -->
<WatchedResource>WEB-INF/web.xml</WatchedResource>
<!-- Uncomment this to disable session persistence across Tomcat restarts -->
<!--
<Manager pathname="" />
-->
<!-- Uncomment this to enable Comet connection tacking (provides events
on session expiration as well as webapp lifecycle) -->
<!--
<Valve className="org.apache.catalina.valves.CometConnectionManagerValve" />
-->
<Valve className="com.orangefunction.tomcat.redissessions.RedisSessionHandlerValve" />
<Manager className="com.orangefunction.tomcat.redissessions.RedisSessionManager"
host="localhost"
port="6379"
database="0"
maxInactiveInterval="60" />
</Context>
View Code
⑦修改tomcat/conf/server.xml中engine信息 增加jvmRoute 標示
<Engine name="Catalina" defaultHost="localhost" jvmRoute="jvm8899">
⑧ 拷貝第⑤步打好的jar包以及依賴的jedis-2.7.2.jar commons-pool2-2.4.1.jar到每個tomcat的lib目錄下
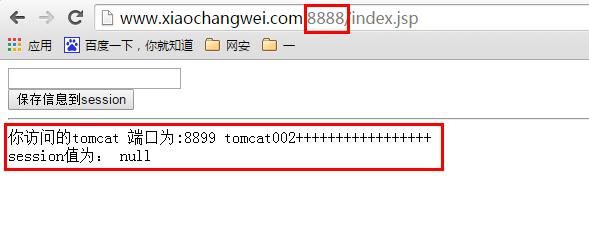
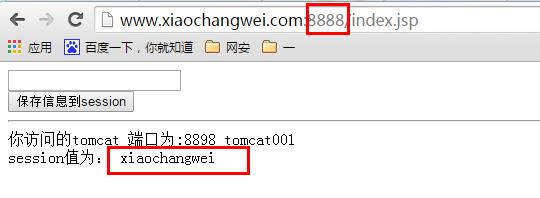
⑨ 先啟動redis,再啟動所有tomcat,最後啟動nginx 輸入nginx監聽的端口進行訪問,結果如下:
最開始沒有輸入session信息時,多次刷新將顯示訪問到了兩個不同的tomcat
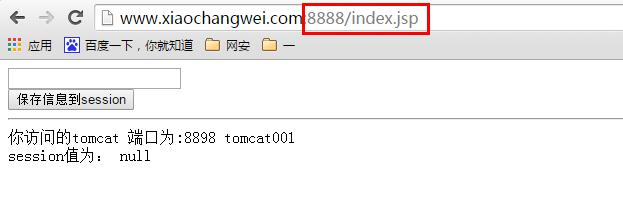
在輸入框中輸入信息並保存,再不斷刷新
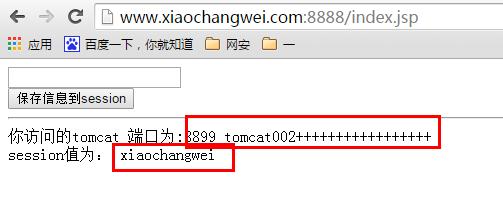
在執行過程中,也會看見redis控制台不停的有相應信息輸出

後期我會將所有的實例代碼及配置文件全部放到我的網盤,歡迎下載驗證,相互交流
下載地址: http://pan.baidu.com/s/1pK7GIbp