Spring是分層的JavaSE/EE Full-Stack輕量級開源框架.以IoC(Inverse of Control 控制反轉)和AOP(Aspect Oriented Programming 面向切面編程)為內核, 取代EJB的臃腫/低效/脫離現實.
 DI: 即依賴注入, IoC容器需要為程序提供依賴對象,而所依賴的對象又依賴於其他對象,因此可以一次獲取該對象所依賴的所有對象(如Controller依賴於Service, Service依賴於DAO, 因此Controller找Ioc容器獲取Service, 當IoC容器提供Service的同時,DAO也同時注入到Service中)
創建和依賴關系的維護交給Spring管理; AOP支持面向切面編程,可以方便的實現對程序進行權限攔截/運行監控/緩存實現等功能; 聲明式事務管理Junit4支持,通過注解方便測試Spring程序; 集成各種優秀框架API(如JDBC/JavaMail/遠程調用等)提供了封裝,大大降低API使用難度;
Spring依賴需求- 模擬用戶注冊過程:
<code class="hljs xml"><dependencies>
    <dependency>
        <groupid>org.springframework</groupid>
        <artifactid>spring-core</artifactid>
        <version>4.2.0.RELEASE</version>
    </dependency>
    <dependency>
        <groupid>org.springframework</groupid>
        <artifactid>spring-context</artifactid>
        <version>4.2.0.RELEASE</version>
    </dependency>
    <dependency>
        <groupid>org.springframework</groupid>
        <artifactid>spring-beans</artifactid>
        <version>4.2.0.RELEASE</version>
    </dependency>
    <dependency>
        <groupid>org.springframework</groupid>
        <artifactid>spring-expression</artifactid>
        <version>4.2.0.RELEASE</version>
    </dependency>
    <dependency>
        <groupid>commons-logging</groupid>
        <artifactid>commons-logging</artifactid>
        <version>1.2</version>
    </dependency>
    <dependency>
        <groupid>junit</groupid>
        <artifactid>junit</artifactid>
        <version>4.11</version>
    </dependency>
</dependencies></code>
Controller
/**
 * Created by jifang on 15/12/5.
 */
public class UserController {

    /**
     * 依賴注入(DI): 在Spring構造UserController對象時, 可以同時將構造好的UserService對象注入(下同)
     */
    private IUserService userService;

    public IUserService getUserService() {
        return userService;
    }

    public void setUserService(IUserService userService) {
        this.userService = userService;
    }

    public void register(String userName, String password) {
        System.out.println("用戶: " + userName + " 進行注冊...");
        userService.register(userName, password);
    }
}
Service
public interface IUserService {
    void register(String userName, String password);
}
public class UserServiceImpl implements IUserService {

    private IUserDao userDao;

    public IUserDao getUserDao() {
        return userDao;
    }

    public void setUserDao(IUserDao userDao) {
        this.userDao = userDao;
    }

    @Override
    public void register(String userName, String password) {
        System.out.println("用戶: " + userName + " 進行注冊...");
        userDao.add(userName, passProcess(password));
    }

    // 對密碼進行加密處理
    private String passProcess(String password) {
        System.out.println("密碼: " + password + "加密處理...");
        return password;
    }
}
DAO
public interface IUserDao {
    void add(String userName, String password);
}
public class UserDaoImpl implements IUserDao {

    @Override
    public void add(String userName, String password) {
        System.out.println("用戶: " + userName + ", 密碼: " + password + " 加入數據庫");
    }
}
配置Bean
<code class="hljs xml"><!--{cke_protected}{C}%3C!%2D%2D%3Fxml%20version%3D%221.0%22%20encoding%3D%22UTF-8%22%3F%2D%2D%3E-->
<beans xmlns="http://www.springframework.org/schema/beans" xmlns:xsi="http://www.w3.org/2001/XMLSchema-instance" xsi:schemalocation="http://www.springframework.org/schema/beans http://www.springframework.org/schema/beans/spring-beans.xsd">

    <bean class="com.fq.first.dao.impl.UserDaoImpl" id="userDao">
    </bean>

    <bean class="com.fq.first.service.impl.UserServiceImpl" id="userService">
        <property name="userDao" ref="userDao"></property>
    </bean>

    <bean class="com.fq.first.controller.UserController" id="userController">
        <property name="userService" ref="userService"></property>
    </bean>

</beans></code>
測試
/**
 * Created by jifang on 15/12/5.
 */
public class UserControllerTest extends TestCase {

    /**
     * 加載Spring容器
     */
    private ApplicationContext context;

    @Before
    public void setUp() throws Exception {
        context = new ClassPathXmlApplicationContext("spring/applicationContext.xml");
    }

    @Test
    public void testRegister() throws Exception {
        UserController controller = context.getBean("userController", UserController.class);
        controller.register("翡青", "123");
    }
}
在程序中通過ApplicationContext接口加載Spring容器, 獲取Spring工廠對象ClassPathXmlApplicationContext //讀取src下配置文件 FileSystemXmlApplicationContext //讀取WEB-INF下配置文件 Spring對象工廠- BeanFactory與ApplicationContext:ApplicationContext是BeanFactory的子接口,BeanFactory是Spring最核心工廠接口。 ApplicationContext提供更多功能(如國際化處理/自動裝配Bean/不同應用層的Context實現) ApplicationContext會在容器初始化時對其中管理Bean對象進行創建,BeanFactory會在對象獲取時才進行初始化.
Spring提供了兩種裝配Bean的方式, XML與注解,其中XML方式Spring支持較早,現在在配置一些不是自己寫的Bean時(如數據庫連接池等從Jar包種引入的Bean)時是非常有用,而注解方式則常用於裝配自己寫的Bean.
<code class="hljs xml"><!--{cke_protected}{C}%3C!%2D%2D%E4%BD%BF%E7%94%A8%E6%9E%84%E9%80%A0%E5%99%A8(%E9%BB%98%E8%AE%A4%E6%97%A0%E5%8F%82)%E6%9E%84%E9%80%A0%E5%AF%B9%E8%B1%A1%2D%2D%3E-->
<bean class="com.fq.instance.ConstructBean" id="constructBean">
</bean></code>
靜態工廠的靜態方法實例化
<code class="hljs xml"><!--{cke_protected}{C}%3C!%2D%2D%E4%BD%BF%E7%94%A8%E9%9D%99%E6%80%81%E5%B7%A5%E5%8E%82%E6%9E%84%E9%80%A0%E5%AF%B9%E8%B1%A1%2C%20%E6%B3%A8%3A%20class%E5%BA%94%E4%B8%BA%E5%B7%A5%E5%8E%82%E7%B1%BB%2D%2D%3E-->
<bean class="com.fq.instance.StaticBeanFactory" factory-method="getInstance" id="staticBean">
</bean></code>
實例工廠的實例方法實例化
<code class="hljs xml"><!--{cke_protected}{C}%3C!%2D%2D%E4%BD%BF%E7%94%A8%E5%AE%9E%E4%BE%8B%E5%B7%A5%E5%8E%82%E6%9E%84%E9%80%A0%E5%AF%B9%E8%B1%A1%2C%20%E6%B3%A8%3A%20%E8%A6%81%E5%85%88%E5%AE%9E%E4%BE%8B%E5%8C%96%E5%B7%A5%E5%8E%82%2D%2D%3E-->
<bean class="com.fq.instance.InstanceBeanFactory" id="beanFactory">
</bean>
<!--{cke_protected}{C}%3C!%2D%2D%20%E5%86%8D%E9%80%9A%E8%BF%87%E5%B7%A5%E5%8E%82%E5%AF%B9%E8%B1%A1%E7%9A%84%E5%AE%9E%E4%BE%8B%E6%96%B9%E6%B3%95%EF%BC%8C%E6%9E%84%E9%80%A0%E7%9B%AE%E6%A0%87%E5%AF%B9%E8%B1%A1%20%2D%2D%3E-->
<bean factory-bean="beanFactory" factory-method="getInstance" id="instanceBean">
</bean></code>
WebApplicationContext環境(不常用)
session
同一個Session共享一個Bean,僅適用於WebApplicationContext環境(不常用)
globalSession
一般用於Porlet應用環境,該作用域僅適用於WebApplicationContext環境(不常用)
scope
<code class="hljs xml"><!--{cke_protected}{C}%3C!%2D%2DSpring%E4%BD%BF%E7%94%A8scope%E6%A0%87%E7%AD%BE%E6%9D%A5%E5%88%B6%E5%AE%9Abean%E7%9A%84%E4%BD%9C%E7%94%A8%E5%9F%9F(%E9%BB%98%E8%AE%A4%E4%B8%BASingleton)%2D%2D%3E-->
<bean class="com.fq.instance.SingletonBean" id="singletonBean" scope="singleton">
</bean>
<bean class="com.fq.instance.PrototypeBean" id="prototypeBean" scope="prototype">
</bean></code>
Spring初始化/銷毀bean時, 有時需要作一些處理工作, 因此Spring可以在創建和銷毀bean的時候調用bean的兩個生命周期方法;
<code class="hljs java">/**
 * Created by jifang on 15/12/6.
 */
public class LifecycleBean {

    public LifecycleBean() {
        System.out.println("Constructor ...");
    }

    /**
     * 聲明周期方法需: 無參, 無返回值, 非static
     */
    public void setUp() {
        System.out.println("SetUp ...");
    }

    /**
     * 同上
     */
    public void tearDown() {
        System.out.println("TearDown ...");
    }
}</code>
配置:
<code class="hljs xml"><!--{cke_protected}{C}%3C!%2D%2D%20init-method%E5%B1%9E%E6%80%A7%E9%85%8D%E7%BD%AE%E5%88%9D%E5%A7%8B%E5%8C%96%E6%96%B9%E6%B3%95%EF%BC%8Cdestroy-method%E5%B1%9E%E6%80%A7%E9%85%8D%E7%BD%AE%E9%94%80%E6%AF%81%E6%96%B9%E6%B3%95%2D%2D%3E-->
<bean class="com.fq.bean.LifecycleBean" destroy-method="tearDown" id="lifecycleBean" init-method="setUp">
</bean></code>
測試
/**
 * Created by jifang on 15/12/6.
 */
public class LifecycleBeanTest extends TestCase {
    private ClassPathXmlApplicationContext context;

    @Before
    public void setUp() throws Exception {
        context = new ClassPathXmlApplicationContext("spring/applicationContext.xml");
    }

    @Test
    public void testLifecycle(){
        LifecycleBean bean = context.getBean("lifecycleBean", LifecycleBean.class);
        System.out.println(bean);
    }

    @After
    public void tearDown() throws Exception {
        // 必須手動調用context的close方法, 才會執行bean的銷毀方法
        context.close();
    }
}
初始化方法與構造方法的區別?
1) 構造方法為對象申請空間, 完成對象基本屬性的初始化;
2) 初始化方法主要完成對象復雜構造過程;
3) Java建議將對象復雜構造過程單獨抽取出初始化方法, 如javax.servlet.GenericServlet
的init方法
public void init(ServletConfig config) throws ServletException {
    this.config = config;
    this.init();
}
Spring提供了BeanPostProcessor接口,在構造Bean對象執行對象初始化(init-method)方法時可以對Bean進行處理;
/**
 * Created by jifang on 15/12/6.
 */
public class PrintBeanProcessor implements BeanPostProcessor {

    @Override
    public Object postProcessBeforeInitialization(Object bean, String beanName) throws BeansException {
        // 可以根據beanName來決定對那個Bean進行後處理操作
        if (beanName.equals("lifecycleBean")) {
            System.out.println("後處理bean -- process before ...");
        }

        return bean;
    }

    @Override
    public Object postProcessAfterInitialization(Object bean, String beanName) throws BeansException {
        // 如果不制定beanName, 則默認處理所有Bean
        System.out.println("後處理bean -- process after ...");
        return bean;
    }
}
配置
這樣在執行init-method[setUp]的前後, 會分別執行BeanPostProcessor中的兩個方法.
後處理器可以在對象構造過程中提供代理,這是AOP自動代理的核心.
Spring配置文件支持構造參數屬性注入和Setter方法屬性注入;
P名稱空間在spring2.5版本後引入, 目的是為了簡化屬性依賴注入(setter方法)
在spring3.0之後,引入SpEL表達式,以簡化屬性注入.
Bean
#{表達式}, 通過value屬性注入: 可以引用一個Bean對象/對象屬性/對象方法… 詳細可參考Spring 表達式語言(SpEL)
public class Car {
    private String logo;
    private double price;
    private String owner;

    public String getLogo() {
        return logo;
    }

    public void setLogo(String logo) {
        this.logo = logo;
    }

    public double getPrice() {
        return price;
    }

    public void setPrice(double price) {
        this.price = price;
    }

    public String getOwner() {
        return owner;
    }

    public void setOwner(String owner) {
        this.owner = owner;
    }
}
public class Employ {

    private String name;
    private Car car;

    public String getName() {
        return name;
    }

    public void setName(String name) {
        this.name = name;
    }

    public Car getCar() {
        return car;
    }

    public void setCar(Car car) {
        this.car = car;
    }
}
配置
<code class="hljs xml"><!--{cke_protected}{C}%3C!%2D%2DSpEL%20%E4%BD%BF%E7%94%A8%23%7B%7D%E6%9D%A5%E5%BC%95%E7%94%A8%2F%E8%8E%B7%E5%8F%96%E5%AF%B9%E8%B1%A1%2D%2D%3E-->
<bean class="com.fq.di.Car" id="car">
    <property name="logo" value="#{'logo.pic'}">
    <property name="price" value="#{18.8}">
    <property name="owner" value="#{'feiqing'}">
</property></property></property></bean>

<bean class="com.fq.di.Employ" id="employ">
    <!--{cke_protected}{C}%3C!%2D%2D%20%E5%8F%AF%E4%BB%A5%E7%9B%B4%E6%8E%A5%E4%BD%BF%E7%94%A8value%E6%9D%A5%E5%BC%95%E7%94%A8%E5%88%B0%E5%AF%B9%E8%B1%A1%2C%20%E8%80%8C%E4%B8%8D%E6%98%AFref%20%2D%2D%3E-->
    <property name="car" value="#{car}">
    <!--{cke_protected}{C}%3C!%2D%2D%20%E5%8F%AF%E4%BB%A5%E7%9B%B4%E6%8E%A5%E5%BC%95%E7%94%A8%E4%B8%80%E4%B8%AA%E5%AF%B9%E8%B1%A1%E7%9A%84%E5%B1%9E%E6%80%A7%20%2D%2D%3E-->
    <!--{cke_protected}{C}%3C!%2D%2D%3Cproperty%20name%3D%22name%22%20value%3D%22%23%7Bcar.owner%7D%22%2F%3E%2D%2D%3E-->
    <!--{cke_protected}{C}%3C!%2D%2D%20%E8%BF%98%E5%8F%AF%E4%BB%A5%E7%9B%B4%E6%8E%A5%E8%B0%83%E7%94%A8%E5%AF%B9%E8%B1%A1%E7%9A%84%E6%96%B9%E6%B3%95%20%2D%2D%3E-->
    <property name="name" value="#{car.getOwner().toUpperCase()}">
</property></property></bean></code>
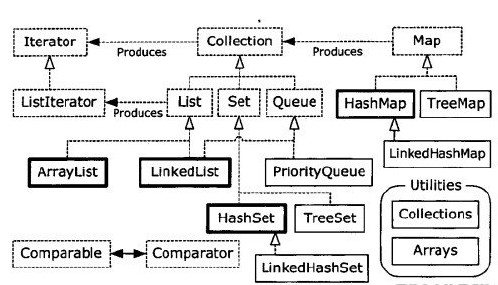
java常見集合: List/Set/Map/Properties等, Spring為每種集合都提供一個標簽進行注入;
public class CollectionBean {
    private List list;
    private Set set;
    private Map map;
    private Properties properties;

    public List getList() {
        return list;
    }

    public void setList(List list) {
        this.list = list;
    }

    public Set getSet() {
        return set;
    }

    public void setSet(Set set) {
        this.set = set;
    }

    public Map getMap() {
        return map;
    }

    public void setMap(Map map) {
        this.map = map;
    }

    public Properties getProperties() {
        return properties;
    }

    public void setProperties(Properties properties) {
        this.properties = properties;
    }
}
配置
<code class="hljs xml"><bean class="com.fq.di.CollectionBean" id="collectionBean">
    <property name="list">
        <list>
            <value>aa</value>
            <value>bb</value>
            <value>cc</value>
            <value>dd</value>
        </list>
    </property>

    <property name="set">
        <set>
            <value>11</value>
            <value>12</value>
            <value>11</value>
        </set>
    </property>

    <property name="map"><map>
            <entry key="key1" value="value1">
            <entry key="key2" value="value2">
        </entry></entry></map>
    </property>

    <property name="properties">
        <props>
            <prop key="key1">value_1</prop>
            <prop key="key2">value_2</prop>
        </props>
    </property>
</bean></code>
@Component注解@Component還可以指定組件名@Component(value = "xxx"))
@Component
public class Bean {

    private String name;

    private Double price;

    public Bean() {
    }

    public Bean(String name, Double price) {
        this.name = name;
        this.price = price;
    }

    public String getName() {
        return name;
    }

    public void setName(String name) {
        this.name = name;
    }

    public Double getPrice() {
        return price;
    }

    public void setPrice(Double price) {
        this.price = price;
    }
}
引入context命名空間並批量掃描
Spring細化@Component以細分組件功能,提供了以下三個等價注解:
通過@Scope注解指定作用域
@Component
@Scope("prototype")
public class Bean {
    // ...
}
@PostConstruct@PreDestroy
銷毀
Bean
public class Bean {

    @PostConstruct
    public void setUp(){
        System.out.println("setUp ...");
    }

    @PreDestroy
    public void tearDown(){
        System.out.println("tearDown ...");
    }
}
@Value
@Component
public class Bean {

    @Value("feiqing")
    private String name;

    @Value("88.88")
    private Double price;

    // ....
}
復雜屬性(使用SpEL表達式)
@Component
public class Bean {

    @Value("#{car}")
    private Car car;

    // ...
}
@Autowired@Autowired 默認按照類型進行注入(如果容器中存在兩個相同類型對象,則@Autowired無法注入)
@Component
public class Bean {

    @Autowired
    private Car car;

    // ....
}
@Autowired+@Qualifier指定注入Bean的id
@Component
public class Bean {

    @Autowired
    @Qualifier("car")
    private Car car;

    // ...
}
@ResourceSpring支持JSR-250規范,可以使用@Resource()進行屬性注入,功能和@Autowired相同:
@Controller(value = "bean")
public class Bean {

    @Resource(name = "car")
    private Car car;

    //...
}
Bean定義使用XML,Bean關系依賴注入使用注解:
需要在applicationContext.xml中配置:
該配置可以使@Resource、@PostConstruct、@PreDestroy、@Autowired注解生效.
如果在配置文件中使用了
則具有了的效果, 不必再單獨配置.