我有一個自己的筆記博客,經常在上面做一些技術文章分析。在查詢一些文章的時候,以前只能將要查詢的內容去mysql中用like模糊匹配。在文章多了的情況下,這樣做法效率肯定不行。於是我把目標投向了中文搜索插件coreseek,並成功的把它使用到了我的項目當中。
效果圖: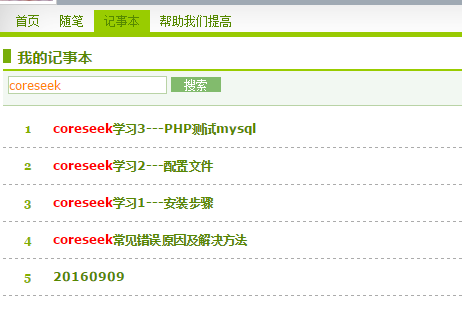
希望通過這篇分析,讓有興趣的同學少走些彎路。
sphinx是開源的搜索引擎,它支持英文的全文檢索。但英文的天然分詞符是空格,而中文則有比較復雜的分詞要求。中國人提供了一個可供企業使用的,基於Sphinx的中文全文檢索引擎。也就是說Coreseek實際上的內核還是Sphinx。但其最大的不同是coreseek有一個中文分詞利器mmseg。
系統:Ubuntu
http服務:Apache/2.2.22
Mysql: Ver 14.14 Distrib 5.5.41
PHP: PHP 5.3.10
安裝步驟
下載coreseek-3.2.14.tar.gz,並放置在/usr/local/src
首先,為了避免安裝中出現依賴包缺失,你需要補一下血
apt-get install make gcc g++ automake libtool mysql-client libmysqlclient15-dev libxml2-dev libexpat1-dev
上面那個命令你執行就行,不然可能會因為軟件包不夠新出現各種奇葩問題。比如我就更新了159M的軟件包。(我在遇到各種坑後才回頭補的血)
1,安裝mmseg分詞模塊
cd /usr/local/src

tar zxvf coreseek-3.2.14.tar.gz #解壓

cd coreseek-3.2.14

cd mmseg-3.2.14

./bootstrap #輸出的warning信息可以忽略,如果出現error則需要解決

./configure --prefix=/usr/local/mmseg3 #配置

make #編譯

make install #安裝
1.1)可能遇到的問題和解決辦法:
在執行./bootstrap時出現./bootstrap: 27: ./bootstrap: autoconf: not found 的錯誤,
原因:因為沒有安裝automake 工具, (ubuntu 10.04)用下面的命令安裝好就可以了。
sudo apt-get install autoconf automake libtool
1.2)可能遇到的問題:在安裝分詞模塊 mmseg ,編譯安裝到最後,出現annot find input file: src/Makefile.in 的錯誤
然後查了一下,只找到解決辦法,如下:
aclocal //是一個perl 腳本程序,它的定義是:“aclocal - create aclocal.m4 by scanning configure.ac”
libtoolize --force //運行後有一個錯誤,不用管它。

automake --add-missing

autoconf

autoheader

make clean
然後在重新編譯
./configure --prefix=/usr/local/mmseg3
make && make install
編譯安裝成功
總結:其實這個報錯原因我也沒查出來。反正按照解決辦法就成功了,誰若知道拜托請留言,謝謝。
2、安裝CoreSeek
cd /usr/local/src

cd coreseek-3.2.14

cd csft-3.2.14

sh buildconf.sh    #輸出的warning信息可以忽略,如果出現error則需要解決

./configure --prefix=/usr/local/coreseek  --without-unixodbc --with-mmseg --with-mmseg-includes=/usr/local/mmseg3/include/mmseg/ --with-mmseg-libs=/usr/local/mmseg3/lib/ --with-mysql  #配置

make  #編譯
make install  #安裝
3,測試mmseg分詞、coreseek搜索、MySQL數據源
cd /usr/local/src
cd coreseek-3.2.14
cd testpack
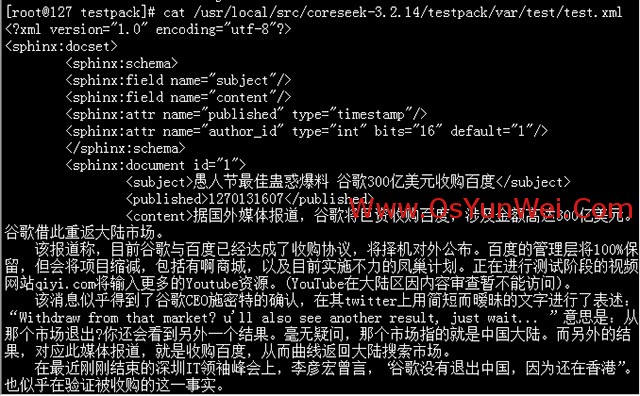
cat /usr/local/src/coreseek-3.2.14/testpack/var/test/test.xml #此時應該正確顯示中文,如下圖所示
/usr/local/mmseg3/bin/mmseg -d /usr/local/mmseg3/etc /usr/local/src/coreseek-3.2.14/testpack/var/test/test.xml
/usr/local/coreseek/bin/indexer -c /usr/local/src/coreseek-3.2.14/testpack/etc/csft.conf --all
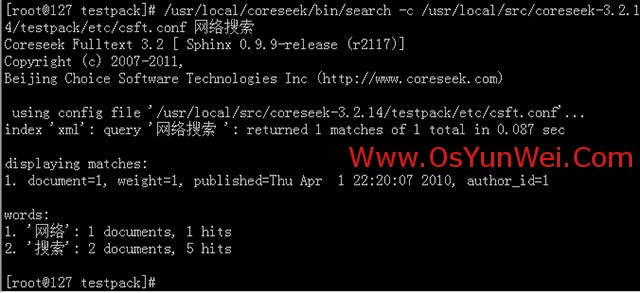
/usr/local/coreseek/bin/search -c /usr/local/src/coreseek-3.2.14/testpack/etc/csft.conf 網絡搜索
/usr/local/coreseek/bin/indexer -c /usr/local/coreseek/etc/sphinx-min.conf.dist
/usr/local/coreseek/bin/indexer -c /usr/local/src/coreseek-3.2.14/testpack/etc/csft.conf --all --rotate #啟動服務,更新索引
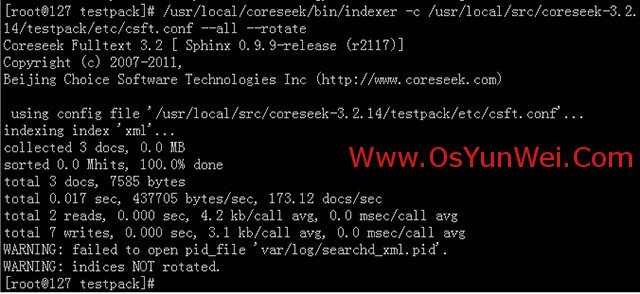
如圖,且無報錯。則說明你的coreseek已經能夠正常運行了。
3.1)可能遇到的問題與解決辦法:
在輸入/usr/local/coreseek/bin/indexer -c etc/csft.conf --all,報xmlpipe2 support NOT compiled in. To use xmlpipe2, install missing錯誤
原因:
缺少xmlpipe2庫,解決:
apt-get install expat-*
然後重新編譯coreseek,記得make clean
4,coreseek配置和使用
cp  /usr/local/src/coreseek-3.2.14/testpack/etc/csft_mysql.conf  /usr/local/coreseek/etc/csft_mysql.conf  #拷貝MySQL數據源配置文件

ln -s  /usr/local/coreseek/etc/csft_mysql.conf  /etc/csft_mysql.conf  #添加軟連接

vim  /etc/csft_mysql.conf  #編輯,修改
以我自己的配置文件為例:
/usr/local/coreseek/etc/csft_mysql.conf
#索引源定義
source mysql
{
    type                    = mysql
    sql_host                = localhost
    sql_user                =xxxx
    sql_pass                =xxxx
    sql_db                    =xxxx
    sql_port                = 3306
    sql_query_pre            = SET NAMES utf8
    sql_query                = SELECT id,id,uid,title,data FROM notebook_notepad
                                                              #sql_query第一列id需為整數
                                                              #title、data作為字符串/文本字段,被全文索引
    sql_attr_uint            = id           #從SQL讀取到的值必須為整數
    #sql_attr_timestamp        = time  #從SQL讀取到的值必須為整數,作為時間屬性
    sql_attr_uint   = uid

    sql_query_info_pre      = SET NAMES utf8                                        #命令行查詢時,設置正確的字符集
    sql_query_info            = SELECT * FROM notebook_notepad WHERE id=$id #命令行查詢時,從數據庫讀取原始數據信息
}

#index定義
index mysql
{
    source            = mysql             #對應的source名稱
    path            =/usr/local/coreseek/var/data/mysql #請修改為實際使用的絕對路徑,例如:/usr/local/coreseek/var/...
    docinfo            = extern
    mlock            = 0
    morphology        = none
    min_word_len        = 1
    html_strip                = 0

    #中文分詞配置,詳情請查看:http://www.coreseek.cn/products-install/coreseek_mmseg/
    charset_dictpath = /usr/local/mmseg3/etc/ #BSD、Linux環境下設置,/符號結尾
    #charset_dictpath = etc/                             #Windows環境下設置,/符號結尾,最好給出絕對路徑,例如:C:/usr/local/coreseek/etc/...
    charset_type        = zh_cn.utf-8
}

#全局index定義
indexer
{
    mem_limit            = 128M
}

#searchd服務定義
searchd
{
    listen                  =   9312
    read_timeout        = 5
    max_children        = 30
    max_matches            = 1000
    seamless_rotate        = 0
    preopen_indexes        = 0
    unlink_old            = 1
    pid_file =/usr/local/coreseek/var/log/searchd_mysql.pid  #請修改為實際使用的絕對路徑,例如:/usr/local/coreseek/var/...
    log =/usr/local/coreseek/var/log/searchd_mysql.log        #請修改為實際使用的絕對路徑,例如:/usr/local/coreseek/var/...
    query_log =/usr/local/coreseek/var/log/query_mysql.log #請修改為實際使用的絕對路徑,例如:/usr/local/coreseek/var/...
}
這樣搜索的話就會從索引文件中查出id,uid,title,data字段。
OK,配置完成以後,重啟Coreseek 服務就能從生產你想要的查詢索引,以後你就可以擺脫mysql的桎梏,什麼中文,英文都可以,還自帶分詞。怎麼樣,是不是打開了新世界的大門。
下面講一下重建索引可能出錯的地方,以及解決辦法。有興趣的同學看一下,否則可以跳到下一節:PHP測試Coreseek 。
重建索引時報錯誤:WARNING: failed to open pid_file '/usr/local/coreseek/var/log/searchd_mysql.pid'.
解決方法:
試著停止一下coreseek服務
/usr/local/coreseek/bin/searchd -c /usr/local/coreseek/etc/csft_mysql.conf --stop 停止服務
然後重啟
/usr/local/coreseek/bin/searchd -c /usr/local/coreseek/etc/csft_mysql.conf 啟動服務
再次建立索引
/usr/local/coreseek/bin/indexer -c /usr/local/coreseek/etc/csft_mysql.conf --all 建立索引
如果提示:FATAL: failed to lock /usr/local/coreseek/var/data/xxxx.spl: Resource temporarily unavailable, will not index. Try --rotate option.
則嘗試重建索引
/usr/local/coreseek/bin/indexer -c /usr/local/coreseek/etc/csft_mysql.conf --all --rotate 重建索引
1,將sphinxapi.php放到測試目錄下
cp /usr/local/src/coreseek-3.2.14/testpack/api/sphinxapi.php ./
vim test.php
header("Content-type: text/html; charset=utf-8");
//require("./ ");
$s = new SphinxClient;
$s->setServer("127.0.0.1", 9312);
//SPH_MATCH_ALL, 匹配所有查詢詞(默認模式); SPH_MATCH_ANY, 匹配查詢詞中的任意一個; SPH_MATCH_EXTENDED2, 支持特殊運算符查詢
$s->setMatchMode(SPH_MATCH_ALL);
$s->setMaxQueryTime(30); //設置最大搜索時間
$s->SetArrayResult(false); //是否將Matches的key用ID代替
$s->SetSelect ( "*" ); //設置返回信息的內容,等同於SQL
$s->SetRankingMode(SPH_RANK_BM25);
$s->SetLimits ( 0, 30, 1000, 0 ); //設置結果集偏移量 SetLimits
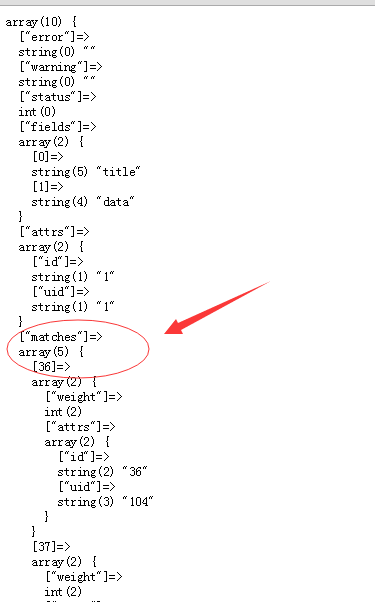
$res = $s->query('coreseek','mysql','--single-0-query--'); #[coreseek]關鍵字,[mysql]數據源source
$err = $s->GetLastError();
echo '<pre>';
var_dump($res);
var_dump($res['matches']);
var_export($err);
echo '</pre>';
php5 test.php
運行結果:matches為匹配後的結果集
1,Sphinx擴展安裝安裝
Coreseek官方教程中建議php使用直接include一個php文件進行操作,事實上php有獨立的sphinx模塊可以直接操作coreseek(coreseek就是sphinx!)已經進入了php的官方函數庫,而且效率更高!但php模塊依賴於libsphinxclient包。我是按照以下這篇文章的步驟安裝了Sphinx擴展。
感謝:http://blog.csdn.net/e421083458/article/details/21529969
[第一步] 安裝依賴libsphinxclient
# cd /var/install/coreseek-4.1-beta/csft-4.1/api/libsphinxclient/
# ./configure  --prefix=/usr/local/sphinxclient

configure: creating ./config.status
config.status: creating Makefile
config.status: error: cannot find input file: Makefile.in   #報錯configure失敗

//處理configure報錯
編譯過程中報了一個config.status: error: cannot find input file: src/Makefile.in這個的錯誤,然後運行下列指令再次編譯就能通過了:
# aclocal
# libtoolize --force
# automake --add-missing
# autoconf
# autoheader
# make clean

//從新configure編譯
# ./configure

# make && make install
[第二步] 安裝sphinx的PHP擴展
http://pecl.php.net/package/sphinx
# wget http://pecl.php.net/get/sphinx-1.3.0.tgz
# tar zxvf sphinx-1.3.0.tgz
# cd sphinx-1.3.0
# phpize
# ./configure --with-php-config=/usr/bin/php-config --with-sphinx=/usr/local/sphinxclient
# make && make install
# cd /etc/php.d/
# cp gd.ini  sphinx.ini
# vi sphinx.ini

extension=sphinx.so

# service php-fpm restart
安裝完PHP的Sphinx擴展後,就可以直接使用$coreseek = new SphinxClient();而無需引入源文件了。
簡單說一下我在TP裡使用coreseek查詢,並高亮關鍵詞的思路:
1,通過sphinx查出id,uid的集合
2,然後$sql = "select * from post where id in($ids)";$res = mysql_query($sql);獲取到數據庫的真實數據
3,用BuildExcerpts將title和data的關鍵字高亮,然後分頁展示
關鍵代碼:
     $where = array();
        $where['uid']=$uid;
        if(!empty($search)){    //有需要查找的內容,則去 coreseek 忠查出對應的id
            $coreseek = new \SphinxClient();
            $coreseek->setServer("127.0.0.1", 9312);
            //SPH_MATCH_ALL, 匹配所有查詢詞(默認模式); SPH_MATCH_ANY, 匹配查詢詞中的任意一個; SPH_MATCH_EXTENDED2, 支持特殊運算符查詢
            $coreseek->setMatchMode(SPH_MATCH_ALL);
            $coreseek->setMaxQueryTime(30);                        //設置最大搜索時間
            $coreseek->SetArrayResult(false);                    //是否將Matches的key用ID代替
            $coreseek->SetSelect ( "*" );                        //設置返回信息的內容,等同於SQL
            $coreseek->SetLimits ( 0, 30, 1000, 0 );            //設置結果集偏移量  SetLimits
            $res = $coreseek->query($search,'mysql','--single-0-query--');
            $key = array_keys($res['matches']);
            $where['id']=array('in',$key);
            $coreseek->close();
        }else{

        }
        //獲取總數據條數
        $total=$mod->where($where)->count();
高亮的關鍵代碼:
     if(!empty($search)){
            $page->parameter['search']=$search;
            //代碼高亮
            $opt = array("before_match"=>"<font style='font-weight:bold;color:#f00'>","after_match"=>"</font>");
            $coreseek1 = new \SphinxClient();
            $coreseek1->setServer("127.0.0.1", 9312);
            $coreseek1->SetMatchMode(SPH_MATCH_ALL);
            $i=0;
            $tags_title=array();
            foreach($info as $key=>$row){
                $tags_title[]=$row['title'];
            }
            $replace_title=$coreseek1->BuildExcerpts($tags_title,'mysql',$search,$opt);
            foreach($info as $key=>&$row){
                $info[$key]['title']=$replace_title[$key];
            }
            $coreseek1->close();
        }
OK,至此,coreseek已經能夠在TP裡完美運行了。這篇分享的文章也可以畫上句號了。以上是我一步步安裝時的細節,記錄下怕以後自己忘記,也希望能給感興趣的同學一些幫助。文章信息量偏大,如果有哪些疏漏,萬望指正!