mac osx10.9.* 自帶了apache, php
Apache配置
1- 啟動
sudo apachectl start
啟動後,訪問 http://localhost/ 應該能看到"It works!"的初始頁面,
vi /etc/apache2/httpd.conf
197行可以看到如下代碼片段:
<Directory "/Library/WebServer/Documents">
    #
    # Possible values for the Options directive are "None", "All",
    # or any combination of:
    #   Indexes Includes FollowSymLinks SymLinksifOwnerMatch ExecCGI MultiViews
    #
    # Note that "MultiViews" must be named *explicitly* --- "Options All"
    # doesn't give it to you.
    #
    # The Options directive is both complicated and important.  Please see
    # http://httpd.apache.org/docs/2.2/mod/core.html#options
    # for more information.
    #
    Options Indexes FollowSymLinks MultiViews

    #
    # AllowOverride controls what directives may be placed in .htaccess files.
    # It can be "All", "None", or any combination of the keywords:
    #   Options FileInfo AuthConfig Limit
    #
    AllowOverride None

    #
    # Controls who can get stuff from this server.
    #
    Order allow,deny
    Allow from all
</Directory>
cd /Library/WebServer/Documents
It Works 內容在 index.html.en 這是apache的默認頁
2- 停止/重啟
sudo apachectl stop
sudo apachectl restart
3- 創建個人站點目錄
cd ~
mkdir Sites
echo "helloWorld" >> index.html
sudo apachectl restart
然後再訪問 http://localhost/~shelley/ 應該就能看到"helloWorld"的個人目錄初始頁面(注:~shelley需換成~你的用戶名)
如果失敗
sudo vi /etc/apache2/users/Guest.conf
<Directory "/Users/shelley/Sites">
    Options Indexes MultiViews
    AllowOverride None
    Order allow,deny
    Allow from all
</Directory>
為何一定是Sites目錄名,
vi /etc/apache2/extra/httpd-userdir.conf
第10行
# Settings for user home directories
#
# Required module: mod_userdir

#
# UserDir: The name of the directory that is appended onto a user's home
# directory if a ~user request is received.  Note that you must also set
# the default access control for these directories, as in the example below.
#
UserDir Sites

#
# Users might not be in /Users/*/Sites, so use user-specific config files.
#
Include /private/etc/apache2/users/*.conf
<IfModule bonjour_module>
       RegisterUserSite customized-users
</IfModule>
4- 啟動虛擬主機
默認情況下,apache的虛擬主機功能是關閉的
sudo vi /etc/apache2/httpd.conf
放開注釋
#Virtual hosts

#Include /private/etc/apache2/extra/httpd-vhosts.conf
修改文件
sudo vi /etc/apache2/extra/httpd-vhosts.conf
類似以下內容
NameVirtualHost *:80

<VirtualHost *:80>
    DocumentRoot "/Users/shelley/Sites"
    ServerName www.shelleymyl.com
    ErrorLog "/Users/shelley/Sites/log/error.log"
    CustomLog "/Users/shelley/Sites/log/access.log" common
    <Directory />
                Options Indexes FollowSymLinks MultiViews
                AllowOverride None
                Order deny,allow
                Allow from all
      </Directory>
</VirtualHost>
5- URL轉發
先打開httpd.conf,確保下面這二行沒有被注釋掉:
LoadModule proxy_module libexec/apache2/mod_proxy.so
LoadModule proxy_http_module libexec/apache2/mod_proxy_http.so
然後在httpd.conf最後加上
ProxyPass /HelloWorldApp http://localhost:8080/HelloWorldApp/
ProxyPassReverse /HelloWorldApp  http://localhost:8080/HelloWorldApp/
這樣訪問 http://localhost/HelloWorldApp、http://ip/HelloWorldApp、http://www.shelleymyl.com/HellpWorldApp 都相當於訪問 http://localhost:8080/HelloWorldApp
6- 端口轉發
假如服務器上有一個應用 http://x.x.x.x:8080/ ,如果想通過類似 http://www.shelleymyl.com 的域名來直接訪問,就需要做端口轉發,仍然打開httpd.conf
LoadModule proxy_connect_module modules/mod_proxy_connect.so
LoadModule proxy_ftp_module modules/mod_proxy_ftp.so
在"5、URL轉發"的基礎上,再打開這二項
然後修改
sudo vi /etc/apache2/extra/httpd-vhosts.conf
NameVirtualHost *:80

<VirtualHost *:80>
        ProxyPreserveHost On
        ServerName www.yjmyzz.com

        ProxyPass / http://www.yjmyzz.com:8000/
        ProxyPassReverse / http://www.yjmyzz.com:8000/

        ServerAdmin webmaster@localhost
</VirtualHost>
這樣就相當於把 80端口轉發到8080端口上了
PHP配置
PHP的配置非常簡單,就一個事
vi /etc/apache2/httpd.conf
LoadModule php5_module libexec/apache2/libphp5.so
放開注釋
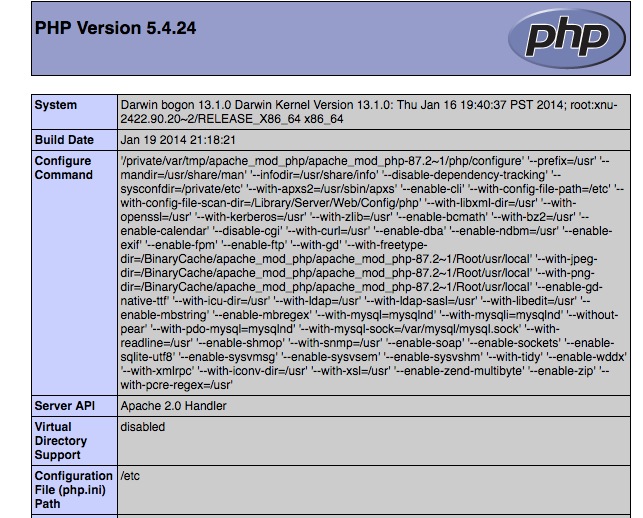
然後sudo apachectl restart 重啟,在用戶目錄的Sites文件夾下,新建一個index.php,裡面echo phpinfo() ,就可以看到效果了:
reference:
http://www.cnblogs.com/yjmyzz/p/3920361.html