php小菜一枚,第一次寫bolg,有什麼不對的地方,還請各位大大指出
1.mariaDb
vim /etc/yum.repos.d/MariaDB.repo
[mariadb]
name = MariaDB
baseurl = http://yum.mariadb.org/5.5/centos5-x86
gpgkey=https://yum.mariadb.org/RPM-GPG-KEY-MariaDB
gpgcheck=1

sudo yum install MariaDB-server MariaDB-client
#啟動MariaDB
sudo /etc/init.d/mysql start
通過在創建MariaDB.repo,可以實現yum安裝
對應不同linux版本配置文件,和詳細方法可以參考下面鏈接
https://mariadb.com/kb/zh-cn/installing-mariadb-with-yum/
https://downloads.mariadb.org/mariadb/repositories/#mirror=opencas
2.nginx
#此命令可以一鍵安裝開發工具包
yum -y groupinstall "Development Tools" "Development Libraries"
#創建www組與www用戶
groupadd www
useradd -g www -s /usr/sbin/nologin www
# 安裝Nginx
tar zxvf nginx-1.9.9.tar.gz
cd nginx-1.9.9.tar.gz/
./configure --user=www --group=www --prefix=/usr/local/nginx --with-http_stub_status_module --with-http_ssl_module
make && make install
#啟動Nginx
/usr/local/nginx/sbin/nginx
#測試配置文件是否正確
/usr/local/nginx/sbin/nginx -t
還可以通過service命令來操作nginx服務,如下
1.先創建一個文件,裡面寫入以下shell腳本如:
文件
#!/bin/bash
# nginx Startup script for the Nginx HTTP Server
#
# chkconfig: - 85 15
# description: Nginx is a high-performance web and proxy server.
#              It has a lot of features, but it's not for everyone.
# processname: nginx
# pidfile: /var/run/nginx.pid
# config: /usr/local/nginx/conf/nginx.conf

nginxd=/usr/local/nginx/sbin/nginx
nginx_config=/usr/local/nginx/conf/nginx.conf
nginx_pid=/var/run/nginx.pid

RETVAL=0
prog="nginx"

# Source function library.
. /etc/rc.d/init.d/functions

# Source networking configuration.
. /etc/sysconfig/network

# Check that networking is up.
[ ${NETWORKING} = "no" ] && exit 0

[ -x $nginxd ] || exit 0


# Start nginx daemons functions.
start() {

if [ -e $nginx_pid ];then
   echo "nginx already running...."
   exit 1
fi

   echo -n $"Starting $prog: "
   daemon $nginxd -c ${nginx_config}
   RETVAL=$?
   echo
   [ $RETVAL = 0 ] && touch /var/lock/subsys/nginx
   return $RETVAL

}


# Stop nginx daemons functions.
stop() {
        echo -n $"Stopping $prog: "
        killproc $nginxd
        RETVAL=$?
        echo
        [ $RETVAL = 0 ] && rm -f /var/lock/subsys/nginx /var/run/nginx.pid
}


# reload nginx service functions.
reload() {

    echo -n $"Reloading $prog: "
    #kill -HUP `cat ${nginx_pid}`
    killproc $nginxd -HUP
    RETVAL=$?
    echo

}

# See how we were called.
case "$1" in
start)
        start
        ;;

stop)
        stop
        ;;

reload)
        reload
        ;;

restart)
        stop
        start
        ;;

status)
        status $prog
        RETVAL=$?
        ;;
*)
        echo $"Usage: $prog {start|stop|restart|reload|status|help}"
        exit 1
esac

exit $RETVAL
2.把這個文件復制到/etc/init.d目錄下
#cp ./nginx /etc/init.d
3.修改這個文件為可執行的權限
#chmod +x /etc/init.d/nginx
4.把這個可執行文件加到服務服務中去
#chkconfig --add nginx
之後就可以使用 service 命令來管理了!
3.php
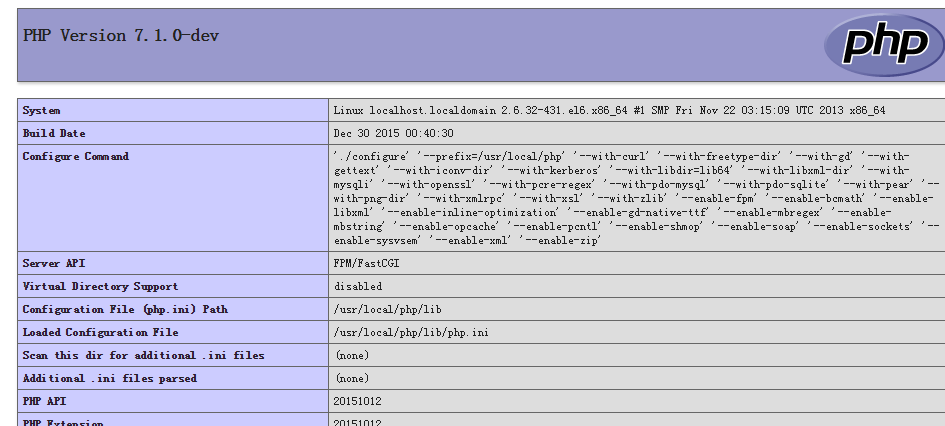
#安裝前先更新所需要的模塊
# yum -y install libjpeg libjpeg-devel libpng libpng-devel freetype freetype-devel libxml2 libxml2-devel mysql pcre-devel
# wget  https://downloads.php.net/~ab/php-7.0.0RC1.tar.gz
# tar zxvf php-7.0.0RC1.tar.gz
# cd php-7.0.0RC1
# ./configure --prefix=/usr/local/php \
 --with-curl \
 --with-freetype-dir \
 --with-gd \
 --with-gettext \
 --with-iconv-dir \
 --with-kerberos \
 --with-libdir=lib64 \
 --with-libxml-dir \
 --with-mysqli \
 --with-openssl \
 --with-pcre-regex \
 --with-pdo-mysql \
 --with-pdo-sqlite \
 --with-pear \
 --with-png-dir \
 --with-xmlrpc \
 --with-xsl \
 --with-zlib \
 --enable-fpm \
 --enable-bcmath \
 --enable-libxml \
 --enable-inline-optimization \
 --enable-gd-native-ttf \
 --enable-mbregex \
 --enable-mbstring \
 --enable-opcache \
 --enable-pcntl \
 --enable-shmop \
 --enable-soap \
 --enable-sockets \
 --enable-sysvsem \
 --enable-xml \
 --enable-zip

# 編譯安裝
# make &&  make install

# 配置文件
# cp php.ini-development /usr/local/php/lib/php.ini
# cp /usr/local/php/etc/php-fpm.conf.default /usr/local/php/etc/php-fpm.conf
# cp /usr/local/php/etc/php-fpm.d/www.conf.default /usr/local/php/etc/php-fpm.d/www.conf
# cp -R ./sapi/fpm/php-fpm /etc/init.d/php-fpm

# 啟動
# /etc/init.d/php-fpm

# 查看是否啟動
ps aux | grep php
修改nginx配置,監聽*.php的文件
# vim /usr/local/nginx/conf/nginx.conf
簡單配置如下:
user  www www;

worker_processes 10;

#error_log  /data/logs/nginx_error.log  crit;


#pid        logs/nginx.pid;

#Specifies the value for maximum file descriptors that can be opened by this process.
worker_rlimit_nofile 51200;

events
{
    use epoll;

    worker_connections 51200;
}

http
{
    include       mime.types;
    default_type  application/octet-stream;

    #charset  gbk;

    server_names_hash_bucket_size 128;
    client_header_buffer_size 32k;
    large_client_header_buffers 4 32k;
    #client_max_body_size 8m;

    server_tokens off;

    expires       1h;

    sendfile on;
    tcp_nopush     on;
    keepalive_timeout 60;
    tcp_nodelay on;

    error_page   404  /404.jpg;

     fastcgi_connect_timeout 20;
     fastcgi_send_timeout 30;
     fastcgi_read_timeout 120;
     fastcgi_buffer_size 256k;
     fastcgi_buffers 8 256k;
     fastcgi_busy_buffers_size 256k;
     fastcgi_temp_file_write_size 256k;
     fastcgi_temp_path /dev/shm;

    gzip on;
    gzip_min_length  2048;
    gzip_buffers     4 16k;
    gzip_http_version 1.1;
    gzip_types  text/plain  text/css application/xml application/x-javascript ;

    log_format  access  '$remote_addr - $remote_user [$time_local] "$request" '
                          '$status $body_bytes_sent "$http_referer" '
                          '"$http_user_agent" $http_x_forwarded_for';


server {
        listen       80;
        server_name  localhost;

        #charset koi8-r;

        #access_log  logs/host.access.log  main;

        location / {
            root   html;
            index  index.html index.htm index.php;
        }

    #rewrite index.php/^(.*)$ idex.php?s=/$1 last ;

        #error_page  404              /404.html;

        # redirect server error pages to the static page /50x.html
        #
        error_page   500 502 503 504  /50x.html;
        location = /50x.html {
            root   html;
        }
location ~ \.php$
            {
         fastcgi_pass  127.0.0.1:9000;
              fastcgi_index index.php;
             include fastcgi.conf;
            }
}


#################  include  ###################

#    include block_ips.conf ;
#    include vhost/*.conf ;

#強制域名訪問對應域名的conf
#    server {
#        listen 80 default ;
#        server_name _;
#        return 404;
#    }
}
最後phpinfo(),成功