准備:
uploadify下載地址:
http://www.uploadify.com/download/
七牛 php-sdk開發指南:
http://developer.qiniu.com/docs/v6/sdk/php-sdk.html
php-sdk地址:
https://github.com/qiniu/php-sdk
開始:
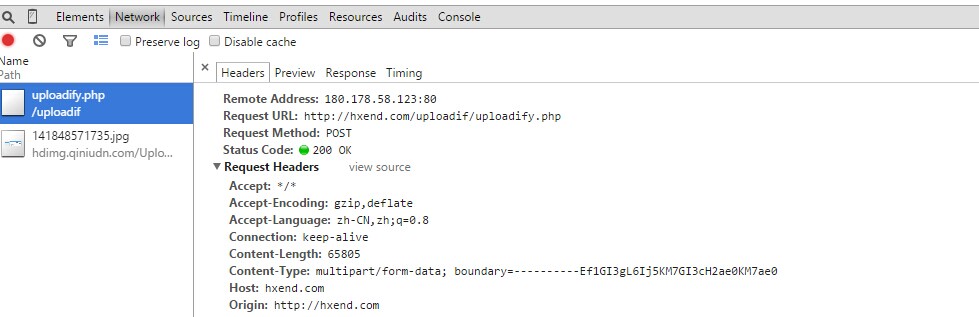
DEMO:
http://hxend.com/uploadif/
在七牛裡面注冊賬號以後,成為標准用戶
免費存儲空間10GB
免費每月下載流量10GB
免費每月PUT/DELETE 10萬次請求
免費每月GET 100萬次請求
貌似是一個不錯的福利。
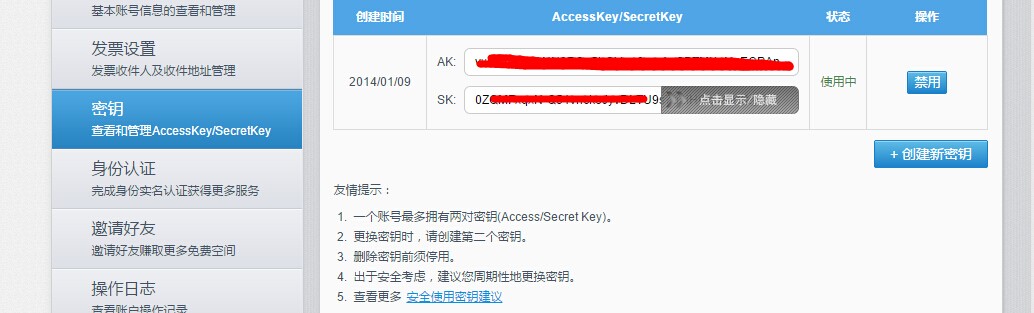
成功注冊後就會 賬號頁面 有ak 和sk key 可以在代碼中使用。
下載好uploadify 後 把 七牛 php -sdk 文件包裡面的內容放在 uploadify 裡面

打開uploadify.php 文件 代碼如下:
<?php
/*
Uploadify
Copyright (c) 2012 Reactive Apps, Ronnie Garcia
Released under the MIT License <http://www.opensource.org/licenses/mit-license.php>
*/

// Define a destination
$targetFolder = '/uploads'; // Relative to the root

$verifyToken = md5('unique_salt' . $_POST['timestamp']);

if (!empty($_FILES) && $_POST['token'] == $verifyToken) {
	$tempFile = $_FILES['Filedata']['tmp_name'];
	$targetPath = $_SERVER['DOCUMENT_ROOT'] . $targetFolder;
	$targetFile = rtrim($targetPath,'/') . '/' . $_FILES['Filedata']['name'];

	// Validate the file type
	$fileTypes = array('jpg','jpeg','gif','png'); // File extensions
	$fileParts = pathinfo($_FILES['Filedata']['name']);

	if (in_array($fileParts['extension'],$fileTypes)) {
		move_uploaded_file($tempFile,$targetFile);
		echo '1';
	} else {
		echo 'Invalid file type.';
	}
}
?>
修改代碼如下: 介紹參考代碼內部.
<?php

$verifyToken = md5('unique_salt' . $_POST['timestamp']);

if (!empty($_FILES) && $_POST['token'] == $verifyToken) {
    $tempFile = $_FILES['Filedata']['tmp_name'];
    //生成新的文件名
    $filename = time().mt_rand(10,99).'.'.end(explode('.', $_FILES['Filedata']['name'])); //在這裡修改生出隨機圖片名
    $fileTypes = array('jpg','jpeg','gif','png');  //限制上傳的文件為圖片
    $fileParts = pathinfo($_FILES['Filedata']['name']);

    if (in_array($fileParts['extension'],$fileTypes)) {
        //上傳圖片到雲端 start
        require_once("qiniu/io.php");
        require_once("qiniu/rs.php");

        $bucket = "hdimg";//空間名
        //截取原始文件後綴名
        $key1 = "Uploads/".$filename;
        $accessKey = ' '; //這裡填寫ak
        $secretKey = ' '; // 這裡填寫SK

        Qiniu_SetKeys($accessKey, $secretKey);
        $putPolicy = new Qiniu_RS_PutPolicy($bucket);
        $upToken = $putPolicy->Token(null);
        $putExtra = new Qiniu_PutExtra();
        $putExtra->Crc32 = 1;
        //$tempFile uploadify上傳的臨時文件路徑
        list($ret, $err) = Qiniu_PutFile($upToken, $key1, $tempFile, $putExtra);
        //上傳圖片到雲端 end

        //返回文件名給前台
        echo "http://hdimg.qiniudn.com/".$key1; //前台使用回調函數的data參數接收
    } else {
        echo 'Invalid file type.';
    }
}
前台index.php修改為:前台調用 echo 輸出的值data 進行操作。
<!DOCTYPE HTML>
<html>
<head>
<meta http-equiv="Content-Type" content="text/html; charset=utf-8">
<title>UploadiFive Test</title>
<script src="http://libs.baidu.com/jquery/1.9.0/jquery.js" type="text/javascript"></script>
<script src="jquery.uploadify.min.js" type="text/javascript"></script>
<link rel="stylesheet" type="text/css" href="uploadify.css">
<style type="text/css">
body {
	font: 13px Arial, Helvetica, Sans-serif;
}
</style>
</head>

<body>
	<form>
		<div id="queue"></div>
		<input id="file_upload" name="file_upload" type="file" multiple="true">
	</form>
			<img width="100" height="100" id="txtimg" src=""/>
	<script type="text/javascript">
		<?php $timestamp = time();?>
		$(function() {
			$('#file_upload').uploadify({
				'formData'     : {
					'timestamp' : '<?php echo $timestamp;?>',
					'token'     : '<?php echo md5('unique_salt' . $timestamp);?>'
				},
				'swf'      : 'uploadify.swf',
				'uploader' : 'uploadify.php',
				 'onUploadSuccess' : function(file,data,response) {  //執行成功後就執行該段js
						document.getElementById('txtimg').src=data;
                                }
			});

		});
	</script>
</body>
</html>
對data 進行輸入到頁面 實現 當前頁面顯示。控制 #txtimg 的值為 輸出的data值 即為 圖片地址。
後期 如果需要 iframe 調用的話 可以把
document.getElementById('txtimg').src=data; 可以把data 傳輸到父頁面 的 #txtimg 中。
parent.document.getElementById('txtimg').src=data;
<img width="100" height="100" id="txtimg" src="https://www.aspphp.online/bianchen/UploadFiles_4619/201701/2017011709395123.jpg">
DEMO:
http://hxend.com/uploadif/
博文歸石頭和博客園所有,轉載請注明出處,方便更新。 http://www.cnblogs.com/webers/p/4162108.html