追隨其他用戶
接下來可以將更多東西添加到 functions.php 文件中。這裡需要一個 show_users() 函數,該函數可以返回系統中所有用戶的一個列表。後面將使用這個函數填充一個用戶列表。
show_users() 函數
function show_users(){
	$users = array();
	$sql = "select id, username from users where status='active' order by username";
	$result = mysql_query($sql);

	while ($data = mysql_fetch_object($result)){
		$users[$data->id] = $data->username;
	}
	return $users;
}
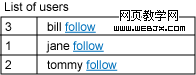
有了 show_users() 函數之後,接下來可以創建一個 users.php 文件,該文件將運行這個函數,並顯示系統中所有用戶的一個列表,對於每個用戶,在用戶名的旁邊都有一個 follow 鏈接。
show_users() 函數的 users.php 文件
<?php
session_start();
include_once("header.php");
include_once("functions.php");

?>
<!DOCTYPE html PUBLIC "-//W3C//DTD XHTML 1.0 Transitional//EN"
        "http://www.w3.org/TR/xhtml1/DTD/xhtml1-transitional.dtd">
<html xmlns="http://www.w3.org/1999/xhtml" xml:lang="en" lang="en">
<head>
	<meta http-equiv="content-type" content="text/html; charset=utf-8" />
	<title>Microblogging Application - Users</title>
</head>
<body>

<h1>List of Users</h1>
<?php
$users = show_users();

if (count($users)){
?>
<table border='1' cellspacing='0' cellpadding='5' width='500'>
<?php
foreach ($users as $key => $value){
	echo "<tr valign='top'>\n";
	echo "<td>".$key ."</td>\n";
	echo "<td>".$value ." <small><a href='#'>follow</a></small></td>\n";
	echo "</tr>\n";
}
?>
</table>
<?php
}else{
?>
<p><b>There are no users in the system!</b></p>
<?php
}
?>
</body>
</html>
為了訪問這個用戶列表,在 index.php 文件中表單的上方添加一個到 users.php 的鏈接:
<p><a href='users.php'>see list of users</a></p>
現在有了一個易於使用的用戶名列表,每個用戶名旁有一個 follow 鏈接。
在進入下一個階段之前,還需要編寫一個小函數,該函數將返回當前用戶正在追隨的用戶。這樣一來,用戶就可以用這個列表來確定是否追隨另一個用戶。
回到 functions.php 文件,添加一個名為 following() 的函數,如清單 12 所示。將當前用戶 ID 傳遞給該函數,就可以得到該用戶正在追隨的每個用戶的 ID。
following() 函數
function following($userid){
	$users = array();

	$sql = "select distinct user_id from following
			where follower_id = '$userid'";
	$result = mysql_query($sql);

	while($data = mysql_fetch_object($result)){
		array_push($users, $data->user_id);

	}

	return $users;

}
現在可以在 users.php 上運行這個函數,檢查某個用戶 ID 是否在該數組中。如果在,則使用 unfollow 鏈接。如果不在,則使用默認的 follow 鏈接。清單 13 顯示修改後的代碼。
<?php
$users = show_users();
$following = following(追隨其他用戶
接下來可以將更多東西添加到 functions.php 文件中。這裡需要一個
show_users()函數,該函數可以返回系統中所有用戶的一個列表。後面將使用這個函數填充一個用戶列表。
清單 10.show_users()函數
function show_users(){
$users = array();
$sql = "select id, username from users where status='active' order by username";
$result = mysql_query($sql);
while ($data = mysql_fetch_object($result)){
$users[$data->id] = $data->username;
}
return $users;
}
有了
show_users()函數之後,接下來可以創建一個 users.php 文件,該文件將運行這個函數,並顯示系統中所有用戶的一個列表,對於每個用戶,在用戶名的旁邊都有一個 follow 鏈接。
清單 11. 運行show_users()函數的 users.php 文件
<?php
session_start();
include_once("header.php");
include_once("functions.php");
?>
<!DOCTYPE html PUBLIC "-//W3C//DTD XHTML 1.0 Transitional//EN"
"http://www.w3.org/TR/xhtml1/DTD/xhtml1-transitional.dtd">
<html xmlns="http://www.w3.org/1999/xhtml" xml:lang="en" lang="en">
<head>
<meta http-equiv="content-type" content="text/html; charset=utf-8" />
<title>Microblogging Application - Users</title>
</head>
<body>
<h1>List of Users</h1>
<?php
$users = show_users();
if (count($users)){
?>
<table border='1' cellspacing='0' cellpadding='5' width='500'>
<?php
foreach ($users as $key => $value){
echo "<tr valign='top'>\n";
echo "<td>".$key ."</td>\n";
echo "<td>".$value ." <small><a href='#'>follow</a></small></td>\n";
echo "</tr>\n";
}
?>
</table>
<?php
}else{
?>
<p><b>There are no users in the system!</b></p>
<?php
}
?>
</body>
</html>
為了訪問這個用戶列表,在 index.php 文件中表單的上方添加一個到 users.php 的鏈接:
<p><a href='users.php'>see list of users</a></p>
現在有了一個易於使用的用戶名列表,每個用戶名旁有一個 follow 鏈接。
圖 2. 用戶列表
在進入下一個階段之前,還需要編寫一個小函數,該函數將返回當前用戶正在追隨的用戶。這樣一來,用戶就可以用這個列表來確定是否追隨另一個用戶。
回到 functions.php 文件,添加一個名為
following()的函數,如清單 12 所示。將當前用戶 ID 傳遞給該函數,就可以得到該用戶正在追隨的每個用戶的 ID。
清單 12.following()函數
function following($userid){
$users = array();
$sql = "select distinct user_id from following
where follower_id = '$userid'";
$result = mysql_query($sql);
while($data = mysql_fetch_object($result)){
array_push($users, $data->user_id);
}
return $users;
}
現在可以在 users.php 上運行這個函數,檢查某個用戶 ID 是否在該數組中。如果在,則使用 unfollow 鏈接。如果不在,則使用默認的 follow 鏈接。清單 13 顯示修改後的代碼。
清單 13. 修改後的 users.php 文件,它將顯示 follow 和 unfollow 鏈接
___FCKpd___4
接下來的步驟很簡單:創建 follow 和 unfollow 鏈接使用的 action.php 文件。該文件接受兩個
GET參數:一個用於用戶 ID,另一個用於 follow 或 unfollow。如清單 14 所示,這個文件和 add.php 文件一樣簡短。
清單 14. action.php 文件
<?php
session_start();
include_once("header.php");
include_once("functions.php");
$id =追隨其他用戶
接下來可以將更多東西添加到 functions.php 文件中。這裡需要一個
show_users()函數,該函數可以返回系統中所有用戶的一個列表。後面將使用這個函數填充一個用戶列表。
清單 10.show_users()函數
function show_users(){
$users = array();
$sql = "select id, username from users where status='active' order by username";
$result = mysql_query($sql);
while ($data = mysql_fetch_object($result)){
$users[$data->id] = $data->username;
}
return $users;
}
有了
show_users()函數之後,接下來可以創建一個 users.php 文件,該文件將運行這個函數,並顯示系統中所有用戶的一個列表,對於每個用戶,在用戶名的旁邊都有一個 follow 鏈接。
清單 11. 運行show_users()函數的 users.php 文件
<?php
session_start();
include_once("header.php");
include_once("functions.php");
?>
<!DOCTYPE html PUBLIC "-//W3C//DTD XHTML 1.0 Transitional//EN"
"http://www.w3.org/TR/xhtml1/DTD/xhtml1-transitional.dtd">
<html xmlns="http://www.w3.org/1999/xhtml" xml:lang="en" lang="en">
<head>
<meta http-equiv="content-type" content="text/html; charset=utf-8" />
<title>Microblogging Application - Users</title>
</head>
<body>
<h1>List of Users</h1>
<?php
$users = show_users();
if (count($users)){
?>
<table border='1' cellspacing='0' cellpadding='5' width='500'>
<?php
foreach ($users as $key => $value){
echo "<tr valign='top'>\n";
echo "<td>".$key ."</td>\n";
echo "<td>".$value ." <small><a href='#'>follow</a></small></td>\n";
echo "</tr>\n";
}
?>
</table>
<?php
}else{
?>
<p><b>There are no users in the system!</b></p>
<?php
}
?>
</body>
</html>
為了訪問這個用戶列表,在 index.php 文件中表單的上方添加一個到 users.php 的鏈接:
<p><a href='users.php'>see list of users</a></p>
現在有了一個易於使用的用戶名列表,每個用戶名旁有一個 follow 鏈接。
圖 2. 用戶列表
在進入下一個階段之前,還需要編寫一個小函數,該函數將返回當前用戶正在追隨的用戶。這樣一來,用戶就可以用這個列表來確定是否追隨另一個用戶。
回到 functions.php 文件,添加一個名為
following()的函數,如清單 12 所示。將當前用戶 ID 傳遞給該函數,就可以得到該用戶正在追隨的每個用戶的 ID。
清單 12.following()函數
function following($userid){
$users = array();
$sql = "select distinct user_id from following
where follower_id = '$userid'";
$result = mysql_query($sql);
while($data = mysql_fetch_object($result)){
array_push($users, $data->user_id);
}
return $users;
}
現在可以在 users.php 上運行這個函數,檢查某個用戶 ID 是否在該數組中。如果在,則使用 unfollow 鏈接。如果不在,則使用默認的 follow 鏈接。清單 13 顯示修改後的代碼。
清單 13. 修改後的 users.php 文件,它將顯示 follow 和 unfollow 鏈接
<?php
$users = show_users();
$following = following(追隨其他用戶
接下來可以將更多東西添加到 functions.php 文件中。這裡需要一個
show_users()函數,該函數可以返回系統中所有用戶的一個列表。後面將使用這個函數填充一個用戶列表。
清單 10.show_users()函數
function show_users(){
$users = array();
$sql = "select id, username from users where status='active' order by username";
$result = mysql_query($sql);
while ($data = mysql_fetch_object($result)){
$users[$data->id] = $data->username;
}
return $users;
}
有了
show_users()函數之後,接下來可以創建一個 users.php 文件,該文件將運行這個函數,並顯示系統中所有用戶的一個列表,對於每個用戶,在用戶名的旁邊都有一個 follow 鏈接。
清單 11. 運行show_users()函數的 users.php 文件
<?php
session_start();
include_once("header.php");
include_once("functions.php");
?>
<!DOCTYPE html PUBLIC "-//W3C//DTD XHTML 1.0 Transitional//EN"
"http://www.w3.org/TR/xhtml1/DTD/xhtml1-transitional.dtd">
<html xmlns="http://www.w3.org/1999/xhtml" xml:lang="en" lang="en">
<head>
<meta http-equiv="content-type" content="text/html; charset=utf-8" />
<title>Microblogging Application - Users</title>
</head>
<body>
<h1>List of Users</h1>
<?php
$users = show_users();
if (count($users)){
?>
<table border='1' cellspacing='0' cellpadding='5' width='500'>
<?php
foreach ($users as $key => $value){
echo "<tr valign='top'>\n";
echo "<td>".$key ."</td>\n";
echo "<td>".$value ." <small><a href='#'>follow</a></small></td>\n";
echo "</tr>\n";
}
?>
</table>
<?php
}else{
?>
<p><b>There are no users in the system!</b></p>
<?php
}
?>
</body>
</html>
為了訪問這個用戶列表,在 index.php 文件中表單的上方添加一個到 users.php 的鏈接:
<p><a href='users.php'>see list of users</a></p>
現在有了一個易於使用的用戶名列表,每個用戶名旁有一個 follow 鏈接。
圖 2. 用戶列表
在進入下一個階段之前,還需要編寫一個小函數,該函數將返回當前用戶正在追隨的用戶。這樣一來,用戶就可以用這個列表來確定是否追隨另一個用戶。
回到 functions.php 文件,添加一個名為
following()的函數,如清單 12 所示。將當前用戶 ID 傳遞給該函數,就可以得到該用戶正在追隨的每個用戶的 ID。
清單 12.following()函數
function following($userid){
$users = array();
$sql = "select distinct user_id from following
where follower_id = '$userid'";
$result = mysql_query($sql);
while($data = mysql_fetch_object($result)){
array_push($users, $data->user_id);
}
return $users;
}
現在可以在 users.php 上運行這個函數,檢查某個用戶 ID 是否在該數組中。如果在,則使用 unfollow 鏈接。如果不在,則使用默認的 follow 鏈接。清單 13 顯示修改後的代碼。
清單 13. 修改後的 users.php 文件,它將顯示 follow 和 unfollow 鏈接
___FCKpd___4
接下來的步驟很簡單:創建 follow 和 unfollow 鏈接使用的 action.php 文件。該文件接受兩個
GET參數:一個用於用戶 ID,另一個用於 follow 或 unfollow。如清單 14 所示,這個文件和 add.php 文件一樣簡短。
清單 14. action.php 文件
___FCKpd___5
可以看到,這裡取決於之前選擇的鏈接,采取兩種不同的動作 —
follow_user()或unfollow_user()。然後,設置一條消息,並將用戶重定向回 index.php 頁面。用戶回到 index.php 頁面後,不僅可以看到自己的消息,還可以看到他們追隨的用戶最近添加的消息。或者,如果之前選擇 unfollow 鏈接,那麼那個用戶的消息將從列表中消失。稍後需要在 index.php 中添加這點代碼。現在,將follow_user()和unfollow_user()函數添加到 functions.php 中。對於這兩個函數要小心一點。不能只是因為用戶單擊了那個鏈接,就盲目地追隨或放棄追隨一個用戶。首先,需要檢查 following 表中是否存在這樣的關系。如果存在,那麼可以忽略請求(單擊 follow 鏈接時),或者接受請求(單擊 unfollow 鏈接時)。為簡單起見,編寫兩種情況下都可以使用的一個
check_count()函數,如下面的清單所示。
清單 15.check_count()函數
function check_count($first, $second){
$sql = "select count(*) from following
where user_id='$second' and follower_id='$first'";
$result = mysql_query($sql);
$row = mysql_fetch_row($result);
return $row[0];
}
function follow_user($me,$them){
$count = check_count($me,$them);
if ($count == 0){
$sql = "insert into following (user_id, follower_id)
values ($them,$me)";
$result = mysql_query($sql);
}
}
function unfollow_user($me,$them){
$count = check_count($me,$them);
if ($count != 0){
$sql = "delete from following
where user_id='$them' and follower_id='$me'
limit 1";
$result = mysql_query($sql);
}
}
接下來的步驟很容易:在主頁上顯示當前用戶正在追隨的其他用戶的列表。雖然已經有了一個
show_users()函數,但那個函數是顯示所有 用戶。可以通過增加一個非必需的參數,輕松地改變這個函數的用途。這個參數是一個用戶 ID,可以用該參數將用戶列表限制為該用戶 ID 所追隨的那些用戶。清單 16 中重新編寫的代碼所做的事情是檢查傳入的
$user_id參數。如果該用戶 ID 大於 0,則使用一個查詢獲取此 ID 追隨的所有用戶的 ID。使用implode()函數將獲得的數組轉換為一個以逗號分隔的列表。然後將這個字符串 — 大致為and id in (1,2,3...n)— 插入到已有的 SQL 查詢中,從而將用戶列表限制為該用戶正在追隨的那些用戶。
清單 16. 重新編寫的代碼,用於限制通過查詢獲得的用戶列表
function show_users($user_id=0){
if ($user_id > 0){
$follow = array();
$fsql = "select user_id from following
where follower_id='$user_id'";
$fresult = mysql_query($fsql);
while($f = mysql_fetch_object($fresult)){
array_push($follow, $f->user_id);
}
if (count($follow)){
$id_string = implode(',', $follow);
$extra = " and id in ($id_string)";
}else{
return array();
}
}
$users = array();
$sql = "select id, username from users
where status='active'
$extra order by username";
$result = mysql_query($sql);
while ($data = mysql_fetch_object($result)){
$users[$data->id] = $data->username;
}
return $users;
}
接下來,將清單 17 中的代碼添加到主頁中,用於顯示所有那些被追隨的用戶。
清單 17. 修改 index.php 以顯示被追隨的用戶
SESSION['userid']);
<h2>Users you're following</h2>
<?php
$users = show_users(追隨其他用戶
接下來可以將更多東西添加到 functions.php 文件中。這裡需要一個
show_users()函數,該函數可以返回系統中所有用戶的一個列表。後面將使用這個函數填充一個用戶列表。
清單 10.show_users()函數
function show_users(){
$users = array();
$sql = "select id, username from users where status='active' order by username";
$result = mysql_query($sql);
while ($data = mysql_fetch_object($result)){
$users[$data->id] = $data->username;
}
return $users;
}
有了
show_users()函數之後,接下來可以創建一個 users.php 文件,該文件將運行這個函數,並顯示系統中所有用戶的一個列表,對於每個用戶,在用戶名的旁邊都有一個 follow 鏈接。
清單 11. 運行show_users()函數的 users.php 文件
<?php
session_start();
include_once("header.php");
include_once("functions.php");
?>
<!DOCTYPE html PUBLIC "-//W3C//DTD XHTML 1.0 Transitional//EN"
"http://www.w3.org/TR/xhtml1/DTD/xhtml1-transitional.dtd">
<html xmlns="http://www.w3.org/1999/xhtml" xml:lang="en" lang="en">
<head>
<meta http-equiv="content-type" content="text/html; charset=utf-8" />
<title>Microblogging Application - Users</title>
</head>
<body>
<h1>List of Users</h1>
<?php
$users = show_users();
if (count($users)){
?>
<table border='1' cellspacing='0' cellpadding='5' width='500'>
<?php
foreach ($users as $key => $value){
echo "<tr valign='top'>\n";
echo "<td>".$key ."</td>\n";
echo "<td>".$value ." <small><a href='#'>follow</a></small></td>\n";
echo "</tr>\n";
}
?>
</table>
<?php
}else{
?>
<p><b>There are no users in the system!</b></p>
<?php
}
?>
</body>
</html>
為了訪問這個用戶列表,在 index.php 文件中表單的上方添加一個到 users.php 的鏈接:
<p><a href='users.php'>see list of users</a></p>
現在有了一個易於使用的用戶名列表,每個用戶名旁有一個 follow 鏈接。
圖 2. 用戶列表
在進入下一個階段之前,還需要編寫一個小函數,該函數將返回當前用戶正在追隨的用戶。這樣一來,用戶就可以用這個列表來確定是否追隨另一個用戶。
回到 functions.php 文件,添加一個名為
following()的函數,如清單 12 所示。將當前用戶 ID 傳遞給該函數,就可以得到該用戶正在追隨的每個用戶的 ID。
清單 12.following()函數
function following($userid){
$users = array();
$sql = "select distinct user_id from following
where follower_id = '$userid'";
$result = mysql_query($sql);
while($data = mysql_fetch_object($result)){
array_push($users, $data->user_id);
}
return $users;
}
現在可以在 users.php 上運行這個函數,檢查某個用戶 ID 是否在該數組中。如果在,則使用 unfollow 鏈接。如果不在,則使用默認的 follow 鏈接。清單 13 顯示修改後的代碼。
清單 13. 修改後的 users.php 文件,它將顯示 follow 和 unfollow 鏈接
<?php
$users = show_users();
$following = following(追隨其他用戶
接下來可以將更多東西添加到 functions.php 文件中。這裡需要一個
show_users()函數,該函數可以返回系統中所有用戶的一個列表。後面將使用這個函數填充一個用戶列表。
清單 10.show_users()函數
function show_users(){
$users = array();
$sql = "select id, username from users where status='active' order by username";
$result = mysql_query($sql);
while ($data = mysql_fetch_object($result)){
$users[$data->id] = $data->username;
}
return $users;
}
有了
show_users()函數之後,接下來可以創建一個 users.php 文件,該文件將運行這個函數,並顯示系統中所有用戶的一個列表,對於每個用戶,在用戶名的旁邊都有一個 follow 鏈接。
清單 11. 運行show_users()函數的 users.php 文件
<?php
session_start();
include_once("header.php");
include_once("functions.php");
?>
<!DOCTYPE html PUBLIC "-//W3C//DTD XHTML 1.0 Transitional//EN"
"http://www.w3.org/TR/xhtml1/DTD/xhtml1-transitional.dtd">
<html xmlns="http://www.w3.org/1999/xhtml" xml:lang="en" lang="en">
<head>
<meta http-equiv="content-type" content="text/html; charset=utf-8" />
<title>Microblogging Application - Users</title>
</head>
<body>
<h1>List of Users</h1>
<?php
$users = show_users();
if (count($users)){
?>
<table border='1' cellspacing='0' cellpadding='5' width='500'>
<?php
foreach ($users as $key => $value){
echo "<tr valign='top'>\n";
echo "<td>".$key ."</td>\n";
echo "<td>".$value ." <small><a href='#'>follow</a></small></td>\n";
echo "</tr>\n";
}
?>
</table>
<?php
}else{
?>
<p><b>There are no users in the system!</b></p>
<?php
}
?>
</body>
</html>
為了訪問這個用戶列表,在 index.php 文件中表單的上方添加一個到 users.php 的鏈接:
<p><a href='users.php'>see list of users</a></p>
現在有了一個易於使用的用戶名列表,每個用戶名旁有一個 follow 鏈接。
圖 2. 用戶列表
在進入下一個階段之前,還需要編寫一個小函數,該函數將返回當前用戶正在追隨的用戶。這樣一來,用戶就可以用這個列表來確定是否追隨另一個用戶。
回到 functions.php 文件,添加一個名為
following()的函數,如清單 12 所示。將當前用戶 ID 傳遞給該函數,就可以得到該用戶正在追隨的每個用戶的 ID。
清單 12.following()函數
function following($userid){
$users = array();
$sql = "select distinct user_id from following
where follower_id = '$userid'";
$result = mysql_query($sql);
while($data = mysql_fetch_object($result)){
array_push($users, $data->user_id);
}
return $users;
}
現在可以在 users.php 上運行這個函數,檢查某個用戶 ID 是否在該數組中。如果在,則使用 unfollow 鏈接。如果不在,則使用默認的 follow 鏈接。清單 13 顯示修改後的代碼。
清單 13. 修改後的 users.php 文件,它將顯示 follow 和 unfollow 鏈接
___FCKpd___4
接下來的步驟很簡單:創建 follow 和 unfollow 鏈接使用的 action.php 文件。該文件接受兩個
GET參數:一個用於用戶 ID,另一個用於 follow 或 unfollow。如清單 14 所示,這個文件和 add.php 文件一樣簡短。
清單 14. action.php 文件
<?php
session_start();
include_once("header.php");
include_once("functions.php");
$id =追隨其他用戶
接下來可以將更多東西添加到 functions.php 文件中。這裡需要一個
show_users()函數,該函數可以返回系統中所有用戶的一個列表。後面將使用這個函數填充一個用戶列表。
清單 10.show_users()函數
function show_users(){
$users = array();
$sql = "select id, username from users where status='active' order by username";
$result = mysql_query($sql);
while ($data = mysql_fetch_object($result)){
$users[$data->id] = $data->username;
}
return $users;
}
有了
show_users()函數之後,接下來可以創建一個 users.php 文件,該文件將運行這個函數,並顯示系統中所有用戶的一個列表,對於每個用戶,在用戶名的旁邊都有一個 follow 鏈接。
清單 11. 運行show_users()函數的 users.php 文件
<?php
session_start();
include_once("header.php");
include_once("functions.php");
?>
<!DOCTYPE html PUBLIC "-//W3C//DTD XHTML 1.0 Transitional//EN"
"http://www.w3.org/TR/xhtml1/DTD/xhtml1-transitional.dtd">
<html xmlns="http://www.w3.org/1999/xhtml" xml:lang="en" lang="en">
<head>
<meta http-equiv="content-type" content="text/html; charset=utf-8" />
<title>Microblogging Application - Users</title>
</head>
<body>
<h1>List of Users</h1>
<?php
$users = show_users();
if (count($users)){
?>
<table border='1' cellspacing='0' cellpadding='5' width='500'>
<?php
foreach ($users as $key => $value){
echo "<tr valign='top'>\n";
echo "<td>".$key ."</td>\n";
echo "<td>".$value ." <small><a href='#'>follow</a></small></td>\n";
echo "</tr>\n";
}
?>
</table>
<?php
}else{
?>
<p><b>There are no users in the system!</b></p>
<?php
}
?>
</body>
</html>
為了訪問這個用戶列表,在 index.php 文件中表單的上方添加一個到 users.php 的鏈接:
<p><a href='users.php'>see list of users</a></p>
現在有了一個易於使用的用戶名列表,每個用戶名旁有一個 follow 鏈接。
圖 2. 用戶列表
在進入下一個階段之前,還需要編寫一個小函數,該函數將返回當前用戶正在追隨的用戶。這樣一來,用戶就可以用這個列表來確定是否追隨另一個用戶。
回到 functions.php 文件,添加一個名為
following()的函數,如清單 12 所示。將當前用戶 ID 傳遞給該函數,就可以得到該用戶正在追隨的每個用戶的 ID。
清單 12.following()函數
function following($userid){
$users = array();
$sql = "select distinct user_id from following
where follower_id = '$userid'";
$result = mysql_query($sql);
while($data = mysql_fetch_object($result)){
array_push($users, $data->user_id);
}
return $users;
}
現在可以在 users.php 上運行這個函數,檢查某個用戶 ID 是否在該數組中。如果在,則使用 unfollow 鏈接。如果不在,則使用默認的 follow 鏈接。清單 13 顯示修改後的代碼。
清單 13. 修改後的 users.php 文件,它將顯示 follow 和 unfollow 鏈接
<?php
$users = show_users();
$following = following(追隨其他用戶
接下來可以將更多東西添加到 functions.php 文件中。這裡需要一個
show_users()函數,該函數可以返回系統中所有用戶的一個列表。後面將使用這個函數填充一個用戶列表。
清單 10.show_users()函數
function show_users(){
$users = array();
$sql = "select id, username from users where status='active' order by username";
$result = mysql_query($sql);
while ($data = mysql_fetch_object($result)){
$users[$data->id] = $data->username;
}
return $users;
}
有了
show_users()函數之後,接下來可以創建一個 users.php 文件,該文件將運行這個函數,並顯示系統中所有用戶的一個列表,對於每個用戶,在用戶名的旁邊都有一個 follow 鏈接。
清單 11. 運行show_users()函數的 users.php 文件
<?php
session_start();
include_once("header.php");
include_once("functions.php");
?>
<!DOCTYPE html PUBLIC "-//W3C//DTD XHTML 1.0 Transitional//EN"
"http://www.w3.org/TR/xhtml1/DTD/xhtml1-transitional.dtd">
<html xmlns="http://www.w3.org/1999/xhtml" xml:lang="en" lang="en">
<head>
<meta http-equiv="content-type" content="text/html; charset=utf-8" />
<title>Microblogging Application - Users</title>
</head>
<body>
<h1>List of Users</h1>
<?php
$users = show_users();
if (count($users)){
?>
<table border='1' cellspacing='0' cellpadding='5' width='500'>
<?php
foreach ($users as $key => $value){
echo "<tr valign='top'>\n";
echo "<td>".$key ."</td>\n";
echo "<td>".$value ." <small><a href='#'>follow</a></small></td>\n";
echo "</tr>\n";
}
?>
</table>
<?php
}else{
?>
<p><b>There are no users in the system!</b></p>
<?php
}
?>
</body>
</html>
為了訪問這個用戶列表,在 index.php 文件中表單的上方添加一個到 users.php 的鏈接:
<p><a href='users.php'>see list of users</a></p>
現在有了一個易於使用的用戶名列表,每個用戶名旁有一個 follow 鏈接。
圖 2. 用戶列表
在進入下一個階段之前,還需要編寫一個小函數,該函數將返回當前用戶正在追隨的用戶。這樣一來,用戶就可以用這個列表來確定是否追隨另一個用戶。
回到 functions.php 文件,添加一個名為
following()的函數,如清單 12 所示。將當前用戶 ID 傳遞給該函數,就可以得到該用戶正在追隨的每個用戶的 ID。
清單 12.following()函數
function following($userid){
$users = array();
$sql = "select distinct user_id from following
where follower_id = '$userid'";
$result = mysql_query($sql);
while($data = mysql_fetch_object($result)){
array_push($users, $data->user_id);
}
return $users;
}
現在可以在 users.php 上運行這個函數,檢查某個用戶 ID 是否在該數組中。如果在,則使用 unfollow 鏈接。如果不在,則使用默認的 follow 鏈接。清單 13 顯示修改後的代碼。
清單 13. 修改後的 users.php 文件,它將顯示 follow 和 unfollow 鏈接
___FCKpd___4
接下來的步驟很簡單:創建 follow 和 unfollow 鏈接使用的 action.php 文件。該文件接受兩個
GET參數:一個用於用戶 ID,另一個用於 follow 或 unfollow。如清單 14 所示,這個文件和 add.php 文件一樣簡短。
清單 14. action.php 文件
___FCKpd___5
可以看到,這裡取決於之前選擇的鏈接,采取兩種不同的動作 —
follow_user()或unfollow_user()。然後,設置一條消息,並將用戶重定向回 index.php 頁面。用戶回到 index.php 頁面後,不僅可以看到自己的消息,還可以看到他們追隨的用戶最近添加的消息。或者,如果之前選擇 unfollow 鏈接,那麼那個用戶的消息將從列表中消失。稍後需要在 index.php 中添加這點代碼。現在,將follow_user()和unfollow_user()函數添加到 functions.php 中。對於這兩個函數要小心一點。不能只是因為用戶單擊了那個鏈接,就盲目地追隨或放棄追隨一個用戶。首先,需要檢查 following 表中是否存在這樣的關系。如果存在,那麼可以忽略請求(單擊 follow 鏈接時),或者接受請求(單擊 unfollow 鏈接時)。為簡單起見,編寫兩種情況下都可以使用的一個
check_count()函數,如下面的清單所示。
清單 15.check_count()函數
function check_count($first, $second){
$sql = "select count(*) from following
where user_id='$second' and follower_id='$first'";
$result = mysql_query($sql);
$row = mysql_fetch_row($result);
return $row[0];
}
function follow_user($me,$them){
$count = check_count($me,$them);
if ($count == 0){
$sql = "insert into following (user_id, follower_id)
values ($them,$me)";
$result = mysql_query($sql);
}
}
function unfollow_user($me,$them){
$count = check_count($me,$them);
if ($count != 0){
$sql = "delete from following
where user_id='$them' and follower_id='$me'
limit 1";
$result = mysql_query($sql);
}
}
接下來的步驟很容易:在主頁上顯示當前用戶正在追隨的其他用戶的列表。雖然已經有了一個
show_users()函數,但那個函數是顯示所有 用戶。可以通過增加一個非必需的參數,輕松地改變這個函數的用途。這個參數是一個用戶 ID,可以用該參數將用戶列表限制為該用戶 ID 所追隨的那些用戶。清單 16 中重新編寫的代碼所做的事情是檢查傳入的
$user_id參數。如果該用戶 ID 大於 0,則使用一個查詢獲取此 ID 追隨的所有用戶的 ID。使用implode()函數將獲得的數組轉換為一個以逗號分隔的列表。然後將這個字符串 — 大致為and id in (1,2,3...n)— 插入到已有的 SQL 查詢中,從而將用戶列表限制為該用戶正在追隨的那些用戶。
清單 16. 重新編寫的代碼,用於限制通過查詢獲得的用戶列表
function show_users($user_id=0){
if ($user_id > 0){
$follow = array();
$fsql = "select user_id from following
where follower_id='$user_id'";
$fresult = mysql_query($fsql);
while($f = mysql_fetch_object($fresult)){
array_push($follow, $f->user_id);
}
if (count($follow)){
$id_string = implode(',', $follow);
$extra = " and id in ($id_string)";
}else{
return array();
}
}
$users = array();
$sql = "select id, username from users
where status='active'
$extra order by username";
$result = mysql_query($sql);
while ($data = mysql_fetch_object($result)){
$users[$data->id] = $data->username;
}
return $users;
}
接下來,將清單 17 中的代碼添加到主頁中,用於顯示所有那些被追隨的用戶。
清單 17. 修改 index.php 以顯示被追隨的用戶
___FCKpd___8SESSION['userid']);
if (count($users)){
?>
<table border='1' cellspacing='0' cellpadding='5' width='500'>
<?php
foreach ($users as $key => $value){
echo "<tr valign='top'>\n";
echo "<td>".$key ."</td>\n";
echo "<td>".$value;
if (in_array($key,$following)){
echo " <small>
<a href='action.php?id=$key&do=unfollow'>unfollow</a>
</small>";
}else{
echo " <small>
<a href='action.php?id=$key&do=follow'>follow</a>
</small>";
}
echo "</td>\n";
echo "</tr>\n";
}
?>
接下來的步驟很簡單:創建 follow 和 unfollow 鏈接使用的 action.php 文件。該文件接受兩個
GET參數:一個用於用戶 ID,另一個用於 follow 或 unfollow。如清單 14 所示,這個文件和 add.php 文件一樣簡短。
清單 14. action.php 文件
___FCKpd___5
可以看到,這裡取決於之前選擇的鏈接,采取兩種不同的動作 —
follow_user()或unfollow_user()。然後,設置一條消息,並將用戶重定向回 index.php 頁面。用戶回到 index.php 頁面後,不僅可以看到自己的消息,還可以看到他們追隨的用戶最近添加的消息。或者,如果之前選擇 unfollow 鏈接,那麼那個用戶的消息將從列表中消失。稍後需要在 index.php 中添加這點代碼。現在,將follow_user()和unfollow_user()函數添加到 functions.php 中。對於這兩個函數要小心一點。不能只是因為用戶單擊了那個鏈接,就盲目地追隨或放棄追隨一個用戶。首先,需要檢查 following 表中是否存在這樣的關系。如果存在,那麼可以忽略請求(單擊 follow 鏈接時),或者接受請求(單擊 unfollow 鏈接時)。為簡單起見,編寫兩種情況下都可以使用的一個
check_count()函數,如下面的清單所示。
清單 15.check_count()函數
___FCKpd___6
接下來的步驟很容易:在主頁上顯示當前用戶正在追隨的其他用戶的列表。雖然已經有了一個
show_users()函數,但那個函數是顯示所有 用戶。可以通過增加一個非必需的參數,輕松地改變這個函數的用途。這個參數是一個用戶 ID,可以用該參數將用戶列表限制為該用戶 ID 所追隨的那些用戶。清單 16 中重新編寫的代碼所做的事情是檢查傳入的
$user_id參數。如果該用戶 ID 大於 0,則使用一個查詢獲取此 ID 追隨的所有用戶的 ID。使用implode()函數將獲得的數組轉換為一個以逗號分隔的列表。然後將這個字符串 — 大致為and id in (1,2,3...n)— 插入到已有的 SQL 查詢中,從而將用戶列表限制為該用戶正在追隨的那些用戶。
清單 16. 重新編寫的代碼,用於限制通過查詢獲得的用戶列表
___FCKpd___7
接下來,將清單 17 中的代碼添加到主頁中,用於顯示所有那些被追隨的用戶。
清單 17. 修改 index.php 以顯示被追隨的用戶
___FCKpd___8GET['id'];
$do =追隨其他用戶
接下來可以將更多東西添加到 functions.php 文件中。這裡需要一個
show_users()函數,該函數可以返回系統中所有用戶的一個列表。後面將使用這個函數填充一個用戶列表。
清單 10.show_users()函數
function show_users(){
$users = array();
$sql = "select id, username from users where status='active' order by username";
$result = mysql_query($sql);
while ($data = mysql_fetch_object($result)){
$users[$data->id] = $data->username;
}
return $users;
}
有了
show_users()函數之後,接下來可以創建一個 users.php 文件,該文件將運行這個函數,並顯示系統中所有用戶的一個列表,對於每個用戶,在用戶名的旁邊都有一個 follow 鏈接。
清單 11. 運行show_users()函數的 users.php 文件
<?php
session_start();
include_once("header.php");
include_once("functions.php");
?>
<!DOCTYPE html PUBLIC "-//W3C//DTD XHTML 1.0 Transitional//EN"
"http://www.w3.org/TR/xhtml1/DTD/xhtml1-transitional.dtd">
<html xmlns="http://www.w3.org/1999/xhtml" xml:lang="en" lang="en">
<head>
<meta http-equiv="content-type" content="text/html; charset=utf-8" />
<title>Microblogging Application - Users</title>
</head>
<body>
<h1>List of Users</h1>
<?php
$users = show_users();
if (count($users)){
?>
<table border='1' cellspacing='0' cellpadding='5' width='500'>
<?php
foreach ($users as $key => $value){
echo "<tr valign='top'>\n";
echo "<td>".$key ."</td>\n";
echo "<td>".$value ." <small><a href='#'>follow</a></small></td>\n";
echo "</tr>\n";
}
?>
</table>
<?php
}else{
?>
<p><b>There are no users in the system!</b></p>
<?php
}
?>
</body>
</html>
為了訪問這個用戶列表,在 index.php 文件中表單的上方添加一個到 users.php 的鏈接:
<p><a href='users.php'>see list of users</a></p>
現在有了一個易於使用的用戶名列表,每個用戶名旁有一個 follow 鏈接。
圖 2. 用戶列表
在進入下一個階段之前,還需要編寫一個小函數,該函數將返回當前用戶正在追隨的用戶。這樣一來,用戶就可以用這個列表來確定是否追隨另一個用戶。
回到 functions.php 文件,添加一個名為
following()的函數,如清單 12 所示。將當前用戶 ID 傳遞給該函數,就可以得到該用戶正在追隨的每個用戶的 ID。
清單 12.following()函數
function following($userid){
$users = array();
$sql = "select distinct user_id from following
where follower_id = '$userid'";
$result = mysql_query($sql);
while($data = mysql_fetch_object($result)){
array_push($users, $data->user_id);
}
return $users;
}
現在可以在 users.php 上運行這個函數,檢查某個用戶 ID 是否在該數組中。如果在,則使用 unfollow 鏈接。如果不在,則使用默認的 follow 鏈接。清單 13 顯示修改後的代碼。
清單 13. 修改後的 users.php 文件,它將顯示 follow 和 unfollow 鏈接
<?php
$users = show_users();
$following = following(追隨其他用戶
接下來可以將更多東西添加到 functions.php 文件中。這裡需要一個
show_users()函數,該函數可以返回系統中所有用戶的一個列表。後面將使用這個函數填充一個用戶列表。
清單 10.show_users()函數
function show_users(){
$users = array();
$sql = "select id, username from users where status='active' order by username";
$result = mysql_query($sql);
while ($data = mysql_fetch_object($result)){
$users[$data->id] = $data->username;
}
return $users;
}
有了
show_users()函數之後,接下來可以創建一個 users.php 文件,該文件將運行這個函數,並顯示系統中所有用戶的一個列表,對於每個用戶,在用戶名的旁邊都有一個 follow 鏈接。
清單 11. 運行show_users()函數的 users.php 文件
<?php
session_start();
include_once("header.php");
include_once("functions.php");
?>
<!DOCTYPE html PUBLIC "-//W3C//DTD XHTML 1.0 Transitional//EN"
"http://www.w3.org/TR/xhtml1/DTD/xhtml1-transitional.dtd">
<html xmlns="http://www.w3.org/1999/xhtml" xml:lang="en" lang="en">
<head>
<meta http-equiv="content-type" content="text/html; charset=utf-8" />
<title>Microblogging Application - Users</title>
</head>
<body>
<h1>List of Users</h1>
<?php
$users = show_users();
if (count($users)){
?>
<table border='1' cellspacing='0' cellpadding='5' width='500'>
<?php
foreach ($users as $key => $value){
echo "<tr valign='top'>\n";
echo "<td>".$key ."</td>\n";
echo "<td>".$value ." <small><a href='#'>follow</a></small></td>\n";
echo "</tr>\n";
}
?>
</table>
<?php
}else{
?>
<p><b>There are no users in the system!</b></p>
<?php
}
?>
</body>
</html>
為了訪問這個用戶列表,在 index.php 文件中表單的上方添加一個到 users.php 的鏈接:
<p><a href='users.php'>see list of users</a></p>
現在有了一個易於使用的用戶名列表,每個用戶名旁有一個 follow 鏈接。
圖 2. 用戶列表
在進入下一個階段之前,還需要編寫一個小函數,該函數將返回當前用戶正在追隨的用戶。這樣一來,用戶就可以用這個列表來確定是否追隨另一個用戶。
回到 functions.php 文件,添加一個名為
following()的函數,如清單 12 所示。將當前用戶 ID 傳遞給該函數,就可以得到該用戶正在追隨的每個用戶的 ID。
清單 12.following()函數
function following($userid){
$users = array();
$sql = "select distinct user_id from following
where follower_id = '$userid'";
$result = mysql_query($sql);
while($data = mysql_fetch_object($result)){
array_push($users, $data->user_id);
}
return $users;
}
現在可以在 users.php 上運行這個函數,檢查某個用戶 ID 是否在該數組中。如果在,則使用 unfollow 鏈接。如果不在,則使用默認的 follow 鏈接。清單 13 顯示修改後的代碼。
清單 13. 修改後的 users.php 文件,它將顯示 follow 和 unfollow 鏈接
___FCKpd___4
接下來的步驟很簡單:創建 follow 和 unfollow 鏈接使用的 action.php 文件。該文件接受兩個
GET參數:一個用於用戶 ID,另一個用於 follow 或 unfollow。如清單 14 所示,這個文件和 add.php 文件一樣簡短。
清單 14. action.php 文件
___FCKpd___5
可以看到,這裡取決於之前選擇的鏈接,采取兩種不同的動作 —
follow_user()或unfollow_user()。然後,設置一條消息,並將用戶重定向回 index.php 頁面。用戶回到 index.php 頁面後,不僅可以看到自己的消息,還可以看到他們追隨的用戶最近添加的消息。或者,如果之前選擇 unfollow 鏈接,那麼那個用戶的消息將從列表中消失。稍後需要在 index.php 中添加這點代碼。現在,將follow_user()和unfollow_user()函數添加到 functions.php 中。對於這兩個函數要小心一點。不能只是因為用戶單擊了那個鏈接,就盲目地追隨或放棄追隨一個用戶。首先,需要檢查 following 表中是否存在這樣的關系。如果存在,那麼可以忽略請求(單擊 follow 鏈接時),或者接受請求(單擊 unfollow 鏈接時)。為簡單起見,編寫兩種情況下都可以使用的一個
check_count()函數,如下面的清單所示。
清單 15.check_count()函數
___FCKpd___6
接下來的步驟很容易:在主頁上顯示當前用戶正在追隨的其他用戶的列表。雖然已經有了一個
show_users()函數,但那個函數是顯示所有 用戶。可以通過增加一個非必需的參數,輕松地改變這個函數的用途。這個參數是一個用戶 ID,可以用該參數將用戶列表限制為該用戶 ID 所追隨的那些用戶。清單 16 中重新編寫的代碼所做的事情是檢查傳入的
$user_id參數。如果該用戶 ID 大於 0,則使用一個查詢獲取此 ID 追隨的所有用戶的 ID。使用implode()函數將獲得的數組轉換為一個以逗號分隔的列表。然後將這個字符串 — 大致為and id in (1,2,3...n)— 插入到已有的 SQL 查詢中,從而將用戶列表限制為該用戶正在追隨的那些用戶。
清單 16. 重新編寫的代碼,用於限制通過查詢獲得的用戶列表
___FCKpd___7
接下來,將清單 17 中的代碼添加到主頁中,用於顯示所有那些被追隨的用戶。
清單 17. 修改 index.php 以顯示被追隨的用戶
___FCKpd___8SESSION['userid']);
if (count($users)){
?>
<table border='1' cellspacing='0' cellpadding='5' width='500'>
<?php
foreach ($users as $key => $value){
echo "<tr valign='top'>\n";
echo "<td>".$key ."</td>\n";
echo "<td>".$value;
if (in_array($key,$following)){
echo " <small>
<a href='action.php?id=$key&do=unfollow'>unfollow</a>
</small>";
}else{
echo " <small>
<a href='action.php?id=$key&do=follow'>follow</a>
</small>";
}
echo "</td>\n";
echo "</tr>\n";
}
?>
接下來的步驟很簡單:創建 follow 和 unfollow 鏈接使用的 action.php 文件。該文件接受兩個
GET參數:一個用於用戶 ID,另一個用於 follow 或 unfollow。如清單 14 所示,這個文件和 add.php 文件一樣簡短。
清單 14. action.php 文件
___FCKpd___5
可以看到,這裡取決於之前選擇的鏈接,采取兩種不同的動作 —
follow_user()或unfollow_user()。然後,設置一條消息,並將用戶重定向回 index.php 頁面。用戶回到 index.php 頁面後,不僅可以看到自己的消息,還可以看到他們追隨的用戶最近添加的消息。或者,如果之前選擇 unfollow 鏈接,那麼那個用戶的消息將從列表中消失。稍後需要在 index.php 中添加這點代碼。現在,將follow_user()和unfollow_user()函數添加到 functions.php 中。對於這兩個函數要小心一點。不能只是因為用戶單擊了那個鏈接,就盲目地追隨或放棄追隨一個用戶。首先,需要檢查 following 表中是否存在這樣的關系。如果存在,那麼可以忽略請求(單擊 follow 鏈接時),或者接受請求(單擊 unfollow 鏈接時)。為簡單起見,編寫兩種情況下都可以使用的一個
check_count()函數,如下面的清單所示。
清單 15.check_count()函數
___FCKpd___6
接下來的步驟很容易:在主頁上顯示當前用戶正在追隨的其他用戶的列表。雖然已經有了一個
show_users()函數,但那個函數是顯示所有 用戶。可以通過增加一個非必需的參數,輕松地改變這個函數的用途。這個參數是一個用戶 ID,可以用該參數將用戶列表限制為該用戶 ID 所追隨的那些用戶。清單 16 中重新編寫的代碼所做的事情是檢查傳入的
$user_id參數。如果該用戶 ID 大於 0,則使用一個查詢獲取此 ID 追隨的所有用戶的 ID。使用implode()函數將獲得的數組轉換為一個以逗號分隔的列表。然後將這個字符串 — 大致為and id in (1,2,3...n)— 插入到已有的 SQL 查詢中,從而將用戶列表限制為該用戶正在追隨的那些用戶。
清單 16. 重新編寫的代碼,用於限制通過查詢獲得的用戶列表
___FCKpd___7
接下來,將清單 17 中的代碼添加到主頁中,用於顯示所有那些被追隨的用戶。
清單 17. 修改 index.php 以顯示被追隨的用戶
___FCKpd___8GET['do'];
switch ($do){
case "follow":
follow_user(追隨其他用戶
接下來可以將更多東西添加到 functions.php 文件中。這裡需要一個
show_users()函數,該函數可以返回系統中所有用戶的一個列表。後面將使用這個函數填充一個用戶列表。
清單 10.show_users()函數
function show_users(){
$users = array();
$sql = "select id, username from users where status='active' order by username";
$result = mysql_query($sql);
while ($data = mysql_fetch_object($result)){
$users[$data->id] = $data->username;
}
return $users;
}
有了
show_users()函數之後,接下來可以創建一個 users.php 文件,該文件將運行這個函數,並顯示系統中所有用戶的一個列表,對於每個用戶,在用戶名的旁邊都有一個 follow 鏈接。
清單 11. 運行show_users()函數的 users.php 文件
<?php
session_start();
include_once("header.php");
include_once("functions.php");
?>
<!DOCTYPE html PUBLIC "-//W3C//DTD XHTML 1.0 Transitional//EN"
"http://www.w3.org/TR/xhtml1/DTD/xhtml1-transitional.dtd">
<html xmlns="http://www.w3.org/1999/xhtml" xml:lang="en" lang="en">
<head>
<meta http-equiv="content-type" content="text/html; charset=utf-8" />
<title>Microblogging Application - Users</title>
</head>
<body>
<h1>List of Users</h1>
<?php
$users = show_users();
if (count($users)){
?>
<table border='1' cellspacing='0' cellpadding='5' width='500'>
<?php
foreach ($users as $key => $value){
echo "<tr valign='top'>\n";
echo "<td>".$key ."</td>\n";
echo "<td>".$value ." <small><a href='#'>follow</a></small></td>\n";
echo "</tr>\n";
}
?>
</table>
<?php
}else{
?>
<p><b>There are no users in the system!</b></p>
<?php
}
?>
</body>
</html>
為了訪問這個用戶列表,在 index.php 文件中表單的上方添加一個到 users.php 的鏈接:
<p><a href='users.php'>see list of users</a></p>
現在有了一個易於使用的用戶名列表,每個用戶名旁有一個 follow 鏈接。
圖 2. 用戶列表
在進入下一個階段之前,還需要編寫一個小函數,該函數將返回當前用戶正在追隨的用戶。這樣一來,用戶就可以用這個列表來確定是否追隨另一個用戶。
回到 functions.php 文件,添加一個名為
following()的函數,如清單 12 所示。將當前用戶 ID 傳遞給該函數,就可以得到該用戶正在追隨的每個用戶的 ID。
清單 12.following()函數
function following($userid){
$users = array();
$sql = "select distinct user_id from following
where follower_id = '$userid'";
$result = mysql_query($sql);
while($data = mysql_fetch_object($result)){
array_push($users, $data->user_id);
}
return $users;
}
現在可以在 users.php 上運行這個函數,檢查某個用戶 ID 是否在該數組中。如果在,則使用 unfollow 鏈接。如果不在,則使用默認的 follow 鏈接。清單 13 顯示修改後的代碼。
清單 13. 修改後的 users.php 文件,它將顯示 follow 和 unfollow 鏈接
<?php
$users = show_users();
$following = following(追隨其他用戶
接下來可以將更多東西添加到 functions.php 文件中。這裡需要一個
show_users()函數,該函數可以返回系統中所有用戶的一個列表。後面將使用這個函數填充一個用戶列表。
清單 10.show_users()函數
function show_users(){
$users = array();
$sql = "select id, username from users where status='active' order by username";
$result = mysql_query($sql);
while ($data = mysql_fetch_object($result)){
$users[$data->id] = $data->username;
}
return $users;
}
有了
show_users()函數之後,接下來可以創建一個 users.php 文件,該文件將運行這個函數,並顯示系統中所有用戶的一個列表,對於每個用戶,在用戶名的旁邊都有一個 follow 鏈接。
清單 11. 運行show_users()函數的 users.php 文件
<?php
session_start();
include_once("header.php");
include_once("functions.php");
?>
<!DOCTYPE html PUBLIC "-//W3C//DTD XHTML 1.0 Transitional//EN"
"http://www.w3.org/TR/xhtml1/DTD/xhtml1-transitional.dtd">
<html xmlns="http://www.w3.org/1999/xhtml" xml:lang="en" lang="en">
<head>
<meta http-equiv="content-type" content="text/html; charset=utf-8" />
<title>Microblogging Application - Users</title>
</head>
<body>
<h1>List of Users</h1>
<?php
$users = show_users();
if (count($users)){
?>
<table border='1' cellspacing='0' cellpadding='5' width='500'>
<?php
foreach ($users as $key => $value){
echo "<tr valign='top'>\n";
echo "<td>".$key ."</td>\n";
echo "<td>".$value ." <small><a href='#'>follow</a></small></td>\n";
echo "</tr>\n";
}
?>
</table>
<?php
}else{
?>
<p><b>There are no users in the system!</b></p>
<?php
}
?>
</body>
</html>
為了訪問這個用戶列表,在 index.php 文件中表單的上方添加一個到 users.php 的鏈接:
<p><a href='users.php'>see list of users</a></p>
現在有了一個易於使用的用戶名列表,每個用戶名旁有一個 follow 鏈接。
圖 2. 用戶列表
在進入下一個階段之前,還需要編寫一個小函數,該函數將返回當前用戶正在追隨的用戶。這樣一來,用戶就可以用這個列表來確定是否追隨另一個用戶。
回到 functions.php 文件,添加一個名為
following()的函數,如清單 12 所示。將當前用戶 ID 傳遞給該函數,就可以得到該用戶正在追隨的每個用戶的 ID。
清單 12.following()函數
function following($userid){
$users = array();
$sql = "select distinct user_id from following
where follower_id = '$userid'";
$result = mysql_query($sql);
while($data = mysql_fetch_object($result)){
array_push($users, $data->user_id);
}
return $users;
}
現在可以在 users.php 上運行這個函數,檢查某個用戶 ID 是否在該數組中。如果在,則使用 unfollow 鏈接。如果不在,則使用默認的 follow 鏈接。清單 13 顯示修改後的代碼。
清單 13. 修改後的 users.php 文件,它將顯示 follow 和 unfollow 鏈接
___FCKpd___4
接下來的步驟很簡單:創建 follow 和 unfollow 鏈接使用的 action.php 文件。該文件接受兩個
GET參數:一個用於用戶 ID,另一個用於 follow 或 unfollow。如清單 14 所示,這個文件和 add.php 文件一樣簡短。
清單 14. action.php 文件
___FCKpd___5
可以看到,這裡取決於之前選擇的鏈接,采取兩種不同的動作 —
follow_user()或unfollow_user()。然後,設置一條消息,並將用戶重定向回 index.php 頁面。用戶回到 index.php 頁面後,不僅可以看到自己的消息,還可以看到他們追隨的用戶最近添加的消息。或者,如果之前選擇 unfollow 鏈接,那麼那個用戶的消息將從列表中消失。稍後需要在 index.php 中添加這點代碼。現在,將follow_user()和unfollow_user()函數添加到 functions.php 中。對於這兩個函數要小心一點。不能只是因為用戶單擊了那個鏈接,就盲目地追隨或放棄追隨一個用戶。首先,需要檢查 following 表中是否存在這樣的關系。如果存在,那麼可以忽略請求(單擊 follow 鏈接時),或者接受請求(單擊 unfollow 鏈接時)。為簡單起見,編寫兩種情況下都可以使用的一個
check_count()函數,如下面的清單所示。
清單 15.check_count()函數
___FCKpd___6
接下來的步驟很容易:在主頁上顯示當前用戶正在追隨的其他用戶的列表。雖然已經有了一個
show_users()函數,但那個函數是顯示所有 用戶。可以通過增加一個非必需的參數,輕松地改變這個函數的用途。這個參數是一個用戶 ID,可以用該參數將用戶列表限制為該用戶 ID 所追隨的那些用戶。清單 16 中重新編寫的代碼所做的事情是檢查傳入的
$user_id參數。如果該用戶 ID 大於 0,則使用一個查詢獲取此 ID 追隨的所有用戶的 ID。使用implode()函數將獲得的數組轉換為一個以逗號分隔的列表。然後將這個字符串 — 大致為and id in (1,2,3...n)— 插入到已有的 SQL 查詢中,從而將用戶列表限制為該用戶正在追隨的那些用戶。
清單 16. 重新編寫的代碼,用於限制通過查詢獲得的用戶列表
___FCKpd___7
接下來,將清單 17 中的代碼添加到主頁中,用於顯示所有那些被追隨的用戶。
清單 17. 修改 index.php 以顯示被追隨的用戶
___FCKpd___8SESSION['userid']);
if (count($users)){
?>
<table border='1' cellspacing='0' cellpadding='5' width='500'>
<?php
foreach ($users as $key => $value){
echo "<tr valign='top'>\n";
echo "<td>".$key ."</td>\n";
echo "<td>".$value;
if (in_array($key,$following)){
echo " <small>
<a href='action.php?id=$key&do=unfollow'>unfollow</a>
</small>";
}else{
echo " <small>
<a href='action.php?id=$key&do=follow'>follow</a>
</small>";
}
echo "</td>\n";
echo "</tr>\n";
}
?>
接下來的步驟很簡單:創建 follow 和 unfollow 鏈接使用的 action.php 文件。該文件接受兩個
GET參數:一個用於用戶 ID,另一個用於 follow 或 unfollow。如清單 14 所示,這個文件和 add.php 文件一樣簡短。
清單 14. action.php 文件
___FCKpd___5
可以看到,這裡取決於之前選擇的鏈接,采取兩種不同的動作 —
follow_user()或unfollow_user()。然後,設置一條消息,並將用戶重定向回 index.php 頁面。用戶回到 index.php 頁面後,不僅可以看到自己的消息,還可以看到他們追隨的用戶最近添加的消息。或者,如果之前選擇 unfollow 鏈接,那麼那個用戶的消息將從列表中消失。稍後需要在 index.php 中添加這點代碼。現在,將follow_user()和unfollow_user()函數添加到 functions.php 中。對於這兩個函數要小心一點。不能只是因為用戶單擊了那個鏈接,就盲目地追隨或放棄追隨一個用戶。首先,需要檢查 following 表中是否存在這樣的關系。如果存在,那麼可以忽略請求(單擊 follow 鏈接時),或者接受請求(單擊 unfollow 鏈接時)。為簡單起見,編寫兩種情況下都可以使用的一個
check_count()函數,如下面的清單所示。
清單 15.check_count()函數
___FCKpd___6
接下來的步驟很容易:在主頁上顯示當前用戶正在追隨的其他用戶的列表。雖然已經有了一個
show_users()函數,但那個函數是顯示所有 用戶。可以通過增加一個非必需的參數,輕松地改變這個函數的用途。這個參數是一個用戶 ID,可以用該參數將用戶列表限制為該用戶 ID 所追隨的那些用戶。清單 16 中重新編寫的代碼所做的事情是檢查傳入的
$user_id參數。如果該用戶 ID 大於 0,則使用一個查詢獲取此 ID 追隨的所有用戶的 ID。使用implode()函數將獲得的數組轉換為一個以逗號分隔的列表。然後將這個字符串 — 大致為and id in (1,2,3...n)— 插入到已有的 SQL 查詢中,從而將用戶列表限制為該用戶正在追隨的那些用戶。
清單 16. 重新編寫的代碼,用於限制通過查詢獲得的用戶列表
___FCKpd___7
接下來,將清單 17 中的代碼添加到主頁中,用於顯示所有那些被追隨的用戶。
清單 17. 修改 index.php 以顯示被追隨的用戶
___FCKpd___8SESSION['userid'],$id);
$msg = "You have followed a user!";
break;
case "unfollow":
unfollow_user(追隨其他用戶
接下來可以將更多東西添加到 functions.php 文件中。這裡需要一個
show_users()函數,該函數可以返回系統中所有用戶的一個列表。後面將使用這個函數填充一個用戶列表。
清單 10.show_users()函數
function show_users(){
$users = array();
$sql = "select id, username from users where status='active' order by username";
$result = mysql_query($sql);
while ($data = mysql_fetch_object($result)){
$users[$data->id] = $data->username;
}
return $users;
}
有了
show_users()函數之後,接下來可以創建一個 users.php 文件,該文件將運行這個函數,並顯示系統中所有用戶的一個列表,對於每個用戶,在用戶名的旁邊都有一個 follow 鏈接。
清單 11. 運行show_users()函數的 users.php 文件
<?php
session_start();
include_once("header.php");
include_once("functions.php");
?>
<!DOCTYPE html PUBLIC "-//W3C//DTD XHTML 1.0 Transitional//EN"
"http://www.w3.org/TR/xhtml1/DTD/xhtml1-transitional.dtd">
<html xmlns="http://www.w3.org/1999/xhtml" xml:lang="en" lang="en">
<head>
<meta http-equiv="content-type" content="text/html; charset=utf-8" />
<title>Microblogging Application - Users</title>
</head>
<body>
<h1>List of Users</h1>
<?php
$users = show_users();
if (count($users)){
?>
<table border='1' cellspacing='0' cellpadding='5' width='500'>
<?php
foreach ($users as $key => $value){
echo "<tr valign='top'>\n";
echo "<td>".$key ."</td>\n";
echo "<td>".$value ." <small><a href='#'>follow</a></small></td>\n";
echo "</tr>\n";
}
?>
</table>
<?php
}else{
?>
<p><b>There are no users in the system!</b></p>
<?php
}
?>
</body>
</html>
為了訪問這個用戶列表,在 index.php 文件中表單的上方添加一個到 users.php 的鏈接:
<p><a href='users.php'>see list of users</a></p>
現在有了一個易於使用的用戶名列表,每個用戶名旁有一個 follow 鏈接。
圖 2. 用戶列表
在進入下一個階段之前,還需要編寫一個小函數,該函數將返回當前用戶正在追隨的用戶。這樣一來,用戶就可以用這個列表來確定是否追隨另一個用戶。
回到 functions.php 文件,添加一個名為
following()的函數,如清單 12 所示。將當前用戶 ID 傳遞給該函數,就可以得到該用戶正在追隨的每個用戶的 ID。
清單 12.following()函數
function following($userid){
$users = array();
$sql = "select distinct user_id from following
where follower_id = '$userid'";
$result = mysql_query($sql);
while($data = mysql_fetch_object($result)){
array_push($users, $data->user_id);
}
return $users;
}
現在可以在 users.php 上運行這個函數,檢查某個用戶 ID 是否在該數組中。如果在,則使用 unfollow 鏈接。如果不在,則使用默認的 follow 鏈接。清單 13 顯示修改後的代碼。
清單 13. 修改後的 users.php 文件,它將顯示 follow 和 unfollow 鏈接
<?php
$users = show_users();
$following = following(追隨其他用戶
接下來可以將更多東西添加到 functions.php 文件中。這裡需要一個
show_users()函數,該函數可以返回系統中所有用戶的一個列表。後面將使用這個函數填充一個用戶列表。
清單 10.show_users()函數
function show_users(){
$users = array();
$sql = "select id, username from users where status='active' order by username";
$result = mysql_query($sql);
while ($data = mysql_fetch_object($result)){
$users[$data->id] = $data->username;
}
return $users;
}
有了
show_users()函數之後,接下來可以創建一個 users.php 文件,該文件將運行這個函數,並顯示系統中所有用戶的一個列表,對於每個用戶,在用戶名的旁邊都有一個 follow 鏈接。
清單 11. 運行show_users()函數的 users.php 文件
<?php
session_start();
include_once("header.php");
include_once("functions.php");
?>
<!DOCTYPE html PUBLIC "-//W3C//DTD XHTML 1.0 Transitional//EN"
"http://www.w3.org/TR/xhtml1/DTD/xhtml1-transitional.dtd">
<html xmlns="http://www.w3.org/1999/xhtml" xml:lang="en" lang="en">
<head>
<meta http-equiv="content-type" content="text/html; charset=utf-8" />
<title>Microblogging Application - Users</title>
</head>
<body>
<h1>List of Users</h1>
<?php
$users = show_users();
if (count($users)){
?>
<table border='1' cellspacing='0' cellpadding='5' width='500'>
<?php
foreach ($users as $key => $value){
echo "<tr valign='top'>\n";
echo "<td>".$key ."</td>\n";
echo "<td>".$value ." <small><a href='#'>follow</a></small></td>\n";
echo "</tr>\n";
}
?>
</table>
<?php
}else{
?>
<p><b>There are no users in the system!</b></p>
<?php
}
?>
</body>
</html>
為了訪問這個用戶列表,在 index.php 文件中表單的上方添加一個到 users.php 的鏈接:
<p><a href='users.php'>see list of users</a></p>
現在有了一個易於使用的用戶名列表,每個用戶名旁有一個 follow 鏈接。
圖 2. 用戶列表
在進入下一個階段之前,還需要編寫一個小函數,該函數將返回當前用戶正在追隨的用戶。這樣一來,用戶就可以用這個列表來確定是否追隨另一個用戶。
回到 functions.php 文件,添加一個名為
following()的函數,如清單 12 所示。將當前用戶 ID 傳遞給該函數,就可以得到該用戶正在追隨的每個用戶的 ID。
清單 12.following()函數
function following($userid){
$users = array();
$sql = "select distinct user_id from following
where follower_id = '$userid'";
$result = mysql_query($sql);
while($data = mysql_fetch_object($result)){
array_push($users, $data->user_id);
}
return $users;
}
現在可以在 users.php 上運行這個函數,檢查某個用戶 ID 是否在該數組中。如果在,則使用 unfollow 鏈接。如果不在,則使用默認的 follow 鏈接。清單 13 顯示修改後的代碼。
清單 13. 修改後的 users.php 文件,它將顯示 follow 和 unfollow 鏈接
___FCKpd___4
接下來的步驟很簡單:創建 follow 和 unfollow 鏈接使用的 action.php 文件。該文件接受兩個
GET參數:一個用於用戶 ID,另一個用於 follow 或 unfollow。如清單 14 所示,這個文件和 add.php 文件一樣簡短。
清單 14. action.php 文件
___FCKpd___5
可以看到,這裡取決於之前選擇的鏈接,采取兩種不同的動作 —
follow_user()或unfollow_user()。然後,設置一條消息,並將用戶重定向回 index.php 頁面。用戶回到 index.php 頁面後,不僅可以看到自己的消息,還可以看到他們追隨的用戶最近添加的消息。或者,如果之前選擇 unfollow 鏈接,那麼那個用戶的消息將從列表中消失。稍後需要在 index.php 中添加這點代碼。現在,將follow_user()和unfollow_user()函數添加到 functions.php 中。對於這兩個函數要小心一點。不能只是因為用戶單擊了那個鏈接,就盲目地追隨或放棄追隨一個用戶。首先,需要檢查 following 表中是否存在這樣的關系。如果存在,那麼可以忽略請求(單擊 follow 鏈接時),或者接受請求(單擊 unfollow 鏈接時)。為簡單起見,編寫兩種情況下都可以使用的一個
check_count()函數,如下面的清單所示。
清單 15.check_count()函數
___FCKpd___6
接下來的步驟很容易:在主頁上顯示當前用戶正在追隨的其他用戶的列表。雖然已經有了一個
show_users()函數,但那個函數是顯示所有 用戶。可以通過增加一個非必需的參數,輕松地改變這個函數的用途。這個參數是一個用戶 ID,可以用該參數將用戶列表限制為該用戶 ID 所追隨的那些用戶。清單 16 中重新編寫的代碼所做的事情是檢查傳入的
$user_id參數。如果該用戶 ID 大於 0,則使用一個查詢獲取此 ID 追隨的所有用戶的 ID。使用implode()函數將獲得的數組轉換為一個以逗號分隔的列表。然後將這個字符串 — 大致為and id in (1,2,3...n)— 插入到已有的 SQL 查詢中,從而將用戶列表限制為該用戶正在追隨的那些用戶。
清單 16. 重新編寫的代碼,用於限制通過查詢獲得的用戶列表
___FCKpd___7
接下來,將清單 17 中的代碼添加到主頁中,用於顯示所有那些被追隨的用戶。
清單 17. 修改 index.php 以顯示被追隨的用戶
___FCKpd___8SESSION['userid']);
if (count($users)){
?>
<table border='1' cellspacing='0' cellpadding='5' width='500'>
<?php
foreach ($users as $key => $value){
echo "<tr valign='top'>\n";
echo "<td>".$key ."</td>\n";
echo "<td>".$value;
if (in_array($key,$following)){
echo " <small>
<a href='action.php?id=$key&do=unfollow'>unfollow</a>
</small>";
}else{
echo " <small>
<a href='action.php?id=$key&do=follow'>follow</a>
</small>";
}
echo "</td>\n";
echo "</tr>\n";
}
?>
接下來的步驟很簡單:創建 follow 和 unfollow 鏈接使用的 action.php 文件。該文件接受兩個
GET參數:一個用於用戶 ID,另一個用於 follow 或 unfollow。如清單 14 所示,這個文件和 add.php 文件一樣簡短。
清單 14. action.php 文件
___FCKpd___5
可以看到,這裡取決於之前選擇的鏈接,采取兩種不同的動作 —
follow_user()或unfollow_user()。然後,設置一條消息,並將用戶重定向回 index.php 頁面。用戶回到 index.php 頁面後,不僅可以看到自己的消息,還可以看到他們追隨的用戶最近添加的消息。或者,如果之前選擇 unfollow 鏈接,那麼那個用戶的消息將從列表中消失。稍後需要在 index.php 中添加這點代碼。現在,將follow_user()和unfollow_user()函數添加到 functions.php 中。對於這兩個函數要小心一點。不能只是因為用戶單擊了那個鏈接,就盲目地追隨或放棄追隨一個用戶。首先,需要檢查 following 表中是否存在這樣的關系。如果存在,那麼可以忽略請求(單擊 follow 鏈接時),或者接受請求(單擊 unfollow 鏈接時)。為簡單起見,編寫兩種情況下都可以使用的一個
check_count()函數,如下面的清單所示。
清單 15.check_count()函數
___FCKpd___6
接下來的步驟很容易:在主頁上顯示當前用戶正在追隨的其他用戶的列表。雖然已經有了一個
show_users()函數,但那個函數是顯示所有 用戶。可以通過增加一個非必需的參數,輕松地改變這個函數的用途。這個參數是一個用戶 ID,可以用該參數將用戶列表限制為該用戶 ID 所追隨的那些用戶。清單 16 中重新編寫的代碼所做的事情是檢查傳入的
$user_id參數。如果該用戶 ID 大於 0,則使用一個查詢獲取此 ID 追隨的所有用戶的 ID。使用implode()函數將獲得的數組轉換為一個以逗號分隔的列表。然後將這個字符串 — 大致為and id in (1,2,3...n)— 插入到已有的 SQL 查詢中,從而將用戶列表限制為該用戶正在追隨的那些用戶。
清單 16. 重新編寫的代碼,用於限制通過查詢獲得的用戶列表
___FCKpd___7
接下來,將清單 17 中的代碼添加到主頁中,用於顯示所有那些被追隨的用戶。
清單 17. 修改 index.php 以顯示被追隨的用戶
___FCKpd___8SESSION['userid'],$id);
$msg = "You have unfollowed a user!";
break;
}追隨其他用戶
接下來可以將更多東西添加到 functions.php 文件中。這裡需要一個
show_users()函數,該函數可以返回系統中所有用戶的一個列表。後面將使用這個函數填充一個用戶列表。
清單 10.show_users()函數
function show_users(){
$users = array();
$sql = "select id, username from users where status='active' order by username";
$result = mysql_query($sql);
while ($data = mysql_fetch_object($result)){
$users[$data->id] = $data->username;
}
return $users;
}
有了
show_users()函數之後,接下來可以創建一個 users.php 文件,該文件將運行這個函數,並顯示系統中所有用戶的一個列表,對於每個用戶,在用戶名的旁邊都有一個 follow 鏈接。
清單 11. 運行show_users()函數的 users.php 文件
<?php
session_start();
include_once("header.php");
include_once("functions.php");
?>
<!DOCTYPE html PUBLIC "-//W3C//DTD XHTML 1.0 Transitional//EN"
"http://www.w3.org/TR/xhtml1/DTD/xhtml1-transitional.dtd">
<html xmlns="http://www.w3.org/1999/xhtml" xml:lang="en" lang="en">
<head>
<meta http-equiv="content-type" content="text/html; charset=utf-8" />
<title>Microblogging Application - Users</title>
</head>
<body>
<h1>List of Users</h1>
<?php
$users = show_users();
if (count($users)){
?>
<table border='1' cellspacing='0' cellpadding='5' width='500'>
<?php
foreach ($users as $key => $value){
echo "<tr valign='top'>\n";
echo "<td>".$key ."</td>\n";
echo "<td>".$value ." <small><a href='#'>follow</a></small></td>\n";
echo "</tr>\n";
}
?>
</table>
<?php
}else{
?>
<p><b>There are no users in the system!</b></p>
<?php
}
?>
</body>
</html>
為了訪問這個用戶列表,在 index.php 文件中表單的上方添加一個到 users.php 的鏈接:
<p><a href='users.php'>see list of users</a></p>
現在有了一個易於使用的用戶名列表,每個用戶名旁有一個 follow 鏈接。
圖 2. 用戶列表
在進入下一個階段之前,還需要編寫一個小函數,該函數將返回當前用戶正在追隨的用戶。這樣一來,用戶就可以用這個列表來確定是否追隨另一個用戶。
回到 functions.php 文件,添加一個名為
following()的函數,如清單 12 所示。將當前用戶 ID 傳遞給該函數,就可以得到該用戶正在追隨的每個用戶的 ID。
清單 12.following()函數
function following($userid){
$users = array();
$sql = "select distinct user_id from following
where follower_id = '$userid'";
$result = mysql_query($sql);
while($data = mysql_fetch_object($result)){
array_push($users, $data->user_id);
}
return $users;
}
現在可以在 users.php 上運行這個函數,檢查某個用戶 ID 是否在該數組中。如果在,則使用 unfollow 鏈接。如果不在,則使用默認的 follow 鏈接。清單 13 顯示修改後的代碼。
清單 13. 修改後的 users.php 文件,它將顯示 follow 和 unfollow 鏈接
<?php
$users = show_users();
$following = following(追隨其他用戶
接下來可以將更多東西添加到 functions.php 文件中。這裡需要一個
show_users()函數,該函數可以返回系統中所有用戶的一個列表。後面將使用這個函數填充一個用戶列表。
清單 10.show_users()函數
function show_users(){
$users = array();
$sql = "select id, username from users where status='active' order by username";
$result = mysql_query($sql);
while ($data = mysql_fetch_object($result)){
$users[$data->id] = $data->username;
}
return $users;
}
有了
show_users()函數之後,接下來可以創建一個 users.php 文件,該文件將運行這個函數,並顯示系統中所有用戶的一個列表,對於每個用戶,在用戶名的旁邊都有一個 follow 鏈接。
清單 11. 運行show_users()函數的 users.php 文件
<?php
session_start();
include_once("header.php");
include_once("functions.php");
?>
<!DOCTYPE html PUBLIC "-//W3C//DTD XHTML 1.0 Transitional//EN"
"http://www.w3.org/TR/xhtml1/DTD/xhtml1-transitional.dtd">
<html xmlns="http://www.w3.org/1999/xhtml" xml:lang="en" lang="en">
<head>
<meta http-equiv="content-type" content="text/html; charset=utf-8" />
<title>Microblogging Application - Users</title>
</head>
<body>
<h1>List of Users</h1>
<?php
$users = show_users();
if (count($users)){
?>
<table border='1' cellspacing='0' cellpadding='5' width='500'>
<?php
foreach ($users as $key => $value){
echo "<tr valign='top'>\n";
echo "<td>".$key ."</td>\n";
echo "<td>".$value ." <small><a href='#'>follow</a></small></td>\n";
echo "</tr>\n";
}
?>
</table>
<?php
}else{
?>
<p><b>There are no users in the system!</b></p>
<?php
}
?>
</body>
</html>
為了訪問這個用戶列表,在 index.php 文件中表單的上方添加一個到 users.php 的鏈接:
<p><a href='users.php'>see list of users</a></p>
現在有了一個易於使用的用戶名列表,每個用戶名旁有一個 follow 鏈接。
圖 2. 用戶列表
在進入下一個階段之前,還需要編寫一個小函數,該函數將返回當前用戶正在追隨的用戶。這樣一來,用戶就可以用這個列表來確定是否追隨另一個用戶。
回到 functions.php 文件,添加一個名為
following()的函數,如清單 12 所示。將當前用戶 ID 傳遞給該函數,就可以得到該用戶正在追隨的每個用戶的 ID。
清單 12.following()函數
function following($userid){
$users = array();
$sql = "select distinct user_id from following
where follower_id = '$userid'";
$result = mysql_query($sql);
while($data = mysql_fetch_object($result)){
array_push($users, $data->user_id);
}
return $users;
}
現在可以在 users.php 上運行這個函數,檢查某個用戶 ID 是否在該數組中。如果在,則使用 unfollow 鏈接。如果不在,則使用默認的 follow 鏈接。清單 13 顯示修改後的代碼。
清單 13. 修改後的 users.php 文件,它將顯示 follow 和 unfollow 鏈接
___FCKpd___4
接下來的步驟很簡單:創建 follow 和 unfollow 鏈接使用的 action.php 文件。該文件接受兩個
GET參數:一個用於用戶 ID,另一個用於 follow 或 unfollow。如清單 14 所示,這個文件和 add.php 文件一樣簡短。
清單 14. action.php 文件
___FCKpd___5
可以看到,這裡取決於之前選擇的鏈接,采取兩種不同的動作 —
follow_user()或unfollow_user()。然後,設置一條消息,並將用戶重定向回 index.php 頁面。用戶回到 index.php 頁面後,不僅可以看到自己的消息,還可以看到他們追隨的用戶最近添加的消息。或者,如果之前選擇 unfollow 鏈接,那麼那個用戶的消息將從列表中消失。稍後需要在 index.php 中添加這點代碼。現在,將follow_user()和unfollow_user()函數添加到 functions.php 中。對於這兩個函數要小心一點。不能只是因為用戶單擊了那個鏈接,就盲目地追隨或放棄追隨一個用戶。首先,需要檢查 following 表中是否存在這樣的關系。如果存在,那麼可以忽略請求(單擊 follow 鏈接時),或者接受請求(單擊 unfollow 鏈接時)。為簡單起見,編寫兩種情況下都可以使用的一個
check_count()函數,如下面的清單所示。
清單 15.check_count()函數
___FCKpd___6
接下來的步驟很容易:在主頁上顯示當前用戶正在追隨的其他用戶的列表。雖然已經有了一個
show_users()函數,但那個函數是顯示所有 用戶。可以通過增加一個非必需的參數,輕松地改變這個函數的用途。這個參數是一個用戶 ID,可以用該參數將用戶列表限制為該用戶 ID 所追隨的那些用戶。清單 16 中重新編寫的代碼所做的事情是檢查傳入的
$user_id參數。如果該用戶 ID 大於 0,則使用一個查詢獲取此 ID 追隨的所有用戶的 ID。使用implode()函數將獲得的數組轉換為一個以逗號分隔的列表。然後將這個字符串 — 大致為and id in (1,2,3...n)— 插入到已有的 SQL 查詢中,從而將用戶列表限制為該用戶正在追隨的那些用戶。
清單 16. 重新編寫的代碼,用於限制通過查詢獲得的用戶列表
___FCKpd___7
接下來,將清單 17 中的代碼添加到主頁中,用於顯示所有那些被追隨的用戶。
清單 17. 修改 index.php 以顯示被追隨的用戶
___FCKpd___8SESSION['userid']);
if (count($users)){
?>
<table border='1' cellspacing='0' cellpadding='5' width='500'>
<?php
foreach ($users as $key => $value){
echo "<tr valign='top'>\n";
echo "<td>".$key ."</td>\n";
echo "<td>".$value;
if (in_array($key,$following)){
echo " <small>
<a href='action.php?id=$key&do=unfollow'>unfollow</a>
</small>";
}else{
echo " <small>
<a href='action.php?id=$key&do=follow'>follow</a>
</small>";
}
echo "</td>\n";
echo "</tr>\n";
}
?>
接下來的步驟很簡單:創建 follow 和 unfollow 鏈接使用的 action.php 文件。該文件接受兩個
GET參數:一個用於用戶 ID,另一個用於 follow 或 unfollow。如清單 14 所示,這個文件和 add.php 文件一樣簡短。
清單 14. action.php 文件
___FCKpd___5
可以看到,這裡取決於之前選擇的鏈接,采取兩種不同的動作 —
follow_user()或unfollow_user()。然後,設置一條消息,並將用戶重定向回 index.php 頁面。用戶回到 index.php 頁面後,不僅可以看到自己的消息,還可以看到他們追隨的用戶最近添加的消息。或者,如果之前選擇 unfollow 鏈接,那麼那個用戶的消息將從列表中消失。稍後需要在 index.php 中添加這點代碼。現在,將follow_user()和unfollow_user()函數添加到 functions.php 中。對於這兩個函數要小心一點。不能只是因為用戶單擊了那個鏈接,就盲目地追隨或放棄追隨一個用戶。首先,需要檢查 following 表中是否存在這樣的關系。如果存在,那麼可以忽略請求(單擊 follow 鏈接時),或者接受請求(單擊 unfollow 鏈接時)。為簡單起見,編寫兩種情況下都可以使用的一個
check_count()函數,如下面的清單所示。
清單 15.check_count()函數
___FCKpd___6
接下來的步驟很容易:在主頁上顯示當前用戶正在追隨的其他用戶的列表。雖然已經有了一個
show_users()函數,但那個函數是顯示所有 用戶。可以通過增加一個非必需的參數,輕松地改變這個函數的用途。這個參數是一個用戶 ID,可以用該參數將用戶列表限制為該用戶 ID 所追隨的那些用戶。清單 16 中重新編寫的代碼所做的事情是檢查傳入的
$user_id參數。如果該用戶 ID 大於 0,則使用一個查詢獲取此 ID 追隨的所有用戶的 ID。使用implode()函數將獲得的數組轉換為一個以逗號分隔的列表。然後將這個字符串 — 大致為and id in (1,2,3...n)— 插入到已有的 SQL 查詢中,從而將用戶列表限制為該用戶正在追隨的那些用戶。
清單 16. 重新編寫的代碼,用於限制通過查詢獲得的用戶列表
___FCKpd___7
接下來,將清單 17 中的代碼添加到主頁中,用於顯示所有那些被追隨的用戶。
清單 17. 修改 index.php 以顯示被追隨的用戶
___FCKpd___8SESSION['message'] = $msg;
header("Location:index.php");
?>
可以看到,這裡取決於之前選擇的鏈接,采取兩種不同的動作 —
follow_user()或unfollow_user()。然後,設置一條消息,並將用戶重定向回 index.php 頁面。用戶回到 index.php 頁面後,不僅可以看到自己的消息,還可以看到他們追隨的用戶最近添加的消息。或者,如果之前選擇 unfollow 鏈接,那麼那個用戶的消息將從列表中消失。稍後需要在 index.php 中添加這點代碼。現在,將follow_user()和unfollow_user()函數添加到 functions.php 中。對於這兩個函數要小心一點。不能只是因為用戶單擊了那個鏈接,就盲目地追隨或放棄追隨一個用戶。首先,需要檢查 following 表中是否存在這樣的關系。如果存在,那麼可以忽略請求(單擊 follow 鏈接時),或者接受請求(單擊 unfollow 鏈接時)。為簡單起見,編寫兩種情況下都可以使用的一個
check_count()函數,如下面的清單所示。
清單 15.check_count()函數
___FCKpd___6
接下來的步驟很容易:在主頁上顯示當前用戶正在追隨的其他用戶的列表。雖然已經有了一個
show_users()函數,但那個函數是顯示所有 用戶。可以通過增加一個非必需的參數,輕松地改變這個函數的用途。這個參數是一個用戶 ID,可以用該參數將用戶列表限制為該用戶 ID 所追隨的那些用戶。清單 16 中重新編寫的代碼所做的事情是檢查傳入的
$user_id參數。如果該用戶 ID 大於 0,則使用一個查詢獲取此 ID 追隨的所有用戶的 ID。使用implode()函數將獲得的數組轉換為一個以逗號分隔的列表。然後將這個字符串 — 大致為and id in (1,2,3...n)— 插入到已有的 SQL 查詢中,從而將用戶列表限制為該用戶正在追隨的那些用戶。
清單 16. 重新編寫的代碼,用於限制通過查詢獲得的用戶列表
___FCKpd___7
接下來,將清單 17 中的代碼添加到主頁中,用於顯示所有那些被追隨的用戶。
清單 17. 修改 index.php 以顯示被追隨的用戶
___FCKpd___8SESSION['userid']);
if (count($users)){
?>
<table border='1' cellspacing='0' cellpadding='5' width='500'>
<?php
foreach ($users as $key => $value){
echo "<tr valign='top'>\n";
echo "<td>".$key ."</td>\n";
echo "<td>".$value;
if (in_array($key,$following)){
echo " <small>
<a href='action.php?id=$key&do=unfollow'>unfollow</a>
</small>";
}else{
echo " <small>
<a href='action.php?id=$key&do=follow'>follow</a>
</small>";
}
echo "</td>\n";
echo "</tr>\n";
}
?>
接下來的步驟很簡單:創建 follow 和 unfollow 鏈接使用的 action.php 文件。該文件接受兩個
GET參數:一個用於用戶 ID,另一個用於 follow 或 unfollow。如清單 14 所示,這個文件和 add.php 文件一樣簡短。
清單 14. action.php 文件
___FCKpd___5
可以看到,這裡取決於之前選擇的鏈接,采取兩種不同的動作 —
follow_user()或unfollow_user()。然後,設置一條消息,並將用戶重定向回 index.php 頁面。用戶回到 index.php 頁面後,不僅可以看到自己的消息,還可以看到他們追隨的用戶最近添加的消息。或者,如果之前選擇 unfollow 鏈接,那麼那個用戶的消息將從列表中消失。稍後需要在 index.php 中添加這點代碼。現在,將follow_user()和unfollow_user()函數添加到 functions.php 中。對於這兩個函數要小心一點。不能只是因為用戶單擊了那個鏈接,就盲目地追隨或放棄追隨一個用戶。首先,需要檢查 following 表中是否存在這樣的關系。如果存在,那麼可以忽略請求(單擊 follow 鏈接時),或者接受請求(單擊 unfollow 鏈接時)。為簡單起見,編寫兩種情況下都可以使用的一個
check_count()函數,如下面的清單所示。
清單 15.check_count()函數
___FCKpd___6
接下來的步驟很容易:在主頁上顯示當前用戶正在追隨的其他用戶的列表。雖然已經有了一個
show_users()函數,但那個函數是顯示所有 用戶。可以通過增加一個非必需的參數,輕松地改變這個函數的用途。這個參數是一個用戶 ID,可以用該參數將用戶列表限制為該用戶 ID 所追隨的那些用戶。清單 16 中重新編寫的代碼所做的事情是檢查傳入的
$user_id參數。如果該用戶 ID 大於 0,則使用一個查詢獲取此 ID 追隨的所有用戶的 ID。使用implode()函數將獲得的數組轉換為一個以逗號分隔的列表。然後將這個字符串 — 大致為and id in (1,2,3...n)— 插入到已有的 SQL 查詢中,從而將用戶列表限制為該用戶正在追隨的那些用戶。
清單 16. 重新編寫的代碼,用於限制通過查詢獲得的用戶列表
___FCKpd___7
接下來,將清單 17 中的代碼添加到主頁中,用於顯示所有那些被追隨的用戶。
清單 17. 修改 index.php 以顯示被追隨的用戶
___FCKpd___8SESSION['userid']);
if (count($users)){
?>
<ul>
<?php
foreach ($users as $key => $value){
echo "<li>".$value."</li>\n";
}
?>
</ul>
<?php
}else{
?>
<p><b>You're not following anyone yet!</b></p>
<?php
}
?>
if (count($users)){
?>
<table border='1' cellspacing='0' cellpadding='5' width='500'>
<?php
foreach ($users as $key => $value){
echo "<tr valign='top'>\n";
echo "<td>".$key ."</td>\n";
echo "<td>".$value;
if (in_array($key,$following)){
echo " <small>
<a href='action.php?id=$key&do=unfollow'>unfollow</a>
</small>";
}else{
echo " <small>
<a href='action.php?id=$key&do=follow'>follow</a>
</small>";
}
echo "</td>\n";
echo "</tr>\n";
}
?>
接下來的步驟很簡單:創建 follow 和 unfollow 鏈接使用的 action.php 文件。該文件接受兩個
GET參數:一個用於用戶 ID,另一個用於 follow 或 unfollow。如清單 14 所示,這個文件和 add.php 文件一樣簡短。
清單 14. action.php 文件
___FCKpd___5
可以看到,這裡取決於之前選擇的鏈接,采取兩種不同的動作 —
follow_user()或unfollow_user()。然後,設置一條消息,並將用戶重定向回 index.php 頁面。用戶回到 index.php 頁面後,不僅可以看到自己的消息,還可以看到他們追隨的用戶最近添加的消息。或者,如果之前選擇 unfollow 鏈接,那麼那個用戶的消息將從列表中消失。稍後需要在 index.php 中添加這點代碼。現在,將follow_user()和unfollow_user()函數添加到 functions.php 中。對於這兩個函數要小心一點。不能只是因為用戶單擊了那個鏈接,就盲目地追隨或放棄追隨一個用戶。首先,需要檢查 following 表中是否存在這樣的關系。如果存在,那麼可以忽略請求(單擊 follow 鏈接時),或者接受請求(單擊 unfollow 鏈接時)。為簡單起見,編寫兩種情況下都可以使用的一個
check_count()函數,如下面的清單所示。
清單 15.check_count()函數
___FCKpd___6
接下來的步驟很容易:在主頁上顯示當前用戶正在追隨的其他用戶的列表。雖然已經有了一個
show_users()函數,但那個函數是顯示所有 用戶。可以通過增加一個非必需的參數,輕松地改變這個函數的用途。這個參數是一個用戶 ID,可以用該參數將用戶列表限制為該用戶 ID 所追隨的那些用戶。清單 16 中重新編寫的代碼所做的事情是檢查傳入的
$user_id參數。如果該用戶 ID 大於 0,則使用一個查詢獲取此 ID 追隨的所有用戶的 ID。使用implode()函數將獲得的數組轉換為一個以逗號分隔的列表。然後將這個字符串 — 大致為and id in (1,2,3...n)— 插入到已有的 SQL 查詢中,從而將用戶列表限制為該用戶正在追隨的那些用戶。
清單 16. 重新編寫的代碼,用於限制通過查詢獲得的用戶列表
___FCKpd___7
接下來,將清單 17 中的代碼添加到主頁中,用於顯示所有那些被追隨的用戶。
清單 17. 修改 index.php 以顯示被追隨的用戶
___FCKpd___8GET['id'];
$do =追隨其他用戶
接下來可以將更多東西添加到 functions.php 文件中。這裡需要一個
show_users()函數,該函數可以返回系統中所有用戶的一個列表。後面將使用這個函數填充一個用戶列表。
清單 10.show_users()函數
function show_users(){
$users = array();
$sql = "select id, username from users where status='active' order by username";
$result = mysql_query($sql);
while ($data = mysql_fetch_object($result)){
$users[$data->id] = $data->username;
}
return $users;
}
有了
show_users()函數之後,接下來可以創建一個 users.php 文件,該文件將運行這個函數,並顯示系統中所有用戶的一個列表,對於每個用戶,在用戶名的旁邊都有一個 follow 鏈接。
清單 11. 運行show_users()函數的 users.php 文件
<?php
session_start();
include_once("header.php");
include_once("functions.php");
?>
<!DOCTYPE html PUBLIC "-//W3C//DTD XHTML 1.0 Transitional//EN"
"http://www.w3.org/TR/xhtml1/DTD/xhtml1-transitional.dtd">
<html xmlns="http://www.w3.org/1999/xhtml" xml:lang="en" lang="en">
<head>
<meta http-equiv="content-type" content="text/html; charset=utf-8" />
<title>Microblogging Application - Users</title>
</head>
<body>
<h1>List of Users</h1>
<?php
$users = show_users();
if (count($users)){
?>
<table border='1' cellspacing='0' cellpadding='5' width='500'>
<?php
foreach ($users as $key => $value){
echo "<tr valign='top'>\n";
echo "<td>".$key ."</td>\n";
echo "<td>".$value ." <small><a href='#'>follow</a></small></td>\n";
echo "</tr>\n";
}
?>
</table>
<?php
}else{
?>
<p><b>There are no users in the system!</b></p>
<?php
}
?>
</body>
</html>
為了訪問這個用戶列表,在 index.php 文件中表單的上方添加一個到 users.php 的鏈接:
<p><a href='users.php'>see list of users</a></p>
現在有了一個易於使用的用戶名列表,每個用戶名旁有一個 follow 鏈接。
圖 2. 用戶列表
在進入下一個階段之前,還需要編寫一個小函數,該函數將返回當前用戶正在追隨的用戶。這樣一來,用戶就可以用這個列表來確定是否追隨另一個用戶。
回到 functions.php 文件,添加一個名為
following()的函數,如清單 12 所示。將當前用戶 ID 傳遞給該函數,就可以得到該用戶正在追隨的每個用戶的 ID。
清單 12.following()函數
function following($userid){
$users = array();
$sql = "select distinct user_id from following
where follower_id = '$userid'";
$result = mysql_query($sql);
while($data = mysql_fetch_object($result)){
array_push($users, $data->user_id);
}
return $users;
}
現在可以在 users.php 上運行這個函數,檢查某個用戶 ID 是否在該數組中。如果在,則使用 unfollow 鏈接。如果不在,則使用默認的 follow 鏈接。清單 13 顯示修改後的代碼。
清單 13. 修改後的 users.php 文件,它將顯示 follow 和 unfollow 鏈接
<?php
$users = show_users();
$following = following(追隨其他用戶
接下來可以將更多東西添加到 functions.php 文件中。這裡需要一個
show_users()函數,該函數可以返回系統中所有用戶的一個列表。後面將使用這個函數填充一個用戶列表。
清單 10.show_users()函數
function show_users(){
$users = array();
$sql = "select id, username from users where status='active' order by username";
$result = mysql_query($sql);
while ($data = mysql_fetch_object($result)){
$users[$data->id] = $data->username;
}
return $users;
}
有了
show_users()函數之後,接下來可以創建一個 users.php 文件,該文件將運行這個函數,並顯示系統中所有用戶的一個列表,對於每個用戶,在用戶名的旁邊都有一個 follow 鏈接。
清單 11. 運行show_users()函數的 users.php 文件
<?php
session_start();
include_once("header.php");
include_once("functions.php");
?>
<!DOCTYPE html PUBLIC "-//W3C//DTD XHTML 1.0 Transitional//EN"
"http://www.w3.org/TR/xhtml1/DTD/xhtml1-transitional.dtd">
<html xmlns="http://www.w3.org/1999/xhtml" xml:lang="en" lang="en">
<head>
<meta http-equiv="content-type" content="text/html; charset=utf-8" />
<title>Microblogging Application - Users</title>
</head>
<body>
<h1>List of Users</h1>
<?php
$users = show_users();
if (count($users)){
?>
<table border='1' cellspacing='0' cellpadding='5' width='500'>
<?php
foreach ($users as $key => $value){
echo "<tr valign='top'>\n";
echo "<td>".$key ."</td>\n";
echo "<td>".$value ." <small><a href='#'>follow</a></small></td>\n";
echo "</tr>\n";
}
?>
</table>
<?php
}else{
?>
<p><b>There are no users in the system!</b></p>
<?php
}
?>
</body>
</html>
為了訪問這個用戶列表,在 index.php 文件中表單的上方添加一個到 users.php 的鏈接:
<p><a href='users.php'>see list of users</a></p>
現在有了一個易於使用的用戶名列表,每個用戶名旁有一個 follow 鏈接。
圖 2. 用戶列表
在進入下一個階段之前,還需要編寫一個小函數,該函數將返回當前用戶正在追隨的用戶。這樣一來,用戶就可以用這個列表來確定是否追隨另一個用戶。
回到 functions.php 文件,添加一個名為
following()的函數,如清單 12 所示。將當前用戶 ID 傳遞給該函數,就可以得到該用戶正在追隨的每個用戶的 ID。
清單 12.following()函數
function following($userid){
$users = array();
$sql = "select distinct user_id from following
where follower_id = '$userid'";
$result = mysql_query($sql);
while($data = mysql_fetch_object($result)){
array_push($users, $data->user_id);
}
return $users;
}
現在可以在 users.php 上運行這個函數,檢查某個用戶 ID 是否在該數組中。如果在,則使用 unfollow 鏈接。如果不在,則使用默認的 follow 鏈接。清單 13 顯示修改後的代碼。
清單 13. 修改後的 users.php 文件,它將顯示 follow 和 unfollow 鏈接
___FCKpd___4
接下來的步驟很簡單:創建 follow 和 unfollow 鏈接使用的 action.php 文件。該文件接受兩個
GET參數:一個用於用戶 ID,另一個用於 follow 或 unfollow。如清單 14 所示,這個文件和 add.php 文件一樣簡短。
清單 14. action.php 文件
___FCKpd___5
可以看到,這裡取決於之前選擇的鏈接,采取兩種不同的動作 —
follow_user()或unfollow_user()。然後,設置一條消息,並將用戶重定向回 index.php 頁面。用戶回到 index.php 頁面後,不僅可以看到自己的消息,還可以看到他們追隨的用戶最近添加的消息。或者,如果之前選擇 unfollow 鏈接,那麼那個用戶的消息將從列表中消失。稍後需要在 index.php 中添加這點代碼。現在,將follow_user()和unfollow_user()函數添加到 functions.php 中。對於這兩個函數要小心一點。不能只是因為用戶單擊了那個鏈接,就盲目地追隨或放棄追隨一個用戶。首先,需要檢查 following 表中是否存在這樣的關系。如果存在,那麼可以忽略請求(單擊 follow 鏈接時),或者接受請求(單擊 unfollow 鏈接時)。為簡單起見,編寫兩種情況下都可以使用的一個
check_count()函數,如下面的清單所示。
清單 15.check_count()函數
___FCKpd___6
接下來的步驟很容易:在主頁上顯示當前用戶正在追隨的其他用戶的列表。雖然已經有了一個
show_users()函數,但那個函數是顯示所有 用戶。可以通過增加一個非必需的參數,輕松地改變這個函數的用途。這個參數是一個用戶 ID,可以用該參數將用戶列表限制為該用戶 ID 所追隨的那些用戶。清單 16 中重新編寫的代碼所做的事情是檢查傳入的
$user_id參數。如果該用戶 ID 大於 0,則使用一個查詢獲取此 ID 追隨的所有用戶的 ID。使用implode()函數將獲得的數組轉換為一個以逗號分隔的列表。然後將這個字符串 — 大致為and id in (1,2,3...n)— 插入到已有的 SQL 查詢中,從而將用戶列表限制為該用戶正在追隨的那些用戶。
清單 16. 重新編寫的代碼,用於限制通過查詢獲得的用戶列表
___FCKpd___7
接下來,將清單 17 中的代碼添加到主頁中,用於顯示所有那些被追隨的用戶。
清單 17. 修改 index.php 以顯示被追隨的用戶
___FCKpd___8SESSION['userid']);
if (count($users)){
?>
<table border='1' cellspacing='0' cellpadding='5' width='500'>
<?php
foreach ($users as $key => $value){
echo "<tr valign='top'>\n";
echo "<td>".$key ."</td>\n";
echo "<td>".$value;
if (in_array($key,$following)){
echo " <small>
<a href='action.php?id=$key&do=unfollow'>unfollow</a>
</small>";
}else{
echo " <small>
<a href='action.php?id=$key&do=follow'>follow</a>
</small>";
}
echo "</td>\n";
echo "</tr>\n";
}
?>
接下來的步驟很簡單:創建 follow 和 unfollow 鏈接使用的 action.php 文件。該文件接受兩個
GET參數:一個用於用戶 ID,另一個用於 follow 或 unfollow。如清單 14 所示,這個文件和 add.php 文件一樣簡短。
清單 14. action.php 文件
___FCKpd___5
可以看到,這裡取決於之前選擇的鏈接,采取兩種不同的動作 —
follow_user()或unfollow_user()。然後,設置一條消息,並將用戶重定向回 index.php 頁面。用戶回到 index.php 頁面後,不僅可以看到自己的消息,還可以看到他們追隨的用戶最近添加的消息。或者,如果之前選擇 unfollow 鏈接,那麼那個用戶的消息將從列表中消失。稍後需要在 index.php 中添加這點代碼。現在,將follow_user()和unfollow_user()函數添加到 functions.php 中。對於這兩個函數要小心一點。不能只是因為用戶單擊了那個鏈接,就盲目地追隨或放棄追隨一個用戶。首先,需要檢查 following 表中是否存在這樣的關系。如果存在,那麼可以忽略請求(單擊 follow 鏈接時),或者接受請求(單擊 unfollow 鏈接時)。為簡單起見,編寫兩種情況下都可以使用的一個
check_count()函數,如下面的清單所示。
清單 15.check_count()函數
___FCKpd___6
接下來的步驟很容易:在主頁上顯示當前用戶正在追隨的其他用戶的列表。雖然已經有了一個
show_users()函數,但那個函數是顯示所有 用戶。可以通過增加一個非必需的參數,輕松地改變這個函數的用途。這個參數是一個用戶 ID,可以用該參數將用戶列表限制為該用戶 ID 所追隨的那些用戶。清單 16 中重新編寫的代碼所做的事情是檢查傳入的
$user_id參數。如果該用戶 ID 大於 0,則使用一個查詢獲取此 ID 追隨的所有用戶的 ID。使用implode()函數將獲得的數組轉換為一個以逗號分隔的列表。然後將這個字符串 — 大致為and id in (1,2,3...n)— 插入到已有的 SQL 查詢中,從而將用戶列表限制為該用戶正在追隨的那些用戶。
清單 16. 重新編寫的代碼,用於限制通過查詢獲得的用戶列表
___FCKpd___7
接下來,將清單 17 中的代碼添加到主頁中,用於顯示所有那些被追隨的用戶。
清單 17. 修改 index.php 以顯示被追隨的用戶
___FCKpd___8GET['do'];
switch ($do){
case "follow":
follow_user(追隨其他用戶
接下來可以將更多東西添加到 functions.php 文件中。這裡需要一個
show_users()函數,該函數可以返回系統中所有用戶的一個列表。後面將使用這個函數填充一個用戶列表。
清單 10.show_users()函數
function show_users(){
$users = array();
$sql = "select id, username from users where status='active' order by username";
$result = mysql_query($sql);
while ($data = mysql_fetch_object($result)){
$users[$data->id] = $data->username;
}
return $users;
}
有了
show_users()函數之後,接下來可以創建一個 users.php 文件,該文件將運行這個函數,並顯示系統中所有用戶的一個列表,對於每個用戶,在用戶名的旁邊都有一個 follow 鏈接。
清單 11. 運行show_users()函數的 users.php 文件
<?php
session_start();
include_once("header.php");
include_once("functions.php");
?>
<!DOCTYPE html PUBLIC "-//W3C//DTD XHTML 1.0 Transitional//EN"
"http://www.w3.org/TR/xhtml1/DTD/xhtml1-transitional.dtd">
<html xmlns="http://www.w3.org/1999/xhtml" xml:lang="en" lang="en">
<head>
<meta http-equiv="content-type" content="text/html; charset=utf-8" />
<title>Microblogging Application - Users</title>
</head>
<body>
<h1>List of Users</h1>
<?php
$users = show_users();
if (count($users)){
?>
<table border='1' cellspacing='0' cellpadding='5' width='500'>
<?php
foreach ($users as $key => $value){
echo "<tr valign='top'>\n";
echo "<td>".$key ."</td>\n";
echo "<td>".$value ." <small><a href='#'>follow</a></small></td>\n";
echo "</tr>\n";
}
?>
</table>
<?php
}else{
?>
<p><b>There are no users in the system!</b></p>
<?php
}
?>
</body>
</html>
為了訪問這個用戶列表,在 index.php 文件中表單的上方添加一個到 users.php 的鏈接:
<p><a href='users.php'>see list of users</a></p>
現在有了一個易於使用的用戶名列表,每個用戶名旁有一個 follow 鏈接。
圖 2. 用戶列表
在進入下一個階段之前,還需要編寫一個小函數,該函數將返回當前用戶正在追隨的用戶。這樣一來,用戶就可以用這個列表來確定是否追隨另一個用戶。
回到 functions.php 文件,添加一個名為
following()的函數,如清單 12 所示。將當前用戶 ID 傳遞給該函數,就可以得到該用戶正在追隨的每個用戶的 ID。
清單 12.following()函數
function following($userid){
$users = array();
$sql = "select distinct user_id from following
where follower_id = '$userid'";
$result = mysql_query($sql);
while($data = mysql_fetch_object($result)){
array_push($users, $data->user_id);
}
return $users;
}
現在可以在 users.php 上運行這個函數,檢查某個用戶 ID 是否在該數組中。如果在,則使用 unfollow 鏈接。如果不在,則使用默認的 follow 鏈接。清單 13 顯示修改後的代碼。
清單 13. 修改後的 users.php 文件,它將顯示 follow 和 unfollow 鏈接
<?php
$users = show_users();
$following = following(追隨其他用戶
接下來可以將更多東西添加到 functions.php 文件中。這裡需要一個
show_users()函數,該函數可以返回系統中所有用戶的一個列表。後面將使用這個函數填充一個用戶列表。
清單 10.show_users()函數
function show_users(){
$users = array();
$sql = "select id, username from users where status='active' order by username";
$result = mysql_query($sql);
while ($data = mysql_fetch_object($result)){
$users[$data->id] = $data->username;
}
return $users;
}
有了
show_users()函數之後,接下來可以創建一個 users.php 文件,該文件將運行這個函數,並顯示系統中所有用戶的一個列表,對於每個用戶,在用戶名的旁邊都有一個 follow 鏈接。
清單 11. 運行show_users()函數的 users.php 文件
<?php
session_start();
include_once("header.php");
include_once("functions.php");
?>
<!DOCTYPE html PUBLIC "-//W3C//DTD XHTML 1.0 Transitional//EN"
"http://www.w3.org/TR/xhtml1/DTD/xhtml1-transitional.dtd">
<html xmlns="http://www.w3.org/1999/xhtml" xml:lang="en" lang="en">
<head>
<meta http-equiv="content-type" content="text/html; charset=utf-8" />
<title>Microblogging Application - Users</title>
</head>
<body>
<h1>List of Users</h1>
<?php
$users = show_users();
if (count($users)){
?>
<table border='1' cellspacing='0' cellpadding='5' width='500'>
<?php
foreach ($users as $key => $value){
echo "<tr valign='top'>\n";
echo "<td>".$key ."</td>\n";
echo "<td>".$value ." <small><a href='#'>follow</a></small></td>\n";
echo "</tr>\n";
}
?>
</table>
<?php
}else{
?>
<p><b>There are no users in the system!</b></p>
<?php
}
?>
</body>
</html>
為了訪問這個用戶列表,在 index.php 文件中表單的上方添加一個到 users.php 的鏈接:
<p><a href='users.php'>see list of users</a></p>
現在有了一個易於使用的用戶名列表,每個用戶名旁有一個 follow 鏈接。
圖 2. 用戶列表
在進入下一個階段之前,還需要編寫一個小函數,該函數將返回當前用戶正在追隨的用戶。這樣一來,用戶就可以用這個列表來確定是否追隨另一個用戶。
回到 functions.php 文件,添加一個名為
following()的函數,如清單 12 所示。將當前用戶 ID 傳遞給該函數,就可以得到該用戶正在追隨的每個用戶的 ID。
清單 12.following()函數
function following($userid){
$users = array();
$sql = "select distinct user_id from following
where follower_id = '$userid'";
$result = mysql_query($sql);
while($data = mysql_fetch_object($result)){
array_push($users, $data->user_id);
}
return $users;
}
現在可以在 users.php 上運行這個函數,檢查某個用戶 ID 是否在該數組中。如果在,則使用 unfollow 鏈接。如果不在,則使用默認的 follow 鏈接。清單 13 顯示修改後的代碼。
清單 13. 修改後的 users.php 文件,它將顯示 follow 和 unfollow 鏈接
___FCKpd___4
接下來的步驟很簡單:創建 follow 和 unfollow 鏈接使用的 action.php 文件。該文件接受兩個
GET參數:一個用於用戶 ID,另一個用於 follow 或 unfollow。如清單 14 所示,這個文件和 add.php 文件一樣簡短。
清單 14. action.php 文件
___FCKpd___5
可以看到,這裡取決於之前選擇的鏈接,采取兩種不同的動作 —
follow_user()或unfollow_user()。然後,設置一條消息,並將用戶重定向回 index.php 頁面。用戶回到 index.php 頁面後,不僅可以看到自己的消息,還可以看到他們追隨的用戶最近添加的消息。或者,如果之前選擇 unfollow 鏈接,那麼那個用戶的消息將從列表中消失。稍後需要在 index.php 中添加這點代碼。現在,將follow_user()和unfollow_user()函數添加到 functions.php 中。對於這兩個函數要小心一點。不能只是因為用戶單擊了那個鏈接,就盲目地追隨或放棄追隨一個用戶。首先,需要檢查 following 表中是否存在這樣的關系。如果存在,那麼可以忽略請求(單擊 follow 鏈接時),或者接受請求(單擊 unfollow 鏈接時)。為簡單起見,編寫兩種情況下都可以使用的一個
check_count()函數,如下面的清單所示。
清單 15.check_count()函數
___FCKpd___6
接下來的步驟很容易:在主頁上顯示當前用戶正在追隨的其他用戶的列表。雖然已經有了一個
show_users()函數,但那個函數是顯示所有 用戶。可以通過增加一個非必需的參數,輕松地改變這個函數的用途。這個參數是一個用戶 ID,可以用該參數將用戶列表限制為該用戶 ID 所追隨的那些用戶。清單 16 中重新編寫的代碼所做的事情是檢查傳入的
$user_id參數。如果該用戶 ID 大於 0,則使用一個查詢獲取此 ID 追隨的所有用戶的 ID。使用implode()函數將獲得的數組轉換為一個以逗號分隔的列表。然後將這個字符串 — 大致為and id in (1,2,3...n)— 插入到已有的 SQL 查詢中,從而將用戶列表限制為該用戶正在追隨的那些用戶。
清單 16. 重新編寫的代碼,用於限制通過查詢獲得的用戶列表
___FCKpd___7
接下來,將清單 17 中的代碼添加到主頁中,用於顯示所有那些被追隨的用戶。
清單 17. 修改 index.php 以顯示被追隨的用戶
___FCKpd___8SESSION['userid']);
if (count($users)){
?>
<table border='1' cellspacing='0' cellpadding='5' width='500'>
<?php
foreach ($users as $key => $value){
echo "<tr valign='top'>\n";
echo "<td>".$key ."</td>\n";
echo "<td>".$value;
if (in_array($key,$following)){
echo " <small>
<a href='action.php?id=$key&do=unfollow'>unfollow</a>
</small>";
}else{
echo " <small>
<a href='action.php?id=$key&do=follow'>follow</a>
</small>";
}
echo "</td>\n";
echo "</tr>\n";
}
?>
接下來的步驟很簡單:創建 follow 和 unfollow 鏈接使用的 action.php 文件。該文件接受兩個
GET參數:一個用於用戶 ID,另一個用於 follow 或 unfollow。如清單 14 所示,這個文件和 add.php 文件一樣簡短。
清單 14. action.php 文件
___FCKpd___5
可以看到,這裡取決於之前選擇的鏈接,采取兩種不同的動作 —
follow_user()或unfollow_user()。然後,設置一條消息,並將用戶重定向回 index.php 頁面。用戶回到 index.php 頁面後,不僅可以看到自己的消息,還可以看到他們追隨的用戶最近添加的消息。或者,如果之前選擇 unfollow 鏈接,那麼那個用戶的消息將從列表中消失。稍後需要在 index.php 中添加這點代碼。現在,將follow_user()和unfollow_user()函數添加到 functions.php 中。對於這兩個函數要小心一點。不能只是因為用戶單擊了那個鏈接,就盲目地追隨或放棄追隨一個用戶。首先,需要檢查 following 表中是否存在這樣的關系。如果存在,那麼可以忽略請求(單擊 follow 鏈接時),或者接受請求(單擊 unfollow 鏈接時)。為簡單起見,編寫兩種情況下都可以使用的一個
check_count()函數,如下面的清單所示。
清單 15.check_count()函數
___FCKpd___6
接下來的步驟很容易:在主頁上顯示當前用戶正在追隨的其他用戶的列表。雖然已經有了一個
show_users()函數,但那個函數是顯示所有 用戶。可以通過增加一個非必需的參數,輕松地改變這個函數的用途。這個參數是一個用戶 ID,可以用該參數將用戶列表限制為該用戶 ID 所追隨的那些用戶。清單 16 中重新編寫的代碼所做的事情是檢查傳入的
$user_id參數。如果該用戶 ID 大於 0,則使用一個查詢獲取此 ID 追隨的所有用戶的 ID。使用implode()函數將獲得的數組轉換為一個以逗號分隔的列表。然後將這個字符串 — 大致為and id in (1,2,3...n)— 插入到已有的 SQL 查詢中,從而將用戶列表限制為該用戶正在追隨的那些用戶。
清單 16. 重新編寫的代碼,用於限制通過查詢獲得的用戶列表
___FCKpd___7
接下來,將清單 17 中的代碼添加到主頁中,用於顯示所有那些被追隨的用戶。
清單 17. 修改 index.php 以顯示被追隨的用戶
___FCKpd___8SESSION['userid'],$id);
$msg = "You have followed a user!";
break;
case "unfollow":
unfollow_user(追隨其他用戶
接下來可以將更多東西添加到 functions.php 文件中。這裡需要一個
show_users()函數,該函數可以返回系統中所有用戶的一個列表。後面將使用這個函數填充一個用戶列表。
清單 10.show_users()函數
function show_users(){
$users = array();
$sql = "select id, username from users where status='active' order by username";
$result = mysql_query($sql);
while ($data = mysql_fetch_object($result)){
$users[$data->id] = $data->username;
}
return $users;
}
有了
show_users()函數之後,接下來可以創建一個 users.php 文件,該文件將運行這個函數,並顯示系統中所有用戶的一個列表,對於每個用戶,在用戶名的旁邊都有一個 follow 鏈接。
清單 11. 運行show_users()函數的 users.php 文件
<?php
session_start();
include_once("header.php");
include_once("functions.php");
?>
<!DOCTYPE html PUBLIC "-//W3C//DTD XHTML 1.0 Transitional//EN"
"http://www.w3.org/TR/xhtml1/DTD/xhtml1-transitional.dtd">
<html xmlns="http://www.w3.org/1999/xhtml" xml:lang="en" lang="en">
<head>
<meta http-equiv="content-type" content="text/html; charset=utf-8" />
<title>Microblogging Application - Users</title>
</head>
<body>
<h1>List of Users</h1>
<?php
$users = show_users();
if (count($users)){
?>
<table border='1' cellspacing='0' cellpadding='5' width='500'>
<?php
foreach ($users as $key => $value){
echo "<tr valign='top'>\n";
echo "<td>".$key ."</td>\n";
echo "<td>".$value ." <small><a href='#'>follow</a></small></td>\n";
echo "</tr>\n";
}
?>
</table>
<?php
}else{
?>
<p><b>There are no users in the system!</b></p>
<?php
}
?>
</body>
</html>
為了訪問這個用戶列表,在 index.php 文件中表單的上方添加一個到 users.php 的鏈接:
<p><a href='users.php'>see list of users</a></p>
現在有了一個易於使用的用戶名列表,每個用戶名旁有一個 follow 鏈接。
圖 2. 用戶列表
在進入下一個階段之前,還需要編寫一個小函數,該函數將返回當前用戶正在追隨的用戶。這樣一來,用戶就可以用這個列表來確定是否追隨另一個用戶。
回到 functions.php 文件,添加一個名為
following()的函數,如清單 12 所示。將當前用戶 ID 傳遞給該函數,就可以得到該用戶正在追隨的每個用戶的 ID。
清單 12.following()函數
function following($userid){
$users = array();
$sql = "select distinct user_id from following
where follower_id = '$userid'";
$result = mysql_query($sql);
while($data = mysql_fetch_object($result)){
array_push($users, $data->user_id);
}
return $users;
}
現在可以在 users.php 上運行這個函數,檢查某個用戶 ID 是否在該數組中。如果在,則使用 unfollow 鏈接。如果不在,則使用默認的 follow 鏈接。清單 13 顯示修改後的代碼。
清單 13. 修改後的 users.php 文件,它將顯示 follow 和 unfollow 鏈接
<?php
$users = show_users();
$following = following(追隨其他用戶
接下來可以將更多東西添加到 functions.php 文件中。這裡需要一個
show_users()函數,該函數可以返回系統中所有用戶的一個列表。後面將使用這個函數填充一個用戶列表。
清單 10.show_users()函數
function show_users(){
$users = array();
$sql = "select id, username from users where status='active' order by username";
$result = mysql_query($sql);
while ($data = mysql_fetch_object($result)){
$users[$data->id] = $data->username;
}
return $users;
}
有了
show_users()函數之後,接下來可以創建一個 users.php 文件,該文件將運行這個函數,並顯示系統中所有用戶的一個列表,對於每個用戶,在用戶名的旁邊都有一個 follow 鏈接。
清單 11. 運行show_users()函數的 users.php 文件
<?php
session_start();
include_once("header.php");
include_once("functions.php");
?>
<!DOCTYPE html PUBLIC "-//W3C//DTD XHTML 1.0 Transitional//EN"
"http://www.w3.org/TR/xhtml1/DTD/xhtml1-transitional.dtd">
<html xmlns="http://www.w3.org/1999/xhtml" xml:lang="en" lang="en">
<head>
<meta http-equiv="content-type" content="text/html; charset=utf-8" />
<title>Microblogging Application - Users</title>
</head>
<body>
<h1>List of Users</h1>
<?php
$users = show_users();
if (count($users)){
?>
<table border='1' cellspacing='0' cellpadding='5' width='500'>
<?php
foreach ($users as $key => $value){
echo "<tr valign='top'>\n";
echo "<td>".$key ."</td>\n";
echo "<td>".$value ." <small><a href='#'>follow</a></small></td>\n";
echo "</tr>\n";
}
?>
</table>
<?php
}else{
?>
<p><b>There are no users in the system!</b></p>
<?php
}
?>
</body>
</html>
為了訪問這個用戶列表,在 index.php 文件中表單的上方添加一個到 users.php 的鏈接:
<p><a href='users.php'>see list of users</a></p>
現在有了一個易於使用的用戶名列表,每個用戶名旁有一個 follow 鏈接。
圖 2. 用戶列表
在進入下一個階段之前,還需要編寫一個小函數,該函數將返回當前用戶正在追隨的用戶。這樣一來,用戶就可以用這個列表來確定是否追隨另一個用戶。
回到 functions.php 文件,添加一個名為
following()的函數,如清單 12 所示。將當前用戶 ID 傳遞給該函數,就可以得到該用戶正在追隨的每個用戶的 ID。
清單 12.following()函數
function following($userid){
$users = array();
$sql = "select distinct user_id from following
where follower_id = '$userid'";
$result = mysql_query($sql);
while($data = mysql_fetch_object($result)){
array_push($users, $data->user_id);
}
return $users;
}
現在可以在 users.php 上運行這個函數,檢查某個用戶 ID 是否在該數組中。如果在,則使用 unfollow 鏈接。如果不在,則使用默認的 follow 鏈接。清單 13 顯示修改後的代碼。
清單 13. 修改後的 users.php 文件,它將顯示 follow 和 unfollow 鏈接
___FCKpd___4
接下來的步驟很簡單:創建 follow 和 unfollow 鏈接使用的 action.php 文件。該文件接受兩個
GET參數:一個用於用戶 ID,另一個用於 follow 或 unfollow。如清單 14 所示,這個文件和 add.php 文件一樣簡短。
清單 14. action.php 文件
___FCKpd___5
可以看到,這裡取決於之前選擇的鏈接,采取兩種不同的動作 —
follow_user()或unfollow_user()。然後,設置一條消息,並將用戶重定向回 index.php 頁面。用戶回到 index.php 頁面後,不僅可以看到自己的消息,還可以看到他們追隨的用戶最近添加的消息。或者,如果之前選擇 unfollow 鏈接,那麼那個用戶的消息將從列表中消失。稍後需要在 index.php 中添加這點代碼。現在,將follow_user()和unfollow_user()函數添加到 functions.php 中。對於這兩個函數要小心一點。不能只是因為用戶單擊了那個鏈接,就盲目地追隨或放棄追隨一個用戶。首先,需要檢查 following 表中是否存在這樣的關系。如果存在,那麼可以忽略請求(單擊 follow 鏈接時),或者接受請求(單擊 unfollow 鏈接時)。為簡單起見,編寫兩種情況下都可以使用的一個
check_count()函數,如下面的清單所示。
清單 15.check_count()函數
___FCKpd___6
接下來的步驟很容易:在主頁上顯示當前用戶正在追隨的其他用戶的列表。雖然已經有了一個
show_users()函數,但那個函數是顯示所有 用戶。可以通過增加一個非必需的參數,輕松地改變這個函數的用途。這個參數是一個用戶 ID,可以用該參數將用戶列表限制為該用戶 ID 所追隨的那些用戶。清單 16 中重新編寫的代碼所做的事情是檢查傳入的
$user_id參數。如果該用戶 ID 大於 0,則使用一個查詢獲取此 ID 追隨的所有用戶的 ID。使用implode()函數將獲得的數組轉換為一個以逗號分隔的列表。然後將這個字符串 — 大致為and id in (1,2,3...n)— 插入到已有的 SQL 查詢中,從而將用戶列表限制為該用戶正在追隨的那些用戶。
清單 16. 重新編寫的代碼,用於限制通過查詢獲得的用戶列表
___FCKpd___7
接下來,將清單 17 中的代碼添加到主頁中,用於顯示所有那些被追隨的用戶。
清單 17. 修改 index.php 以顯示被追隨的用戶
___FCKpd___8SESSION['userid']);
if (count($users)){
?>
<table border='1' cellspacing='0' cellpadding='5' width='500'>
<?php
foreach ($users as $key => $value){
echo "<tr valign='top'>\n";
echo "<td>".$key ."</td>\n";
echo "<td>".$value;
if (in_array($key,$following)){
echo " <small>
<a href='action.php?id=$key&do=unfollow'>unfollow</a>
</small>";
}else{
echo " <small>
<a href='action.php?id=$key&do=follow'>follow</a>
</small>";
}
echo "</td>\n";
echo "</tr>\n";
}
?>
接下來的步驟很簡單:創建 follow 和 unfollow 鏈接使用的 action.php 文件。該文件接受兩個
GET參數:一個用於用戶 ID,另一個用於 follow 或 unfollow。如清單 14 所示,這個文件和 add.php 文件一樣簡短。
清單 14. action.php 文件
___FCKpd___5
可以看到,這裡取決於之前選擇的鏈接,采取兩種不同的動作 —
follow_user()或unfollow_user()。然後,設置一條消息,並將用戶重定向回 index.php 頁面。用戶回到 index.php 頁面後,不僅可以看到自己的消息,還可以看到他們追隨的用戶最近添加的消息。或者,如果之前選擇 unfollow 鏈接,那麼那個用戶的消息將從列表中消失。稍後需要在 index.php 中添加這點代碼。現在,將follow_user()和unfollow_user()函數添加到 functions.php 中。對於這兩個函數要小心一點。不能只是因為用戶單擊了那個鏈接,就盲目地追隨或放棄追隨一個用戶。首先,需要檢查 following 表中是否存在這樣的關系。如果存在,那麼可以忽略請求(單擊 follow 鏈接時),或者接受請求(單擊 unfollow 鏈接時)。為簡單起見,編寫兩種情況下都可以使用的一個
check_count()函數,如下面的清單所示。
清單 15.check_count()函數
___FCKpd___6
接下來的步驟很容易:在主頁上顯示當前用戶正在追隨的其他用戶的列表。雖然已經有了一個
show_users()函數,但那個函數是顯示所有 用戶。可以通過增加一個非必需的參數,輕松地改變這個函數的用途。這個參數是一個用戶 ID,可以用該參數將用戶列表限制為該用戶 ID 所追隨的那些用戶。清單 16 中重新編寫的代碼所做的事情是檢查傳入的
$user_id參數。如果該用戶 ID 大於 0,則使用一個查詢獲取此 ID 追隨的所有用戶的 ID。使用implode()函數將獲得的數組轉換為一個以逗號分隔的列表。然後將這個字符串 — 大致為and id in (1,2,3...n)— 插入到已有的 SQL 查詢中,從而將用戶列表限制為該用戶正在追隨的那些用戶。
清單 16. 重新編寫的代碼,用於限制通過查詢獲得的用戶列表
___FCKpd___7
接下來,將清單 17 中的代碼添加到主頁中,用於顯示所有那些被追隨的用戶。
清單 17. 修改 index.php 以顯示被追隨的用戶
___FCKpd___8SESSION['userid'],$id);
$msg = "You have unfollowed a user!";
break;
}追隨其他用戶
接下來可以將更多東西添加到 functions.php 文件中。這裡需要一個
show_users()函數,該函數可以返回系統中所有用戶的一個列表。後面將使用這個函數填充一個用戶列表。
清單 10.show_users()函數
function show_users(){
$users = array();
$sql = "select id, username from users where status='active' order by username";
$result = mysql_query($sql);
while ($data = mysql_fetch_object($result)){
$users[$data->id] = $data->username;
}
return $users;
}
有了
show_users()函數之後,接下來可以創建一個 users.php 文件,該文件將運行這個函數,並顯示系統中所有用戶的一個列表,對於每個用戶,在用戶名的旁邊都有一個 follow 鏈接。
清單 11. 運行show_users()函數的 users.php 文件
<?php
session_start();
include_once("header.php");
include_once("functions.php");
?>
<!DOCTYPE html PUBLIC "-//W3C//DTD XHTML 1.0 Transitional//EN"
"http://www.w3.org/TR/xhtml1/DTD/xhtml1-transitional.dtd">
<html xmlns="http://www.w3.org/1999/xhtml" xml:lang="en" lang="en">
<head>
<meta http-equiv="content-type" content="text/html; charset=utf-8" />
<title>Microblogging Application - Users</title>
</head>
<body>
<h1>List of Users</h1>
<?php
$users = show_users();
if (count($users)){
?>
<table border='1' cellspacing='0' cellpadding='5' width='500'>
<?php
foreach ($users as $key => $value){
echo "<tr valign='top'>\n";
echo "<td>".$key ."</td>\n";
echo "<td>".$value ." <small><a href='#'>follow</a></small></td>\n";
echo "</tr>\n";
}
?>
</table>
<?php
}else{
?>
<p><b>There are no users in the system!</b></p>
<?php
}
?>
</body>
</html>
為了訪問這個用戶列表,在 index.php 文件中表單的上方添加一個到 users.php 的鏈接:
<p><a href='users.php'>see list of users</a></p>
現在有了一個易於使用的用戶名列表,每個用戶名旁有一個 follow 鏈接。
圖 2. 用戶列表
在進入下一個階段之前,還需要編寫一個小函數,該函數將返回當前用戶正在追隨的用戶。這樣一來,用戶就可以用這個列表來確定是否追隨另一個用戶。
回到 functions.php 文件,添加一個名為
following()的函數,如清單 12 所示。將當前用戶 ID 傳遞給該函數,就可以得到該用戶正在追隨的每個用戶的 ID。
清單 12.following()函數
function following($userid){
$users = array();
$sql = "select distinct user_id from following
where follower_id = '$userid'";
$result = mysql_query($sql);
while($data = mysql_fetch_object($result)){
array_push($users, $data->user_id);
}
return $users;
}
現在可以在 users.php 上運行這個函數,檢查某個用戶 ID 是否在該數組中。如果在,則使用 unfollow 鏈接。如果不在,則使用默認的 follow 鏈接。清單 13 顯示修改後的代碼。
清單 13. 修改後的 users.php 文件,它將顯示 follow 和 unfollow 鏈接
<?php
$users = show_users();
$following = following(追隨其他用戶
接下來可以將更多東西添加到 functions.php 文件中。這裡需要一個
show_users()函數,該函數可以返回系統中所有用戶的一個列表。後面將使用這個函數填充一個用戶列表。
清單 10.show_users()函數
function show_users(){
$users = array();
$sql = "select id, username from users where status='active' order by username";
$result = mysql_query($sql);
while ($data = mysql_fetch_object($result)){
$users[$data->id] = $data->username;
}
return $users;
}
有了
show_users()函數之後,接下來可以創建一個 users.php 文件,該文件將運行這個函數,並顯示系統中所有用戶的一個列表,對於每個用戶,在用戶名的旁邊都有一個 follow 鏈接。
清單 11. 運行show_users()函數的 users.php 文件
<?php
session_start();
include_once("header.php");
include_once("functions.php");
?>
<!DOCTYPE html PUBLIC "-//W3C//DTD XHTML 1.0 Transitional//EN"
"http://www.w3.org/TR/xhtml1/DTD/xhtml1-transitional.dtd">
<html xmlns="http://www.w3.org/1999/xhtml" xml:lang="en" lang="en">
<head>
<meta http-equiv="content-type" content="text/html; charset=utf-8" />
<title>Microblogging Application - Users</title>
</head>
<body>
<h1>List of Users</h1>
<?php
$users = show_users();
if (count($users)){
?>
<table border='1' cellspacing='0' cellpadding='5' width='500'>
<?php
foreach ($users as $key => $value){
echo "<tr valign='top'>\n";
echo "<td>".$key ."</td>\n";
echo "<td>".$value ." <small><a href='#'>follow</a></small></td>\n";
echo "</tr>\n";
}
?>
</table>
<?php
}else{
?>
<p><b>There are no users in the system!</b></p>
<?php
}
?>
</body>
</html>
為了訪問這個用戶列表,在 index.php 文件中表單的上方添加一個到 users.php 的鏈接:
<p><a href='users.php'>see list of users</a></p>
現在有了一個易於使用的用戶名列表,每個用戶名旁有一個 follow 鏈接。
圖 2. 用戶列表
在進入下一個階段之前,還需要編寫一個小函數,該函數將返回當前用戶正在追隨的用戶。這樣一來,用戶就可以用這個列表來確定是否追隨另一個用戶。
回到 functions.php 文件,添加一個名為
following()的函數,如清單 12 所示。將當前用戶 ID 傳遞給該函數,就可以得到該用戶正在追隨的每個用戶的 ID。
清單 12.following()函數
function following($userid){
$users = array();
$sql = "select distinct user_id from following
where follower_id = '$userid'";
$result = mysql_query($sql);
while($data = mysql_fetch_object($result)){
array_push($users, $data->user_id);
}
return $users;
}
現在可以在 users.php 上運行這個函數,檢查某個用戶 ID 是否在該數組中。如果在,則使用 unfollow 鏈接。如果不在,則使用默認的 follow 鏈接。清單 13 顯示修改後的代碼。
清單 13. 修改後的 users.php 文件,它將顯示 follow 和 unfollow 鏈接
___FCKpd___4
接下來的步驟很簡單:創建 follow 和 unfollow 鏈接使用的 action.php 文件。該文件接受兩個
GET參數:一個用於用戶 ID,另一個用於 follow 或 unfollow。如清單 14 所示,這個文件和 add.php 文件一樣簡短。
清單 14. action.php 文件
___FCKpd___5
可以看到,這裡取決於之前選擇的鏈接,采取兩種不同的動作 —
follow_user()或unfollow_user()。然後,設置一條消息,並將用戶重定向回 index.php 頁面。用戶回到 index.php 頁面後,不僅可以看到自己的消息,還可以看到他們追隨的用戶最近添加的消息。或者,如果之前選擇 unfollow 鏈接,那麼那個用戶的消息將從列表中消失。稍後需要在 index.php 中添加這點代碼。現在,將follow_user()和unfollow_user()函數添加到 functions.php 中。對於這兩個函數要小心一點。不能只是因為用戶單擊了那個鏈接,就盲目地追隨或放棄追隨一個用戶。首先,需要檢查 following 表中是否存在這樣的關系。如果存在,那麼可以忽略請求(單擊 follow 鏈接時),或者接受請求(單擊 unfollow 鏈接時)。為簡單起見,編寫兩種情況下都可以使用的一個
check_count()函數,如下面的清單所示。
清單 15.check_count()函數
___FCKpd___6
接下來的步驟很容易:在主頁上顯示當前用戶正在追隨的其他用戶的列表。雖然已經有了一個
show_users()函數,但那個函數是顯示所有 用戶。可以通過增加一個非必需的參數,輕松地改變這個函數的用途。這個參數是一個用戶 ID,可以用該參數將用戶列表限制為該用戶 ID 所追隨的那些用戶。清單 16 中重新編寫的代碼所做的事情是檢查傳入的
$user_id參數。如果該用戶 ID 大於 0,則使用一個查詢獲取此 ID 追隨的所有用戶的 ID。使用implode()函數將獲得的數組轉換為一個以逗號分隔的列表。然後將這個字符串 — 大致為and id in (1,2,3...n)— 插入到已有的 SQL 查詢中,從而將用戶列表限制為該用戶正在追隨的那些用戶。
清單 16. 重新編寫的代碼,用於限制通過查詢獲得的用戶列表
___FCKpd___7
接下來,將清單 17 中的代碼添加到主頁中,用於顯示所有那些被追隨的用戶。
清單 17. 修改 index.php 以顯示被追隨的用戶
___FCKpd___8SESSION['userid']);
if (count($users)){
?>
<table border='1' cellspacing='0' cellpadding='5' width='500'>
<?php
foreach ($users as $key => $value){
echo "<tr valign='top'>\n";
echo "<td>".$key ."</td>\n";
echo "<td>".$value;
if (in_array($key,$following)){
echo " <small>
<a href='action.php?id=$key&do=unfollow'>unfollow</a>
</small>";
}else{
echo " <small>
<a href='action.php?id=$key&do=follow'>follow</a>
</small>";
}
echo "</td>\n";
echo "</tr>\n";
}
?>
接下來的步驟很簡單:創建 follow 和 unfollow 鏈接使用的 action.php 文件。該文件接受兩個
GET參數:一個用於用戶 ID,另一個用於 follow 或 unfollow。如清單 14 所示,這個文件和 add.php 文件一樣簡短。
清單 14. action.php 文件
___FCKpd___5
可以看到,這裡取決於之前選擇的鏈接,采取兩種不同的動作 —
follow_user()或unfollow_user()。然後,設置一條消息,並將用戶重定向回 index.php 頁面。用戶回到 index.php 頁面後,不僅可以看到自己的消息,還可以看到他們追隨的用戶最近添加的消息。或者,如果之前選擇 unfollow 鏈接,那麼那個用戶的消息將從列表中消失。稍後需要在 index.php 中添加這點代碼。現在,將follow_user()和unfollow_user()函數添加到 functions.php 中。對於這兩個函數要小心一點。不能只是因為用戶單擊了那個鏈接,就盲目地追隨或放棄追隨一個用戶。首先,需要檢查 following 表中是否存在這樣的關系。如果存在,那麼可以忽略請求(單擊 follow 鏈接時),或者接受請求(單擊 unfollow 鏈接時)。為簡單起見,編寫兩種情況下都可以使用的一個
check_count()函數,如下面的清單所示。
清單 15.check_count()函數
___FCKpd___6
接下來的步驟很容易:在主頁上顯示當前用戶正在追隨的其他用戶的列表。雖然已經有了一個
show_users()函數,但那個函數是顯示所有 用戶。可以通過增加一個非必需的參數,輕松地改變這個函數的用途。這個參數是一個用戶 ID,可以用該參數將用戶列表限制為該用戶 ID 所追隨的那些用戶。清單 16 中重新編寫的代碼所做的事情是檢查傳入的
$user_id參數。如果該用戶 ID 大於 0,則使用一個查詢獲取此 ID 追隨的所有用戶的 ID。使用implode()函數將獲得的數組轉換為一個以逗號分隔的列表。然後將這個字符串 — 大致為and id in (1,2,3...n)— 插入到已有的 SQL 查詢中,從而將用戶列表限制為該用戶正在追隨的那些用戶。
清單 16. 重新編寫的代碼,用於限制通過查詢獲得的用戶列表
___FCKpd___7
接下來,將清單 17 中的代碼添加到主頁中,用於顯示所有那些被追隨的用戶。
清單 17. 修改 index.php 以顯示被追隨的用戶
___FCKpd___8SESSION['message'] = $msg;
header("Location:index.php");
?>
可以看到,這裡取決於之前選擇的鏈接,采取兩種不同的動作 —
follow_user()或unfollow_user()。然後,設置一條消息,並將用戶重定向回 index.php 頁面。用戶回到 index.php 頁面後,不僅可以看到自己的消息,還可以看到他們追隨的用戶最近添加的消息。或者,如果之前選擇 unfollow 鏈接,那麼那個用戶的消息將從列表中消失。稍後需要在 index.php 中添加這點代碼。現在,將follow_user()和unfollow_user()函數添加到 functions.php 中。對於這兩個函數要小心一點。不能只是因為用戶單擊了那個鏈接,就盲目地追隨或放棄追隨一個用戶。首先,需要檢查 following 表中是否存在這樣的關系。如果存在,那麼可以忽略請求(單擊 follow 鏈接時),或者接受請求(單擊 unfollow 鏈接時)。為簡單起見,編寫兩種情況下都可以使用的一個
check_count()函數,如下面的清單所示。
清單 15.check_count()函數
___FCKpd___6
接下來的步驟很容易:在主頁上顯示當前用戶正在追隨的其他用戶的列表。雖然已經有了一個
show_users()函數,但那個函數是顯示所有 用戶。可以通過增加一個非必需的參數,輕松地改變這個函數的用途。這個參數是一個用戶 ID,可以用該參數將用戶列表限制為該用戶 ID 所追隨的那些用戶。清單 16 中重新編寫的代碼所做的事情是檢查傳入的
$user_id參數。如果該用戶 ID 大於 0,則使用一個查詢獲取此 ID 追隨的所有用戶的 ID。使用implode()函數將獲得的數組轉換為一個以逗號分隔的列表。然後將這個字符串 — 大致為and id in (1,2,3...n)— 插入到已有的 SQL 查詢中,從而將用戶列表限制為該用戶正在追隨的那些用戶。
清單 16. 重新編寫的代碼,用於限制通過查詢獲得的用戶列表
___FCKpd___7
接下來,將清單 17 中的代碼添加到主頁中,用於顯示所有那些被追隨的用戶。
清單 17. 修改 index.php 以顯示被追隨的用戶
___FCKpd___8SESSION['userid']);
if (count($users)){
?>
<table border='1' cellspacing='0' cellpadding='5' width='500'>
<?php
foreach ($users as $key => $value){
echo "<tr valign='top'>\n";
echo "<td>".$key ."</td>\n";
echo "<td>".$value;
if (in_array($key,$following)){
echo " <small>
<a href='action.php?id=$key&do=unfollow'>unfollow</a>
</small>";
}else{
echo " <small>
<a href='action.php?id=$key&do=follow'>follow</a>
</small>";
}
echo "</td>\n";
echo "</tr>\n";
}
?>
接下來的步驟很簡單:創建 follow 和 unfollow 鏈接使用的 action.php 文件。該文件接受兩個 GET 參數:一個用於用戶 ID,另一個用於 follow 或 unfollow。如清單 14 所示,這個文件和 add.php 文件一樣簡短。
___FCKpd___5
可以看到,這裡取決於之前選擇的鏈接,采取兩種不同的動作 — follow_user() 或 unfollow_user()。然後,設置一條消息,並將用戶重定向回 index.php 頁面。用戶回到 index.php 頁面後,不僅可以看到自己的消息,還可以看到他們追隨的用戶最近添加的消息。或者,如果之前選擇 unfollow 鏈接,那麼那個用戶的消息將從列表中消失。稍後需要在 index.php 中添加這點代碼。現在,將 follow_user() 和 unfollow_user() 函數添加到 functions.php 中。
對於這兩個函數要小心一點。不能只是因為用戶單擊了那個鏈接,就盲目地追隨或放棄追隨一個用戶。首先,需要檢查 following 表中是否存在這樣的關系。如果存在,那麼可以忽略請求(單擊 follow 鏈接時),或者接受請求(單擊 unfollow 鏈接時)。為簡單起見,編寫兩種情況下都可以使用的一個 check_count() 函數,如下面的清單所示。
check_count() 函數___FCKpd___6
接下來的步驟很容易:在主頁上顯示當前用戶正在追隨的其他用戶的列表。雖然已經有了一個 show_users() 函數,但那個函數是顯示所有 用戶。可以通過增加一個非必需的參數,輕松地改變這個函數的用途。這個參數是一個用戶 ID,可以用該參數將用戶列表限制為該用戶 ID 所追隨的那些用戶。
清單 16 中重新編寫的代碼所做的事情是檢查傳入的 $user_id 參數。如果該用戶 ID 大於 0,則使用一個查詢獲取此 ID 追隨的所有用戶的 ID。使用 implode() 函數將獲得的數組轉換為一個以逗號分隔的列表。然後將這個字符串 — 大致為 and id in (1,2,3...n) — 插入到已有的 SQL 查詢中,從而將用戶列表限制為該用戶正在追隨的那些用戶。
___FCKpd___7
接下來,將清單 17 中的代碼添加到主頁中,用於顯示所有那些被追隨的用戶。
___FCKpd___8