介紹
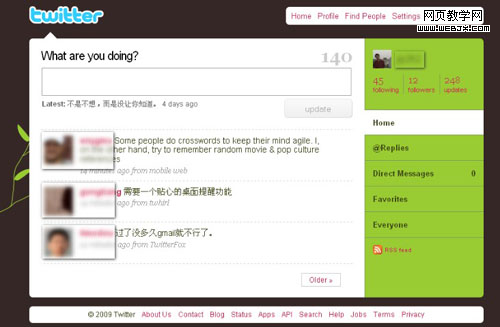
通過twitter,用戶可以任何時候發布他們在做什麼,twitter會及時顯示這些信息。從而,每個朋友都能同時知道你在做什麼。twitter主頁如下:
在本教程中,我們將實現類似twitter的界面,並且會使用PHP實現信息發布功能,數據會保存到MySQL數據庫中。
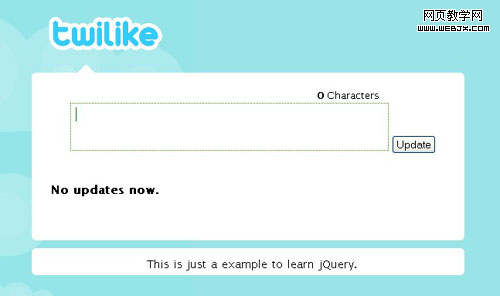
第一步:界面布局
界面布局和twitter.com非常相似。本例中,只會顯示消息文本框和消息顯示區域,如上圖所示。Html代碼如下:
以下為引用的內容:
<!DOCTYPE html PUBLIC "-//W3C//DTD XHtml 1.0 Transitional//EN" "http://www.w3.org/TR/xhtml1/DTD/xHtml1-transitional.dtd">
<Html XMLns="http://www.w3.org/1999/xHtml">
<head>
<meta http-equiv="Content-Type" content="text/Html; charset=utf-8" />
<title>jQuery Tutorial: Twitter-Like Site by Ji Guofei</title>
</head>
<body>
<div id="title">
<h1><a href="#"><img _fcksavedurl=""#"><img" _fcksavedurl=""#"><img" _fcksavedurl=""#"><img" _fcksavedurl=""#"><img" src="twilike.png" alt="Twitter-Like Site" ></a></h1>
</div>
<div id="arrow"><img src="images/arrow-up.gif" alt="arrow"/></div>
<div id="container">
<form id="commentForm">
<fIEldset>
<legend><span id="counter"></span> Characters</legend>
<textarea id="message" name="message" ></textarea>
<input name="btnSign" class="submit" type="submit" id="submit" value="Update" />
</fIEldset>
</form>
<div id="messagewindow">
This area will be used to display the messages.
</div>
</div>
<div id="footer">
<div id="footer_a">
This is just a example to learn jQuery.
</div>
</div>
</body>
</Html>
將代碼保存為index.php,我們將向文件中添加一些PHP代碼以便顯示消息。
接著,我們可以用CSS定義頁面的樣式。CSS文件命名為style.CSS:
以下為引用的內容:
body {
font:0.8em/1.5 "Lucida Sans Unicode", "Lucida Grande", Arial, Helvetica;
color:#333;
background:#9AE4E8 url('bg.gif') no-repeat fixed left top;
}
#title{
margin:20px 0px 10px 380px;
}
#title img {
border:0;
width:150px;
}
#title h2{
margin-top:10px;
font-size:small;
}
#footer {
text-align:center;
margin-top: 10px;
padding-bottom: 4px;
padding-top: 4px;
}
#arrow {
margin-top: 8px;
padding-left: 420px;
}
#container, #footer {
background-color:white;
padding-top: 10px;
color: #000000;
width:560px;
margin-left: auto;
margin-right: auto;
}
#footer {
margin-bottom:30px;
}
#container {
padding-bottom: 30px;
width:560px;
margin-left: auto;
margin-right: auto;
}
#container form {
margin:10px 0px 10px 50px;
}
legend {
padding:0px 0px 0px 320px;
}
legend span {
font-weight:bold;
}
#footer_a {
display:inline;
Word-spacing: 2px;
font-size: 14px;
padding-left: 10px;
}
fIEldset {
border: none;
}
textarea {
border: 1px dotted #449F00;
width: 400px;
height: 50px;
padding: 5px;
font-weight:bold;
color:green;
}
當然,請不要忘了引用外部CSS文件。
<link media="screen" href="css/style.css" type="text/CSS" rel="stylesheet" />
第二步:用MySQL創建數據庫
MySQL是一個非常強大的數據庫系統,最重要的是,可以免費使用在我們的例子中,我們將使用MySQL保存我們的消息數據。創建一個新表“message”,其字段如下所列:
id: key of this table, integer, auto-increment
message: the text of message, string
date: the message date, data format
該表設計如下:
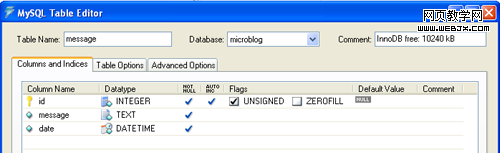
創建該表的sql腳本如下:
CREATE TABLE `microblog`.`message` (
`id` int(10) unsigned NOT NULL auto_increment,
`message` text NOT NULL,
`date` datetime NOT NULL,
PRIMARY KEY (`id`)
);
第三步:用PHP配置MySQL連接
在本教程中,我們建立一個配置文件用於保存數據庫配置信息,例如主機名、用戶名、密碼、數據庫名稱,等等。文件config.PHP如下:
以下為引用的內容:
<?PHP
// Configuration
$dbhost = 'localhost';
$dbuser = 'root';
$dbpass = '';
$dbname = 'microblog';
$conn = mysql_connect ($dbhost, $dbuser, $dbpass) or dIE ('I cannot connect to the database because: ' . MySQL_error());
MySQL_select_db ($dbname);
?>
在代碼中,mysql_connect()函數用於麗娜接mysql數據庫服務器。該函數有三個參數:主機名、用戶名和密碼。連接數據庫後,我們可以用函數mysql_select_db()查詢活動的數據庫,MySQL_select_db()需要一個參數,數據庫名稱。
第四步:實現信息發布功能
發布和顯示消息是本教程的核心功能。我們將使用jquery庫來實現它。首先我們應在Html頁面中包含jquery庫。
<script type=“text/Javascript” src=“js/jquery.JS”></script>
所有jquery代碼將被保存在main.JS中,也應被包含在Html頁面:
<script type=“text/Javascript” src=“js/main.JS”></script>
在main.JS中,我們應在編寫jquery代碼之前定義函數$(document).ready()。
$(document).ready(function(){
//Place your codes here
});
實現發布新消息的AJax代碼如下:
$(document).ready(function(){
$.post("backend.PHP",{
message: $("#message").val(),
action: "postmsg"
}, function(XML) {
$("#comm").Html("The latest Update: ");
addMessages(XML);
});
return false;
});
});
在代碼中,$post()函數用於通過AJax發布信息到後台邏輯backend.PHP。返回數據是XML格式。addMessages()函數用於不刷新頁面顯示新更新的消息。
function addMessages(XML) {
message = $("message",XML).get(0);
$("#comments").prepend("<li><p class='info'>Added on Today:</p> <div class='body'>"
+ $("text",message).text() + "</div></li>");
$("#message").val("").focus();
}
返回數據是XML格式,從firebug中,我們能看到:
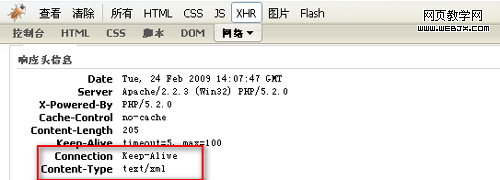
下面是該XML文件的一個例子:
那麼,在上面的jquery代碼中,$(”text”,message).text()用於得到消息。請注意如何使用Javascript/jquery得到XML文件節點的值。
第五步:實現backend.PHP
backend.PHP文件用於接收前台的AJax請求,並返回XML格式的消息。其內容如下:
以下為引用的內容:
<?PHP
include("config.PHP");
header("Content-type: text/XML");
header("Cache-Control: no-cache");
foreach($_POST as $key => $value)
{
$$key = MySQL_real_escape_string($value);
}
if(@$action == "postmsg")
{
// prepare the query string
$query = "INSERT INTO message (message, date) VALUES ('$message', current_date)";
mysql_query($query) or dIE('Error, query failed. ' . MySQL_error());
}
echo "<?XML version=\"1.0\"?>\n";
echo "\t<message>\n";
echo "\t\t<text>$message</text>\n";
echo "\t</message>\n";
?>
前台會從backend.PHP得到xml相應,並解碼XML文件顯示在頁面上。
第六步:用樣式顯示消息
用戶每次載入頁面,我們應在頁面上顯示舊的消息。因此,我們需要查詢數據庫以便得到舊的消息並顯示他們:
以下為引用的內容:
<div id="messagewindow">
<?PHP
include("config.PHP");
// prepare the query string
$query = "SELECT id, message, DATE_FORMAT(date, '%Y-%m-%d') ".
"FROM message ".
"ORDER BY id DESC ";
// execute the query
$result = mysql_query($query) or dIE('Error, query failed. ' . MySQL_error());
// if the guestbook is empty show a message
if(MySQL_num_rows($result) == 0)
{
echo "<h3 id='comm'>No updates now.</h3>";
echo "<ul id='comments'></ul>";
}
else
{
echo "<h3 id='comm'>The latest Update: </h3>" .
"<ul id='comments'>";
while($row = MySQL_fetch_array($result))
{
list($id, $message, $date) = $row;
$message = Htmlspecialchars($message);
$message = nl2br($message);
echo "<li><p class='info'>Added on $date :</p>";
echo "<div class='body'><p>" . $message . "</p>";
echo "</div></li>";
}
echo "</ul>";
}
?>
</div>
</div>
這些代碼也位於在index.PHP中,同樣,我們應用CSS定義一個漂亮的消息顯示:
以下為引用的內容:
#comments, #comments li{
margin:0;
padding:0;
list-style:none;
}
#comments li{
padding:.5em;
margin:.5em 0;
background:#fcfcfc;
border:1px solid #e1e1e1;
}
#comments li .info{
padding:.2em 20px;
background:#f1f1f1 url(images/ico_comments.gif) no-repeat 2px 50%;
margin:0;
color:#333;
font-family:Georgia, "Times New Roman", Times, serif;
}
#comments li .body{
padding:.5em 20px;
}
#commentForm {
width: 550px;
}
#messagewindow {
padding: 25px;
overflow: auto;
}
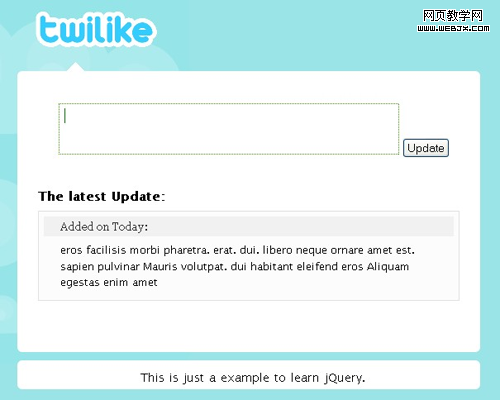
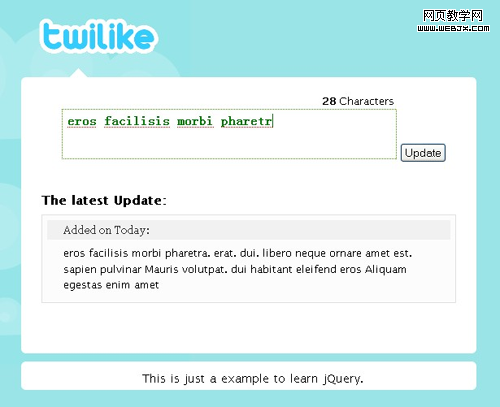
現在,在我們添加一個新的更新後,頁面看起來如下:
第七步:為輸入框創建字符計算
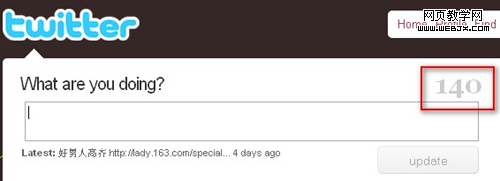
在twitter中有個有趣的功能,只允許用戶輸入最多140個字符,當用戶輸入時,twitter會告訴用戶,他/她還能輸入多少字符。如下所示:
在我們的教程中,我們沒必要限制用戶輸入為140個字符,當我們也可以計算用戶輸入了多少字符,並且能在用戶輸入時即時顯示字符計數。
該功能實現代碼如下:
$(document).ready(function(){
$("#counter").Html($("#message").val().length + "");
$("#message").keyup(function(){
// get new length of characters
$("#counter").Html($(this).val().length);
});
});
現在,當用戶輸入時,字符計數會同時增加,如下所示:
結論
現在,我們完成了教程。最終作品看起來如下圖:

在本教程中,代碼僅僅用於演示jquery, PHP和MySQL的用法,因此,有時候看來不那麼優雅