Zend Studio(後面簡稱ZDE)的調試功能分為內部調試和遠程調試。內部調試是用ZDE內置的PHP(有4、5兩個版本)進行的代碼初步調試,我們把重點放在遠程調試上,因為它可以完全模擬一個真實的運行環境。
遠程調試需要服務器端的組件支持,我們今天的內容就是怎麼來安裝這個服務器端調試環境,用到的調試組件是Zend Debugger,它是輕便而且夠用的,在撰寫本文時,其最新版本是5.2.14,與網絡上廣為流傳的5.2.10版略有更新。我的服務器是Windows下的apache,因此我就下載了Windows版的Zend Debugger,下來的壓縮包大約2.1M,有個readme.txt,我覺得有必要看哈子:
- Zend Debugger installation instructions
- —————————————
- 1. Locate ZendDebugger.so or ZendDebugger.dll file that is compiled for the correct version of PHP
- (4.3.x, 4.4.x, 5.0.x, 5.1.x, 5.2.x) in theappropriate directory.
- 2. Add the following line to the PHP.ini file:
- Linux and Mac OS X: zend_extension=/full/path/to/ZendDebugger.so
- Windows: zend_extension_ts=/full/path/to/ZendDebugger.dll
- Windows non-tread safe: zend_extension=/full/path/to/ZendDebugger.dll
- (*) the Windows non-thread safe is used only with Zend Core 2.0
- 3. Add the following lines to the PHP.ini file:
- zend_debugger.allow_hosts=<ip_addresses>
- zend_debugger.expose_remotely=always
- 4. Place dummy.PHP file in the document root directory.
- 5. Restart web server.
這裡已經非常詳細的講了安裝方法了,那我就以我晦澀的語言再描述一遍吧,以下是壓縮包內所有文件的列表:
- ZendDebugger-5.2.14RC9-cygwin_nt-i386\md5
- ZendDebugger-5.2.14RC9-cygwin_nt-i386\Inventory.XML
- ZendDebugger-5.2.14RC9-cygwin_nt-i386\4_3_x_comp
- ZendDebugger-5.2.14RC9-cygwin_nt-i386\4_3_x_comp\ZendDebugger.dll
- ZendDebugger-5.2.14RC9-cygwin_nt-i386\4_4_x_comp
- ZendDebugger-5.2.14RC9-cygwin_nt-i386\4_4_x_comp\ZendDebugger.dll
- ZendDebugger-5.2.14RC9-cygwin_nt-i386\5_0_x_comp
- ZendDebugger-5.2.14RC9-cygwin_nt-i386\5_0_x_comp\ZendDebugger.dll
- ZendDebugger-5.2.14RC9-cygwin_nt-i386\5_1_x_comp
- ZendDebugger-5.2.14RC9-cygwin_nt-i386\5_1_x_comp\ZendDebugger.dll
- ZendDebugger-5.2.14RC9-cygwin_nt-i386\5_2_x_comp
- ZendDebugger-5.2.14RC9-cygwin_nt-i386\5_2_x_comp\ZendDebugger.dll
- ZendDebugger-5.2.14RC9-cygwin_nt-i386\5_2_x_nts_comp
- ZendDebugger-5.2.14RC9-cygwin_nt-i386\5_2_x_nts_comp\ZendDebugger.dll
- ZendDebugger-5.2.14RC9-cygwin_nt-i386\dummy.PHP
- ZendDebugger-5.2.14RC9-cygwin_nt-i386\README.txt
解壓出合適的也就是和你當前php的版本對應的Zend Debugger版本,我的php版本是5.2.5,因此我就把5_2_x_comp給拖出來了(至於5_2_x_nts_comp指的是non-tread safe,沒有明白具體用途,也就不妄用了),我將5_2_x_comp\ZendDebugger.dll移動到D:\myserver\ZendDebugger\5_2_x\ZendDebugger.dll,將壓縮包中的dummy.php解壓到web根目錄,我這裡的apache的DocumentRoot設置在D:/myserver/wwwroot,就拷貝dummy.php到D:\myserver\wwwroot,然後修改PHP.ini,加入了這些內容:
- zend_extension_ts=D:/myserver/ZendDebugger/5_2_x/ZendDebugger.dll
- zend_debugger.allow_hosts=127.0.0.1/32,192.168.1.88/24
- zend_debugger.expose_remotely=always
然後重啟apache,在略微的等待之後,我們輸入PHPinfo()查看成功與否?
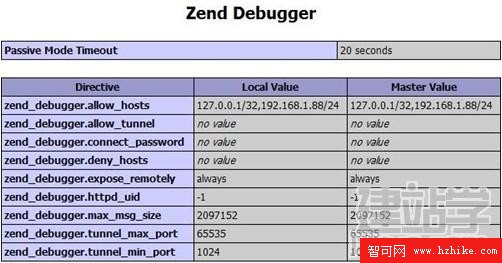
結果運行的很好。
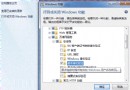
下面打開zde,工具菜單->首選項,選擇調試選項卡,設置調試方式為服務器,Debug Server URL填寫web服務器的URL,我這裡apache的端口是8080,如果是默認80端口,就可以省略了,OK,設置完成,確定之(如圖)。

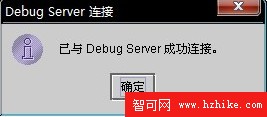
選擇 工具->檢查Debug Server連接,出來的對話框選擇是,我們看到了連接成功的提示。
至此,我們的Debug Server就算成功安裝完成了。