前言:
PHP實現QQ快速登錄,羅列了三種方法
方法一:面向過程,回調地址和首次觸發登錄寫到了一個方法頁面【因為有了if做判斷】,
方法二,三:面向對象
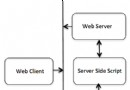
1.先調用登錄方法,向騰訊發送請求,
2.騰訊攜帶本網站唯一對應參數OPENID,ACCESSTOKEN,返回到對應回調頁面,
3.回調頁面接受到騰訊的參數後,通過這個兩個參數,再發出對應的請求,如查詢用戶的數據。
4.騰訊做出對應的操作,如返回這個用戶的數據給你
即使你沒看懂,也沒關系,按照我下面的流程來,保證你可以實現。
前期准備:
使用人家騰訊的功能,總得和人家打招呼吧!
QQ互聯首頁:http://connect.qq.com/
進入網址後,按如下操作來:
一.進入官網
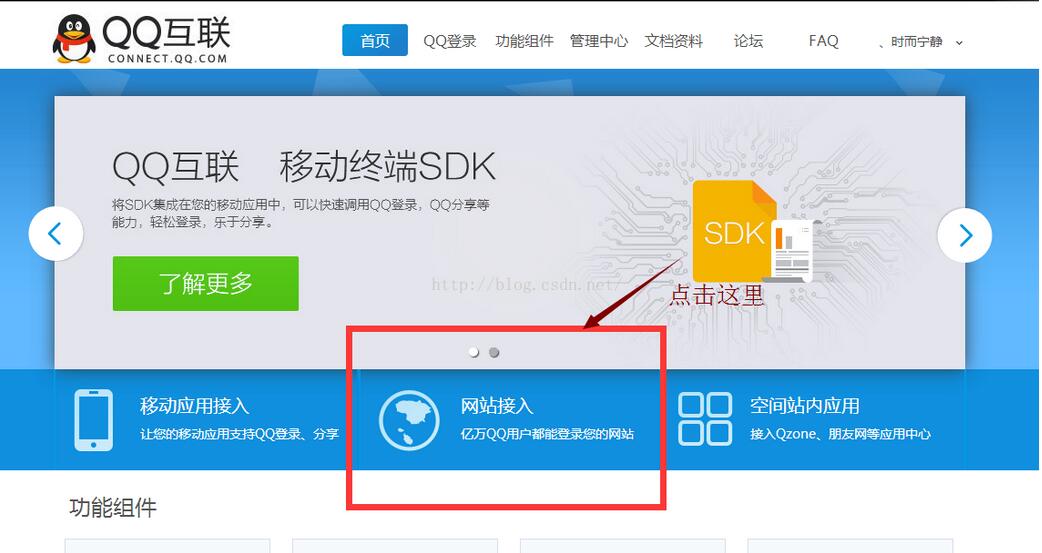
二.申請創建【網站】應用

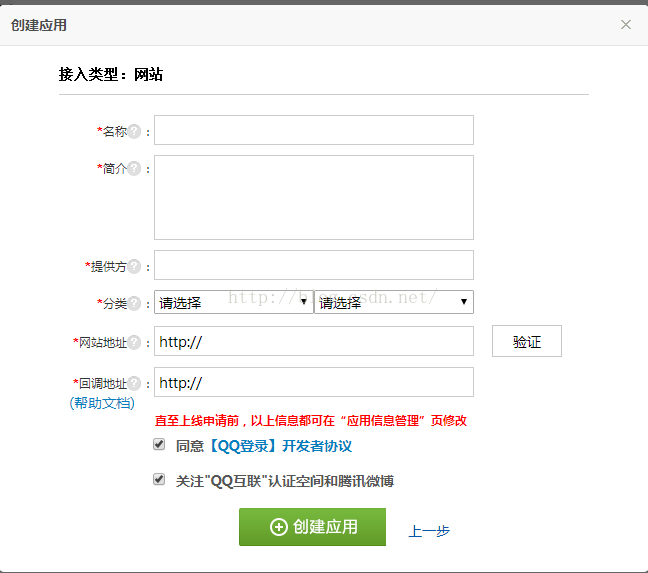
三.按要求填寫資料
注意網站地址:填寫你要設置快速登錄的網址,eg:http://www.test.com;
回調地址:填寫你發送QQ快速登陸後,騰訊得給你信息,這個信息往此頁面接受。eg:http://www.test.com/accept_info.php
【詳細的申請填寫,請見官方提示,這裡不做贅述】
四.申請成功後,完善信息
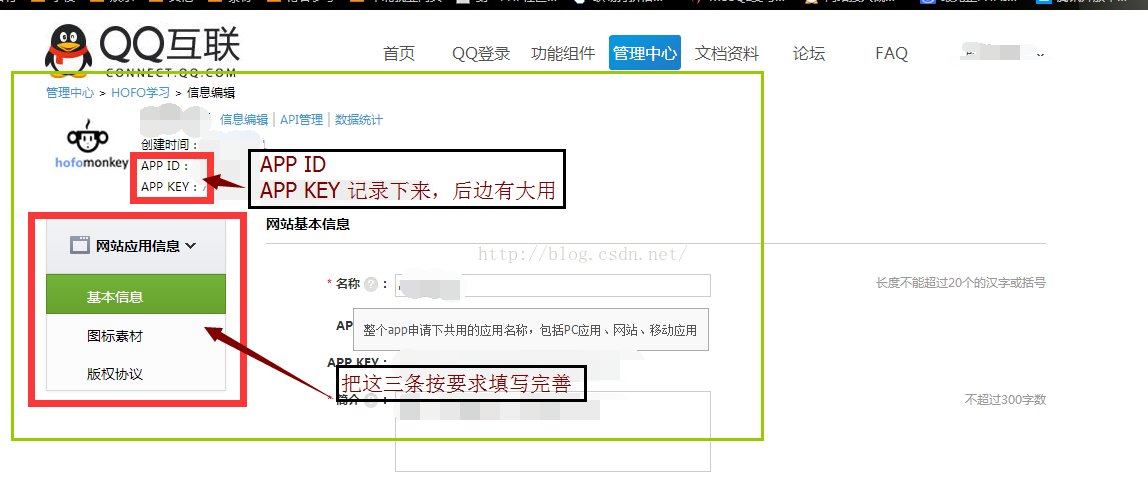
最終要求,獲得APP_ID ,APP_KEY
五.代碼部分:
在你對應的PHP文件內寫入,如下
方法一,面向過程法
使用方法:配置$app_id,$app_secret,$my_url後,其他原封復制即可,$user_data為返回的登錄信息
代碼:
//應用的APPID
   $app_id = "你的APPID";
   //應用的APPKEY
   $app_secret = "你的APPKEY";
   //【成功授權】後的回調地址,即此地址在騰訊的信息中有儲存
   $my_url = "你的回調網址";

   //Step1:獲取Authorization Code
   session_start();
   $code = $_REQUEST["code"];//存放Authorization Code
   if(empty($code))
   {
    //state參數用於防止CSRF攻擊,成功授權後回調時會原樣帶回
    $_SESSION['state'] = md5(uniqid(rand(), TRUE));
    //拼接URL
    $dialog_url = "https://graph.qq.com/oauth2.0/authorize?response_type=code&client_id="
     . $app_id . "&redirect_uri=" . urlencode($my_url) . "&state="
     . $_SESSION['state'];
    echo("<script> top.location.href='" . $dialog_url . "'</script>");
   }

   //Step2:通過Authorization Code獲取Access Token
   if($_REQUEST['state'] == $_SESSION['state'] || 1)
   {
    //拼接URL
    $token_url = "https://graph.qq.com/oauth2.0/token?grant_type=authorization_code&"
     . "client_id=" . $app_id . "&redirect_uri=" . urlencode($my_url)
     . "&client_secret=" . $app_secret . "&code=" . $code;
    $response = file_get_contents($token_url);
    if (strpos($response, "callback") !== false)//如果登錄用戶臨時改變主意取消了,返回true!==false,否則執行step3
    {
     $lpos = strpos($response, "(");
     $rpos = strrpos($response, ")");
     $response = substr($response, $lpos + 1, $rpos - $lpos -1);
     $msg = json_decode($response);
     if (isset($msg->error))
     {
      echo "<h3>error:</h3>" . $msg->error;
      echo "<h3>msg :</h3>" . $msg->error_description;
      exit;
     }
    }

    //Step3:使用Access Token來獲取用戶的OpenID
    $params = array();
    parse_str($response, $params);//把傳回來的數據參數變量化
    $graph_url = "https://graph.qq.com/oauth2.0/me?access_token=".$params['access_token'];
    $str = file_get_contents($graph_url);
    if (strpos($str, "callback") !== false)
    {
     $lpos = strpos($str, "(");
     $rpos = strrpos($str, ")");
     $str = substr($str, $lpos + 1, $rpos - $lpos -1);
    }
    $user = json_decode($str);//存放返回的數據 client_id ,openid
    if (isset($user->error))
    {
     echo "<h3>error:</h3>" . $user->error;
     echo "<h3>msg :</h3>" . $user->error_description;
     exit;
    }
    //echo("Hello " . $user->openid);
    //echo("Hello " . $params['access_token']);

    //Step4:使用<span style="font-family: Arial, Helvetica, sans-serif;">openid,</span><span style="font-family: Arial, Helvetica, sans-serif;">access_token來獲取所接受的用戶信息。</span>
    $user_data_url = "https://graph.qq.com/user/get_user_info?access_token={$params['access_token']}&oauth_consumer_key={$app_id}&openid={$user->openid}&format=json";

    $user_data = file_get_contents($user_data_url);//此為獲取到的user信息
    }
    else
    {
     echo("The state does not match. You may be a victim of CSRF.");
    }
方法二,面向對象 使用類QQ_LoginAction.class
使用方法:
1.在QQ_LoginAction.class中正確配置 APPID,APPKEY CALLBACK(回調網址)
2.在調用方法中,代碼:
$qq_login = new \Component\QQ_LoginAction();    //引入此類文件即可
$qq_login->qq_login();          //調用登錄方法,向騰訊發出快速登錄請求
3.在回調頁面中,代碼:
$qc = new \Component\QQ_LoginAction();
$acs = $qc->qq_callback();<span style="white-space:pre">    //access_token
$oid=$qc->get_openid();<span style="white-space:pre">     //openid
$user_data = $qc->get_user_info();<span style="white-space:pre">  //get_user_info()為獲得該用戶的信息,其他操作方法見API文檔
4.$user_data即為返回的用戶數據。
5.QQ_LoginAction.class.php 文件代碼:【用的ThinkPHP3.2】
<?php
namespace Component;

session_start();
define('APPID','XXXX');   //appid
define('APPKEY','XXXX');  //appkey
define('CALLBACK','XXXX');  //回調地址
define('SCOPE','get_user_info,list_album,add_album,upload_pic,add_topic,add_weibo');  //授權接口列表
class QQ_LoginAction {
 const GET_AUTH_CODE_URL = "https://graph.qq.com/oauth2.0/authorize";
 const GET_ACCESS_TOKEN_URL = "https://graph.qq.com/oauth2.0/token";
 const GET_OPENID_URL = "https://graph.qq.com/oauth2.0/me";
 private $APIMap = array(
  "get_user_info" => array(   //獲取用戶資料
   "https://graph.qq.com/user/get_user_info",
   array("format" => "json"),
  ),
  "add_t" => array(    //發布一條普通微博
   "https://graph.qq.com/t/add_t",
   array("format" => "json", "content","#clientip","#longitude","#latitude","#compatibleflag"),
   "POST"
  ),
  "add_pic_t" => array(    //發布一條圖片微博
   "https://graph.qq.com/t/add_pic_t",
   array("content", "pic", "format" => "json", "#clientip", "#longitude", "#latitude", "#syncflag", "#compatiblefalg"),
   "POST"
  ),
  "del_t" => array(      //刪除一條微博
   "https://graph.qq.com/t/del_t",
   array("id", "format" => "json"),
   "POST"
  ),
  "get_repost_list" => array(    //獲取單條微博的轉發或點評列表
   "https://graph.qq.com/t/get_repost_list",
   array("flag", "rootid", "pageflag", "pagetime", "reqnum", "twitterid", "format" => "json")
  ),
  "get_info" => array(     //獲取當前用戶資料
   "https://graph.qq.com/user/get_info",
   array("format" => "json")
  ),
  "get_other_info" => array(    //獲取其他用戶資料
   "https://graph.qq.com/user/get_other_info",
   array("format" => "json", "#name-1", "#fopenid-1")
  ),
  "get_fanslist" => array(
   "https://graph.qq.com/relation/get_fanslist", //我的微博粉絲列表
   array("format" => "json", "reqnum", "startindex", "#mode", "#install", "#sex")
  ),
  "get_idollist" => array(
   "https://graph.qq.com/relation/get_idollist", //我的微博收聽列表
   array("format" => "json", "reqnum", "startindex", "#mode", "#install")
  ),
  "add_idol" => array(
   "https://graph.qq.com/relation/add_idol",  //微博收聽某用戶
   array("format" => "json", "#name-1", "#fopenids-1"),
   "POST"
  ),
  "del_idol" => array(   //微博取消收聽某用戶
   "https://graph.qq.com/relation/del_idol",
   array("format" => "json", "#name-1", "#fopenid-1"),
   "POST"
  )
 );
 private $keysArr;
 function __construct(){
  if($_SESSION["openid"]){
   $this->keysArr = array(
    "oauth_consumer_key" => APPID,
    "access_token" => $_SESSION['access_token'],
    "openid" => $_SESSION["openid"]
   );
  }else{
   $this->keysArr = array(
    "oauth_consumer_key" => APPID
   );
  }
 }
 public function qq_login(){
  //-------生成唯一隨機串防CSRF攻擊
  $_SESSION['state'] = md5(uniqid(rand(), TRUE));
  $keysArr = array(
   "response_type" => "code",
   "client_id" => APPID,
   "redirect_uri" => CALLBACK,
   "state" => $_SESSION['state'],
   "scope" => SCOPE
  );
  $login_url = self::GET_AUTH_CODE_URL.'?'.http_build_query($keysArr);
  header("Location:$login_url");
 }
 public function qq_callback(){
  //--------驗證state防止CSRF攻擊
  if($_GET['state'] != $_SESSION['state']){
   return false;
  }
  //-------請求參數列表
  $keysArr = array(
   "grant_type" => "authorization_code",
   "client_id" => APPID,
   "redirect_uri" => CALLBACK,
   "client_secret" => APPKEY,
   "code" => $_GET['code']
  );
  //------構造請求access_token的url
  $token_url = self::GET_ACCESS_TOKEN_URL.'?'.http_build_query($keysArr);
  $response = $this->get_contents($token_url);
  if(strpos($response, "callback") !== false){
   $lpos = strpos($response, "(");
   $rpos = strrpos($response, ")");
   $response = substr($response, $lpos + 1, $rpos - $lpos -1);
   $msg = json_decode($response);
   if(isset($msg->error)){
    $this->showError($msg->error, $msg->error_description);
   }
  }
  $params = array();
  parse_str($response, $params);
  $_SESSION["access_token"]=$params["access_token"];
  $this->keysArr['access_token']=$params['access_token'];
  return $params["access_token"];
 }

 public function get_contents($url){
  if (ini_get("allow_url_fopen") == "1") {
   $response = file_get_contents($url);
  }else{
   $ch = curl_init();
   curl_setopt($ch, CURLOPT_SSL_VERIFYPEER, FALSE);
   curl_setopt($ch, CURLOPT_RETURNTRANSFER, TRUE);
   curl_setopt($ch, CURLOPT_URL, $url);
   $response = curl_exec($ch);
   curl_close($ch);
  }
  if(empty($response)){
   return false;
  }
  return $response;
 }
 public function get_openid(){
  //-------請求參數列表
  $keysArr = array(
   "access_token" => $_SESSION["access_token"]
  );
  $graph_url = self::GET_OPENID_URL.'?'.http_build_query($keysArr);
  $response = $this->get_contents($graph_url);
  //--------檢測錯誤是否發生
  if(strpos($response, "callback") !== false){
   $lpos = strpos($response, "(");
   $rpos = strrpos($response, ")");
   $response = substr($response, $lpos + 1, $rpos - $lpos -1);
  }
  $user = json_decode($response);
  if(isset($user->error)){
   $this->showError($user->error, $user->error_description);
  }
  //------記錄openid
  $_SESSION['openid']=$user->openid;
  $this->keysArr['openid']=$user->openid;
  return $user->openid;
 }

 /**
  * showError
  * 顯示錯誤信息
  * @param int $code 錯誤代碼
  * @param string $description 描述信息(可選)
  */
 public function showError($code, $description = '$'){
   echo "<meta charset=\"UTF-8\">";
   echo "<h3>error:</h3>$code";
   echo "<h3>msg :</h3>$description";
   exit();
 }

 /**
  * _call
  * 魔術方法,做api調用轉發
  * @param string $name 調用的方法名稱
  * @param array $arg  參數列表數組
  * @since 5.0
  * @return array   返加調用結果數組
  */
 public function __call($name,$arg){
  //如果APIMap不存在相應的api
  if(empty($this->APIMap[$name])){
   $this->showError("api調用名稱錯誤","不存在的API: <span style='color:red;'>$name</span>");
  }
  //從APIMap獲取api相應參數
  $baseUrl = $this->APIMap[$name][0];
  $argsList = $this->APIMap[$name][1];
  $method = isset($this->APIMap[$name][2]) ? $this->APIMap[$name][2] : "GET";
  if(empty($arg)){
   $arg[0] = null;
  }
  $responseArr = json_decode($this->_applyAPI($arg[0], $argsList, $baseUrl, $method),true);
  //檢查返回ret判斷api是否成功調用
  if($responseArr['ret'] == 0){
   return $responseArr;
  }else{
   $this->showError($responseArr['ret'], $responseArr['msg']);
  }
 }

 //調用相應api
 private function _applyAPI($arr, $argsList, $baseUrl, $method){
  $pre = "#";
  $keysArr = $this->keysArr;
  $optionArgList = array();//一些多項選填參數必選一的情形
  foreach($argsList as $key => $val){
   $tmpKey = $key;
   $tmpVal = $val;
   if(!is_string($key)){
    $tmpKey = $val;
    if(strpos($val,$pre) === 0){
     $tmpVal = $pre;
     $tmpKey = substr($tmpKey,1);
     if(preg_match("/-(\d$)/", $tmpKey, $res)){
      $tmpKey = str_replace($res[0], "", $tmpKey);
      $optionArgList[]= $tmpKey;
     }
    }else{
     $tmpVal = null;
    }
   }
   //-----如果沒有設置相應的參數
   if(!isset($arr[$tmpKey]) || $arr[$tmpKey] === ""){
    if($tmpVal == $pre){
     continue;
    }else if($tmpVal){//則使用默認的值
     $arr[$tmpKey] = $tmpVal;
    }else{
     $this->showError("api調用參數錯誤","未傳入參數$tmpKey");
    }
   }
   $keysArr[$tmpKey] = $arr[$tmpKey];
  }
  //檢查選填參數必填一的情形
  if(count($optionArgList)!=0){
   $n = 0;
   foreach($optionArgList as $val){
    if(in_array($val, array_keys($keysArr))){
     $n++;
    }
   }
   if(!$n){
    $str = implode(",",$optionArgList);
    $this->showError("api調用參數錯誤",$str."必填一個");
   }
  }
  if($method == "POST"){
   $response = $this->post($baseUrl, $keysArr, 0);
  }else if($method == "GET"){
   $baseUrl=$baseUrl.'?'.http_build_query($keysArr);
   $response = $this->get_contents($baseUrl);
  }
  return $response;
 }

 public function post($url, $keysArr, $flag = 0){
  $ch = curl_init();
  if(! $flag) curl_setopt($ch, CURLOPT_SSL_VERIFYPEER, FALSE);
  curl_setopt($ch, CURLOPT_RETURNTRANSFER, TRUE);
  curl_setopt($ch, CURLOPT_POST, TRUE);
  curl_setopt($ch, CURLOPT_POSTFIELDS, $keysArr);
  curl_setopt($ch, CURLOPT_URL, $url);
  $ret = curl_exec($ch);
  curl_close($ch);
  return $ret;
 }
}
方法三,面向對象 使用騰訊給的SDK
使用方法:騰訊SDK,API寫的很詳細,不做贅述
地址:http://wiki.connect.qq.com/%E7%BD%91%E7%AB%99%E6%8E%A5%E5%85%A5%E6%A6%82%E8%BF%B0
這樣就實現了QQ快捷登錄,其實很簡單的,大家可以試一試。
還有什麼不清楚的,可以看看官方介紹,更詳細,
Tips:如何在本地測試QQ快速登錄
方法:修改HOST配置文件
1. 打開C:\Windows\System32\drivers\etc\host
2. 添加127.0.0.1 www.test.com
然後操作就可以了。
以上就是本文的全部內容,希望對大家的學習有所幫助,也希望大家多多支持。