原本使用操作系統的快照進行備份還原,備份成功後,還原沒有成功(參考:Backup and Restore with Filesystem Snapshots)
所以這個方法就先不記錄到這裡了。
當前測試以下?種備份還原方法(個人初學理解):
1. 使用拷貝和替換數據庫文件進行備份還原
2. 使用mongodump和mongorestore
3. 使用mongoimport 和 mongoexport
1. 使用拷貝和替換數據庫文件進行備份還原(有些危險又不好)
1.1 備份
a. 在mongodb中執行db.fsyncLock(),刷新數據寫入磁盤並鎖住整個實例:
>db.fsyncLock()b. 打包壓縮整個數據庫目錄(也可以打包部分數據庫),作為備份:
[root@localhost ~]# tar -cvzf /root/mongodb_20150505.tar.gz /var/lib/mongoc. 在mongodb中執行db.fsyncUnlock()解鎖,備份步驟完成!~
>db.fsyncUnlock()
1.1 還原
a. 在mongodb中關閉服務(或者在操作系統層面關閉mongod服務):
>use admin
>db.shutdownServer()
b. 將mongo數據文件刪除!注意確認備份存在且正常!~否則回天無力!
[root@localhost ~]# rm -rf /var/lib/mongo/*c. 解壓備份的文件到根目錄下,相當於還原:
[root@localhost ~]# tar -xvzf /root/mongodb_20150505.tar.gz -C /d. 如果啟動不了服務,先刪除文件mongod.lock:
[root@localhost ~]# rm -f /var/lib/mongo/mongod.locke. 啟動服務,正常訪問。
[root@localhost ~]# service mongod start
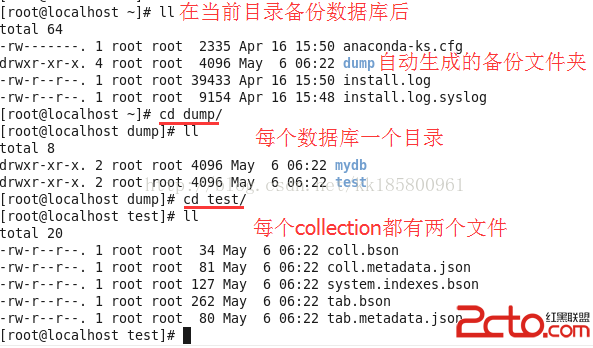
a. 簡單備份還原本地數據庫的的方法,備份所有及還原所有:
mongodump
mongorestore /root/dump
備份完成後在當前目錄將生成一個文件夾”dump“:
b. 還原單個數據庫時,指定要還原的數據庫及其備份目錄:
mongorestore --db test /root/dump/test還可以指定輸出路徑,使用計算機名:
mongodump --host localhost.localdomain --port 27017 --out /root/mongodump-2015-05-05
mongorestore --port 27017 --db test /root/mongodump-2015-05-05/test
遠程備份時指定用戶名密碼(這個沒嘗試,參考官方例子):
mongodump --host mongodb1.example.net --port 3017 --username user --password pass --out /opt/backup/mongodump-2013-10-24
mongorestore --host mongodb1.example.net --port 3017 --username user --password pass /opt/backup/mongodump-2013-10-24
# mongorestore --help


general options:
      --help                              print usage
      --version                           print the tool version and exit

verbosity options:
  -v, --verbose                           more detailed log output (include multiple times for more verbosity, e.g. -vvvvv)
      --quiet                             hide all log output

connection options:
  -h, --host=                             mongodb host to connect to (setname/host1,host2 for replica sets)
      --port=                             server port (can also use --host hostname:port)

ssl options:
      --ssl                               connect to a mongod or mongos that has ssl enabled
      --sslCAFile=                        the .pem file containing the root certificate chain from
                                          the certificate authority
      --sslPEMKeyFile=                    the .pem file containing the certificate and key
      --sslPEMKeyPassword=                the password to decrypt the sslPEMKeyFile, if necessary
      --sslCRLFile=                       the .pem file containing the certificate revocation list
      --sslAllowInvalidCertificates       bypass the validation for server certificates
      --sslAllowInvalidHostnames          bypass the validation for server name
      --sslFIPSMode                       use FIPS mode of the installed openssl library

authentication options:
  -u, --username=                         username for authentication
  -p, --password=                         password for authentication
      --authenticationDatabase=           database that holds the user's credentials
      --authenticationMechanism=          authentication mechanism to use

namespace options:
  -d, --db=                               database to use
  -c, --collection=                       collection to use

input options:
      --objcheck                          validate all objects before inserting
      --oplogReplay                       replay oplog for point-in-time restore
      --oplogLimit=                       only include oplog entries before the provided Timestamp(seconds[:ordinal])
      --restoreDbUsersAndRoles            restore user and role definitions for the given database
      --dir=                              input directory, use '-' for stdin

restore options:
      --drop                              drop each collection before import
      --writeConcern=                     write concern options e.g. --writeConcern majority,
                                          --writeConcern '{w: 3, wtimeout: 500, fsync: true, j:true}' (defaults to 'majority')
      --noIndexRestore                    don't restore indexes
      --noOptionsRestore                  don't restore collection options
      --keepIndexVersion                  don't update index version
      --maintainInsertionOrder            preserve order of documents during restoration
  -j, --numParallelCollections=           number of collections to restore in parallel (4 by default)
      --numInsertionWorkersPerCollection= number of insert operations to run concurrently per collection (1 by default)
      --stopOnError                       stop restoring if an error is encountered on insert (off bydefault)
3. 使用mongoimport 和 mongoexport
3.1 mongoexport導出
--type: 為json 或 csv
--fields: 選擇導出的列


#導出列{_id,id,size}為csv的格式
mongoexport --db test --collection tab --type=csv --fields _id,id,size --out /root/test_tab.csv

#導出json格式
mongoexport --db test --collection tab --type=json --out /root/test_tab.json

#輸出到shell中,查詢id=2 並按name升序輸出
mongoexport --db test --collection tab --query '{"id": 2}' --sort '{"name": 1}'

#查詢導出
mongoexport --db test --collection tab --type=csv --query '{"id": 2}' --fields _id,id --out /root/test_tab.csv

#簡寫選項[--db]和[--collection],使用跳過和限制函數輸出
mongoexport -d test -c tab --sort '{"name": -1}' --limit 2 --skip 2 --out /root/test_tab.json


#若是遠程,需要添加參數:host,port,username,password
--host servername_or_ip --port 37017 --username user --password pass
查看幫助:mongoexport --help
general options:
      --help                         print usage
      --version                      print the tool version and exit

verbosity options:
  -v, --verbose                      more detailed log output (include multiple times for more verbosity, e.g. -vvvvv)
      --quiet                        hide all log output

connection options:
  -h, --host=                        mongodb host to connect to (setname/host1,host2 for replica sets)
      --port=                        server port (can also use --host hostname:port)

ssl options:
      --ssl                          connect to a mongod or mongos that has ssl enabled
      --sslCAFile=                   the .pem file containing the root certificate chain from the certificate authority
      --sslPEMKeyFile=               the .pem file containing the certificate and key
      --sslPEMKeyPassword=           the password to decrypt the sslPEMKeyFile, if necessary
      --sslCRLFile=                  the .pem file containing the certificate revocation list
      --sslAllowInvalidCertificates  bypass the validation for server certificates
      --sslAllowInvalidHostnames     bypass the validation for server name
      --sslFIPSMode                  use FIPS mode of the installed openssl library

authentication options:
  -u, --username=                    username for authentication
  -p, --password=                    password for authentication
      --authenticationDatabase=      database that holds the user's credentials
      --authenticationMechanism=     authentication mechanism to use

namespace options:
  -d, --db=                          database to use
  -c, --collection=                  collection to use

output options:
  -f, --fields=                      comma separated list of field names (required for exporting CSV) e.g. -f "name,age"
      --fieldFile=                   file with field names - 1 per line
      --type=                        the output format, either json or csv (defaults to 'json')
  -o, --out=                         output file; if not specified, stdout is used
      --jsonArray                    output to a JSON array rather than one object per line
      --pretty                       output JSON formatted to be human-readable

querying options:
  -q, --query=                       query filter, as a JSON string, e.g., '{x:{$gt:1}}'
  -k, --slaveOk                      allow secondary reads if available (default true)
      --forceTableScan               force a table scan (do not use $snapshot)
      --skip=                        number of documents to skip
      --limit=                       limit the number of documents to export
      --sort=                        sort order, as a JSON string, e.g. '{x:1}'
#列"_id"也會導入,注意重復鍵
mongoimport --db mydb --collection tab --file /root/test_tab.json

mongoimport --db mydb --collection tab --type csv --headerline --file /root/test_tab.csv


#若是遠程,需要添加參數:host,port,username,password
--host servername_or_ip --port 37017 --username user --password pass
general options:
      --help                         print usage
      --version                      print the tool version and exit

verbosity options:
  -v, --verbose                      more detailed log output (include multiple times for more verbosity, e.g. -vvvvv)
      --quiet                        hide all log output

connection options:
  -h, --host=                        mongodb host to connect to (setname/host1,host2 for replica sets)
      --port=                        server port (can also use --host hostname:port)

ssl options:
      --ssl                          connect to a mongod or mongos that has ssl enabled
      --sslCAFile=                   the .pem file containing the root certificate chain from the certificate authority
      --sslPEMKeyFile=               the .pem file containing the certificate and key
      --sslPEMKeyPassword=           the password to decrypt the sslPEMKeyFile, if necessary
      --sslCRLFile=                  the .pem file containing the certificate revocation list
      --sslAllowInvalidCertificates  bypass the validation for server certificates
      --sslAllowInvalidHostnames     bypass the validation for server name
      --sslFIPSMode                  use FIPS mode of the installed openssl library

authentication options:
  -u, --username=                    username for authentication
  -p, --password=                    password for authentication
      --authenticationDatabase=      database that holds the user's credentials
      --authenticationMechanism=     authentication mechanism to use

namespace options:
  -d, --db=                          database to use
  -c, --collection=                  collection to use

input options:
  -f, --fields=                      comma separated list of field names, e.g. -f name,age
      --fieldFile=                   file with field names - 1 per line
      --file=                        file to import from; if not specified, stdin is used
      --headerline                   use first line in input source as the field list (CSV and TSV
                                     only)
      --jsonArray                    treat input source as a JSON array
      --type=                        input format to import: json, csv, or tsv (defaults to 'json')

ingest options:
      --drop                         drop collection before inserting documents
      --ignoreBlanks                 ignore fields with empty values in CSV and TSV
      --maintainInsertionOrder       insert documents in the order of their appearance in the input source
  -j, --numInsertionWorkers=         number of insert operations to run concurrently (defaults to 1)
      --stopOnError                  stop importing at first insert/upsert error
      --upsert                       insert or update objects that already exist
      --upsertFields=                comma-separated fields for the query part of the upsert
      --writeConcern=                write concern options e.g. --writeConcern majority,
                                     --writeConcern '{w: 3, wtimeout: 500, fsync: true, j: true}'
                                     (defaults to 'majority')
由於沒有做復制,復制中的備份到時再測試記錄吧!~