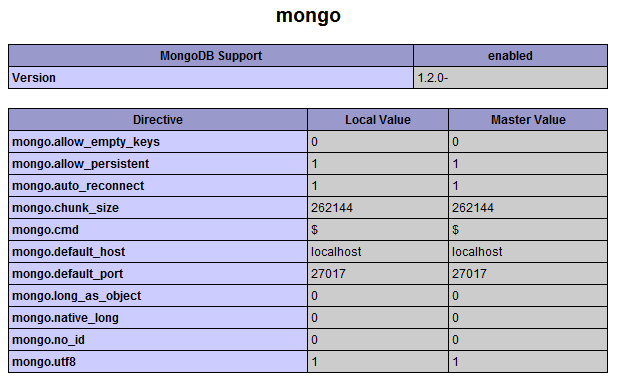
本文教程只適合在 PHP7 的環境,如果你是 PHP5 環境,你可以參閱 PHP MongDB 安裝與使用。
我們使用 pecl 命令來安裝:
$ /usr/local/php7/bin/pecl install mongodb
執行成功後,會輸出以下結果:
……
Build process completed successfully
Installing '/usr/local/php7/lib/php/extensions/no-debug-non-zts-20151012/mongodb.so'
install ok: channel://pecl.php.net/mongodb-1.1.7
configuration option "php_ini" is not set to php.ini location
You should add "extension=mongodb.so" to php.ini
接下來我們打開 php.ini 文件,添加 extension=mongodb.so 配置。
可以直接執行以下命令來添加。
$ echo "extension=mongodb.so" >> `/usr/local/php7/bin/php --ini | grep "Loaded Configuration" | sed -e "s|.*:\s*||"`
注意:以上執行的命令中 php7 的安裝目錄為 /usr/local/php7/,如果你安裝在其他目錄,需要相應修改 pecl 與 php 命令的路徑。
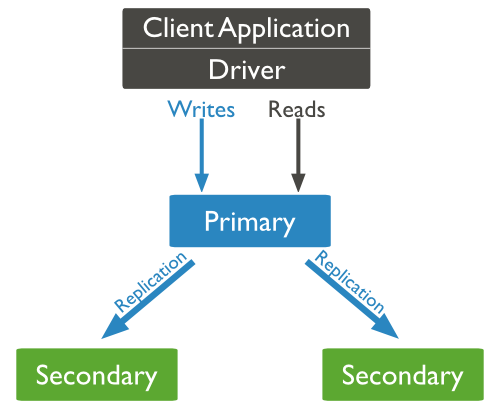
PHP7 連接 MongoDB 語法如下:
$manager = new MongoDB\Driver\Manager("mongodb://localhost:27017");
將 name 為"菜鳥教程" 的數據插入到 test 數據庫的 runoob 集合中。
<?php
$bulk = new MongoDB\Driver\BulkWrite;
$document = ['_id' => new MongoDB\BSON\ObjectID, 'name' => '菜鳥教程'];

$_id= $bulk->insert($document);

var_dump($_id);

$manager = new MongoDB\Driver\Manager("mongodb://localhost:27017");
$writeConcern = new MongoDB\Driver\WriteConcern(MongoDB\Driver\WriteConcern::MAJORITY, 1000);
$result = $manager->executeBulkWrite('test.runoob', $bulk, $writeConcern);
?>
這裡我們將三個網址數據插入到 test 數據庫的 sites 集合,並讀取迭代出來:
<?php
$manager = new MongoDB\Driver\Manager("mongodb://localhost:27017");

// 插入數據
$bulk = new MongoDB\Driver\BulkWrite;
$bulk->insert(['x' => 1, 'name'=>'菜鳥教程', 'url' => 'http://www.runoob.com']);
$bulk->insert(['x' => 2, 'name'=>'Google', 'url' => 'http://www.google.com']);
$bulk->insert(['x' => 3, 'name'=>'taobao', 'url' => 'http://www.taobao.com']);
$manager->executeBulkWrite('test.sites', $bulk);

$filter = ['x' => ['$gt' => 1]];
$options = [
    'projection' => ['_id' => 0],
    'sort' => ['x' => -1],
];

// 查詢數據
$query = new MongoDB\Driver\Query($filter, $options);
$cursor = $manager->executeQuery('test.sites', $query);

foreach ($cursor as $document) {
    print_r($document);
}
?>
輸出結果為:
stdClass Object
(
    [x] => 3
    [name] => taobao
    [url] => http://www.taobao.com
)
stdClass Object
(
    [x] => 2
    [name] => Google
    [url] => http://www.google.com
)
接下來我們將更新 test 數據庫 sites 集合中 x 為 2 的數據:
<?php
$bulk = new MongoDB\Driver\BulkWrite;
$bulk->update(
    ['x' => 2],
    ['$set' => ['name' => '菜鳥工具', 'url' => 'tool.runoob.com']],
    ['multi' => false, 'upsert' => false]
);

$manager = new MongoDB\Driver\Manager("mongodb://localhost:27017");
$writeConcern = new MongoDB\Driver\WriteConcern(MongoDB\Driver\WriteConcern::MAJORITY, 1000);
$result = $manager->executeBulkWrite('test.sites', $bulk, $writeConcern);
?>
接下來我們使用 "db.sites.find()" 命令查看數據的變化,x 為 2 的數據已經變成了菜鳥工具:

以下實例刪除了 x 為 1 和 x 為 2的數據,注意 limit 參數的區別:
<?php
$bulk = new MongoDB\Driver\BulkWrite;
$bulk->delete(['x' => 1], ['limit' => 1]);   // limit 為 1 時,刪除第一條匹配數據
$bulk->delete(['x' => 2], ['limit' => 0]);   // limit 為 0 時,刪除所有匹配數據

$manager = new MongoDB\Driver\Manager("mongodb://localhost:27017");
$writeConcern = new MongoDB\Driver\WriteConcern(MongoDB\Driver\WriteConcern::MAJORITY, 1000);
$result = $manager->executeBulkWrite('test.sites', $bulk, $writeConcern);
?>
更多使用方法請參考:http://php.net/manual/en/book.mongodb.php。