一、環境說明:
復制代碼 代碼如下:
[root@beanvm ~]# cat /etc/redhat-release
Red Hat Enterprise Linux Server release 6.2 (Santiago)
[root@beanvm ~]# uname -a
Linux beanvm 2.6.32-220.el6.i686 #1 SMP Wed Nov 9 08:02:18 EST 2011 i686 i686 i386 GNU/Linux
二、准備工作與系統配置
1.下載安裝包
這裡下載的是較新的MySQL 5.6.16版本,更新迭代的太快了,文件為:mysql-5.6.16.tar.gz
下載地址:http://dev.mysql.com/downloads/mysql/
2. 安裝編譯必須的包
復制代碼 代碼如下:
[root@beanvm ~]# rpm -ivh bison-devel-2.4.1-5.el6.i686.rpm
warning: bison-devel-2.4.1-5.el6.i686.rpm: Header V3 RSA/SHA256 Signature, key ID c105b9de: NOKEY
Preparing... ########################################### [100%]
1:bison-devel ########################################### [100%]
[root@beanvm ~]# rpm -ivh ncurses-devel-5.7-3.20090208.el6.i686.rpm
warning: ncurses-devel-5.7-3.20090208.el6.i686.rpm: Header V3 RSA/SHA256 Signature, key ID fd431d51: NOKEY
Preparing... ########################################### [100%]
1:ncurses-devel ########################################### [100%]
個人經驗上面兩個包是比較容易缺失,像gcc,make,cmake則是必備的了,也建議檢查一下:
復制代碼 代碼如下:
[root@beanvm ~]# rpm -qa |grep gcc-c++
gcc-c++-4.4.6-3.el6.i686
[root@beanvm ~]# rpm -qa |grep make
imake-1.0.2-11.el6.i686
automake-1.11.1-1.2.el6.noarch
cmake-2.6.4-5.el6.i686
make-3.81-19.el6.i686
3.創建MySQL用戶和組
復制代碼 代碼如下:
[root@beanvm ~]# groupadd mysql
[root@beanvm ~]# useradd -g mysql mysql
[root@beanvm ~]# passwd mysql
4.配置環境變量
復制代碼 代碼如下:
[root@beanvm ~]# su – mysql
在.bash_profile文件中為PATH變量追加mysql路徑:
復制代碼 代碼如下:export PATH=/sbin:$HOME/bin:/usr/local/mysql/bin:$PATH
三、安裝MySQL
解壓安裝包:
復制代碼 代碼如下:[root@beanvm ~]# tar -xvf mysql-5.6.16.tar.gz
[root@beanvm ~]# cd mysql-5.6.16
編譯腳本如下:
復制代碼 代碼如下:
cmake \
# MySQL根目錄
-DCMAKE_INSTALL_PREFIX=/usr/local/mysql \
# 數據文件目錄
-DMYSQL_DATADIR=/usr/local/mysql/data \
-DSYSCONFDIR=/etc \
-DWITH_MYISAM_STORAGE_ENGINE=1 \
-DWITH_INNOBASE_STORAGE_ENGINE=1 \
-DWITH_MEMORY_STORAGE_ENGINE=1 \
-DWITH_READLINE=1 \
-DMYSQL_UNIX_ADDR=/var/lib/mysql/mysql.sock \
-DMYSQL_TCP_PORT=3306 \
-DENABLED_LOCAL_INFILE=1 \
-DWITH_PARTITION_STORAGE_ENGINE=1 \
-DEXTRA_CHARSETS=all \
-DDEFAULT_CHARSET=utf8 \
-DDEFAULT_COLLATION=utf8_general_ci
make && make install
基本上安裝的選項還是一目了然的,更多的選項示意參見:
http://dev.mysql.com/doc/refman/5.6/en/source-configuration-options.html
編譯時間是機器而定,我的有20多分鐘的樣子。
安裝完成後要給根目錄指定為mysql用戶和組,也可以在這時候進行mysql用戶和組的創建工作:
復制代碼 代碼如下:
[root@beanvm ~]# chown -R mysql:mysql /usr/local/mysql
安裝完成的MySQL根目錄如下:
復制代碼 代碼如下:
[root@beanvm ~]# ls -l /usr/local/mysql/
total 164
drwxr-xr-x. 2 mysql mysql 4096 Feb 15 14:40 bin
-rw-r--r--. 1 mysql mysql 17987 Jan 14 23:38 COPYING
drwxr-xr-x. 6 mysql mysql 4096 Feb 18 16:32 data
drwxr-xr-x. 2 mysql mysql 4096 Feb 15 14:39 docs
drwxr-xr-x. 3 mysql mysql 4096 Feb 15 14:39 include
-rw-r--r--. 1 mysql mysql 88109 Jan 14 23:38 INSTALL-BINARY
drwxr-xr-x. 3 mysql mysql 4096 Feb 15 14:39 lib
drwxr-xr-x. 4 mysql mysql 4096 Feb 15 14:40 man
-rw-r--r--. 1 mysql mysql 943 Feb 15 14:56 my.cnf
-rw-r--r--. 1 mysql mysql 943 Feb 18 16:26 my-new.cnf
drwxr-xr-x. 10 mysql mysql 4096 Feb 15 14:40 mysql-test
-rw-r--r--. 1 mysql mysql 2496 Jan 14 23:38 README
drwxr-xr-x. 2 mysql mysql 4096 Feb 15 14:40 scripts
drwxr-xr-x. 28 mysql mysql 4096 Feb 15 14:40 share
drwxr-xr-x. 4 mysql mysql 4096 Feb 15 14:40 sql-bench
drwxr-xr-x. 3 mysql mysql 4096 Feb 15 14:40 support-files
可以看到已經創建一個默認的配置文件my.cnf。
四、MySQL初始化
執行初始化腳本來創建數據庫:
復制代碼 代碼如下:
[root@beanvm ~]# cd /usr/local/mysql/scripts/
[root@beanvm scripts]# ./mysql_install_db --user=mysql --basedir=/usr/local/mysql --datadir=/usr/local/mysql/data
創建MySQL服務並啟動:
復制代碼 代碼如下:
[root@beanvm ~]# cp /usr/local/mysql/support-files/mysql.server /etc/init.d/mysql
[root@beanvm ~]# service mysql start
Starting MySQL.. SUCCESS!
接下來就是配置數據庫了,在新版的MySQL安裝過程中提供了一個腳本用於自動完成數據庫使用前的配置工作,這個腳本位於/usr/local/mysql/bin/mysql_secure_installation,它會完成以下任務:
1.指定root用戶密碼(默認是沒有密碼的)
2.刪除匿名用戶
3.設置root用戶的遠程訪問(對應的要在防火牆中開啟3306端口)
4.是否刪除測試數據庫
5.重載權限表
這裡建議使用這個腳本,執行過程如下:
復制代碼 代碼如下:
[mysql@beanvm ~]$ /usr/local/mysql/bin/mysql_secure_installation
NOTE: RUNNING ALL PARTS OF THIS SCRIPT IS RECOMMENDED FOR ALL MySQL
SERVERS IN PRODUCTION USE! PLEASE READ EACH STEP CAREFULLY!
In order to log into MySQL to secure it, we'll need the current
password for the root user. If you've just installed MySQL, and
you haven't set the root password yet, the password will be blank,
so you should just press enter here.
Enter current password for root (enter for none):
OK, successfully used password, moving on...
Setting the root password ensures that nobody can log into the MySQL
root user without the proper authorisation.
You already have a root password set, so you can safely answer 'n'.
Change the root password? [Y/n] Y
New password:
Re-enter new password:
Password updated successfully!
Reloading privilege tables..
... Success!
By default, a MySQL installation has an anonymous user, allowing anyone
to log into MySQL without having to have a user account created for
them. This is intended only for testing, and to make the installation
go a bit smoother. You should remove them before moving into a
production environment.
Remove anonymous users? [Y/n] Y
... Success!
Normally, root should only be allowed to connect from 'localhost'. This
ensures that someone cannot guess at the root password from the network.
Disallow root login remotely? [Y/n] n
... skipping.
By default, MySQL comes with a database named 'test' that anyone can
access. This is also intended only for testing, and should be removed
before moving into a production environment.
Remove test database and access to it? [Y/n] n
... skipping.
Reloading the privilege tables will ensure that all changes made so far
will take effect immediately.
Reload privilege tables now? [Y/n] Y
... Success!
All done! If you've completed all of the above steps, your MySQL
installation should now be secure.
Thanks for using MySQL!
Cleaning up...
當然也可以手動完成這些操作:
復制代碼 代碼如下:
[mysql@beanvm ~]$ mysqladmin -u root password 'new-password'
[mysql@beanvm ~]$ mysqladmin -u root -h beanvm password 'new-password'
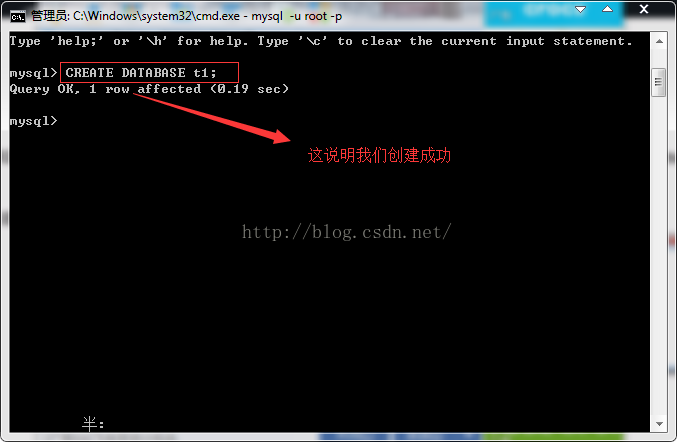
[mysql@beanvm ~]$ mysql -u root -p
Enter password:
Welcome to the MySQL monitor. Commands end with ; or \g.
Your MySQL connection id is 19
Server version: 5.6.16 Source distribution
Copyright (c) 2000, 2014, Oracle and/or its affiliates. All rights reserved.
Oracle is a registered trademark of Oracle Corporation and/or its
affiliates. Other names may be trademarks of their respective
owners.
Type 'help;' or '\h' for help. Type '\c' to clear the current input statement.
mysql> delete from mysql.user where user='';
Query OK, 2 rows affected (0.01 sec)
mysql> GRANT ALL PRIVILEGES ON *.* TO 'root'@'%' IDENTIFIED BY 'mypasswd' WITH GRANT OPTION;
Query OK, 0 rows affected (0.01 sec)
mysql> flush privileges;
Query OK, 0 rows affected (0.00 sec)