簡單來講MySQL的主從復制就是一個C/S架構的應用。master可以認為是我們通常意義上所認為的server,slave可以當作是一台client。slave上的I/O線程去請求master上數據,而master驗證通過slave的信息後就允許slave接入,然後進行數據變化信息的發送。
一、MySQL主從復制原理
這裡我以MySQL5.5為例來說一下MySQL的主從復制的原理:
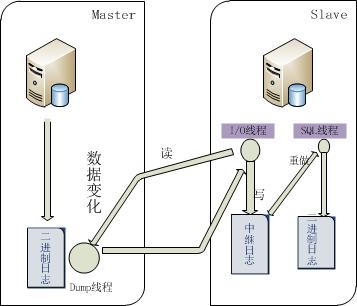
首先由備節點的I/O線程負責向主節點請求數據,主節點驗證通過以後會由dump線程把數據發送給備用節點。備用節點的I/O線程收到資源後會把把這些數據寫入到中繼日志,備節點的SQL線程檢測到中繼日志變更後會立刻根據中繼日志的內容跟新備庫的內容。這樣就完成了同步的過程。
二、常見的復制模型
1、一主一從模型
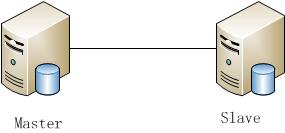
這種架構的優點就是比較簡單,搭建和維護都比較容易,成本也比較低。對於一些負載量不是特別大、可靠性要求不是特別高的場合,完全可以采用這種模型。但是對於一些負載比較大站點,和對可用性要求比較高的場合,這種架構就不太適用了。因為如果訪問量比較大,Master節點的壓力會比較的,另外如果Master崩潰,也會導致業務的終止。
2、一主多從模型
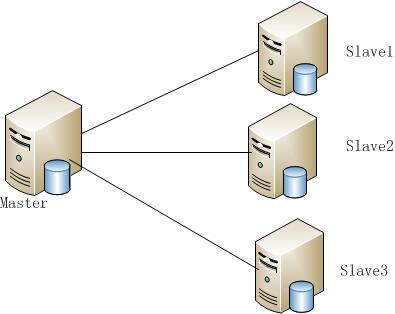
在絕大多數場景中,我們的應用都是讀多寫。我們使用這種架構,通過讀寫分離的技術,可以有效降低Master上讀的壓力。我們在後端的slave上可以做一些數據備份,數據挖掘等方面的工作。但是如果備庫比較多,同時主庫又要負責其他的請求時,主庫的壓力會明顯增大,此時主庫會成為整個系統的性能瓶頸。
當然,還有其他的復制模型,比如多級中繼,和環狀復制等,這些復制的基本原理都和上面的差不多,這裡不再詳細的解釋了。
3、配置主從復制
(1)、異步復制
主從同步的條件:
Master:
a:啟用二進制日志;
b:選擇一個server-id
c:創建具有復制權限的用戶
Slave:
a:啟用中繼日志
b:選擇一個唯一的server-id
c:連接主服務器,並開始復制數據
A、首先在主庫上建立用於復制的最小權限的用戶
mysql> grant replication slave,replication client on *.* to repl@'10.12.%'
 -> identified by '123456';
Query OK, 0 rows affected (0.03 sec)
B、在從庫上連接主庫
mysql> CHANGE MASTER TO MASTER_HOST='10.12.128.19',MASTER_PORT=3306,MASTER_USER='repl',
MASTER_PASSWORD='123456',MASTER_LOG_FILE='mysql-bin.000006', MASTER_LOG_POS=451;

#查看復制的狀態
mysql> show slave status\G
*************************** 1. row ***************************
    Slave_IO_State: Waiting for master to send event
     Master_Host: 10.12.128.19
     Master_User: repl
     Master_Port: 3306
    Connect_Retry: 60
    Master_Log_File: mysql-bin.000006
   Read_Master_Log_Pos: 1512
    Relay_Log_File: relay_index.000002
    Relay_Log_Pos: 283
  Relay_Master_Log_File: mysql-bin.000006
    Slave_IO_Running: Yes
   Slave_SQL_Running: Yes
    Replicate_Do_DB:
   Replicate_Ignore_DB:
   Replicate_Do_Table:
  Replicate_Ignore_Table:
  Replicate_Wild_Do_Table:
 Replicate_Wild_Ignore_Table:
     Last_Errno: 0
     Last_Error:
     Skip_Counter: 0
   Exec_Master_Log_Pos: 1512
    Relay_Log_Space: 452
    Until_Condition: None
    Until_Log_File:
    Until_Log_Pos: 0
   Master_SSL_Allowed: No
   Master_SSL_CA_File:
   Master_SSL_CA_Path:
    Master_SSL_Cert:
   Master_SSL_Cipher:
    Master_SSL_Key:
  Seconds_Behind_Master: 0
Master_SSL_Verify_Server_Cert: No
    Last_IO_Errno: 0
    Last_IO_Error:
    Last_SQL_Errno: 0
    Last_SQL_Error:
 Replicate_Ignore_Server_Ids:
    Master_Server_Id: 3306
     Master_UUID: 97f33396-ed12-11e4-921a-000c29e8ee06
    Master_Info_File: /mydata/data5.6/master.info
     SQL_Delay: 0
   SQL_Remaining_Delay: NULL
  Slave_SQL_Running_State: Slave has read all relay log; waiting for the slave I/O thread to update it
   Master_Retry_Count: 86400
     Master_Bind:
  Last_IO_Error_Timestamp:
  Last_SQL_Error_Timestamp:
    Master_SSL_Crl:
   Master_SSL_Crlpath:
   Retrieved_Gtid_Set:
   Executed_Gtid_Set:
    Auto_Position: 0
1 row in set (0.00 sec)
C、然後再從庫上執行:
#啟動復制
mysql> start slave;
也可以單獨啟動IO線程和SQL線程。
(如果從庫的IO線程狀態一直是connecting的狀態,可能是防火牆的原因,一般來說關閉防火牆或者配置防火牆規則就可以了)
(2)、半同步復制
半同步復制是基於Google為MySQL開發的半同步復制的插件。半同步復制的原理是,一個事務在主服務器上執行完成後,必須至少確保至少在一台從服務器上執行完成後,事務才算提交成功。如果在一定時間內從服務器沒有響應,則會自動降級為異步復制。
這個半同步復制是建立在異步復制的基礎之上進行的。
首先需要安裝Google的半同步插件:
master:
install plugin rpl_semi_sync_master soname 'semisync_master.so';
slave:
install plugin rpl_semi_sync_slave soname 'semisync_slave.so';
然後開啟半同步的功能
master:
set global rpl_semi_sync_master_enabled = 1;
set global rpl_semi_sync_master_timeout = 100; //以毫秒計算
slave:
set global rpl_semi_sync_slave_enabled = ON;
在從庫上還需要重啟IO線程:
stop slave IO_thread;
start slave IO_thread;
分別在主庫和備庫上查看半同步插件運行的狀態:
mysql> show global status like 'rpl%';
+--------------------------------------------+-------+
| Variable_name        | Value |
+--------------------------------------------+-------+
| Rpl_semi_sync_master_clients    | 1  |
| Rpl_semi_sync_master_net_avg_wait_time  | 0  |
| Rpl_semi_sync_master_net_wait_time   | 0  |
| Rpl_semi_sync_master_net_waits    | 0  |
| Rpl_semi_sync_master_no_times    | 1  |
| Rpl_semi_sync_master_no_tx     | 8  |
| Rpl_semi_sync_master_status    | ON |
| Rpl_semi_sync_master_timefunc_failures  | 0  |
| Rpl_semi_sync_master_tx_avg_wait_time  | 0  |
| Rpl_semi_sync_master_tx_wait_time   | 0  |
| Rpl_semi_sync_master_tx_waits    | 0  |
| Rpl_semi_sync_master_wait_pos_backtraverse | 0  |
| Rpl_semi_sync_master_wait_sessions   | 0  |
| Rpl_semi_sync_master_yes_tx    | 0  |
+--------------------------------------------+-------+
14 rows in set (0.04 sec)
mysql> show global status like 'rpl%';
+----------------------------+-------+
| Variable_name    | Value |
+----------------------------+-------+
| Rpl_semi_sync_slave_status | ON |
+----------------------------+-------+
1 row in set (0.04 sec)
可以看到,主庫和備庫的半同步插件都已經處於啟用狀態。
至此,異步主從配置結束。