0.首先在准備兩個機器A,B,在上面安裝相同版本的mysql(最好是5.0以上)
A為主數據庫,B為從數據庫
1 mysql同步server-id 格式說明
A B C
A:1:表示域名配置
2:表示SDNS服務器
3:表示探測中心服務器
4:表示收集中心服務器
5:表示探測運算中心服務器
6:表示探測節點服務器
一般
功能模塊ID小的為master服務器
功能模塊ID大的為slave服務器
B: 一般在同一個局域網內為一組
C:同一功能模塊分組內的服務器ID在同一分組內同一個功能模塊各個的ID號
例如:3 03 01
2 主從同步配置(主)
1) 修改my.cnf
在my.cnf 中[mysqld] 字段中添加
vi /etc/my.cnf
server-id=10101
log-bin=mysql-bin #這個一定得設置,否則沒有日志的話,從數據庫上會報錯
binlog-ignore-db=mysql,test
innodb_flush_log_at_trx_commit=1
sync_binlog=1
log-slave-updates
2) 重啟mysql
service mysql restart
3) 添加帳戶給主服務器上mysql的從機用
GRANT REPLICATION SLAVE ON *.* TO 'repl'@'2.2.2.%' IDENTIFIED BY 'testpass';
4) 創建數據庫
>create database gslb;
>create database dns;
5) 顯示日志位置
>SHOW MASTER STATUS;
+------------------+-----------+--------------+------------------+
| File | Position | Binlog_Do_DB | Binlog_Ignore_DB |
+------------------+-----------+--------------+------------------+
| mysql-bin.000003 | 107 | | |
+------------------+-----------+--------------+------------------+
3 主從同步配置(從)
1) 修改my.cnf
在my.cnf 中[mysqld] 字段中添加
vi /etc/my.cnf
server-id = 20101
replicate-do-db = dns
replicate-do-table = gslb.zone
replicate-do-table = gslb.zone_rr
master-info-file = master.info
relay-log = relay-relay-bin
relay-log-index = relay-relay-bin.index
relay-log-info-file=relay-relay-log.info
2) 重啟mysql
service mysql restart
3) 設置主服務器信息
change master to master_host='1.1.1.1',
master_user='repl',
master_password='testpass',
master_log_file='mysql-bin.000003',
master_log_pos=107;
4) 啟動同步
>start slave;
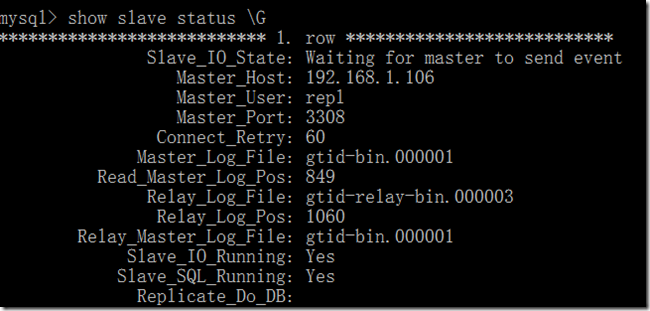
5) 顯示日志位置,出現兩個Yes就表示同步成功
mysql> show slave status \G;
*************************** 1. row ***************************
Slave_IO_State: Waiting for master to send event
Master_Host: 1.1.1.1
Master_User: repl
Master_Port: 3306
Connect_Retry: 60
Master_Log_File: mysql-bin.000006
Read_Master_Log_Pos: 270500590
Relay_Log_File: relay-relay-bin.000012
Relay_Log_Pos: 1148354
Relay_Master_Log_File: mysql-bin.000006
Slave_IO_Running: Yes
Slave_SQL_Running: Yes
Replicate_Do_DB:
Replicate_Ignore_DB:
Replicate_Do_Table: gslb.server_threshold,gslb.server,gslb.threshold,gslb.vip,gslb.status,gslb.vip_threshold
Replicate_Ignore_Table:
Replicate_Wild_Do_Table:
Replicate_Wild_Ignore_Table:
Last_Errno: 0
Last_Error:
Skip_Counter: 0
Exec_Master_Log_Pos: 270500590
Relay_Log_Space: 1148510
Until_Condition: None
Until_Log_File:
Until_Log_Pos: 0
Master_SSL_Allowed: No
Master_SSL_CA_File:
Master_SSL_CA_Path:
Master_SSL_Cert:
Master_SSL_Cipher:
Master_SSL_Key:
Seconds_Behind_Master: 0
Master_SSL_Verify_Server_Cert: No
Last_IO_Errno: 0
Last_IO_Error:
Last_SQL_Errno: 0
Last_SQL_Error:
Replicate_Ignore_Server_Ids:
Master_Server_Id: 10201
1 row in set (0.00 sec)
6) 導入master的數據
mysql –e “create database gslb”
mysql gslb < gslb.sql
mysql –e ”create database dns”
mysql dns < dns.sql
本文出自 “一方有” 博客