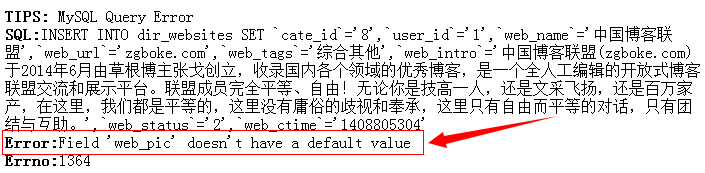
Ubuntu Server使用automysqlbackup腳本 昨天服務器意外關閉,導致開發環境數據庫文件損壞,所以想起了做自動備份的事情,原本是打算自己用Mysqldump寫個腳本來做計劃任務的,不過出於偷懶的角度考慮,在網上找了找,發現了automysqlbackup,看評論都還不錯,而且本身也是shell腳本實現的。本著不重復造輪子的精神,就下載來使用了。 地址:http://sourceforge.net/projects/automysqlbackup/ 選擇的版本是最新的automysqlbackup-v3.0_rc6.tar.gz。 安裝非常簡單,比較麻煩的地方,是後面配置郵件客戶端,以及腳本中的一個小bug。 1、在任意目錄下,解壓文件包 tar –xzf automysqlbackup-v3.0_rc6.tar.gz 2、省事起見,切個權限 sudo su - 3、安裝(若對路徑沒有什麼特別的要求,出現提示回車即可) ./install.sh 默認配置文件位置:/etc/automysqlbackup 默認sh文件位置:/usr/local/bin 4、修改配置文件 安裝完成,默認會有兩個配置文件,一個是automysqlbackup.conf,還有一個是myserver.conf。 實際上看了安裝腳本就知道,這兩個文件本來就是拷貝冗余了一個出來,猜測用途是防止二次安裝或者誤操作的情況下,誤操作覆蓋已經配置好的配置文件。不過從腳本邏輯上看起來,貌似沒太大用,因為他重裝,照樣兩個文件一塊會覆蓋。不過如果發現automysqlbackup.conf配置有值的話,會給出提示就是了。 依舊,為了偷懶期間,就直接修改automysqlbackup.conf了,畢竟這是默認配置,sh執行的時候,不用帶任何參數。 主要需要注意的配置,有以下幾個:(配置文件中,帶有默認值,如果不需要更改,直接保持被注釋的狀態就好) # Username to access the MySQL server e.g. dbuser (數據庫連接用戶名) CONFIG_mysql_dump_username='root' # Password to access the MySQL server e.g. password(數據庫連接密碼) CONFIG_mysql_dump_password='密碼' # "Friendly" host name of MySQL server to be used in email log # if unset or empty (default) will use CONFIG_mysql_dump_host instead(dump的時候,數據庫host顯示的別名,不配的話,基本就都是localhost之流了) CONFIG_mysql_dump_host_friendly='DataBaseAlias' # Backup directory location e.g /backups(不用多說了,重中之重,備份路徑) CONFIG_backup_dir='/srv/backup/mysql' # List of databases for Daily/Weekly Backup e.g. ( 'DB1' 'DB2' 'DB3' ... ) # set to (), i.e. empty, if you want to backup all databases(需要日備份和周備份的數據庫名稱) CONFIG_db_names=('TestDB') # List of databases for Monthly Backups. # set to (), i.e. empty, if you want to backup all databases(需要月備份的數據庫名稱) CONFIG_db_month_names=('TestDB') # Which day do you want monthly backups? (01 to 31) (月備份的日期,如果配置的日期大於當月最大日期,會在當月最後一天的時候執行) # If the chosen day is greater than the last day of the month, it will be done # on the last day of the month. # Set to 0 to disable monthly backups. #CONFIG_do_monthly="01" # Which day do you want weekly backups? (1 to 7 where 1 is Monday)(周備份在星期幾發生) # Set to 0 to disable weekly backups. #CONFIG_do_weekly="5" # Set rotation of daily backups. VALUE*24hours # If you want to keep only today's backups, you could choose 1, i.e. everything older than 24hours will be removed.(日備份文件保留多少天) CONFIG_rotation_daily=7 # Set rotation for weekly backups. VALUE*24hours(周備份文件保留多少天) #CONFIG_rotation_weekly=35 # Set rotation for monthly backups. VALUE*24hours(月備份文件保留多少天) #CONFIG_rotation_monthly=150 # Use ssl encryption with mysqldump?(是否使用ssl,本地的話,開ssl找抽?遠程就另算了) CONFIG_mysql_dump_usessl='no' # What would you like to be mailed to you?(是不是想要備份完的時候,自動給你發個郵件?) # - log : send only log file(郵件內容僅包含日志) # - files : send log file and sql files as attachments (see docs)(郵件內容除了日志意外,把備份的壓縮包也發給你) # - stdout : will simply output the log to the screen if run manually.(表郵件了,屏幕顯示下就好。問題是誰吃飽沒事一天到晚盯著server屏幕看?) # - quiet : Only send logs if an error occurs to the MAILADDR.(出錯了的話,給個信兒就好) CONFIG_mailcontent='files' # Email Address to send mail to? (user@domain.com)(mail地址咯,不用多說了吧) CONFIG_mail_address='nc@na.com' 5、先改個腳本的小bug吧。。不過如果你的server上mail和mutt齊備,請忽略該步驟。 vi /usr/local/bin/automysqlbackup 到1026行,將: if [[ "x$CONFIG_mailcontent" = 'xlog' || "x$CONFIG_mailcontent" = 'xquiet' ]]; then dependencies=( "${dependencies[@]}" 'mail' ) elif [[ "x$CONFIG_mailcontent" = 'xfiles' ]]; then dependencies=( "${dependencies[@]}" 'mail' ) if [[ "x$CONFIG_mail_use_uuencoded_attachments" != 'xyes' ]]; then dependencies=( "${dependencies[@]}" 'mutt' ) fi fi 改為: if [[ "x$CONFIG_mail_use_uuencoded_attachments" != 'xyes' ]]; then if [[ "x$CONFIG_mailcontent" = 'xlog' || "x$CONFIG_mailcontent" = 'xquiet' ]]; then dependencies=( "${dependencies[@]}" 'mutt' ) elif [[ "x$CONFIG_mailcontent" = 'xfiles' ]]; then dependencies=( "${dependencies[@]}" 'mutt' ) fi else if [[ "x$CONFIG_mailcontent" = 'xlog' || "x$CONFIG_mailcontent" = 'xquiet' ]]; then dependencies=( "${dependencies[@]}" 'mail' ) elif [[ "x$CONFIG_mailcontent" = 'xfiles' ]]; then dependencies=( "${dependencies[@]}" 'mail' ) fi fi 6、安裝郵件客戶端 mutt+msmtp apt-get install mutt 安裝mutt的時候,會自動安裝postfix用作mail server,問題是這玩意太大,出於比較有潔癖的心態,我就主動把它干掉了。畢竟小巧玲珑的msmtp在那等著我呢。(看個人需求和喜好而定) apt-get remove postfix –purge apt-get autoremove –purge 安裝msmtp apt-get install msmtp 安裝完了,來配郵件吧。 7、郵件客戶端配置 vi /etc/Muttrc 最上面加上如下: #My Mail Setting set sendmail="/usr/bin/msmtp" set use_from=yes set realname="郵件地址別名" set from=username@126.com set envelope_from=yes #不保留sent的本地存檔 set copy = no 然後到~目錄下,新建個.msmtprc cd ~ vi .msmtprc 加上如下內容: account 郵箱別名 host smtp.126.com from username@126.com auth plain user username password pwd logfile ~/.msmtp.log 因為這裡是明文密碼,所以建議修改個600之流,再增加個日志文件 chmod 600 .msmtprc touch ~/.msmtp.log 這全部完成了的話,可以試試郵件發不發的出去了。 echo "喂" |mutt -s "發出去沒?" testmail@126.com 測試成功的話,就跑一下備份腳本看看吧 8、裝上幾個我服務器上木有的命令: apt-get install pax apt-get install pigz 9、mysql如果之前沒設環境變量,只是加了個快捷方式的話,設個環境變量 vi /etc/profile 在最後的位置加入 export PATH=$PATH:/usr/local/mysql/bin 保存,然後再刷新檢查下 source /etc/profile echo $PATH 10、啟動下備份腳本試試了,對了,記得要先創建備份路徑 mkdir /srv/backup mkdir /srv/backup/mysql automysqlbackup 如果沒什麼問題的話,就會看到備份文件路徑下面,自動給你創建好了幾個目錄: daily fullschema latest monthly status tmp weekly 而且打開daily,裡面應該就會有剛才備份的文件了。 再去check一下mail,都ok,那就配個計劃任務就完事了。 11、配置計劃任務 crontab –l 先查查看目前有沒有任務,沒有的話,就在~建個配置文件 cd ~ vi root-crontab 內容添上 30 23 * * * /usr/local/bin/automysqlbackup 表示每天23點30,自動運行備份腳本 然後再添加到計劃任務裡面去 crontab -u root root-crontab 齊活。。。