一、PostgreSQL簡介
1、什麼是PostgreSQL
PostgreSQL數據庫是目前功能最強大的開源數據庫,支持豐富的數據類型(如JSON何JSONB類型,數組類型)和自定義類型。而且它提供了豐富的接口,可以很容易地擴展它的功能,如可以在GiST框架下實現自己的索引類型等,它還支持使用C語言寫自定義函數、觸發器,也支持使用流行的語言寫自定義函數,比如其中的PL/Perl提供了使用Perl語言寫自定義函數的功能,當然還有PL/Python、PL/Tcl,等等。
2、PostgreSQL數據庫的優勢
PostgreSQL數據庫是目前功能最強大的開源數據庫,它是最接近工業標准SQL92的查詢語言,並且正在實現新的功能已兼容最新的SQL標准:SQL2003.
穩定可靠:PostgreSQL是唯一能做到數據零丟失的開源數據庫。有報道稱國外的部分銀行也在使用PostgreSQL。
開源省錢:PostgreSQL數據庫是開源的、免費的,而且是BSD協議,在使用和二次開發上基本沒有限制。
支持廣泛:PostgreSQL數據庫支持大量的主流開發語言,包括C、C++、Perl、Python、Java、Tcl,和PHP等。
PostgreSQL社區活躍:PostgreSQL基本上每三個月推出一個補丁版本,這意味著已知的BUG很快會被修復,有應用場景的需求也會及時得到響應。
二、PostgreSQL安裝與配置
#安裝前准備:
1、系統版本
[root@node1 ~]# cat /etc/redhat-release
CentOS Linux release 7.2.1511 (Core)
2、yum安裝(在官網上找到對應版本的yum源,之後安裝到本地。
[root@node1 ~]# yum -y install pgdg-centos96-9.6-3.noarch.rpm #yum源安裝
[root@node1 ~]# yum -y install postgresql-server #安裝postgreesql
#安裝生成的文件
[root@node1 ~]# rpm -ql postgresql-server
/etc/pam.d/postgresql
/usr/bin/initdb
/usr/bin/pg_basebackup
/usr/bin/pg_controldata
/usr/bin/pg_ctl
/usr/bin/pg_receivexlog
/usr/bin/pg_resetxlog
/usr/bin/postgres
/usr/bin/postgresql-check-db-dir
/usr/bin/postgresql-setup
/usr/bin/postmaster
/usr/lib/systemd/system/postgresql.service
/usr/lib/tmpfiles.d/postgresql.conf
/var/lib/pgsql
/var/lib/pgsql/.bash_profile
/var/lib/pgsql/backups
/var/lib/pgsql/data
/var/run/postgresql、
#啟動postgresql
#直接啟動會報錯:
[root@node1 ~]# systemctl start postgresql.service
Job for postgresql.service failed because the control process exited with error code. See "systemctl status postgresql.service" and "journalctl -xe" for details.
#上面是提示數據庫還沒有初始化,所以我們先初始化一下
postgresql-setup initdb
Initializing database ... OK #提示初始化成功
#重新啟動Postgresql
[root@node1 ~]# systemctl start postgresql.service
[root@node1 ~]# netstat -tnlp
Proto Recv-Q Send-Q Local Address Foreign Address State PID/Program name
tcp  0  0 127.0.0.1:5432  0.0.0.0:*  LISTEN  1512/postgres
tcp6  0  0 ::1:5432    :::*  LISTEN  1512/postgres
#查看運行狀態
[root@node1 ~]# systemctl status postgresql.service
● postgresql.service - PostgreSQL database server
 Active: active (running) since Sat 2016-11-26 22:49:07 CST; 1min 33s ago
#切換到操作系統下的“postgres”用戶,登錄數據庫
[root@node1 ~]# su - postgres
-bash-4.2$ psql
psql (9.2.15)
Type "help" for help.
postgres=# help
You are using psql, the command-line interface to PostgreSQL.
Type: \copyright for distribution terms
  \h for help with SQL commands
  \? for help with psql commands
  \g or terminate with semicolon to execute query
  \q to quit
#到此為止,基本安裝已經完成。
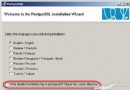
3、源碼安裝
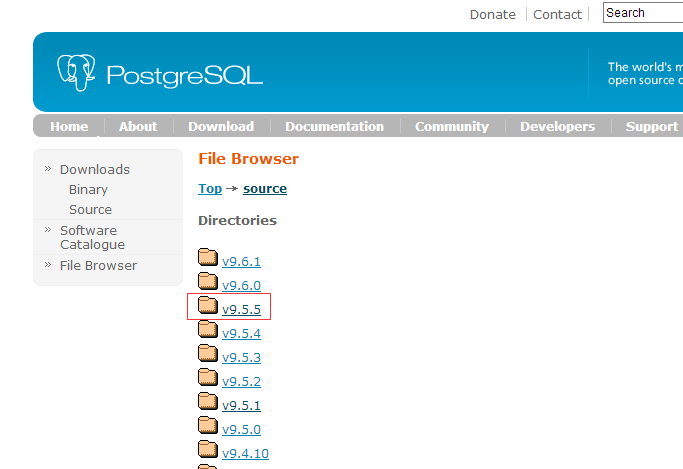
#首先到官方網站下載源代碼(https://www.postgresql.org/ftp/source/)
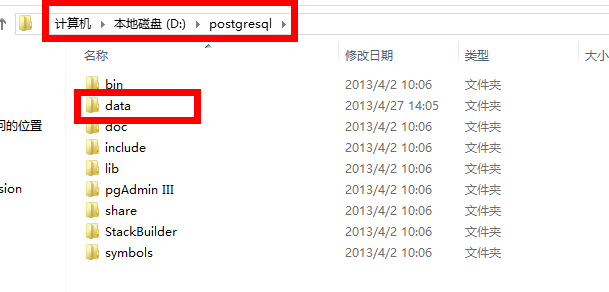
#開始編譯安裝
[root@node1 soft]# tar xf postgresql-9.6.1.tar.bz2
[root@node1 soft]# cd postgresql-9.6.1
# yum -y groupinstall "Development tools" #開發包組
# yum -y install perl-ExtUtils-Embed readline-devel zlib-devel python-devel #依賴包
# ./configure --prefix=/usr/local/postgresql-9.6.1 --with-perl --with-python --with-blocksize=32 --with-wal-blocksize=64 --with-wal-segsize=64
# make && make install
#安裝後的配置
[root@node1 postgresql-9.6.1]# cat /etc/profile.d/postgresql.sh
export PATH=$PATH:/usr/local/pgsql/bin
export PGDATA=/data/pgdata
[root@node1 postgresql-9.6.1]# source /etc/profile.d/postgresql.sh
[root@node1 postgresql-9.6.1]# echo "/usr/local/pgsql/lib" > /etc/ld.so.conf.d/pgsql.conf
[root@node1 postgresql-9.6.1]# ldconfig
#創建數據庫目錄並初始化數據庫
[root@node1 postgresql-9.6.1]# mkdir /data/pgdata/
[root@node1 postgresql-9.6.1]# chown -R postgres.postgres /data/pgdata/
[root@node1 postgresql-9.6.1]# su - postgres
-bash-4.2$ initdb
The database cluster will be initialized with locale "en_US.UTF-8".
The default database encoding has accordingly been set to "UTF8".
The default text search configuration will be set to "english".
fixing permissions on existing directory /data/pgdata ... ok
creating subdirectories ... ok
selecting default max_connections ... 100
selecting default shared_buffers ... 128MB
selecting dynamic shared memory implementation ... posix
creating configuration files ... ok
running bootstrap script ... ok
performing post-bootstrap initialization ... ok
syncing data to disk ... ok
Success. You can now start the database server using:
 pg_ctl -D /data/pgdata -l logfile start
#安裝contrib目錄下的工具
# cd postgresql-9.6.1/contrib/
# make
# make install
#啟動和停止數據庫
# pg_ctl start -D $PGDATA #PGDATA是pgsql的數據目錄
# pg_ctl stop -D $PGDATA [-m SHUTDOWN-MODE]
其中-m是制定數據庫的停止方法,有以下三種
smart:等所有的連接中止後,關閉數據庫。如果客戶端不中止,則無法關閉數據庫。
fast:快速關閉數據庫,斷開客戶端的連接,讓已有的事務回滾,然後正常關閉數據庫。
immediate:立即關閉數據庫,相當於數據庫進程立即停止,直接退出,下次啟動數據庫需要進行修復。
4、PostgreSQL的簡單配置
在數據目錄下編輯postgresql.conf文件,找到如下內容:
#listen_addresses = 'localhost'   # what IP address(es) to listen on;
#port = 5432       # (change requires restart)
listen_addresses表示要監聽的地址,要讓網絡上的主機登錄這台數據庫,需要把這個地址改成"*",或者0.0.0.0。
port表示監聽的端口,可以不更改,修改這兩個參數後,需要重啟才能生效。
#與數據庫Log相關的參數
logging_collector = on #日志的收集,on表示打開
log_directory = 'pg_log' #定義日志的收集目錄
日志的切換和是否選擇覆蓋則可以使用如下幾種方案
方案一:每天生產一個新的日志文件
log_filename = ‘postgresql-%Y-%m-%d_%H%M%S.log'
log_truncate_on_rotation = off
log_rotation_age = 1d
log_rotation_size = 0
方案二:每當日志寫滿一定的大小(如10MB空間),則切換一個日志
log_filename = ‘postgresql-%Y-%m-%d_%H%M%S.log'
log_truncate_on_rotation = off
log_rotation_age = 0
log_rotation_size = 10M
方案三:只保留7天的日志,進行循環覆蓋
log_filename = ‘postgresql-%a.log'
log_truncate_on_rotation = off
log_rotation_age = 1d
log_rotation_size = 0
5、內存參數的設置
shared_buffers:共享內存的大小,主要用於共享數據塊。
#shared_buffers默認值為32MB,如果有足夠的內存,可以把這個參數改得大一些,這樣數據庫就可以緩存更多的數據庫,當讀取數據時,就可以從共享內存中讀,而不需要再從文件上去讀取。
work_mem:單個SQL執行時,排序、hash join所使用的內存,SQL運行完後,內存就釋放了,把這個值設大一些,會讓排序操作快一些。
三、SQL語法入門
1、SQL語句語法簡介
(1)、語句的分類(SQL命令一般分為DDL、DML、DQL幾類)
DDL:Data Definition Language的縮寫,即數據定義語言,主要用於創建、刪除,以及修改表、索引等數據庫對象語言。
DML:Data Manipulation Language的簡稱,即數據操縱語言,主要用於插入、更新、刪除數據,所以也分為INSERT、UPDATE、DELETE三種語句。
DQL:數據庫查詢語句,基本及時SELECT查詢命令,用於數據查詢。