介紹
在本系列的教程中,我要討論一些ATL的內部工作方式以及它所 使用的技術。
在討論的開始,讓我們先看看一個程序的內存分布。首先 ,編寫一個簡單的程序,它沒有任何的數據成員,你可以看看它的內存結構。
程序1.
#include <iostream>

using namespace std;

class Class {

};

int main() {

 Class objClass;

 cout << "Size of object is = " << sizeof(objClass) << endl;

 cout << "Address of object is = " << &objClass << endl;

 return 0;

}
這個程序的輸出為:
Size of object is = 1

Address of object is = 0012FF7C
現在,如果我 們向類中添加一些數據成員,那麼這個類的大小就會是各個成員的大小之和。對 於模板,也依然是這樣:
程序2.
#include <iostream>

using namespace std;

template <typename T>

class CPoint {

public:

 T m_x;

 T m_y;

};

int main() {

 CPoint<int> objPoint;

 cout << "Size of object is = " << sizeof(objPoint) << endl;

 cout << "Address of object is = " << &objPoint << endl;

 return 0;

}
現 在程序的輸出為:
Size of object is = 8

Address of object is = 0012FF78
那麼,再向程序中添加繼承。現在我們使Point3D類繼承自 Point類,然後來看看程序的內存結構:
程序3.
#include <iostream>

using namespace std;

template <typename T>

class CPoint {

public:

  T m_x;

  T m_y;

};

template <typename T>

class CPoint3D : public CPoint<T> {

public:

  T m_z;

};

int main() {

  CPoint<int> objPoint;

  cout << "Size of object Point is = " << sizeof(objPoint) << endl;

  cout << "Address of object Point is = " << &objPoint << endl;

  CPoint3D<int> objPoint3D;

  cout << "Size of object Point3D is = " << sizeof(objPoint3D) << endl;

  cout << "Address of object Point3D is = " << &objPoint3D << endl;

  return 0;

}
程序的輸出為:
Size of object Point is = 8

Address of object Point is = 0012FF78

Size of object Point3D is = 12

Address of object Point3D is = 0012FF6C
這一程序演示了派生類的內存結構,它表明派生類的對象所占 據的內存為它本身的數據成員和它基類的成員之和。
當虛函數加入到這 個派對中的時候,一切就變得都有意思了。請看下面的程序:
程序4.
#include <iostream>

using namespace std;

class Class {

public:

 virtual void fun() { cout << "Class::fun" << endl; }

};

int main() {

 Class objClass;

 cout << "Size of Class = " << sizeof(objClass) << endl;

 cout << "Address of Class = " << &objClass << endl;

 return 0;

}
程序的輸出為:
Size of Class = 4

Address of Class = 0012FF7C
並且,在我們添加了多於一個 的虛函數之後,會變得更加有趣:
程序5.
#include <iostream>

using namespace std;

class Class {

public:

 virtual void fun1() { cout << "Class::fun1" << endl; }

 virtual void fun2() { cout << "Class::fun2" << endl; }

 virtual void fun3() { cout << "Class::fun3" << endl; }

};

int main() {

 Class objClass;

 cout << "Size of Class = " << sizeof(objClass) << endl;

 cout << "Address of Class = " << &objClass << endl;

 return 0;

}
這個程序的 輸出和前一個程序一模一樣,讓我們再做一個實驗來更好地弄懂這件事吧。
程序6.
#include <iostream>

using namespace std;

class CPoint {

public:

 int m_ix;

 int m_iy;

 virtual ~CPoint() { } // 譯注:原文此處有分號,我將其去掉 ,下皆同

};

int main() {

CPoint objPoint;

cout << "Size of Class = " << sizeof(objPoint) << endl;

cout << "Address of Class = " << &objPoint << endl;

return 0;

}
程序 的輸出為:
Size of Class = 12

Address of Class = 0012FF68
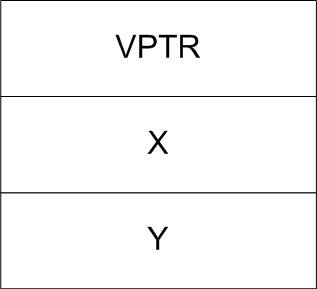
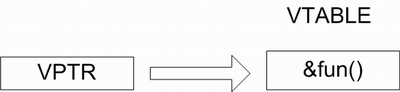
這些程序的輸出表明,當你向類中添加了虛函數之後,那麼它 的尺寸就會增加一個int的大小。在Visual C++中也就是增加4個字節。這就意味 著這個類中有三個整數大小的位置,一個是x,一個是y,另一個是處理虛函數之 用的虛函數表指針。首先,讓我們來看看這個新的位置,也就是這個位於對象首 部(或末尾)的虛函數表指針。要這麼做的話,我們需要直接存取對象所占用的 內存。我們可以使用神奇的指針技術,即用一個指向int的指針來存儲一個對象 的地址。
程序7.
#include <iostream>

using namespace std;

class CPoint {

public:

 int m_ix;

 int m_iy;

 CPoint(const int p_ix = 0, const int p_iy = 0) :

  m_ix(p_ix), m_iy(p_iy) {

 }

 int getX() const {

  return m_ix;

 }

 int getY() const {

  return m_iy;

 }

 virtual ~CPoint() { }

};

int main() {

 CPoint objPoint(5, 10);

 int* pInt = (int*) &objPoint;

 *(pInt+0) = 100; // 企圖改變x的值

 * (pInt+1) = 200; // 企圖改變y的值

 cout << "X = " << objPoint.getX() << endl;

 cout << "Y = " << objPoint.getY() << endl;

 return 0;

}
這個程序中最重要的東西是:
int* pInt = (int*) &objPoint;

 *(pInt+0) = 100; // 企圖改變x的值

 * (pInt+1) = 200; // 企圖改變y的值
其中,我們在把對象的地址存入一 個整型指針之後,就可以把這個對象看作一個整型的指針了。程序的輸出為:
X = 200

Y = 10
當然,這並不是我們想要的結果,它表明 200存儲在了m_ix數據成員的位置。這就意味著m_ix,也就是第一個成員變量, 是起始於內存中第二個位置的,而不是第一個。換句話說,第一個成員是虛函數 表指針,其它的才是對象的數據成員。那麼,只需要修改以下的兩行:
int* pInt = (int*)&objPoint;

*(pInt+1) = 100; // 企圖改 變x的值

*(pInt+2) = 200; // 企圖改變y的值
這樣我們就會獲得 想要的結果了,以下為完整程序:
程序8.
#include <iostream>

using namespace std;

class CPoint {

public:

 int m_ix;

 int m_iy;

 CPoint(const int p_ix = 0, const int p_iy = 0) :

  m_ix(p_ix), m_iy(p_iy) {

 }

 int getX() const {

  return m_ix;

 }

  int getY() const {

  return m_iy;

 }

 virtual ~CPoint() { }

};

int main() {

 CPoint objPoint(5, 10);

 int* pInt = (int*)&objPoint;

 *(pInt+1) = 100; // 企圖改變x的值

 *(pInt+2) = 200; // 企圖改變y的值

 cout << "X = " << objPoint.getX() << endl;

 cout << "Y = " << objPoint.getY() << endl;

 return 0;

}
並且,程序的輸出為:
X = 100

Y = 200
下圖清楚地示范了當我們向類中添加了虛函數之後, 虛函數表指針就會被添加在內存結構中的第一個位置。
現在 問題出現了:虛函數表指針中到底存儲了什麼?那麼看看下面的程序:
程序9.
#include <iostream>

using namespace std;

class Class {

 virtual void fun() { cout << "Class::fun" << endl; }

};

int main() {

 Class objClass;

 cout << "Address of virtual pointer " << (int*)(&objClass+0) << endl;

  cout << "Value at virtual pointer " << (int*)* (int*)(&objClass+0) << endl;

 return 0;

}
程序的輸出為:
Address of virtual pointer 0012FF7C

Value at virtual pointer 0046C060
虛函表數指針存儲了一個虛函數表的地址。 並且,虛函數表存儲了類中所有虛函數的地址。換句話說,虛函數表是一個數組 ,這個數組的元素為虛函數指針的地址。讓我們看看下面這個程序來考慮吧。
程序10.
#include <iostream>

using namespace std;

class Class {

 virtual void fun() { cout << "Class::fun" << endl; }

};

typedef void (*Fun)(void);

int main() {

 Class objClass;

 cout << "Address of virtual pointer " << (int*) (&objClass+0) << endl;

 cout << "Value at virtual pointer i.e. Address of virtual table "

   << (int*)*(int*)(&objClass+0) << endl;

 cout << "Value at first entry of virtual table "

   << (int*)*(int*)*(int*)(&objClass+0) << endl;

  cout << endl << "Executing virtual function" << endl << endl;

 Fun pFun = (Fun)*(int*)*(int*) (&objClass+0);

 pFun();

 return 0;

}
這個程 序中有一些使用了類型轉換的間接調用,其中最重要的一行是:
Fun pFun = (Fun)*(int*)*(int*)(&objClass+0);
在這裡,Fun為一個由 typedef定義的函數指針類型:
typedef void (*Fun)(void);
讓我 們來剖析一下這個冗長的間接調用。(int*)(&objClass+0)給出了虛函數表 指針的地址,這個虛函數表指針是類的第一個入口,我們將它轉換為了int*。要 獲得這個地址的值,我們需要使用間接調用運算符(也就是*),然後將它再次 轉換為int*,也就是(int*)*(int*)(&objClass+0)。這就會給出虛函數表的 第一個入口。要獲得這個位置的值,也就是獲得類中第一個虛函數的地址,我們 需要再次使用間接調用運算符,並將其轉換為合適的函數指針類型,所以
Fun pFun = (Fun)*(int*)*(int*)(&objClass+0);
就表示從 虛函數表的第一個入口獲得值,作Fun的類型轉換,並將其存入pFun之中。
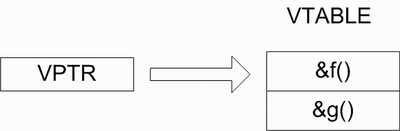
那麼,當類中含有多於一個的虛函數,又會怎麼樣呢?現在我們希望存取 虛函數表中的第二個虛函數,請看下面的程序:
程序11.
#include <iostream>

using namespace std;

class Class {

 virtual void f() { cout << "Class::f" << endl; }

 virtual void g() { cout << "Class::g" << endl; }

};

int main() {

 Class objClass;

 cout << "Address of virtual pointer " << (int*)(&objClass+0) << endl;

  cout << "Value at virtual pointer i.e. Address of virtual table "

  << (int*)*(int*)(&objClass+0) << endl;

 cout << endl << "Information about VTable" << endl << endl;

 cout << "Value at 1st entry of VTable "

  << (int*)* ((int*)*(int*)(&objClass+0)+0) << endl;

 cout << "Value at 2nd entry of VTable "

  << (int*)* ((int*)*(int*)(&objClass+0)+1) << endl;

 return 0;

}
程序的輸出為:
Address of virtual pointer 0012FF7C

Value at virtual pointer i.e. Address of virtual table 0046C0EC

Information about VTable

Value at 1st entry of VTable 0040100A

Value at 2nd entry of VTable 0040129E
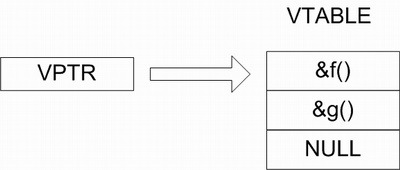
那麼,有一個問題很自然地出現了——編譯器是如何知道虛函數表的 長度的呢?答案是:虛函數表的最後一個入口為NULL。你可以把程序改一改來考 慮這個問題。
程序12.
#include <iostream>

using namespace std;

class Class {

 virtual void f() { cout << "Class::f" << endl; }

 virtual void g() { cout << "Class::g" << endl; }

};

int main() {

 Class objClass;

 cout << "Address of virtual pointer " << (int*)(&objClass+0) << endl;

 cout << "Value at virtual pointer i.e. Address of virtual table "

   << (int*)*(int*) (&objClass+0) << endl;

 cout << endl << "Information about VTable" << endl << endl;

 cout << "Value at 1st entry of VTable "

   << (int*)*((int*)*(int*)(&objClass+0)+0) << endl;

 cout << "Value at 2nd entry of VTable "

   << (int*)*((int*)*(int*)(&objClass+0)+1) << endl;

 cout << "Value at 3rd entry of VTable "

   << (int*)*((int*)*(int*)(&objClass+0)+2) << endl;

 cout << "Value at 4th entry of VTable "

   << (int*)*((int*)*(int*)(&objClass+0)+3) << endl;

 return 0;

}
程序的輸出為:
Address of virtual pointer 0012FF7C

Value at virtual pointer i.e. Address of virtual table 0046C134

Information about VTable

Value at 1st entry of VTable 0040100A

Value at 2nd entry of VTable 0040129E

Value at 3rd entry of VTable 00000000

Value at 4th entry of VTable 73616C43
這個程序的輸出示范了虛函數表的最後一個入口為NULL 。就讓我們來用已有的知識來調用虛函數吧:
程序 13.
#include <iostream>

using namespace std;

class Class {

 virtual void f() { cout << "Class::f" << endl; }

 virtual void g() { cout << "Class::g" << endl; }

};

typedef void(*Fun)(void);

int main() {

 Class objClass;

 Fun pFun = NULL;

 // 調用第一個虛函數

 pFun = (Fun)*((int*)* (int*)(&objClass+0)+0);

 pFun();

 // 調用第二個虛函數

 pFun = (Fun)*((int*)*(int*)(&objClass+0)+1);

 pFun ();

 return 0;

}
程序的輸出為:
Class::f

Class::g
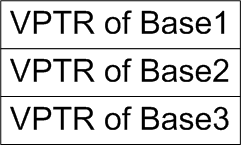
現在我們來看看多重繼承的情況。先看一個多重繼承最簡單 的情況:
程序14.
#include <iostream>

using namespace std;

class Base1 {

public:

 virtual void f() { }

};

class Base2 {

public:

 virtual void f() { }

};

class Base3 {

public:

 virtual void f() { }

};

class Drive : public Base1, public Base2, public Base3 {

};

int main() {

 Drive objDrive;

 cout << "Size is = " << sizeof(objDrive) << endl;

 return 0;

}
程序的輸出為:
Size is = 12
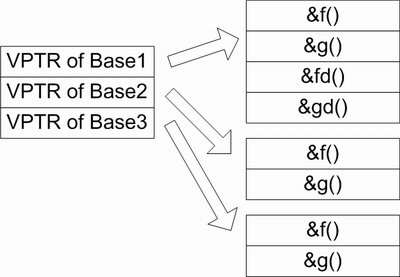
這個程序示范了當你從多個基類繼承一個類的時候,這個派生類就會 擁有所有基類的虛函數表指針。
那麼 ,當派生類也有虛函數表指針的時候會發生什麼事情呢?讓我們看看下面的程序 來弄懂關於帶有虛函數的多重繼承的概念吧。
程序15.
#include <iostream>

using namespace std;

class Base1 {

  virtual void f() { cout << "Base1::f" << endl; }

 virtual void g() { cout << "Base1::g" << endl; }

};

class Base2 {

 virtual void f() { cout << "Base2::f" << endl; }

 virtual void g() { cout << "Base2::g" << endl; }

};

class Base3 {

 virtual void f() { cout << "Base3::f" << endl; }

 virtual void g() { cout << "Base3::g" << endl; }

};

class Drive : public Base1, public Base2, public Base3 {

public:

 virtual void fd() { cout << "Drive::fd" << endl; }

 virtual void gd() { cout << "Drive::gd" << endl; }

};

typedef void(*Fun)(void);

int main () {

 Drive objDrive;

 Fun pFun = NULL;

 // 調用 Base1的第一個虛函數

 pFun = (Fun)*((int*)*(int*)((int*) &objDrive+0)+0);

 pFun();

 // 調用Base1的第二個虛函數

 pFun = (Fun)*((int*)*(int*)((int*)&objDrive+0)+1);

  pFun();

 // 調用Base2的第一個虛函數

 pFun = (Fun)*((int*) *(int*)((int*)&objDrive+1)+0);

 pFun();

 // 調用Base2 的第二個虛函數

 pFun = (Fun)*((int*)*(int*)((int*) &objDrive+1)+1);

 pFun();

 // 調用Base3的第一個虛函數

 pFun = (Fun)*((int*)*(int*)((int*)&objDrive+2)+0);

  pFun();

 // 調用Base3的第二個虛函數

 pFun = (Fun)*((int*) *(int*)((int*)&objDrive+2)+1);

 pFun();

 // 調用派生類 的第一個虛函數

 pFun = (Fun)*((int*)*(int*)((int*) &objDrive+0)+2);

 pFun();

 // 調用派生類的第二個虛函數

 pFun = (Fun)*((int*)*(int*)((int*)&objDrive+0)+3);

  pFun();

 return 0;

}
程序的輸出為:
Base1::f

Base1::g

Base2::f

Base2::f

Base3::f

Base3::f

Drive::fd

Drive::gd
我們可以通過使用static_cast獲得派生類虛函數表指針的偏移量,請看以下程 序:
程序16.
#include <iostream>

using namespace std;

class Base1 {

public:

 virtual void f() { }

};

class Base2 {

public:

 virtual void f() { }

};

class Base3 {

public:

 virtual void f() { }

};

class Drive : public Base1, public Base2, public Base3 {

};

// 任意的非0值,因為0乘任何數都得0

#define SOME_VALUE 1

int main() {

 cout << (DWORD) static_cast<Base1*>((Drive*)SOME_VALUE)-SOME_VALUE << endl;

 cout << (DWORD)static_cast<Base2*>((Drive*) SOME_VALUE)-SOME_VALUE << endl;

 cout << (DWORD) static_cast<Base3*>((Drive*)SOME_VALUE)-SOME_VALUE << endl;

 return 0;

}
ATL使用了一個定義在ATLDEF.H中的宏 offsetofclass來做這件事,這個宏被定義為:
#define offsetofclass (base, derived) \

    ((DWORD)(static_cast<base*> ((derived*)_ATL_PACKING))-_ATL_PACKING)
這個宏返回了在派生類對象 模型中基類虛函數表指針的偏移量,讓我們來看看下面這個例子:
程序 17.
#include <windows.h>

#include <iostream>

using namespace std;

class Base1 {

public:

 virtual void f() { }

};

class Base2 {

public:

 virtual void f() { }

};

class Base3 {

public:

 virtual void f() { }

};

class Drive : public Base1, public Base2, public Base3 {

};

#define _ATL_PACKING 8

#define offsetofclass(base, derived) \

 ((DWORD) (static_cast<base*>((derived*)_ATL_PACKING))-_ATL_PACKING)

int main() {

 cout << offsetofclass(Base1, Drive) << endl;

 cout << offsetofclass(Base2, Drive) << endl;

 cout << offsetofclass(Base3, Drive) << endl;

 return 0;

}
派生類的內存布局為:
程序的輸出為:
0

4

8
這個程序的輸出示范了這 個宏返回指定基類的虛函數表指針偏移量。在Don Box的《COM本質論》中,它使 用了一個簡單的的宏,你可以修改這個程序,用Box的宏替換ATL的宏。
程序18.
#include <windows.h>

#include <iostream>

using namespace std;

class Base1 {

public:

 virtual void f() { }

};

class Base2 {

public:

 virtual void f() { }

};

class Base3 {

public:

 virtual void f() { }

};

class Drive : public Base1, public Base2, public Base3 {

};

#define BASE_OFFSET(ClassName, BaseName) \

 (DWORD (static_cast<BaseName*>(reinterpret_cast<ClassName*>\

 (0x10000000))) - 0x10000000)

int main() {

 cout << BASE_OFFSET(Drive, Base1) << endl;

 cout << BASE_OFFSET(Drive, Base2) << endl;

 cout << BASE_OFFSET(Drive, Base3) << endl;

 return 0;

}
這一程序的目的和輸出與前一個程序完全相同。
現在讓我們用這 個宏來做些特別的東西,事實上我們可以通過獲得派生類內存結構中基類虛函數 表指針的偏移量的方法來調用指定基類中的虛函數。
程序19.
#include <windows.h>

#include <iostream>

using namespace std;

class Base1 {

public:

 virtual void f() { cout << "Base1::f()" << endl; }

};

class Base2 {

public:

 virtual void f() { cout << "Base2::f()" << endl; }

};

class Base3 {

public:

 virtual void f() { cout << "Base3::f()" << endl; }

};

class Drive : public Base1, public Base2, public Base3 {

};

#define _ATL_PACKING 8

#define offsetofclass(base, derived) \

  ((DWORD)(static_cast<base*>((derived*)_ATL_PACKING))- _ATL_PACKING)

int main() {

 Drive d;

 void* pVoid = NULL;

 // 調用Base1的函數

 pVoid = (char*)&d + offsetofclass(Base1, Drive);

 ((Base1*)(pVoid))->f();

  // 調用Base2的函數

 pVoid = (char*)&d + offsetofclass(Base2, Drive);

 ((Base2*)(pVoid))->f();

 // 調用Base3的函數( 譯注:原文為Base1)

 pVoid = (char*)&d + offsetofclass (Base3, Drive);

 ((Base3*)(pVoid))->f();

 return 0;

}
程序的輸出為:
Base1::f()

Base2::f()

Base3::f()
在本章教程中,我嘗試著解釋了ATL中offsetofclass宏的 工作方式。我希望在下一篇文章中,繼續探究ATL中其它的秘密。