話不多說,直接上代碼吧:
  string client_id = "分配的APP ID";
  string appid = " 分配的 APP KEY";
  string Return_url = "返回處理的url";
  public string Authorize()
  {
   string state = new Random(100000).Next(99, 99999).ToString();//隨機數
   HttpHelper http = new HttpHelper();
   string url = string.Format("https://graph.qq.com/oauth2.0/authorize?response_type=code&client_id={0}&redirect_uri={1}&state={2}", client_id, Return_url, state);
   string str="<script> location.href='" + url + "'</script>";
   return str;

  }
點擊事件直接調用Authorize()就可以了,我是直接用跳轉鏈接處理的。
 protected void Page_Load(object sender, EventArgs e)
  {
   QQ_Login q = new QQ_Login();
   string url = q.Authorize();//這裡調用
   Response.Write(url);
  }
效果:
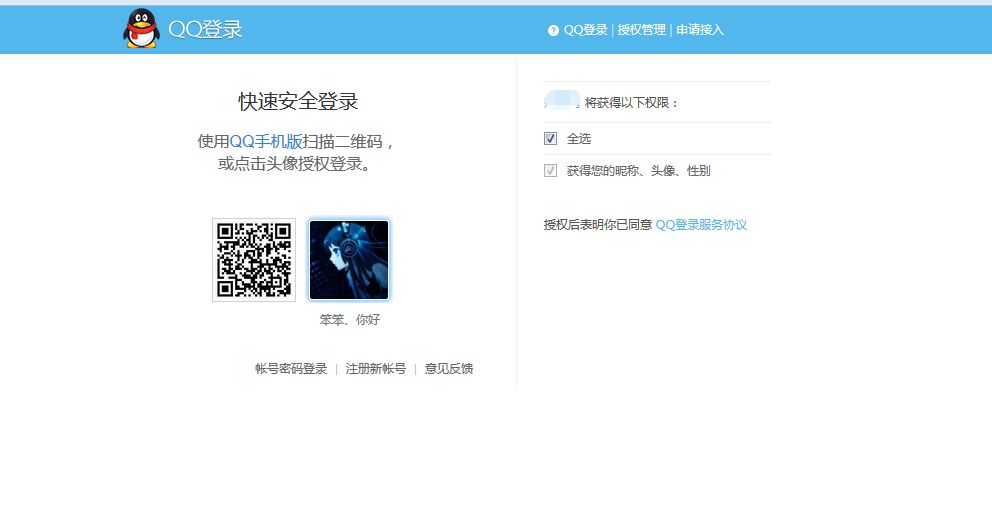
點擊圖像,接著在,回調的url裡面調用下面的方法,參數再往下看一點;
  public User_info Back_User(string code)
  {
   string state = new Random(100000).Next(99, 99999).ToString();//隨機數
   User_info ui = new User_info();
   string url = string.Format("https://graph.qq.com/oauth2.0/token?grant_type=authorization_code&client_id={0}&client_secret={1}&code={2}&redirect_uri={3}&state={4}", client_id, appid, code, Return_url, state);
   string uu = HttpHelper.HtmlFromUrlGet(url);//處理http請求幫助類
   string code1 = uu.Split('&')[0].Split('=')[1].ToString();//獲得access_token

   //根基access_token獲取用戶唯一OpenID
   string url_me = string.Format("https://graph.qq.com/oauth2.0/me?access_token={0}" , code1);
   string callback = HttpHelper.HtmlFromUrlGet(url_me);//這裡獲取的
   callback = callback.Substring(callback.IndexOf('(') + 1, (callback.IndexOf(')') - callback.IndexOf('(') - 1)).Trim();
   // dynamic jsonP = JValue.FromObject(callback); //這裡我用的是一個序列化類庫 Newtonsoft.Json.dll 6.0.4版本無奈公司版本過低 只能用4.0的版本 建議使用6.0.4版本
   a jsonP = JsonConvert.DeserializeObject<a>(callback);//Newtonsoft.Json.dll 4.0或4.5版本
   string OpenID = jsonP.openid;//獲取用戶唯一的OpenID

   //根據OpenID獲取用戶信息 可以顯示更多 用的就幾個 需要的可以自己在下面加
   string getinfo = string.Format("https://graph.qq.com/user/get_user_info?access_token={0}&oauth_consumer_key={1}&openid={2}", code1, client_id, OpenID);
   string user = HttpHelper.HtmlFromUrlGet(getinfo);
   b info = JsonConvert.DeserializeObject<b>(user);
   ui.Name = info.nickname;
   ui.OpenID = OpenID;
   ui.img_qq100 = info.figureurl_qq_1;
   ui.img_qq50 = info.figureurl_qq_2;
   ui.city = info.city;
   ui.year = info.year;
   ui.Type = 1;
   return ui;

  }
點擊圖像時跳轉到指定的回調地址,並在redirect_uri地址後帶上Authorization Code;
User_info ui = new User_info();
     var verifier = Request.Params["code"]; //獲取Authorization Code
     ui = q.Back_User(verifier); 掉用方法並返回數據
再把返回的類貼出來吧
  public class User_info
  {
   public string OpenID { get; set; }//用戶唯一appid

   public string Name { get; set; }

   public string img_qq50 { get; set; } //QQ圖像40*40

   public string img_qq100 { get; set; }

   public string city { get; set; }

   public int year { get; set; }
  }
 public class a {

  public string client_id { get; set; }

  public string openid { get; set; }
 }
總結
基本就完了,代碼就這麼多了,感興趣的同學自己動手操作操作才能更加熟悉,希望本文對大家能有所幫助。