參考頁面:
http://www.yuanjiaocheng.net/webapi/mvc-consume-webapi-put.html
http://www.yuanjiaocheng.net/webapi/mvc-consume-webapi-delete.html
http://www.yuanjiaocheng.net/webapi/httpclient-consume-webapi.html
http://www.yuanjiaocheng.net/webapi/webapi-di-configure.html
http://www.yuanjiaocheng.net/webapi/web-api-host.html
By Mike Wasson|January 21, 2012
作者:Mike Wasson | 日期:2012-1-21
本文引自:http://www.asp.net/web-api/overview/getting-started-with-aspnet-web-api/tutorial-your-first-web-api
HTTP is not just for serving up web pages. It is also a powerful platform for building APIs that expose services and data. HTTP is simple, flexible, and ubiquitous. Almost any platform that you can think of has an HTTP library, so HTTP services can reach a broad range of clients, including browsers, mobile devices, and traditional desktop applications.
HTTP不僅服務於web頁面。它也是建立暴露服務與數據的API(應用程序編程接口)的功能強大的平台。HTTP簡單、靈活且無處不在。幾乎你所能想到的任何平台都有一個HTTP庫,因此,HTTP服務能夠到達范圍廣泛的客戶端,包括浏覽器、移動設備、以及傳統的桌面應用程序。
ASP.NET Web API is a framework for building web APIs on top of the .NET Framework. In this tutorial, you will use ASP.NET Web API to create a web API that returns a list of products. The front-end web page uses jQuery to display the results.
ASP.NET Web API是一個用來在.NET框架上建立web API的框架。在本教程中,你將運用ASP.NET Web API來創建一個返回產品列表的web API。前端web頁面使用jQuery來顯示其結果(如圖1所示)。
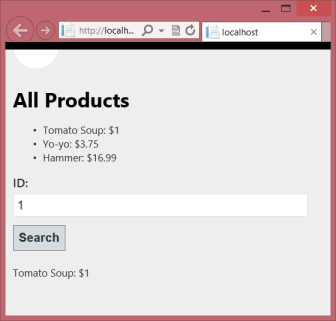
圖1. 應用程序的web頁面
Download the completed project.
下載完整的項目。
This tutorial requires Visual Studio with ASP.NET MVC 4. You can use any of the following:
本教程需要安裝有ASP.NET MVC 4的Visual Studio。你可以使用以下任何一個:
If you are using Visual Studio 2010 or Visual Web Developer 2010 Express, you will need to install ASP.NET MVC 4 separately. The screenshots in this tutorial show Visual Studio Express 2012 for Web.
如果使用Visual Studio 2010或Visual Web Developer 2010 Express,需要獨立安裝ASP.NET MVC 4。本教程中的屏幕截圖顯示的是Visual Studio Express 2012 for Web。
Start Visual Studio and select New Project from the Start page. Or, from the File menu, select New and then Project.
啟動Viusal Studio,並從“開始”頁面選擇“新項目”。或者,從“文件”菜單選擇“新建”,然後選擇“項目”。
In the Templates pane, select Installed Templates and expand the Visual C# node. Under Visual C#, select Web. In the list of project templates, select ASP.NET MVC 4 Web Application. Name the project "HelloWebAPI" and click OK.
在“模板”面板中選擇“已安裝模板”,並展開“Visual C#”節點。在“Visual C#”下選擇“Web”。在項目模板列表中選擇“ASP.NET MVC 4 Web應用程序”。將該項目命名為“HelloWebAPI”,點擊“OK”(如圖2所示)。
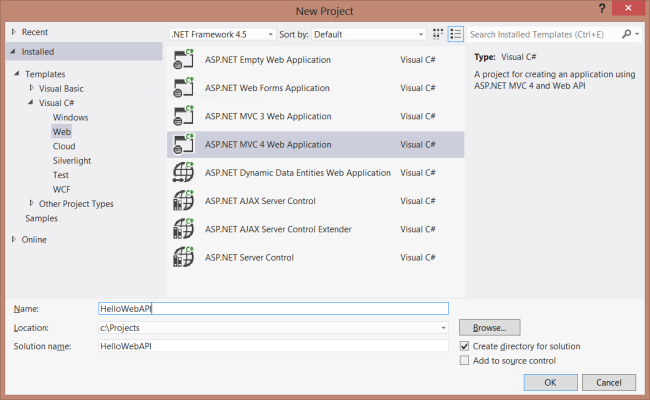
圖2. 創建項目
In the New ASP.NET MVC 4 Project dialog, select Web API and click OK.
在“新ASP.NET MVC 4項目”對話框中,選擇“Web API”並點擊“OK”(如圖3所示)。
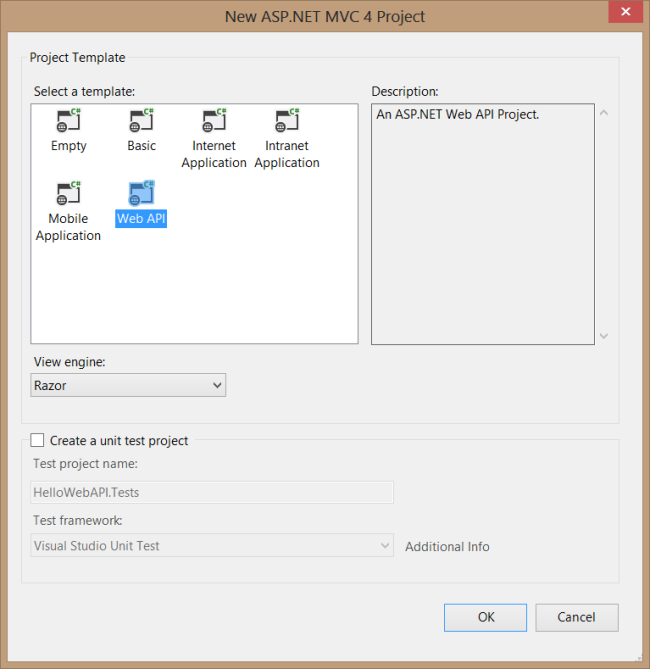
圖3. 選擇Web API項目模板
A model is an object that represents the data in your application. ASP.NET Web API can automatically serialize your model to JSON, XML, or some other format, and then write the serialized data into the body of the HTTP response message. As long as a client can read the serialization format, it can deserialize the object. Most clients can parse either XML or JSON. Moreover, the client can indicate which format it wants by setting the Accept header in the HTTP request message.
模型是表示應用程序數據的一種對象。ASP.NET Web API可以自動地把模型序列化成JSON、XML、或某些其它格式,然後這些序列化數據寫到HTTP響應的消息體中。只要一個客戶端能夠讀取這種序列化格式,它就可以對這種對象進行反序列化。大多數客戶端都能夠解析XML或JSON。另一方面,通過設置HTTP請求消息中的Accept報頭,客戶端能夠指示它所希望的是哪一種格式。
Let's start by creating a simple model that represents a product.
我們從創建一個表示產品的簡單模型開始。
If Solution Explorer is not already visible, click the View menu and select Solution Explorer. In Solution Explorer, right-click the Models folder. From the context menu, select Add then select Class.
如果“解決方案資源管理器”還不可見,點擊“視圖”菜單,選擇“解決方案資源管理器”。在“解決方案資源管理器”中,右擊“模型”文件夾。從上下文菜單選擇“添加” — “類”(如圖4所示)。
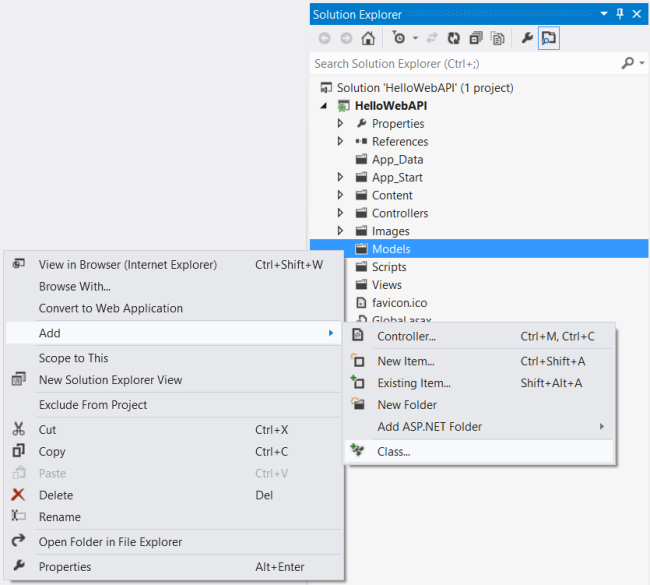
圖4. 添加模型
Name the class "Product". Next, add the following properties to the Product class.
將這個類命名為“Product”。下一步,將以下屬性添加到這個Product類。
namespace HelloWebAPI.Models
{
    public class Product
    {
        public int Id { get; set; }
        public string Name { get; set; }
        public string Category { get; set; }
        public decimal Price { get; set; }
    }
}
A controller is an object that handles HTTP requestst. The New Project wizard created two controllers for you when it created the project. To see them, expand the Controllers folder in Solution Explorer.
控制器是一種處理HTTP請求的對象。“新項目”向導在創建該項目時為你創建了兩個控制器。要看到它們,在“解決方案資源管理器”中展開Controllers文件夾。
Note If you have worked with ASP.NET MVC, then you are already familiar with controllers. They work similarly in Web API, but controllers in Web API derive from the ApiController class instead of Controller class. The first major difference you will notice is that actions on Web API controllers do not return views, they return data.
注:如果曾使用過ASP.NET MVC,對控制器已有所熟悉。Web API中的控制器是類似的,只不過它們派生於ApiController類,而不是Controller類。你要注意到的第一個主要區別是Web API控制器上的動作並不返回視圖,而返回的是數據。
Go ahead and delete ValuesController, by right-clicking the file in Solution Explorer and selecting Delete.
繼續並刪除ValuesController,在“解決方案資源管理器”右擊此文件,並選擇“刪除”。
Add a new controller, as follows:
按以下說明添加一個新控制器:
In Solution Explorer, right-click the the Controllers folder. Select Add and then select Controller.
在“解決方案資源管理器”中右擊Controllers文件夾。選擇“添加”,然後選擇“控制器”(如圖5所示)。
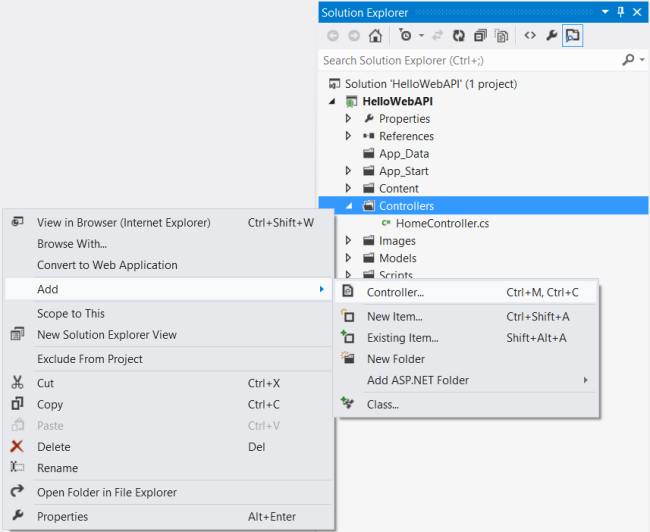
圖5. 添加一個新的控制器
In the Add Controller wizard, name the controller "ProductsController". In the Template drop-down list, select Empty API Controller. Then click Add.
在“添加控制器”向導中,命名此控制器為“ProductsController”。在“模板”下拉列表中選擇“空的API控制器”,然後點擊“添加”(如圖6所示)。
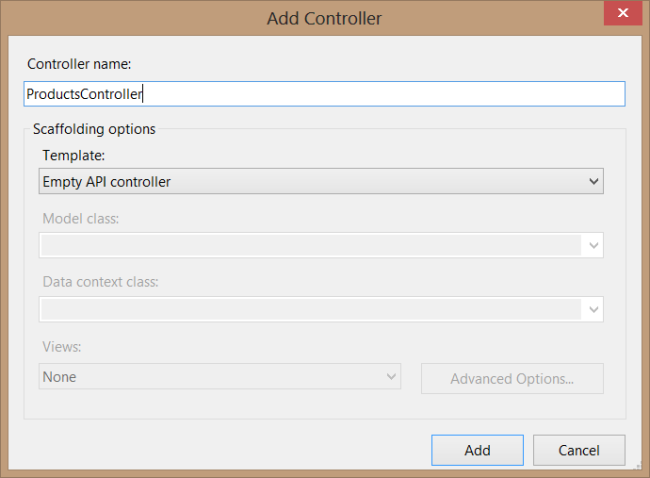
圖6. 創建一個API控制器
The Add Controller wizard will create a file named ProductsController.cs in the Controllers folder.
“添加控制器”向導將在Controllers文件夾中創建一個名為ProductsController.cs的文件。
It is not necessary to put your contollers into a folder named Controllers. The folder name is not important; it is simply a convenient way to organize your source files.
把你的控制器放在名稱為Controllers的文件夾中並不是必須的。文件夾名稱並不重要,這只是組織你源文件的一種簡單約定。
If this file is not open already, double-click the file to open it. Add the following implementation:
如果此文件尚未打開,雙擊該文件打開它。添加以下代碼:
namespace HelloWebAPI.Controllers
{
    using HelloWebAPI.Models;
    using System;
    using System.Collections.Generic;
    using System.Linq;
    using System.Net;
    using System.Net.Http;
    using System.Web.Http;
    public class ProductsController : ApiController
    {
        Product[] products = new Product[]
        {
            new Product { Id = 1, Name = "Tomato Soup", Category = "Groceries", Price = 1 },
            new Product { Id = 2, Name = "Yo-yo", Category = "Toys", Price = 3.75M },
            new Product { Id = 3, Name = "Hammer", Category = "Hardware", Price = 16.99M }
        };
        public IEnumerable<Product> GetAllProducts()
        {
            return products;
        }
        public Product GetProductById(int id)
        {
            var product = products.FirstOrDefault((p) => p.Id == id);
            if (product == null)
            {
                throw new HttpResponseException(HttpStatusCode.NotFound);
            }
            return product;
        }
        public IEnumerable<Product> GetProductsByCategory(string category)
        {
            return products.Where(
                (p) => string.Equals(p.Category, category,
                    StringComparison.OrdinalIgnoreCase));
        }
    }
}
To keep the example simple, products are stored in a fixed array inside the controller class. Of course, in a real application, you would query a database or use some other external data source.
為了保持示例簡單,產品被存儲在該控制器類的一個固定數組中。當然,在一個實際應用程序中,你會查詢一個數據庫,或使用某些其它外部數據源。
The controller defines three methods that return either single products or lists of products:
該控制器定義了三個方法,它們或者返回一個單一產品,或一個產品列表:
That's it! You have a working web API. Each method on the controller maps to a URI:
好了,你有了一個能工作的Web API了。該控制器上的每個方法都映射到一個URI(如表1所示):
A client can invoke the method by sending an HTTP GET request to the URI. Later, we'll look at how this mapping is done. But first, let's try it out.
客戶端可以通過發送一個HTTP的GET請求到這些URI來調用一個方法。稍後,我們將考查這種映射是如何完成的。但首先,讓我們先試一試它。
You can use any HTTP client to invoke your web API. In fact, you can call it directly from a web browser.
你可以用任何HTTP客戶端來調用你的web API。事實上,你可以直接從一個web浏覽器來調用它。
In Visual Studio, choose Start Debugging from the Debug menu, or use the F5 keyboard shortcut. The ASP.NET Development Server will start, and a notification will appear in the bottom corner of the screen showing the port number that it is running under. By default, the Development Server chooses a random port number.
在Visual Studio中,從“調試”菜單選擇“啟動調試”,或使用F5快捷鍵。ASP.NET開發服務器(ASP.NET Development Server)將啟動,屏幕的右下角部將出現一個通知,顯示它運行的端口號。默認地,開發服務器選擇隨機端口號。
Visual Studio will then automatically open a browser window whose URL points to http//www.localhost:xxxx/, where xxxx is the port number. The home page should look like the following:
Visual Studio然後將自動打開浏覽器窗口,其URL指向http//www.localhost:xxxx/,這裡,xxxx是端口號。首頁看上去應當像這樣(如圖7所示):
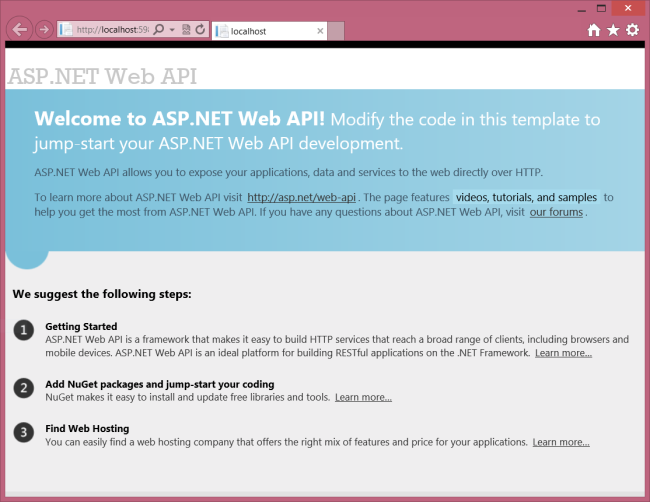
圖7. 應用程序首頁
This home page is an ASP.NET MVC view, returned by the HomeController class. To invoke the web API, we must use one of the URIs listed previously. For example, to get the list of all products, browse to http://localhost:xxxx/api/products/. (Replace "xxxx" with the actual port number.)
該首頁是一個ASP.NET MVC視圖,它是由HomeControllers類返回的。為了調用Web API,我們必須使用前面列出的URI之一。例如,要得到全部產品列表,浏覽http://localhost:xxxx/api/products/。
The exact result depends on which web browser you are using. Internet Explorer will prompt you to open or save a "file" named products.
確切的結果取決於你所使用的浏覽器。Internet Explorer(IE浏覽器)將提示你是否打開或保存一個名稱為products的“文件”(如圖8所示)。

圖8. IE的屏幕提示
This "file" is actually just the body of the HTTP response. Click Open. In the Open with dialog, select Notepad. Click OK, and when prompted, click Open. The file should contain a JSON representation of the array of products:
這個“文件”實際只是HTTP的響應體。點擊“打開”按鈕,在“打開”對話框中選擇Notepad(記事本),點擊“OK”,並在提示出現時點擊“打開”。該文件應當包含產品數組的一個JSON表達:
[{"Id":1,"Name":"Tomato soup","Category":"Groceries","Price":1.0},{"Id":2,"Name":

"Yo-yo","Category":"Toys","Price":3.75},{"Id":3,"Name":"Hammer","Category":

"Hardware","Price":16.99}]
Mozilla Firefox, on the other hand, will display the list as XML in the browser.
另一方面,Mozilla Firefox將在浏覽器中以XML形式顯示此列表(圖9):
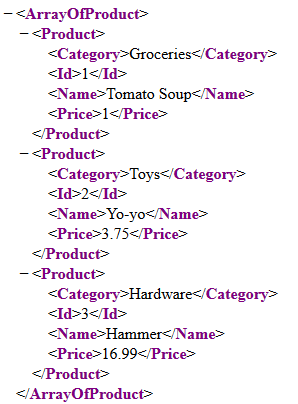
圖9. XML格式的數據
The reason for the difference is that Internet Explorer and Firefox send different Accept headers, so the web API sends different content types in the response.
出現這種差別的原因是IE和Firefox發送了不同的Accept報頭,因此,Web API在響應中發送了不同的內容類型。
Now try browsing to these URIs:
現在,試著浏覽這些URI:
The first should return the entry with ID equal to 1. The second should return a list of all the products with Category equal to "hardware" (in this case, a single item).
第一個應當返回ID等於1的詞條。第二個應當返回Category等於“hardware”的所有產品的列表(這裡,只有一個詞條)。
In the previous section, we invoked the web API directly from the browser. But most web APIs are meant to be consumed programmatically by a client application. So let's write a simple javascript client.
在上一小節中,我們直接通過浏覽器調用了這個web API。但大多數web API都是打算通過程序由一個客戶端應用程序去使用的。那麼,讓我們編寫一個簡單的JavaScript客戶端。
In Solution Explorer, expand the Views folder, and expand the Home folder under that. You should see a file named Index.cshtml. Double-click this file to open it.
在“解決方案資源管理器”中展開Views文件夾,並展開下面的Home文件夾。你應該看到一個名為Index.cshtml的文件。雙擊該文件打開它(如圖10所示)。
圖10. 打開Index.cshtml文件
Index.cshtml renders HTML using the Razor view engine. However, we will not use any Razor features in this tutorial, because I want to show how a client can access the service using plain HTML and Javascript. Therefore, go ahead and delete everything in this file, and replace it with the following:
Index.cshtml使用Razor視圖引擎渲染HTML。然而,本教程中我們不使用任何Razor特性,因為我想演示一個客戶端如何用文本型的HTML和JavaScript來訪問這種服務。因此,繼續並刪除這個文件中的所有內容,並用以下代碼替換:
<!DOCTYPE html>
<html lang="en">
<head>
    <title>ASP.NET Web API</title>
    <link href="http://www.cnblogs.com/Content/Site.css" rel="stylesheet" />
    <script src="http://www.cnblogs.com/Scripts/jquery-1.7.1.min.js" type="text/javascript">
        // TODO Add script
    </script>
</head>
<body id="body" >
    <div class="main-content">
        <div>
            <h1>All Products</h1>
            <ul id="products"/>
        </div>
        <div>
            <label for="prodId">ID:</label>
            <input type="text" id="prodId" size="5"/>
            <input type="button" value="Search" onclick="find();" />
            <p id="product" />
        </div>
    </div>
</body>
</html>
To get a list of products, send an HTTP GET request to "/api/products". You can do this with jQuery as follows:
為了獲取產品列表,要發送一個HTTP的GET請求到“/api/products”。你可以用下述jQuery代碼來做這件事:
<script type="text/javascript">
    $(document).ready(function () {
        // Send an AJAX request
        // 發送AJAX請求
        $.getJSON("api/products/",
        function (data) {
            // On success, 'data' contains a list of products.
            // 成功時,'data'含有一組產品列表
            $.each(data, function (key, val) {
                // Format the text to display.
                // 格式化文本,以便顯示
                var str = val.Name + ': $' + val.Price;
                // Add a list item for the product.
                // 添加一個產品列表項
                $('<li/>', { text: str })
                .appendTo($('#products'));
            });
        });
    });
</script>
The getJSON function sends the AJAX request. The response will be an array of JSON objects. The second parameter to getJSON is a callback function that is invoked when the request successfully completes.
getJSON函數發送Ajax請求。響應將是一個JSON對象的數組。getJSON的第二個參數是在請求成功完成時調用的一個回調函數。
To get a product by ID, send an HTTP GET request to "/api/products/id", where id is the product ID. Add the following code to the script block:
為了通過ID得到一個產品,要發送一個HTTP的GET請求到“/api/products/id”,這裡,id是產品的ID。把以下代碼添加到script塊:
function find() {
    var id = $('#prodId').val();
    $.getJSON("api/products/" + id,
        function (data) {
            var str = data.Name + ': $' + data.Price;
            $('#product').text(str);
        })
    .fail(
        function (jqXHR, textStatus, err) {
            $('#product').text('Error: ' + err);
        });
}
Again, we call the jQuery getJSON function to send the AJAX request, but this time we use the ID to construct the request URI. The response from this request is a JSON representation of a single Product object.
同樣,jQuery的getJSON函數發送的仍是Ajax請求,但這次我們使用了ID來構造該請求的URI。該請求的響應是單個Product對象的一個JSON表達式。
The following code shows the complete Index.cshtml file.
以下代碼展示了完整的index.cshtml文件:
<!DOCTYPE html>
<html lang="en">
<head>
    <title>ASP.NET Web API</title>
    <link href="http://www.cnblogs.com/Content/Site.css" rel="stylesheet" />
    <script src="http://www.cnblogs.com/Scripts/jquery-1.7.1.min.js"
        type="text/javascript"></script>
        <script type="text/javascript">
            $(document).ready(function () {
                // Send an AJAX request
                $.getJSON("api/products/",
                function (data) {
                    // On success, 'data' contains a list of products.
                    $.each(data, function (key, val) {
                        // Format the text to display.
                        var str = val.Name + ': $' + val.Price;
                        // Add a list item for the product.
                        $('<li/>', { text: str })
                        .appendTo($('#products'));
                    });
                });
            });
            function find() {
                var id = $('#prodId').val();
                $.getJSON("api/products/" + id,
                    function (data) {
                        var str = data.Name + ': $' + data.Price;
                        $('#product').text(str);
                    })
                .fail(
                    function (jqXHR, textStatus, err) {
                        $('#product').text('Error: ' + err);
                    });
            }
        </script>
</head>
<body id="body" >
    <div class="main-content">
        <div>
            <h1>All Products</h1>
            <ul id="products"/>
        </div>
        <div>
            <label for="prodId">ID:</label>
            <input type="text" id="prodId" size="5"/>
            <input type="button" value="Search" onclick="find();" />
            <p id="product" />
        </div>
    </div>
</body>
</html>
Press F5 to start debugging the application. The web page should look like the following:
按F5啟動調試此應用程序。其web頁面看上去應當像這樣(圖11):
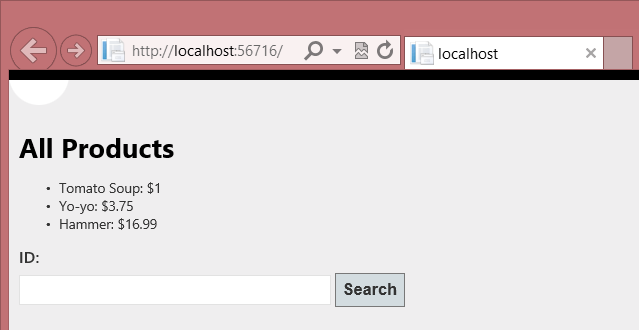
圖11. 啟動頁面
It's not the best in web design, but it shows that our HTTP service is working. You can get a product by ID by entering the ID in the text box:
這不是最好的web設計,但它表明我們的HTTP服務已經在工作。你可以在文本框中輸入ID並通過這個ID獲得一個產品(圖12):
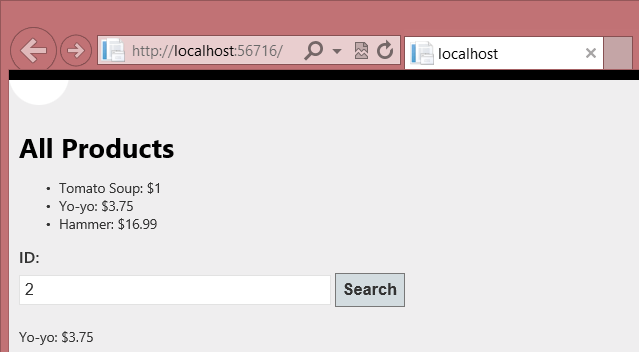
圖12. 通過ID獲得一個產品
If you enter an invalid ID, the server returns an HTTP error:
如果輸入無效的ID,服務器會返回一個HTTP錯誤(圖13):
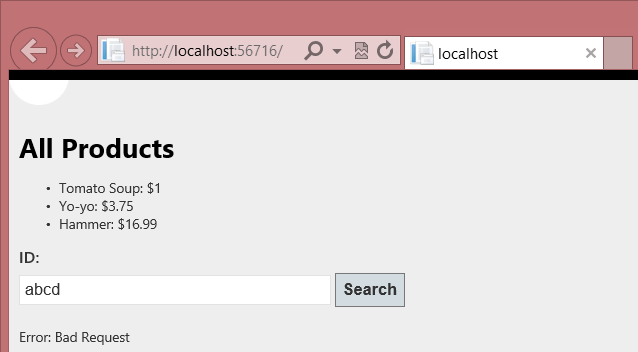
圖13. 無效ID錯誤
This section explains briefly how ASP.NET Web API maps URIs to controller methods. For more detail, see Routing in ASP.NET Web API.
本節主要解釋ASP.NET Web API如何把URI映射到控制器的方法。更多信息參閱ASP.NET Web API中的路由。
For each HTTP message, the ASP.NET Web API framework decides which controller receives the request by consulting a route table. When you create a new Web API project, the project contains a default route that looks like this:
對於每一個HTTP消息,ASP.NET Web API框架都會通過咨詢一個路由表來決定接收該請求的控制器。在創建一個新的Web API項目時,該項目便會包含一個類似於下面這樣的默認路由:
/api/{controller}/{id}
The {controller} and {id} portions are placeholders. When the framework sees a URI that matches this pattern, it looks for a controller method to invoke, as follows:
{controller}和{id}部分是占位符。當框架看到一個與此模式匹配的URI時,它按以下步驟查找控制器方法:
Here are some example requests, and the action that results from each, given our current implementation.
以下是一些示例請求,以及每個請求的形成的動作(表2)。
In the first example, "products" matches the controller named ProductsController. The request is a GET request, so the framework looks for a method on ProductsController whose name starts with "Get...". Furthermore, the URI does not contain the optional {id} segment, so the framework looks for a method with no parameters. The ProductsController::GetAllProducts method meets all of these requirements.
其中第一個示例,“products”匹配名為ProductsController的控制器。該請求是一個GET請求,因此框架在ProductsController上查找一個名稱以“GET…”開頭的方法。進一步地,這個URI不包含可選的{id}片段,因此,框架查找的是一個不帶參數的方法。於是,ProductsController::GetAllProducts滿足所有這些需求。
The second example is the same, except that the URI contains the {id} portion. Therefore, the frameworks calls GetProduct, which takes a parameter named id. Also, notice that value "5" from the URI is passed in as the value of the id parameter. The framework automatically converts the "5" to an int type, based on the method signature.
第二個示例與此相同,只是該URI包含了{id}選項。因此,框架會調用GetProduct,它有一個名稱為id的參數。另外,這個URI的值“5”會作為這個id參數的值進行傳遞。框架會根據該方法的簽名,自動地把這個“5”轉換成int類。
Here are some requests that cause routing errors:
以下是一些會引起路由錯誤的請求(表3):
In the first example, the client sends an HTTP POST request. The framework looks for a method whose name starts with "Post..." However, no such method exists in ProductsController, so the framework returns an HTTP response with status 405, Method Not Allowed.
其中第一個示例,客戶端發送了一個HTTP的POST請求。框架會查找以名稱以“Post…”開頭的方法。然而,在ProductsController中不存在這樣的方法,因此,框架會返回一個狀態為“405 – 方法不允許”的HTTP響應。
The request for /api/users fails because there is no controller named UsersController. The request for api/products/abc fails because the URI segment "abc" cannot be converted into the id parameter, which expects an int value.
/api/users請求失敗的原因是沒有名稱為UserController的控制器。api/products/abc請求失敗的原因是這個URI的片段“abc”不能被轉換成id參數,它期望的是一個int值。
When you are working with an HTTP service, it can be very useful to see the HTTP request and request messages. You can do this by using the F12 developer tools in Internet Explorer 9. From Internet Explorer 9, press F12 to open the tools. Click the Network tab and press Start Capturing. Now go back to the web page and press F5 to reload the web page. Internet Explorer will capture the HTTP traffic between the browser and the web server. The summary view shows all the network traffic for a page:
在使用HTTP服務時,查看HTTP請求與響應的消息可能是非常有用的。你可以在IE9中使用F12開發者工具來做這種事。在IE9中使用F12鍵打開此工具。點擊“網絡”標簽,並按“開始捕捉”。現在,回到web頁面,並按F5鍵刷新此頁面。IE會捕捉出浏覽器與web服務器之間的HTTP通信。摘要視圖展示了一個頁面的所有網絡通信(圖14):
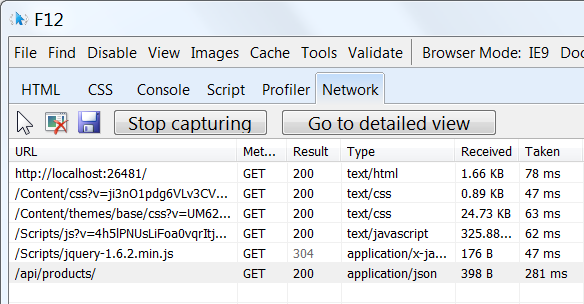
圖14. 一個頁面的網絡通信
Locate the entry for the relative URI “api/products/”. Select this entry and click Go to detailed view. In the detail view, there are tabs to view the request and response headers and bodies. For example, if you click the Request headers tab, you can see that the client requested "application/json" in the Accept header.
定位到相對URI地址“api/products/”條目。選擇這個條目,並點擊“轉到詳細視圖”。在詳細視圖中,有查看請求與響應報頭與正文的標簽。例如,如果你點擊“請求報頭”標簽,會看到客戶端請求的“application/json”中的Accept報頭(見圖15)。
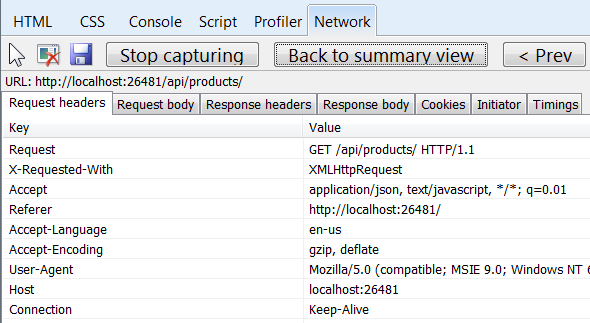
圖15. “請求報頭”
If you click the Response body tab, you can see how the product list was serialized to JSON. Other browsers have similar functionality. Another useful tool is Fiddler, a web debugging proxy. You can use Fiddler to view your HTTP traffic, and also to compose HTTP requests, which gives you full control over the HTTP headers in the request.
如果點擊“響應正文”標簽,會看到產品列表是如何被序列化成JSON的。其它浏覽器有類似的功能。另一個有用的工具是Fiddler,這是一個web調試代理。你可以用Fiddler來查看HTTP通信,並且也可以構造HTTP請求,這讓你能夠充分控制請求的HTTP報頭。
For a more complete example of an HTTP service that supports POST, PUT, and DELETE actions, see:
更多支持POST、PUT和DELETE動作的完整示例參見:
Web API does not require ASP.NET MVC. Other options:
Web API並不要求與ASP.NET MVC一起使用。其它選項: