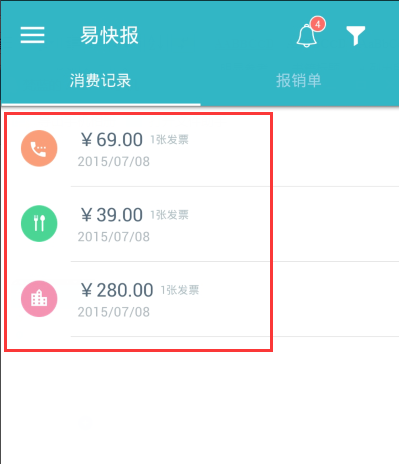
對於熟悉C#語言的開發者而言,用Xamarin開發Android應用也是一個不錯的選擇。小米盒子是Android系統,當然也就可以使用Xamarin來開發。首選來看效果圖。
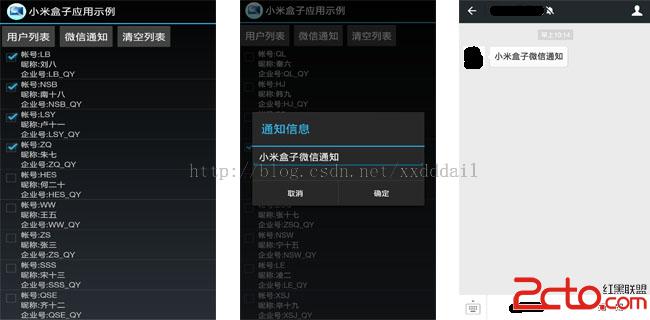
注:(1).左圖是從數據庫中拉取用戶列表(圖中的用戶的虛擬的)
(2)中間圖是根據選中的用戶發起微信通知
(3)右圖是微信企業號中收到的通知
一、在VS中建立Android應用
1.布局主界面
注:由於小米盒子使用的遙控器控制,不像手機是觸摸屏的,所以界面中盡量以按鈕、簡易圖表的形式展現,以方便控制。
2.主界面MainActivity的CS代碼
using System;
using Android.App;
using Android.Content;
using Android.Runtime;
using Android.Views;
using Android.Widget;
using Android.OS;
using System.Data;
using System.Data.SqlClient;
using System.Collections.Generic;
using System.Text;
namespace XiaoMiBoxDemo
{
[Activity(Label = 小米盒子應用示例, MainLauncher = true, Icon = @drawable/icon)]
public class MainActivity : Activity
{
private Button _btnLoadUser = null;
private Button _btnWeiXinNotify = null;
private Button _btnClear = null;
private ListView _listView = null;
private List _userList = null;
protected override void OnCreate(Bundle bundle)
{
base.OnCreate(bundle);
SetContentView(Resource.Layout.Main);
FetchControls();
BindEvents();
}
private void BindEvents()
{
_btnLoadUser.Click += _btnLoadUser_Click;
_listView.ItemClick += _listView_ItemClick;
_btnWeiXinNotify.Click += _btnWeiXinNotify_Click;
_btnClear.Click += _btnClear_Click;
}
void _btnClear_Click(object sender, EventArgs e)
{
_listView.Adapter = null;
_userList.Clear();
}
void _btnWeiXinNotify_Click(object sender, EventArgs e)
{
if (_userList == null || _userList.Count <= 0)
{
Toast.MakeText(this, 請選擇要通知的用戶, ToastLength.Long).Show();
return;
}
String qyNoIds = ;
bool hasSelectedUser = false;
foreach (UserInfo _userInfo in _userList)
{
if (!_userInfo.IsSelected)
{
continue;
}
hasSelectedUser = true;
if (String.IsNullOrWhiteSpace(_userInfo.QYNo))
{
continue;
}
if (String.IsNullOrWhiteSpace(qyNoIds))
{
qyNoIds = _userInfo.QYNo;
}
else
{
qyNoIds += | + _userInfo.QYNo;
}
}
if (String.IsNullOrWhiteSpace(qyNoIds))
{
if (hasSelectedUser)
{
Toast.MakeText(this, 所選擇的用戶沒有綁定企業號, ToastLength.Long).Show();
}
else
{
Toast.MakeText(this, 請選擇要通知的用戶, ToastLength.Long).Show();
}
return;
}
String returnErrorMsg = ;
EditText editText = new EditText(this);
AlertDialog.Builder builder = new AlertDialog.Builder(this);
builder.SetTitle(通知信息);
builder.SetView(editText);
EventHandler okClick = delegate
{
String message = editText.Text;
if (WeiXinHelper.SendContent(out returnErrorMsg, qyNoIds, message))
{
returnErrorMsg = 發送成功;
}
Toast.MakeText(this, returnErrorMsg, ToastLength.Long).Show();
};
builder.SetNegativeButton(取消, delegate { });
builder.SetPositiveButton(確定, okClick);
builder.Show();
}
void _listView_ItemClick(object sender, AdapterView.ItemClickEventArgs e)
{
UserInfo userInfo = _userList[e.Position];
userInfo.IsSelected = (!userInfo.IsSelected);
String guid = String.Format({0}, e.View.Tag);
if (guid.Equals(userInfo.Guid))
{
e.View.FindViewById(Resource.Id.checkBoxUser).Checked = userInfo.IsSelected;
}
}
private void FetchControls()
{
_btnLoadUser = FindViewById
注:(1)使用自定義的DBUtil類來查詢數據庫。
(2)_listView使用自定義的UserListAdapter來綁定數據。
(3)給相應的按鈕和_listView的項添加點擊事件
(3)需要特別注意的是MainActivity定義的上一行有 [Activity(Label = 小米盒子應用示例, MainLauncher = true, Icon = @drawable/icon)]的代碼,這裡的Label將會影響到最終應用顯示的名稱(包括應用列表和應用啟動後的),而icon在更換了之後,除了在項目屬性中調整之外,這裡也要一並調整,否則會編譯不過。
3.數據庫工具類DBUtil
using System;
using System.Collections.Generic;
using System.Data;
using System.Data.SqlClient;
using System.Text;

namespace XiaoMiBoxDemo
{
    public class DBUtil
    {
        private static String ConnectionString = server=數據庫服務器;database=DBDemo;uid=sa;pwd=abc;pooling=false;Connect Timeout=120;;

        ///
        /// 執行查詢語句,返回DataSet
        ///
        ///查詢語句
        /// DataSet
        public static DataSet Query(string SQLString)
        {
            using (SqlConnection connection = new SqlConnection(ConnectionString))
            {
                DataSet ds = new DataSet();
                try
                {
                    connection.Open();
                    SqlDataAdapter command = new SqlDataAdapter(SQLString, connection);
                    command.Fill(ds, ds);
                }
                catch (System.Data.SqlClient.SqlException ex)
                {
                    throw new Exception(ex.Message);
                }
                return ds;
            }
        }
    }
}
注:(1).數據庫服務器,需要換成相應的值。比如192.168.1.101或www.xxx.com:8090等
(2).C#下的Android連接數據庫時,直接使用.Net的數據庫連接方式,不必像eclipse下那麼麻煩。不過需要注意,記得要引用相應的DLL(System.Data).該DLL一定要引用Android下的,而不.Net下的,這是我的Android的System.Data.dll路徑C:Program Files (x86)Reference AssembliesMicrosoftFrameworkMonoAndroid 1.0System.Data.dll。
(3).記得設置Android應用的編碼,否則在執行SQL時可能會出現Code page 936 not support。這是因為我們開發的應用的字符集和數據庫服務器的字符集不一致造成的。
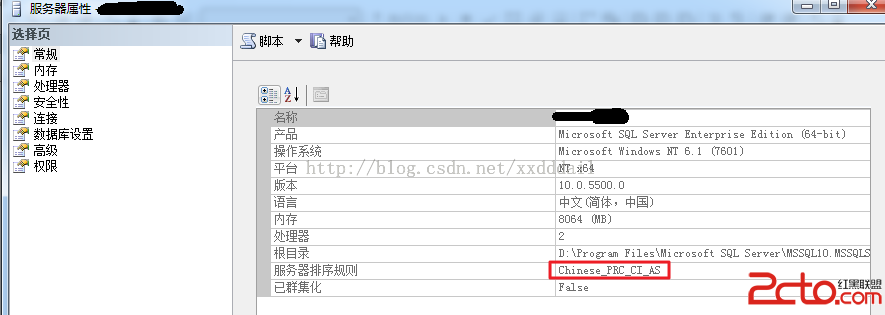
從圖上可以看到SQL服務器使用的Chinese_PRC_CI_AS的排序規則,這是GBK的字符集,所以我們的應用也需需有這樣的字符集支持,為此需要給應用加一個配置,見下圖。項目->右鍵->屬性,然後按下圖配置。
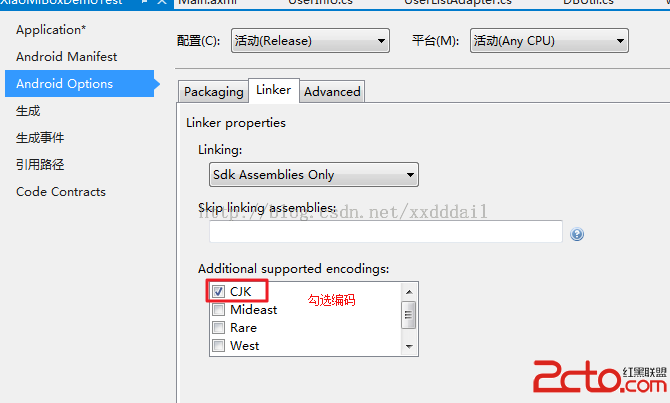
注:CJK表示的中日韓的字符集。
4.列表適配器UserListAdapter
using System;
using System.Collections.Generic;
using System.Linq;
using System.Text;
using Android.App;
using Android.Views;
using Android.Widget;
namespace XiaoMiBoxDemo
{
public class UserListAdapter : BaseAdapter
{
///
/// 所有UserInof 的數據
///
List items;
Activity context;
public UserListAdapter(Activity context, List items)
: base()
{
this.context = context;
this.items = items;
}
public override long GetItemId(int position)
{
return position;
}
public override UserInfo this[int position]
{
get { return items[position]; }
}
public override int Count
{
get { return items.Count; }
}
///
/// 系統會呼叫 並且render.
///
///
///
///
/// (Resource.Id.textViewAccount).Text = item.Account;
view.FindViewById(Resource.Id.textViewNickname).Text = item.Nickname;
view.FindViewById(Resource.Id.textViewQYNo).Text = item.QYNo;
view.FindViewById(Resource.Id.checkBoxUser).Checked = item.IsSelected;
view.Tag = item.Guid;
return view;
}
}
}
其中UserInfo的代碼如下
using System;
using System.Collections.Generic;
using System.ComponentModel;
using System.Linq;
using System.Text;

namespace XiaoMiBoxDemo
{
    public class UserInfo
    {
        ///
        /// Guid
        ///
        public String Guid { get; set; }

        ///
        /// 帳號
        ///
        public String Account { get; set; }

        ///
        /// 昵稱
        ///
        public String Nickname { get; set; }

        ///
        /// 企業號
        ///
        public String QYNo { get; set; }

        ///
        /// 是否選中
        ///
        [DefaultValue(false)]
        public bool IsSelected { get; set; }
    }
}
下面是每一個Item的布局代碼
5.字符串變量Strings.xml
  用戶列表
  微信通知
  清空列表
  小米盒子應用示例
  帳號:
  昵稱:
  企業號:
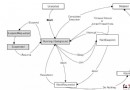
1.原理:在實現了微信企業號的WCF服務後,在Android端以Web服務調用的形式來發起通知。
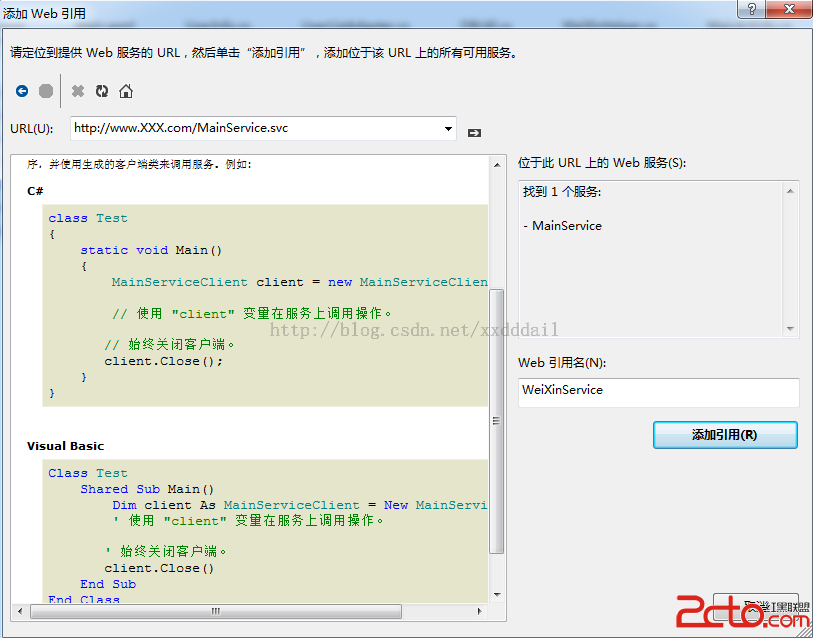
2.引用WCF
在WinForm或者Asp.Net下調用WCF,只需要直接添加服務引用就可以了。在Xamarin下也是如果,所不同的是,這裡添加的是Web引用,見下圖。
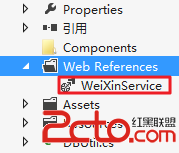
這時在我們的項目中,會多一個Web References的文件夾,下面會有一個WeiXinService,見下圖。
3.調用WCF
為了方便以後調用,這裡將調用封裝到WeiXinHelper類中,代碼如下
using System;
using System.Collections.Generic;
using System.Linq;
using System.Text;
namespace XiaoMiBoxDemo
{
#region WeiXinMessageType
///
/// 微信的消息類型
///
public sealed class WeiXinMessageType
{
public const string TEXT = text;
}
#endregion
#region WeiXinMessageEncription
///
/// 微信的消息加密開關
///
public sealed class WeiXinMessageEncription
{
///
/// 不需要加密
///
public const string NOT = 0;
///
/// 需要加密
///
public const string NEED = 1;
}
#endregion
public class WeiXinHelper
{
///
/// 發送文本消息給微信用戶
///
///當返回值為false時,返回的錯誤信息.
///用戶的企業號的ID列表(多個用戶之間用‘|’分隔)
///發送的消息
///
注:
(1).這裡調用WCF時不像Asp.Net或者WinForm下,使用Client來調用。而是要使用MainService實例來調用。為什麼使用MainService呢?因為WCF的微信企業號服務主類就是MainService.
(2).MainService中的SendMsg方法,原來有一個bool的返回值,但是這裡不見了。其實不是不見了,而是以out的形式輸出了。即isSendMsgResult和isSendMsgResultSpecified.其中isSendMsgResultSpecified是引用時自動帶入的參數,當isSendMsgResult和isSendMsgResultSpecified都為true時,表示成功。
三.生成應用
1.在生成應用之前,一定記得設置應用的api級別,並配置所需要的相關權限,具體見下面的圖。
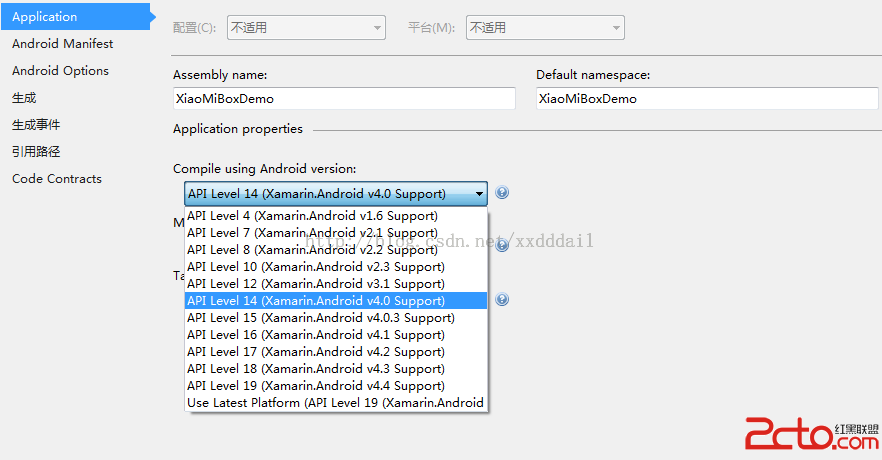
注:如果沒有配置Android的API級別,將會導致應用安裝時程序包解析失敗而無法安裝。
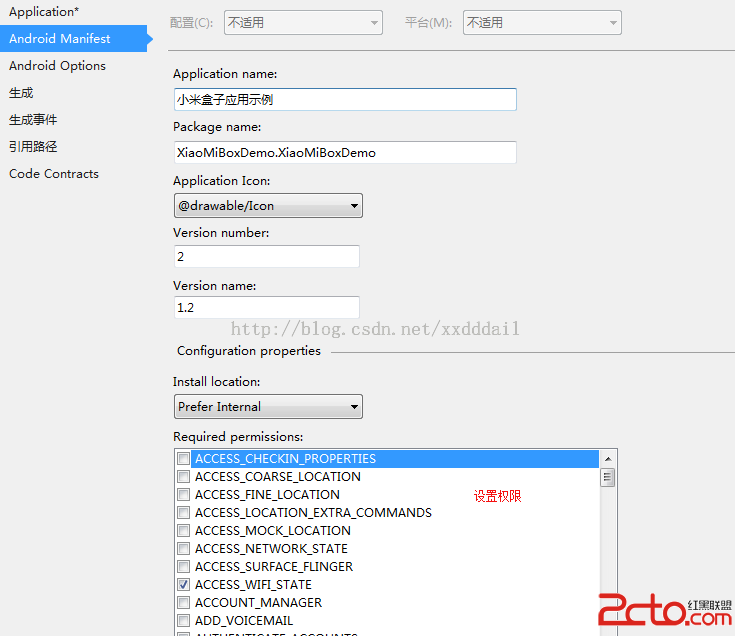
注:這裡需要配置ACCESS_WIFI_STATE和INTERNAL的權限,如果沒有配置將會導致數據庫連接和微信通知時失敗,提示connect refuse等字樣。
2.一定記得設置成Release下生成應用,在Debug下生成的應用可能正常運行的,在Release下可能會失敗,最常見的就是權限沒有設置導致的。
3.應用可能需要配置合適的屏幕尺寸,否則在小米盒子中會無法顯示,比如一片黑。
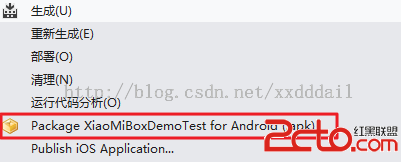
3.打包應用