因為工作中負責的軟件涉及的區域太廣,每次換個軟件很麻煩,微軟自帶的 one key click一直不是很喜歡,可能一部分原因是因為那個key是要自己處理一下,否則時效不夠長,還有一部分原因可能是因為每次發布這個東西都很麻煩,並且如果出錯路徑不好尋找,故軟件早就放棄了one key click的方式,現在采取的均為setup安裝,但是問題出來了,安裝好了之後升級就是個問題了。本文主要是針對setup的升級來的。主要實現如下效果:主程序啟動的同時啟動更新程序,更新程序通過webservice來獲取服務器某個目錄下面的文件,然後批量的download到主程序的根目錄下,之後解壓,解壓完成後程序重新啟動。
故本文從以下兩個方面講解1、webservice的部署,2、更新程序的說明。
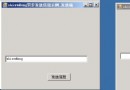
主程序圖如下:
BLLImpl
public class LoadInfoServiceImpl:ILoadInfoService
    {
        private string version;

        public string Version
        {
            set { version = value; }
        }

        private string url;

        public string Url
        {
            set { url = value; }
        }

        private string directory;

        public string Directory
        {
            set { directory = value; }
        }

        private string updateLog;

        public string UpdateLog
        {
            set { updateLog = value; }
        }

        #region ILoadInfoService 成員

        public string GetVersion()
        {
            return version;
        }

        public string GetUrl()
        {
            return url + directory;
        }

        public string[] GetZips()
        {
            string folder = HttpRuntime.AppDomainAppPath + directory;
            string[] zips = System.IO.Directory.GetFileSystemEntries( folder );
            for (int i = 0; i < zips.Length; i++)
            {
                string fileName = Path.GetFileName( zips[i] );

                zips[i] = fileName;
            }
            return zips;
        }

        public string GetUpdateLog()
        {
            StringBuilder sb = new StringBuilder();
            string path = HttpRuntime.AppDomainAppPath + directory + updateLog;
            if (File.Exists( path ))
            {
                StreamReader sr = new StreamReader( path, Encoding.Default );
                string s;
                while ((s = sr.ReadLine()) != null)
                {
                    //上面一行一行讀。然後在裡面就看你自己怎麼處理了。下面是假設。
                    sb.AppendLine( s );
                }
                sr.Close();
            }
            return sb.ToString();
        }

        public string[] GetUpdateInfos()
        {
            string[] strArray = new string[] { this.GetVersion(), this.GetUrl(), string.Join( ",", this.GetZips() ), this.GetUpdateLog() };
            return strArray;
        }

        #endregion
    }
UpdateWeb
Configs/AutoUpdateWebService.xml 這個文件主要是spring.net用作注入的,實現webservice。這樣只要網站部署好了之後,通過如下地址http://ip/SXSUpdateWebService.asmx 即可訪問webservice,下面是大概的描述
<?xml version="1.0" encoding="utf-8" ?>
<objects xmlns="http://www.springframework.net" xmlns:db="http://www.springframework.net/database">

  <object id="SXSUpdateWebServiceBLL" type="BJCreation.AutoUpdate.BLLImpl.LoadInfoServiceImpl, BJCreation.AutoUpdate.BLLImpl">
    <property name="Version" value="20132101" /><!-- 這個是版本號 -->
    <property name="Url" value="${local.url}" /> <!-- 這個是url就是http://ip  -->
    <property name="Directory" value="UpdateFile/test/" /><!-- 這個是要從服務器的那個目錄下去取更新的文件 -->
    <property name="UpdateLog" value="${local.log}" /> <!-- 這個是此次更新的日志 -->
  </object>
  <object id="SXSUpdateWebService" type="Spring.Web.Services.WebServiceExporter, Spring.Web">
    <property name="TargetName" value="SXSUpdateWebServiceBLL" />
    <property name="Namespace" value="http://www.creation.com" />
    <property name="Description" value="測試webservice" />
    <property name="TypeAttributes">
      <list>
        <object type="System.Web.Script.Services.ScriptServiceAttribute, System.Web.Extensions"/>
      </list>
    </property>
  </object>
</objects>
整個文章的源代碼在第二篇會附上。