在winform下完成閣下結構多窗口界面的辦法之續篇。本站提示廣大學習愛好者:(在winform下完成閣下結構多窗口界面的辦法之續篇)文章只能為提供參考,不一定能成為您想要的結果。以下是在winform下完成閣下結構多窗口界面的辦法之續篇正文
在上篇文章在winform下完成閣下結構多窗口界面的辦法曾經完成了閣下結構多窗口界面,明天原來是研討基於winform的插件編程,沒想到趁便又找到了另外一種完成計劃,這類完成計劃更簡略,要寫的代碼也很少,詳細完成以下。
可視化設計部分:
1.父窗口:ParentForm的IsMdiContainer 設置為 true,即:this.IsMdiContainer=true;
2.在父窗口中添加一個頂部菜單:menuStrip1,並新增一個菜單項:Windows,且將menuStrip1的MdiWindowListItem設置為該Windows菜單對象,即: this.menuStrip1.MdiWindowListItem = this.windowsToolStripMenuItem;
3.在父窗口中添加一個樹形菜單:treeView1,並將其Dock設為左靠齊,即:this.treeView1.Dock = System.Windows.Forms.DockStyle.Left;且將margin設為0;
4.在父窗口中添加一個Panel:panel1,且將其width設為3;
以下是設計後主動生成的代碼:
namespace WinFormTest
{
partial class ParentForm
{
/// <summary>
/// 必須的設計器變量。
/// </summary>
private System.ComponentModel.IContainer components = null;
/// <summary>
/// 清算一切正在應用的資本。
/// </summary>
/// <param name="disposing">假如應釋放托管資本,為 true;不然為 false。</param>
protected override void Dispose(bool disposing)
{
if (disposing && (components != null))
{
components.Dispose();
}
base.Dispose(disposing);
}
#region Windows 窗體設計器生成的代碼
/// <summary>
/// 設計器支撐所需的辦法 - 不要
/// 應用代碼編纂器修正此辦法的內容。
/// </summary>
private void InitializeComponent()
{
this.menuStrip1 = new System.Windows.Forms.MenuStrip();
this.windowsToolStripMenuItem = new System.Windows.Forms.ToolStripMenuItem();
this.treeView1 = new System.Windows.Forms.TreeView();
this.panel1 = new System.Windows.Forms.Panel();
this.menuStrip1.SuspendLayout();
this.SuspendLayout();
//
// menuStrip1
//
this.menuStrip1.Items.AddRange(new System.Windows.Forms.ToolStripItem[] {
this.windowsToolStripMenuItem});
this.menuStrip1.Location = new System.Drawing.Point(0, 0);
this.menuStrip1.MdiWindowListItem = this.windowsToolStripMenuItem;
this.menuStrip1.Name = "menuStrip1";
this.menuStrip1.Size = new System.Drawing.Size(684, 25);
this.menuStrip1.TabIndex = 0;
this.menuStrip1.Text = "menuStrip1";
//
// windowsToolStripMenuItem
//
this.windowsToolStripMenuItem.Name = "windowsToolStripMenuItem";
this.windowsToolStripMenuItem.Size = new System.Drawing.Size(73, 21);
this.windowsToolStripMenuItem.Text = "Windows";
//
// treeView1
//
this.treeView1.Dock = System.Windows.Forms.DockStyle.Left;
this.treeView1.Location = new System.Drawing.Point(0, 25);
this.treeView1.Margin = new System.Windows.Forms.Padding(0);
this.treeView1.Name = "treeView1";
this.treeView1.Size = new System.Drawing.Size(228, 380);
this.treeView1.TabIndex = 3;
this.treeView1.NodeMouseDoubleClick += new System.Windows.Forms.TreeNodeMouseClickEventHandler(this.treeView1_NodeMouseDoubleClick);
//
// panel1
//
this.panel1.Anchor = ((System.Windows.Forms.AnchorStyles)(((System.Windows.Forms.AnchorStyles.Top | System.Windows.Forms.AnchorStyles.Bottom)
| System.Windows.Forms.AnchorStyles.Left)));
this.panel1.BackColor = System.Drawing.Color.Red;
this.panel1.BorderStyle = System.Windows.Forms.BorderStyle.FixedSingle;
this.panel1.Cursor = System.Windows.Forms.Cursors.VSplit;
this.panel1.Location = new System.Drawing.Point(230, 28);
this.panel1.Margin = new System.Windows.Forms.Padding(0);
this.panel1.Name = "panel1";
this.panel1.Size = new System.Drawing.Size(3, 100);
this.panel1.TabIndex = 5;
//
// Form1
//
this.AutoScaleDimensions = new System.Drawing.SizeF(6F, 12F);
this.AutoScaleMode = System.Windows.Forms.AutoScaleMode.Font;
this.ClientSize = new System.Drawing.Size(684, 405);
this.Controls.Add(this.panel1);
this.Controls.Add(this.treeView1);
this.Controls.Add(this.menuStrip1);
this.IsMdiContainer = true;
this.MainMenuStrip = this.menuStrip1;
this.Name = "Form1";
this.Text = "Form1";
this.Load += new System.EventHandler(this.Form1_Load);
this.Resize += new System.EventHandler(this.Form1_Resize);
this.menuStrip1.ResumeLayout(false);
this.menuStrip1.PerformLayout();
this.ResumeLayout(false);
this.PerformLayout();
}
#endregion
private System.Windows.Forms.MenuStrip menuStrip1;
private System.Windows.Forms.ToolStripMenuItem windowsToolStripMenuItem;
private System.Windows.Forms.TreeView treeView1;
private System.Windows.Forms.Panel panel1;
}
}
編碼部分:
其實下面的設計後,假如經由過程以下界說的辦法翻開一個子窗口,則直接完成了閣下結構且包括多子窗口的界面。
private void ShowChildForm<TForm>() where TForm : Form, new()
{
Form childForm = new TForm();
childForm.MdiParent = this;
childForm.Name = "ChildForm - " + DateTime.Now.Millisecond.ToString();
childForm.Text = childForm.Name;
childForm.Show();
}
固然依然有不完善的處所,那就是右邊菜單欄寬度不克不及靜態調劑,而又沒有效到splitContainer,故我們只要本身來完成,其實也很簡略,步調以下:
1.在父窗口結構函數中參加初始化panel1(用作朋分器)地位及定閱相干事宜,代碼以下:
public ParentForm()
{
InitializeComponent();
panel1.MouseDown += panel1_MouseDown;
panel1.MouseUp += panel1_MouseUp;
panel1.MouseMove += panel1_MouseMove;
panel1.Top = menuStrip1.Height;
panel1.Left = treeView1.Left + treeView1.Width;
panel1.Height = panel1.Parent.Height;
}
上述代碼的感化是:1.包管panel1的高度與地位與左邊樹形菜單控件相婚配;2.定閱的三個Mouse事宜重要是為了前面完成挪動panel1。
2.完成定閱的三個Mouse事宜所對應的辦法,分離為鼠標按下、鼠標挪動、鼠標松開,代碼以下:
private bool startMove = false; //用於標志能否在挪動中
void panel1_MouseMove(object sender, MouseEventArgs e)
{
if (startMove)
{
panel1.Left += e.X;
}
}
void panel1_MouseUp(object sender, MouseEventArgs e)
{
if (startMove)
{
panel1.Left += e.X;
startMove = false;
this.treeView1.Width = panel1.Left;
}
}
void panel1_MouseDown(object sender, MouseEventArgs e)
{
startMove = true;
}
上述代碼感化:按下鼠標標志為開端挪動,然後挪動鼠標,若是標志挪動中,解釋是要挪動panel1,故直接將鼠標以後的X坐標地位累加到panel1.Left屬性上,從而完成挪動,當鼠標彈起後,則將樹形菜單的寬度設置為panel1.Left,從而完成樹形菜單隨panel1的挪動而轉變年夜小。
同時為了包管panel1的高度一直與樹形菜單雷同,在父窗口的Resize辦法參加靜態調劑panel1的高度,代碼以下:
private void ParentForm_Resize(object sender, EventArgs e)
{
panel1.Height = panel1.Parent.Height;
}
到此就完成了全部的完成計劃,為了便於模仿在樹形菜單中雙擊翻開子窗口的後果,同時也添加了以下代碼:
private void ParentForm_Load(object sender, EventArgs e)
{
LoadMenuNodes();
}
private void LoadMenuNodes() //完成情形應當是從數據庫及用戶權限來停止靜態創立菜單項
{
this.treeView1.Nodes.Clear();
var root = this.treeView1.Nodes.Add("Root");
for (int i = 1; i <= 10; i++)
{
var section = root.Nodes.Add("Section-" + i);
int maxNodes = new Random(i).Next(1, 10);
for (int n = 1; n <= maxNodes; n++)
{
section.Nodes.Add(string.Format("Level-{0}-{1}", i, n));
}
}
}
private void treeView1_NodeMouseDoubleClick(object sender, TreeNodeMouseClickEventArgs e)
{
if (e.Node.Nodes.Count <= 0)//當非父節點(即:現實的功效節點)
{
ShowChildForm<ChildForm>();
}
}
附上完全的完成代碼:
using System;
using System.Collections.Generic;
using System.ComponentModel;
using System.Data;
using System.Drawing;
using System.Linq;
using System.Text;
using System.Threading.Tasks;
using System.Windows.Forms;
namespace WinFormTest
{
public partial class ParentForm : Form
{
private bool startMove = false;
public ParentForm()
{
InitializeComponent();
panel1.MouseDown += panel1_MouseDown;
panel1.MouseUp += panel1_MouseUp;
panel1.MouseMove += panel1_MouseMove;
panel1.Top = menuStrip1.Height;
panel1.Left = treeView1.Left + treeView1.Width;
panel1.Height = panel1.Parent.Height;
}
void panel1_MouseMove(object sender, MouseEventArgs e)
{
if (startMove)
{
panel1.Left += e.X;
}
}
void panel1_MouseUp(object sender, MouseEventArgs e)
{
if (startMove)
{
panel1.Left += e.X;
startMove = false;
this.treeView1.Width = panel1.Left;
}
}
void panel1_MouseDown(object sender, MouseEventArgs e)
{
startMove = true;
}
private void ParentForm_Load(object sender, EventArgs e)
{
LoadMenuNodes();
}
private void treeView1_NodeMouseDoubleClick(object sender, TreeNodeMouseClickEventArgs e)
{
if (e.Node.Nodes.Count <= 0)//當非父節點(即:現實的功效節點)
{
ShowChildForm<ChildForm>();
}
}
private void ParentForm_Resize(object sender, EventArgs e)
{
panel1.Height = panel1.Parent.Height;
}
private void LoadMenuNodes() //完成情形應當是從數據庫及用戶權限來停止靜態創立菜單項
{
this.treeView1.Nodes.Clear();
var root = this.treeView1.Nodes.Add("Root");
for (int i = 1; i <= 10; i++)
{
var section = root.Nodes.Add("Section-" + i);
int maxNodes = new Random(i).Next(1, 10);
for (int n = 1; n <= maxNodes; n++)
{
section.Nodes.Add(string.Format("Level-{0}-{1}", i, n));
}
}
}
private void ShowChildForm<TForm>() where TForm : Form, new()
{
Form childForm = new TForm();
childForm.MdiParent = this;
childForm.Name = "ChildForm - " + DateTime.Now.Millisecond.ToString();
childForm.Text = childForm.Name;
childForm.Show();
}
}
}
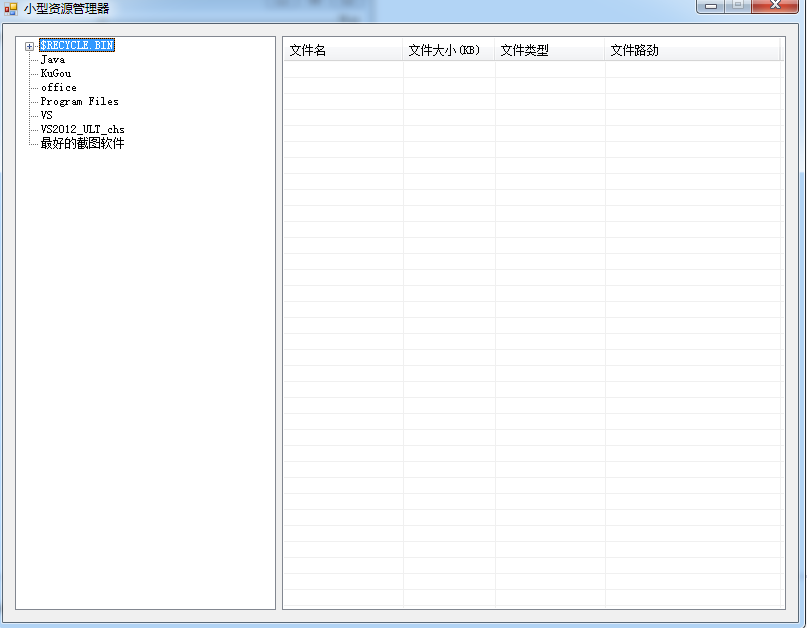
終究後果以下圖示:


解釋:我這裡為了表現朋分器,故將其配景色設為白色,便於年夜家不雅察,這類處理計劃與之前的處理計劃功效上是雷同的,但有一點小小差別,之前的處理計劃中子窗口的題目欄是在父窗口的容器內,而本文的處理計劃中子窗口在最年夜化後,子窗口的題目欄會與父窗口歸並,以下圖示,至於年夜家用哪一種依現實場景。

關於在winform下完成閣下結構多窗口界面的辦法之續篇的相干常識就給年夜家引見到這裡,後續時光我會持續研討winform關於插件式編程(近期任務義務請求),到時刻異樣會分享給年夜家,也迎接年夜家一路交換,固然高手可以疏忽。