在網絡通訊的編程中我們經常使用到Socket, 這種情況下我們往往需要長期的監聽某個端口, 以獲得相應的Socket, 然後再利用它進行相關操作.但是這樣的話, 主線程就會被阻塞.無法對其他時間做出相應.其實在.Net的Socket類中提供了對異步操作的支持.下面將介紹其基本原理, 以及利用它做的一個P2P的實現.
背景知識:
你需要了解有關Socket的基本知識, 以及Delegate的異步調用操作.
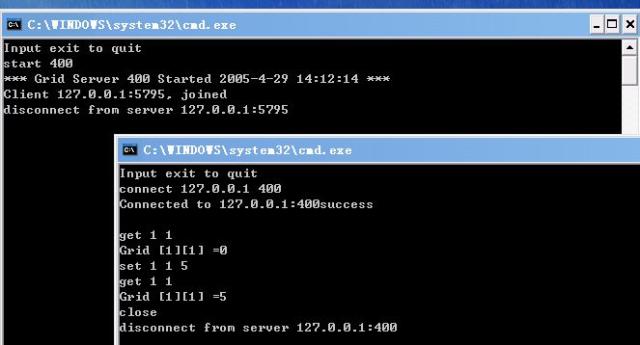
在這個例子中, 我們實現了一個利用非阻塞(non-blocking)的Socket進行局域網通訊的P2P應用.每個客戶擁有一個Grid(類似於一個二維數組), 當它啟動Grid設置服務的時候,一旦別的客戶與它相連就可以查詢並修改某個網格中的數值.(比如查詢 grid[1][2]的值).
運行步驟:
1.啟動服務 在某個客戶端輸入 start 400 (400是端口號, 你可以任意指定)
2.連接其他Peer 在另一個客戶端中輸入 connect 202.119.9.12 400 (202.119.9.12 400是某個開啟服務的客戶端的IP地址)
3.輸入 get 1 1 表示你想獲得grid[1][1]這個網格中的數值.默認情況下得到0
4.輸入 set 1 1 5 表示你想設置grid[1][1]這個網格中的數值為5 .
5.再次輸入 get 1 1 查詢到結果為已修改的5
6.輸入shutdown 關閉與剛才與當前的Peer的連接.你可以再次連接別的Peer
運行示意圖.
在通常的應用中Server往往需要長期處於監聽狀態, 以等待Client的連接.下面是一個典型的應用.
private Socket client = null;

const int nPortListen = 399;

try

{

TcpListener listener = new TcpListener( nPortListen );

Console.WriteLine( "Listening as {0}", listener.LocalEndpoint );

listener.Start();

do

{

byte [] m_byBuff = new byte[127];

if( listener.Pending() )

{

client = listener.AcceptSocket();

// Get current date and time.

DateTime now = DateTime.Now;

string strDateLine = "Welcome " + now.ToString("G") + "nr";

// Convert to byte array and send.

Byte[] byteDateLine = System.Text.Encoding.ASCII.GetBytes( strDateLine.ToCharArray() );

client.Send( byteDateLine, byteDateLine.Length, 0 );

}

else

{

Thread.Sleep( 100 );

}

} while( true ); // Don't use this.

}

catch( Exception ex )

{

Console.WriteLine ( ex.Message );

}
看到那個do {} while( true )了嗎?
只要if( listener.Pending() )的條件不被滿足,這個過程中,主線程就處於被阻塞的狀態, 當然很不利於與用戶的交互(還以為死機了呢).
於是就希望有一種非阻塞的機制來實現網絡間的通訊.如果你熟悉java的話, 你可能用過java1.4中的nio (new io).其中的select機制就是用於解決此問題的.其實在.net中也有類似於它的一個機制, 而且通過事件觸發的異步操作, 使得它更方便被使用, 也更容易被理解.
首先來看看服務器是如何監聽客戶端的連接的.
const int nPortListen = 399;

// Create the listener socket in this machines IP address

Socket listener = new Socket( AddressFamily.InterNetwork, SocketType.Stream, ProtocolType.Tcp );

listener.Bind( new IPEndPoint( aryLocalAddr[0], 399 ) );

//listener.Bind( new IPEndPoint( IPAddress.Loopback, 399 ) ); // For use with localhost 127.0.0.1

listener.Listen( 10 );

// Setup a callback to be notified of connection requests

listener.BeginAccept( new AsyncCallback( OnConnectRequest ), listener );
注意最後一行代碼, BeginAccept 為以後client真正接入的時候設置好了回調函數, 也就是說一旦server發現有client連接它, server端的 OnConnectRequest方法就將被調用.
那麼OnConnectRequest方法中又將做一些什麼事呢?
Socket client;

public void OnConnectRequest( IAsyncResult ar )

{

Socket listener = (Socket)ar.AsyncState;

client = listener.EndAccept( ar );

Console.WriteLine( "Client {0}, joined", client.RemoteEndPoint );

// Get current date and time.

DateTime now = DateTime.Now;

string strDateLine = "Welcome " + now.ToString("G") + "nr";

// Convert to byte array and send.

Byte[] byteDateLine = System.Text.Encoding.ASCII.GetBytes( strDateLine.ToCharArray() );

client.Send( byteDateLine, byteDateLine.Length, 0 );

listener.BeginAccept( new AsyncCallback( OnConnectRequest ), listener );

}
這裡利用連接獲得的socket, 向client發回了連接成功的信息.
隨後又跳回了BeginAccept的狀態, 繼續監聽, 也就是允許有多用戶連接.
再來看看連接的那方.
/**//// <summary>

    /// Connect to the server, setup a callback to connect

    /// </summary>

    /// <param name="serverAdd">server ip address</param>

    /// <param name="port">port</param>

    public void Connect(string serverAdd, int port)

    {

      try

      {

        // Create the socket object

        clientSock = new Socket(AddressFamily.InterNetwork, SocketType.Stream, ProtocolType.Tcp);

        // Define the Server address and port

        IPEndPoint epServer = new IPEndPoint(IPAddress.Parse(serverAdd), port);

        // Connect to server non-Blocking method

        clientSock.Blocking = false;


 // Setup a callback to be notified of connection success

        clientSock.BeginConnect(epServer, new AsyncCallback(OnConnect), clientSock);

      }

      catch (Exception ex)

      {

        Console.WriteLine("Server Connect failed!");

        Console.WriteLine(ex.Message);

      }

   }
BeginConnect為連接成功設置了回調方法OnConnect, 一旦與服務器連接成功就會執行該方法.來看看OnConnect具體做了什麼
    /**//// <summary>

    /// Callback used when a server accept a connection.

    /// setup to receive message

    /// </summary>

    /// <param name="ar"></param>

    public void OnConnect(IAsyncResult ar)

    {

      // Socket was the passed in object

      Socket sock = (Socket)ar.AsyncState;

      // Check if we were sucessfull

      try

      {

        //sock.EndConnect( ar );

        if (sock.Connected)

        {

          AsyncCallback recieveData = new AsyncCallback(OnRecievedData);

          sock.BeginReceive(msgBuff, 0, msgBuff.Length, SocketFlags.None, recieveData, sock);

        }

else

          Console.WriteLine("Unable to connect to remote machine", "Connect Failed!");

      }

      catch (Exception ex)

      {

        Console.WriteLine(ex.Message, "Unusual error during Connect!");

      }

    }
它在檢測確實連接成功後, 又使用BeginReceive注冊了接受數據的回調函數.
/**//// <summary>

    /// Callback used when receive data., both for server or client

    /// Note: If not data was recieved the connection has probably died.

    /// </summary>

    /// <param name="ar"></param>

    public void OnRecievedData(IAsyncResult ar)

    {

      Socket sock = (Socket)ar.AsyncState;

      // Check if we got any data

      try

      {

        int nBytesRec = sock.EndReceive(ar);

        if (nBytesRec > 0)

        {

          // Wrote the data to the List

          string sRecieved = Encoding.ASCII.GetString(msgBuff, 0, nBytesRec);

          ParseMessage(sock ,sRecieved);

          // If the connection is still usable restablish the callback

          SetupRecieveCallback(sock);

        }

        else

        {

          // If no data was recieved then the connection is probably dead

          Console.WriteLine("disconnect from server {0}", sock.RemoteEndPoint);

          sock.Shutdown(SocketShutdown.Both);

          sock.Close();

        }

      }

      catch (Exception ex)

      {

        Console.WriteLine(ex.Message, "Unusual error druing Recieve!");

      }

    }
它在檢測確實連接成功後又使用注冊了接受數據的回調函數
我們可以發現在整個過程中就是通過事件的不斷觸發, 然後在預先設置好的回調函數中做相應的處理工作,比如發送接受數據.下面這幅圖將讓你對這個事件觸發的過程有一個形象的認識.
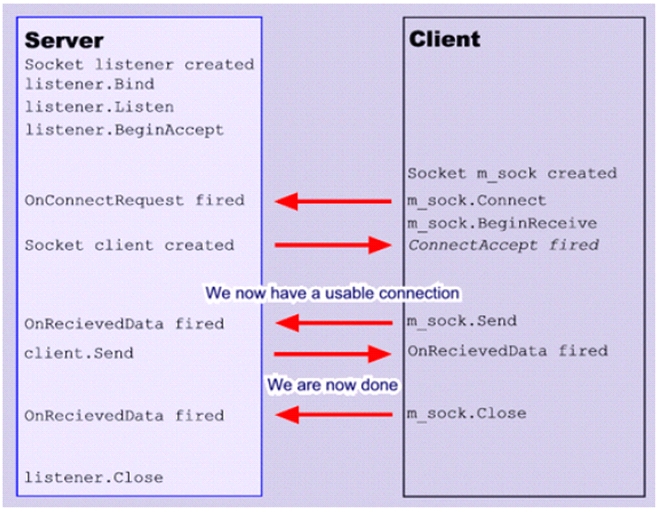
配合附帶的源代碼, 相信可以讓你對此過程有更加深入的了解.
至於本文有關P2P的示例, 其實還很不完善.只是為每個Peer同時提供了充當服務器和客戶端的功能.當然在這個基礎上你可以很方便的做出你想要的效果.