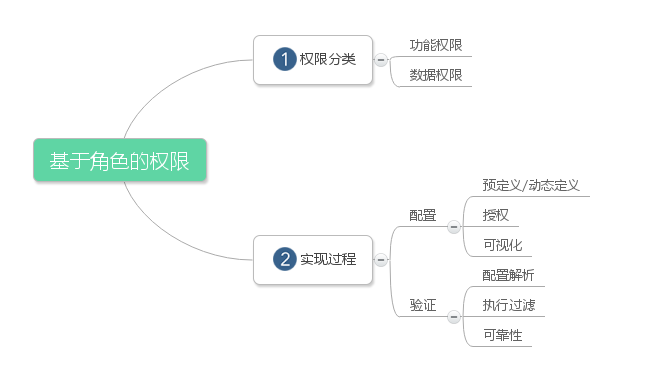
Windows8 的開發已經如火如荼開始了,在 Windows8 中提供的 .NET Framework 已經更新到了 4.5 版,其中又增加了一些新的特性,對壓縮文件的支持就是其中之一。
在 4.5 之前,處理壓縮文件,我們經常需要使用第三方的類庫 SharpZipLib, 現在可以直接實現了。
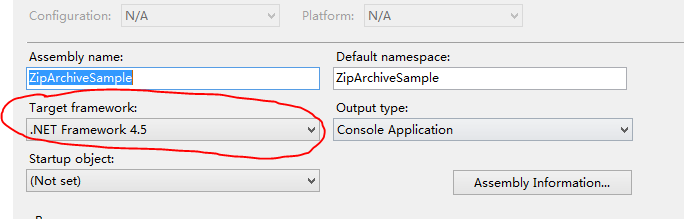
首先做一下准備工作,需要確保你使用 .NET 4.5 版,可以在項目的屬性窗口中檢查一下。
然後,引用必須的程序集。
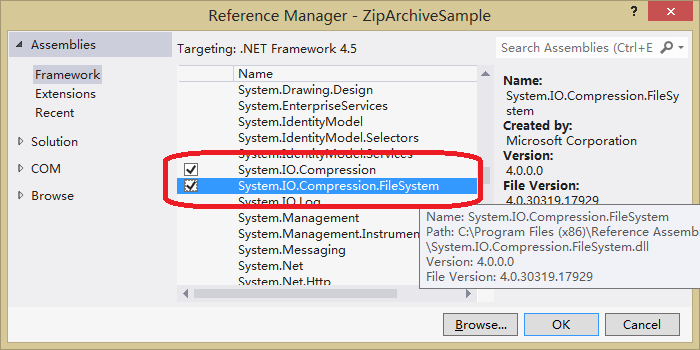
程序集有兩個:System.IO.Compression 和 System.IO.Compression.FileSystem.
類似於對文件和目錄的操作,對於壓縮文件也提供了兩種方式:ZipArchive 和 ZipFile,分別對應兩個新增加的類 ZipArchive 和 ZipFile。這兩個類都定義在命名空間 System.IO.Compression 中。
為了後面演示方便,我們定義一個表示壓縮文件路徑的常量。
const string zipFilePath = @"..\..\Sample.zip";
先看ZipArchive的使用。
創建一個空的壓縮文件,使用 ZipArchiveMode.Create 創建參數。
// 創建 Zip 文件
using (FileStream zipFileToOpen = new FileStream(zipFilePath, FileMode.Create))
using (ZipArchive archive = new ZipArchive(zipFileToOpen, ZipArchiveMode.Create))
{

}
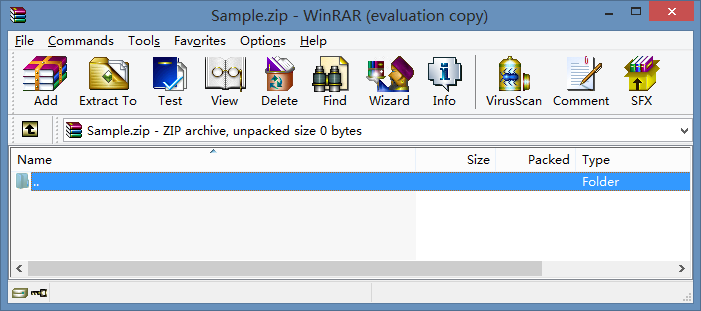
使用 WinRaR 打開壓縮文件,可以看到裡面沒有文件。
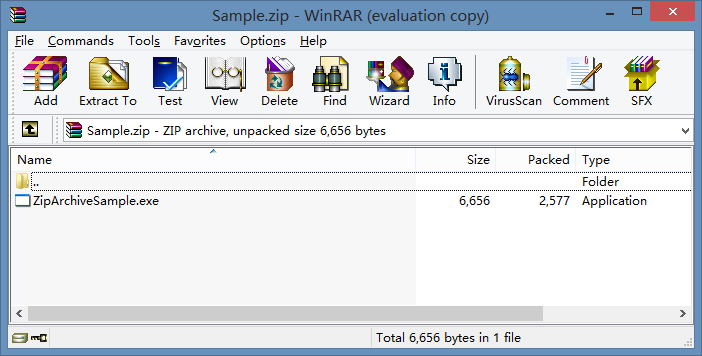
通常,在創建的同時,我們就會加入一些文件,下面的例子中,我們將當前的執行程序文件本身加到壓縮文件中。
// 創建並添加被壓縮文件
using (FileStream zipFileToOpen = new FileStream(zipFilePath, FileMode.Create))
using (ZipArchive archive = new ZipArchive(zipFileToOpen, ZipArchiveMode.Create))
{
    System.Reflection.Assembly assemble = System.Reflection.Assembly.GetExecutingAssembly();
    string path = assemble.Location;
    string filename = System.IO.Path.GetFileName(path);

    ZipArchiveEntry readMeEntry = archive.CreateEntry(filename);
    using (System.IO.Stream stream = readMeEntry.Open())
    {
        byte[] bytes = System.IO.File.ReadAllBytes(path);
        stream.Write(bytes, 0, bytes.Length);
    }
}
現在,打開壓縮文件,可以看到文件已經被壓縮進來了。
當然,也可以通過程序檢查壓縮文件的內容了。使用 Read 方式就可以了。
// 列出壓縮壓縮文件
using (FileStream zipFileToOpen = new FileStream(zipFilePath, FileMode.Open))
using (ZipArchive archive = new ZipArchive(zipFileToOpen, ZipArchiveMode.Read))
{

    foreach (var zipArchiveEntry in archive.Entries)
        Console.WriteLine(
            "FullName of the Zip Archive Entry: {0}", zipArchiveEntry.FullName
        );
}
當然可以從壓縮文件中提取被壓縮的內容了。
// 讀取其中一個文件的內容
using (FileStream zipFileToOpen = new FileStream(zipFilePath, FileMode.Open))
using (ZipArchive archive = new ZipArchive(zipFileToOpen, ZipArchiveMode.Read))
{
    // 解壓某個文件
    ZipArchiveEntry entry = archive.GetEntry("ZipArchiveSample.exe");
    Console.WriteLine(entry.Name);
    using (System.IO.Stream stream = entry.Open())
    {
        System.IO.Stream output = new FileStream("http://www.cnblogs.com/ZipArchiveSample.exe", FileMode.Create);
        int b = -1;
        while ((b = stream.ReadByte()) != -1)
        {
            output.WriteByte((byte) b);
        }
        output.Close();
    }

}
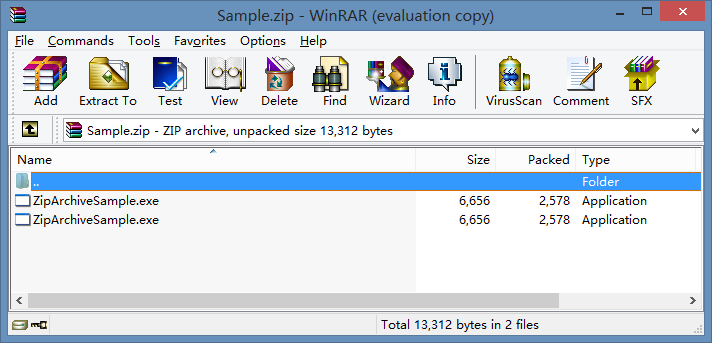
在壓縮文件已經創建之後,還可以打開它,繼續添加文件,這就稱為更新了,使用 Update 模式。
// 向現有的壓縮文件中添加文件
using (FileStream zipFileToOpen = new FileStream(zipFilePath, FileMode.Open))
using (ZipArchive archive = new ZipArchive(zipFileToOpen, ZipArchiveMode.Update))
{
    // 這裡添加當前正在執行的程序文件本身
    System.Reflection.Assembly assemble = System.Reflection.Assembly.GetExecutingAssembly();
    string path = assemble.Location;
    string filename = System.IO.Path.GetFileName( path);

    ZipArchiveEntry readMeEntry = archive.CreateEntry( filename );
    using (System.IO.Stream stream = readMeEntry.Open() )
    {
        byte[] bytes = System.IO.File.ReadAllBytes(path);
        stream.Write(bytes, 0, bytes.Length);
    }

    foreach (var zipArchiveEntry in archive.Entries)
        Console.WriteLine(
            "FullName of the Zip Archive Entry: {0}", zipArchiveEntry.FullName
        );
}
現在壓縮文件中又增加了一個,這可以一個怪異的文件,同一個文件被在壓縮文件中添加了兩次!
除了上邊的基本方法之外,還有一些簡單的使用方法。這涉及到另外一個類:ZipFile。
// 刪除壓縮文件
System.IO.File.Delete(zipFilePath);

// 使用 ZipFile 的靜態方法創建壓縮文件,要保證文件沒有存在
using (ZipArchive zipArchive = ZipFile.Open(zipFilePath, ZipArchiveMode.Create))
{
}
直接添加一個文件的方法。直接使用 CreateEntryFromFile 就可以了。
System.IO.File.Delete(zipFilePath);

// 使用 CreateEntryFromFile 方法添加文件
// 使用 ZipFile 的靜態方法創建壓縮文件
using (ZipArchive zipArchive = ZipFile.Open(zipFilePath, ZipArchiveMode.Create))
{
    System.Reflection.Assembly assemble = System.Reflection.Assembly.GetExecutingAssembly();
    string path = assemble.Location;
    string filename = System.IO.Path.GetFileName(path);

    zipArchive.CreateEntryFromFile(path, filename);
}
將壓縮文件解壓到指定的目錄中。
// 解壓文件
ZipFile.ExtractToDirectory(zipFilePath, "../..");
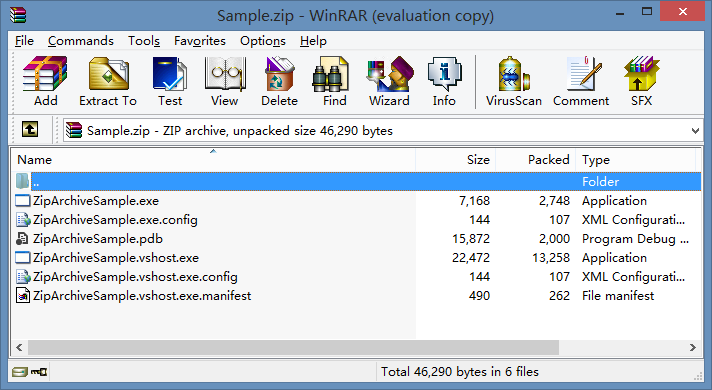
還可以直接將一個目錄中所有的文件都壓縮到一個壓縮文件中。
// 壓縮指定目錄中所有文件
System.IO.File.Delete(zipFilePath);
ZipFile.CreateFromDirectory(".", zipFilePath);
你是不是最喜歡這個方法?現在壓縮文件中的文件更多了。
附錄:
SharpZipLib 的下載地址: http://www.icsharpcode.net/OpenSource/SharpZipLib/
更對C#資料歡迎訪問http://hovertree.com/