1. 背景
最近在研究DotNetOpenAuth——OAuth的一個.NET開源實現,官方網站:http://dotnetopenauth.net/ 。
從GitHub簽出DotNetOpenAuth的源代碼發現最新版本已到5.1,而NuGet中發布的版本只是4.3。新版中使用到了.NET 4.5的異步特性(async, await),於是決定直接用最新版。
用最新版,就要自己進行編譯。用Visual Studio 2012打開解決方案文件進行編譯,一次編譯成功,但編譯出的DotNetOpenAuth相關dll有20個,這麼多dll引用起來不方便。發現DotNetOpenAuth提供了msbuild的配置文件,可以在編譯時自動將dll文件進行合並(使用了ILMerge)。於是改用msbuild命令進行編譯。
2. 用msbuild進行第一次編譯
2.1. 使用的是DotNetOpenAuth的tools\drop.proj編譯配置文件,為了加快編譯速度,注釋了下面的內容:
<!--<ItemGroup>
    <ProjectsToBuild Include="$(ProjectRoot)samples\samples.proj">
        <Properties>TargetFrameworkVersion=v4.5</Properties>
    </ProjectsToBuild>

    --><!-- Sandcastle doesn't seem to be able to handle .NET 4.0 dependencies right now. --><!--
    <ProjectsToBuild Include="$(ProjectRoot)doc\doc.proj">
        <Properties>TargetFrameworkVersion=v4.5</Properties>
    </ProjectsToBuild>
</ItemGroup>-->
2.2. 運行VS2012的命令行:Developer Command Prompt for VS2012
2.3. 運行msbuild命令:
msbuild tools/drop.proj
2.4. 編譯成功
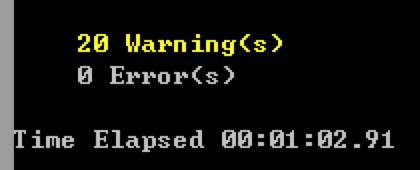
2.5. 在drops\v4.5\Debug文件夾中得到合並後的DotNetOpenAuth.dll。
3. 測試已編譯的DotNetOpenAuth
3.1. 在另外的項目中引用已編譯出的DotNetOpenAuth.dll
3.2. 編譯後運行項目,出現錯誤提示:
Could not load file or assembly 'DotNetOpenAuth' or one of its dependencies. Strong name signature could not be verified. The assembly may have been tampered with, or it was delay signed but not fully signed with the correct private key. (Exception from HRESULT: 0x80131045)
從這個錯誤信息中可以解讀出:需要對DotNetOpenAuth進行強簽名。
4. 使用強簽名進行msbuild編譯
4.1. 生成公鑰
生成公鑰需要借助sn.exe(sn是Strong Name的縮寫),它是Visual Studio/Windows SDK中自帶的一個工具。運行sn.exe命令需要進入Developer Command Prompt for VS2012。
具體操作步驟如下:
4.1.1. 生成密鑰對(公鑰/私鑰)並保存至.pfx文件中
sn -k mykeyfile.pfx
4.1.2. 將密鑰對從文件安裝至密鑰容器中
sn -i mykeyfile.pfx mykeycontainer
4.1.3. 從存放密鑰對的.pfx文件中導出公鑰至.pub文件
sn -p mykeyfile.pfx mykeyfile.pub
4.1.4. 顯示.pub文件中存放的公鑰
sn -q -t mykeyfile.pub
4.2. 使用生成的公鑰進行msbuild編譯
msbuild /p:KeyPairContainer=mykeycontainer,PublicKeyFile="<full path>mykeyfile.pub" tools/drop.proj
4.3. 編譯成功
5. 測試已進行強簽名編譯的DotNetOpenAuth
原以為問題到此就解決了,哪知測試結果出人意料——同樣的錯誤!。。。後來恍然大悟,不放在GAC中,強簽名怎麼會起作用呢?
6. 將DotNetOpenAuth注冊到GAC
6.1. 進入Developer Command Prompt for VS2012命令行
6.2. 運行gacutil命令:
gacutil /i DotNetOpenAuth.dll
6.3. 卻出現錯誤提示:
Failure adding assembly to the cache: Strong name signature could not be verified. Was the assembly built delay-signed?
查看本欄目