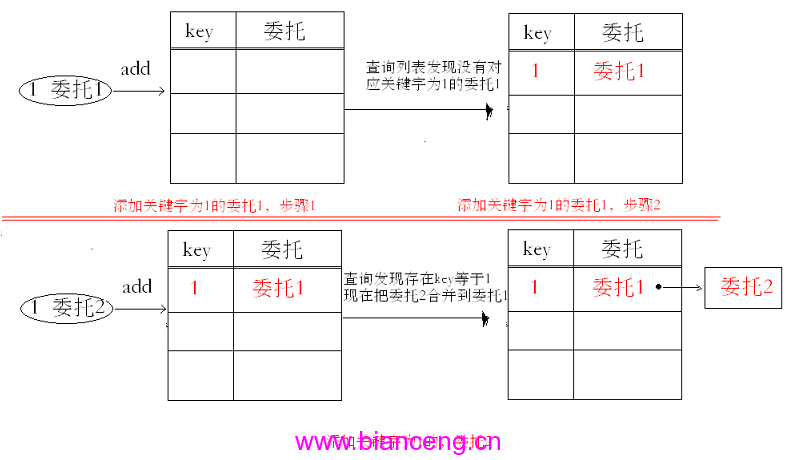
在上篇總結隨筆《Winform開發框架之權限管理系統改進的經驗總結(1)-TreeListLookupEdit控件 的使用》介紹了權限管理模塊的用戶管理部分,其中主要介紹了其中的用戶所屬公司、所屬部門、直屬 經理(人員列表)的幾級數據級聯的展示,通過引入TreeListLookupEdit控件,能增強用戶的體驗效果 。本篇繼續介紹權限系統模塊中的一些閃光點,介紹組織機構管理裡面選擇用戶的界面設計和實現,用 戶選擇在很多場合會用到,如組織機構的用戶選擇,角色裡面的用戶選擇,或者流程裡面的用戶選擇等 用途。
1、選擇用戶界面效果展示
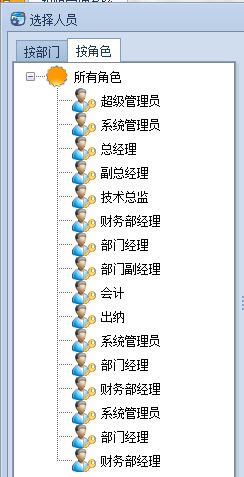
用戶選擇在很多地方需要用到,本篇以組織機構裡面的用戶選擇為例,介紹用戶選擇的界面效果。我 們知道,用戶一般可以按組織機構進行分類,也可以按照角色進行分類,因此我們需要結合兩者進行快 速展示用戶的層次關系,界面效果如下所示。
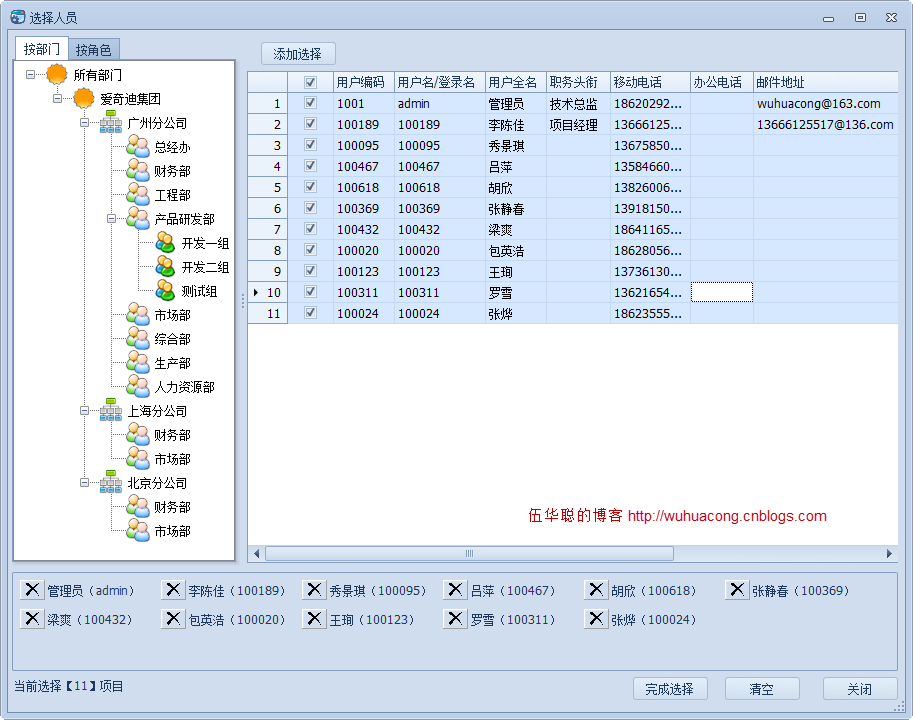
在上面的界面分為三個部分:左邊主要是機構和角色的展示;右邊則是通過列表控件進行展示,並可 以進行勾選的操作;底部則是已選用戶的列表展示(可以移除)。
2、左邊機構樹的遞歸展現
組織機構本身設計就是一個有層次關系的樹,因此它可以通過遞歸函數進行展現,展示方式可以使用 傳統樣式的TreeView控件或者DevExpress樣式的TreeList控件,不過我傾向於使用TreeView,覺得這個 線狀的層次關系更美觀一些,遞歸展示結構樹的代碼如下所示。
private void InitDeptTree()
        {
            this.treeDept.BeginUpdate();
            this.treeDept.Nodes.Clear();

            TreeNode node = new TreeNode();
            node.Text = "所有部門";

            List<OUNodeInfo> list = BLLFactory<OU>.Instance.GetTree();
            AddDept(list, node);

            this.treeDept.Nodes.Add(node);
            this.treeDept.ExpandAll();
            this.treeDept.EndUpdate();
        }

        private void AddDept(List<OUNodeInfo> list, TreeNode treeNode)
        {
            foreach (OUNodeInfo ouInfo in list)
            {
                TreeNode deptNode = new TreeNode();
                deptNode.Text = ouInfo.Name;
                deptNode.Tag = ouInfo.ID;
                deptNode.ImageIndex = Portal.gc.GetImageIndex(ouInfo.Category);
                deptNode.SelectedImageIndex = Portal.gc.GetImageIndex(ouInfo.Category);
                treeNode.Nodes.Add(deptNode);

                AddDept(ouInfo.Children, deptNode);
            }
        }
角色樹不是一個遞歸的關系,因此只需要按列表展示即可,展示代碼如下所示。
private void InitRoleTree()
        {
            this.treeRole.BeginUpdate();
            this.treeRole.Nodes.Clear();

            TreeNode node = new TreeNode();
            node.Text = "所有角色";

            List<RoleInfo> list = BLLFactory<Role>.Instance.GetAll();
            foreach (RoleInfo info in list)
            {
                TreeNode roleNode = new TreeNode();
                roleNode.Text = info.Name;
                roleNode.Tag = info.ID;
                roleNode.ImageIndex = 5;
                roleNode.SelectedImageIndex = 5;

                node.Nodes.Add(roleNode);
            }

            this.treeRole.Nodes.Add(node);
            this.treeRole.ExpandAll();
            this.treeRole.EndUpdate();
        }
角色列表大概效果如下所示。
3、右邊可勾選列表的實現
右邊其實可以通過一般的GridView進行展示,但為了更好的封裝和使用,我使用我的Winform分頁控 件中的WinGridview對象進行展示,這樣使用起來更簡便。
public partial class FrmSelectUser : BaseForm
    {
        public FrmSelectUser()
        {
            InitializeComponent();

            this.winGridView1.ShowCheckBox = true;
            this.winGridView1.ShowExportButton = false;
            this.winGridView1.ShowLineNumber = true;
            this.winGridView1.BestFitColumnWith = false;//是否設置為自動調整寬度,false為不設置
            this.winGridView1.OnRefresh += new EventHandler(winGridView1_OnRefresh);
            this.winGridView1.gridView1.DataSourceChanged += new EventHandler(gridView1_DataSourceChanged);

            if (!this.DesignMode)
            {
                InitDeptTree();
                InitRoleTree();
            }
        }
綁定數據是通過左邊的樹進行條件檢索的,因此可以通過獲取組織機構或者角色的節點數據進行查詢 ,我們通過判斷組織機構樹節點或者角色樹節點是否選中來判斷即可,具體列表綁定的代碼如下所示。
private void BindGridData()
        {
            List<UserInfo> list = new List<UserInfo>();
            if (this.treeDept.SelectedNode != null && this.treeDept.SelectedNode.Tag != null)
            {
                int ouId = this.treeDept.SelectedNode.Tag.ToString().ToInt32();
                list = BLLFactory<User>.Instance.FindByDept(ouId);
            }
            else if (this.treeRole.SelectedNode != null && this.treeRole.SelectedNode.Tag != null)
            {
                int roleId = this.treeRole.SelectedNode.Tag.ToString().ToInt32();
                list = BLLFactory<User>.Instance.GetUsersByRole(roleId);
            }

            //entity
            this.winGridView1.DisplayColumns = "HandNo,Name,FullName,Title,MobilePhone,OfficePhone,Email,Gender,QQ,Note";
            this.winGridView1.ColumnNameAlias = BLLFactory<User>.Instance.GetColumnNameAlias();//字段列顯示名稱轉義

            this.winGridView1.DataSource = new WHC.Pager.WinControl.SortableBindingList<UserInfo>(list);
        }
單用戶勾選列表的復選框的時候,該行的數據會被選中,我們最後要獲取用戶的勾選記錄(通過 WinGridview控件的GetCheckedRows方法獲取),然後獲取對應的數據,添加到關聯關系的數據庫即可, 具體代碼如下所示。
private void btnAddUser_Click(object sender, EventArgs e)
        {
            List<int> list = this.winGridView1.GetCheckedRows();
            foreach(int rowIndex in list)
            {
                string ID = this.winGridView1.GridView1.GetRowCellDisplayText(rowIndex, "ID");
                string Name= this.winGridView1.GridView1.GetRowCellDisplayText(rowIndex, "Name");
                string FullName = this.winGridView1.GridView1.GetRowCellDisplayText(rowIndex, "FullName");
                string displayname = string.Format("{0}({1})", FullName, Name);

                if (!this.SelectUserDict.ContainsKey(ID))
                {
                    this.SelectUserDict.Add(ID, displayname);
                }
            }

            RefreshSelectItems();
        }
4、用戶選擇結果的展示
在一些場景中,我們可能需要在多個組織機構和角色中選擇不同的用戶,為了更方便展示我們選中的 記錄,我設計了一個用戶控件(一個刪除按鈕(Button)+標簽控件(Lable))組合即可,如下所示。
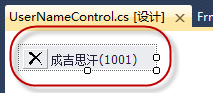
由於我們選擇的內容,無非就是選擇它的人員名稱即可,如果需要,單擊刪除按鈕,讓用戶剔除不需 要的人員,因此控件增加一個OnDeleteItem事件用來處理這個刪除操作。
我們展示多個用戶信息的時候,就是通過構造多個這樣的控件,並動態增加到Panel裡面即可,實現 代碼如下所示。
/// <summary>
        /// 刷新選擇信息
        /// </summary>
        private void RefreshSelectItems()
        {
            this.flowLayoutPanel1.Controls.Clear();
            foreach (string key in SelectUserDict.Keys)
            {
                string info = SelectUserDict[key];
                if (!string.IsNullOrEmpty(info))
                {
                    UserNameControl control = new UserNameControl();
                    control.BindData(key, info);
                    control.OnDeleteItem += new UserNameControl.DeleteEventHandler(control_OnDeleteItem);
                    this.flowLayoutPanel1.Controls.Add(control);
                }
            }
            this.lblItemCount.Text = string.Format("當前選擇【{0}】項目", SelectUserDict.Keys.Count);
        }
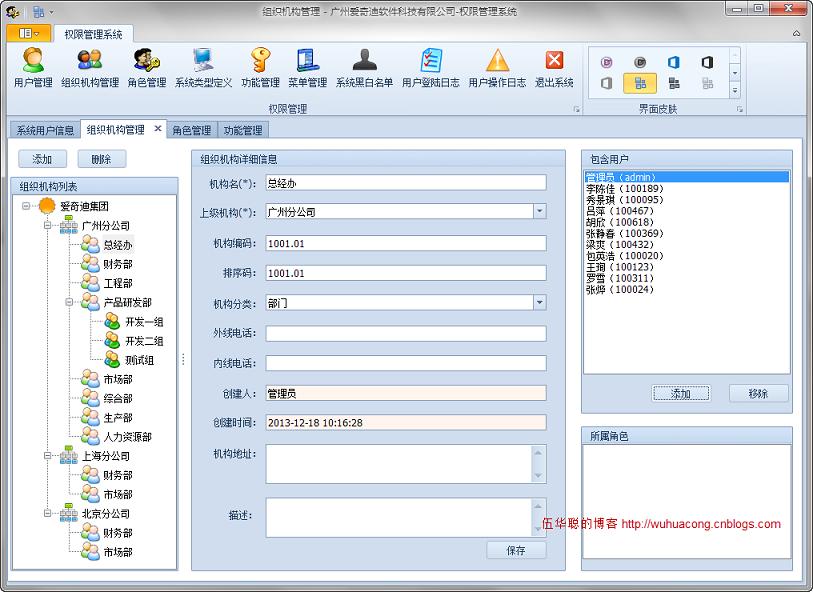
5、最終的組織機構管理界面效果
在開篇說了,用戶選擇在很多場合會用到,如組織機構的用戶選擇,角色裡面的用戶選擇,或者流程 裡面的用戶選擇等用途。
下面是組織機構裡面的主體界面。
查看本欄目
在右上角的包含用戶區域,單擊添加按鈕,就會出現前面說到的用戶選擇對話框,如下所示。
伍華聰 http://www.iqidi.com