1. 簡單的景深影像處理
在上篇文章中,我們討論了如何獲取像素點的深度值以及如何根據深度值產生影像。在之前的例子中,我們過濾掉了阈值之外的點。這就是一種簡單的圖像處理,叫阈值處理。使用的阈值方法雖然有點粗糙,但是有用。更好的方法是利用機器學習來從每一幀影像數據中計算出阈值。Kinect深度值最大為4096mm,0值通常表示深度值不能確定,一般應該將0值過濾掉。微軟建議在開發中使用1220mm(4’)~3810mm(12.5’)范圍內的值。在進行其他深度圖像處理之前,應該使用阈值方法過濾深度數據至1220mm-3810mm這一范圍內。
使用統計方法來處理深度影像數據是一個很常用的方法。阈值可以基於深度數據的平均值或者中值來確定。統計方法可以幫助確定某一點是否是噪聲、陰影或者是其他比較有意義的物體,比如說用戶的手的一部分。有時候如果不考慮像素的視覺意義,可以對原始深度進行數據挖掘。對景深數據處理的目的是進行形狀或者物體的識別。通過這些信息,程序可以確定人體相對於Kinect的位置及動作。
1.1深度影像數據直方圖
直方圖是統計數據分布的一個很有效的工具。在這裡我們關心的是一個景深影像圖中深度值的分布。直方圖能夠直觀地反映給定數據集中數據的分布狀況。從直方圖中,我們能夠看出深度值出現的頻率以及聚集分組。通過這些信息,我們能夠確定阈值以及其他能夠用來對圖像進行過濾的指標,使得能夠最大化的揭示深度影像圖中的深度信息。為了展示這一點,接下來我們將會展示一副景深影像數據的直方圖,並通過直方圖,使用一些簡單的技術來過濾掉我們不想要的像素點。
首先創建一個新的項目。然後根據之前文章中講的步驟發現和初始化KinectSensor對象來進行深度影像數據處理,包括注冊DepthFrameReady事件。在添加實現深度直方圖之前,將UI界面更改為如下:
<Window x:Class="KinectDepthHistogram.MainWindow"
        xmlns="http://schemas.microsoft.com/winfx/2006/xaml/presentation"
        xmlns:x="http://schemas.microsoft.com/winfx/2006/xaml"
        Title="MainWindow" Height="800" Width="1200" WindowStartupLocation="CenterScreen">
    <Grid>
        <StackPanel>
            <StackPanel Orientation="Horizontal">
                <Image x:Name="DepthImage" Width="640" Height="480" />
                <Image x:Name="FilteredDepthImage" Width="640" Height="480" />
            </StackPanel>
            <ScrollViewer Margin="0,15" HorizontalScrollBarVisibility="Auto" VerticalScrollBarVisibility="Auto">
                <StackPanel x:Name="DepthHistogram" Orientation="Horizontal" Height="300" />
            </ScrollViewer>
        </StackPanel>
    </Grid>
</Window>
創建直方圖的方法很簡單,就是創建一系列的矩形元素,然後將它添加到名為DepthHistogram的StackPanel元素中,由於DepthHistogram對象的Orientation屬性設置為Horizontal,所以這些矩形會水平排列。大多數應用程序計算直方圖只是用來進行中間過程處理用,如果想要將直方圖展現出來,則需要在繪圖上面做些工作。下面的代碼展現了如何繪制直方圖:
private void KinectDevice_DepthFrameReady(object sender, DepthImageFrameReadyEventArgs e)
{
    using (DepthImageFrame frame = e.OpenDepthImageFrame())
    {
        if (frame != null)
        {
            frame.CopyPixelDataTo(this._DepthPixelData);
            CreateBetterShadesOfGray(frame, this._DepthPixelData);
            CreateDepthHistogram(frame, this._DepthPixelData);
        }
    }
}

private void CreateDepthHistogram(DepthImageFrame depthFrame, short[] pixelData)
{
    int depth;
    int[] depths = new int[4096];
    double chartBarWidth = Math.Max(3, DepthHistogram.ActualWidth / depths.Length);
    int maxValue = 0;


    DepthHistogram.Children.Clear();


    //計算並獲取深度值.並統計每一個深度值出現的次數
    for (int i = 0; i < pixelData.Length; i++)
    {
        depth = pixelData[i] >> DepthImageFrame.PlayerIndexBitmaskWidth;

        if (depth >= LoDepthThreshold && depth <= HiDepthThreshold)
        {
            depths[depth]++;
        }
    }


    //查找最大的深度值
    for (int i = 0; i < depths.Length; i++)
    {
        maxValue = Math.Max(maxValue, depths[i]);
    }


    //繪制直方圖
    for (int i = 0; i < depths.Length; i++)
    {
        if (depths[i] > 0)
        {
            Rectangle r = new Rectangle();
            r.Fill = Brushes.Black;
            r.Width = chartBarWidth;
            r.Height = DepthHistogram.ActualHeight * (depths[i] / (double)maxValue);
            r.Margin = new Thickness(1, 0, 1, 0);
            r.VerticalAlignment = System.Windows.VerticalAlignment.Bottom;
            DepthHistogram.Children.Add(r);
        }
    }
}
繪制直方圖時,創建一個數組來存儲所有可能的深度值數據,因此數組的大小為4096。第一步遍歷深度圖像,獲取深度值,然後統計深度值出現的次數。因為設置了最高最低的距離阈值,忽略了0值。下圖顯示了深度值影像的直方圖,X軸表示深度值,Y軸表示深度值在圖像中出現的次數。

當站在Kinect前後晃動時,下面的直方圖會不停的變化。圖中後面最長的幾個線條表示牆壁,大約離攝像頭3米左右,前面的幾個小的線條是人體,大概離攝像頭2米左右,下面那副圖中,我手上拿了一個靠墊,可以發現直方圖與之前的直方圖相比發生了一些變化。
這兩幅圖中,可以看到直方圖都集中在兩個地方,前面的一小撮和後面的那一大坨。所以根據直方圖可以看出,前面那個表示人體,後面那個代表房間的牆壁,在結合一些圖像處理技術,就大致可以把人體和背景區分開來了。
1.2 一些圖像處理相關的知識
本文不打算詳細講解圖像處理的相關知識。只是討論如何獲取原始的深度數據,以及理解數據的用途。很多情況下,基於Kinect的應用程序不會對深度數據進行很多處理。如果要處理數據,也應該使用一些類庫諸如OpenCV庫來處理這些數據。深度影像處理經常要耗費大量計算資源,不應該使用諸如C#這類的高級語言來進行影像處理。
Note: OpenCV(Open Source Computer Vision)庫是是一個經常用來處理和計算影像數據的算法類庫。這個類庫也包含點雲庫(Point Cloud Library, PCL) 和機器人操作系統(Robot Operating System, ROS),這些都涉及到了大量的深度數據處理。有興趣的可以研究一下OpenCV庫。
應用程序處理深度數據目的是用來確定人體在Kinect視場中的位置。雖然Kinect SDK中的骨骼追蹤在這方面功能更強大,但是在某些情況下還是需要從深度數據中分析出人物所處的位置。在下節中,我們將會分析人體在深度影像中的范圍。在開始之前,有必要了解和研究一下圖像處理中常用的一些算法,有時候這些對特征提取非常有幫助。
圖像處理
阈值處理(Thresholding)
圖像分割 (Segmentation)
邊緣/輪廓探測 (Edge/Contour Detection)
高斯濾波(Gaussian filter)
Sobel、Prewitt、Kirsh算子
Canny算子
羅伯特 算子
哈夫變換
Blob檢測
拉普拉斯變換
Hession 算子
K均值聚類
2. 深度數據和游戲者索引位
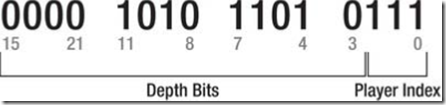
Kinect SDK具有分析景深數據和探測人體或者游戲者輪廓的功能,它一次能夠識別多達6個游戲者。SDK為每一個追蹤到的游戲者編號作為索引。游戲者索引存儲在深度數據的前3個位中。如前一篇文章討論的,景深數據每一個像素占16位,0-2位存儲游戲者索引值,3-15為存儲深度值。7 (0000 0111)這個位掩碼能夠幫助我們從深度數據中獲取到游戲者索引值。幸運的是,SDK為游戲者索引位定義了一些列常量。他們是DepthImageFrame.PlayerIndexBitmaskWidth和DepthImageFrame.PlayerIndexBitmask。前一個值是3,後一個是7。開發者應該使用SDK定義的常量而不應該硬編碼3或者7。
游戲者索引位取值范圍為0~6,值為0表示該像素不是游戲者。但是初始化了景深數據流並沒有開啟游戲者追蹤。游戲者追蹤需要依賴骨骼追蹤技術。初始化KinectSensor對象和DepthImageStream對象時,需要同時初始化SkeletonStream對象。只有當SkeletonStream對象初始化了後,景深數據中才會有游戲者索引信息。獲取游戲者索引信息並不需要注冊SkeletonFrameReady事件。
再創建一個工程來展示如何獲取游戲者索引位信息。首先,創建一個新的項目,初始化KinectSensor對象,初始化DepthImageStream和SkeletonStream對象,並注冊KinectSensor的DepthFrameReady事件。在UI界面MainWindows.xaml中添加兩個Image控件分別取名為RamDepthImage和EnhDepthImage。添加WirteableBitmap對象,代碼如下:
<Window x:Class="KinectDepthImagePlayerIndex.MainWindow"
        xmlns="http://schemas.microsoft.com/winfx/2006/xaml/presentation"
        xmlns:x="http://schemas.microsoft.com/winfx/2006/xaml"
        Title="Kinect Player Index" Height="600" Width="1200">
    <Grid>
        <StackPanel Orientation="Horizontal">
            <Image x:Name="RawDepthImage" Margin="0,0,10,0" Width="640" Height="480"/>
            <Image x:Name="EnhDepthImage" Width="640" Height="480"/>
        </StackPanel>
    </Grid>
</Window>
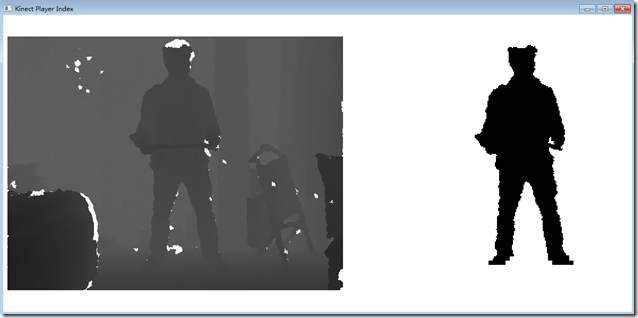
下面的代碼將有游戲者索引位的數據顯示為黑色,其他像元顯示為白色。
private void KinectDevice_DepthFrameReady(object sender, DepthImageFrameReadyEventArgs e)
{
    using (DepthImageFrame frame = e.OpenDepthImageFrame())
    {
        if (frame != null)
        {
            frame.CopyPixelDataTo(this._RawDepthPixelData);
            this._RawDepthImage.WritePixels(this._RawDepthImageRect, this._RawDepthPixelData, this._RawDepthImageStride, 0);
            CreatePlayerDepthImage(frame, this._RawDepthPixelData);
        }
    }
}


private void CreatePlayerDepthImage(DepthImageFrame depthFrame, short[] pixelData)
{
    int playerIndex;
    int depthBytePerPixel = 4;
    byte[] enhPixelData = new byte[depthFrame.Width * depthFrame.Height * depthBytePerPixel];

    for (int i = 0, j = 0; i < pixelData.Length; i++, j += depthBytePerPixel)
    {
        playerIndex = pixelData[i] & DepthImageFrame.PlayerIndexBitmask;

        if (playerIndex == 0)
        {
            enhPixelData[j] = 0xFF;
            enhPixelData[j + 1] = 0xFF;
            enhPixelData[j + 2] = 0xFF;
        }
        else
        {
            enhPixelData[j] = 0x00;
            enhPixelData[j + 1] = 0x00;
            enhPixelData[j + 2] = 0x00;
        }
    }


    this._EnhDepthImage.WritePixels(this._EnhDepthImageRect, enhPixelData, this._EnhDepthImageStride, 0);
}
運行後,效果如下圖,還可以對上面的代碼進行一些改進。例如,可以對游戲者所在的像素進行灰度值拉伸,能夠繪制出游戲者深度值的直方圖,根據直方圖可以看出每一灰度級對應的頻率。另一個改進是,可以對不同的游戲者給予不同的顏色顯示,比如游戲者1用紅色表示,游戲者2用藍色表示等等。
要注意的是,不要對特定的游戲者索引位進行編碼,因為他們是會變化的。實際的游戲者索引位並不總是和Kinect前面的游戲者編號一致。例如, Kinect視野中只有一個游戲者,但是返回的游戲者索引位值可能是3或者4。有時候第一個游戲者的游戲者索引位可能不是1,比如走進Kinect視野,返回的索引位是1,走出去後再次走進,可能索引位變為其他值了。所以開發Kinect應用程序的時候應該注意到這一點。
3. 對物體進行測量
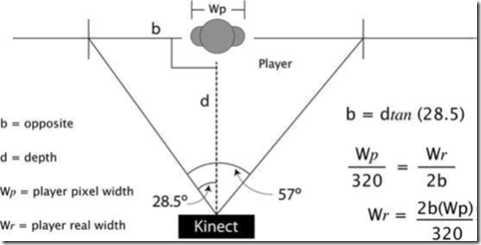
像上篇文章中對深度值測量原理進行討論的那樣,像素點的X,Y位置和實際的寬度和高度並不一致。但是運用幾何知識,通過他們對物體進行測量是可能的。每一個攝像機都有視場,焦距的長度和相機傳感器的大小決定了視場角。Kinect中相機的水平和垂直視場角分別為57°和43°。既然我們知道了深度值,利用三角幾何知識,就可以計算出物體的實際寬度。示意圖如下:
圖中的公式在某些情況下可能不准確,Kinect返回的數據也有這個問題。這個簡化的公式並沒有考慮到游戲者的其他部分。盡管如此,公式依然能滿足大部分的應用。這裡只是簡單地介紹了如何將Kinect數據映射到真實環境中。如果想得到更好的精度,則需要研究Kinect攝像頭的焦距和攝像頭的尺寸。
在開始寫代碼前,先看看上圖中的公式。攝像頭的視場角是一個以人體深度位置為底的一個等腰三角形。人體的實際深度值是這個等腰三角形的高。可以將這個等腰三角形以人所在的位置分為兩個直角三角形,這樣就可以計算出底邊的長度。一旦知道了底邊的長度,我們就可以將像素的寬度轉換為現實中的寬度。例如:如果我們計算出等腰三角形底邊的寬度為1500mm,游戲者所占有的總象元的寬度為100,深度影像數據的總象元寬度為320。那麼游戲者實際的寬度為468.75mm((1500/320)*100)。公式中,我們需要知道游戲者的深度值和游戲者占用的總的象元寬度。我們可以將游戲者所在的象元的深度值取平均值作為游戲者的深度值。之所以求平均值是因為人體不是平的,這能夠簡化計算。計算人物高度也是類似的原理,只不過使用的垂直視場角和深度影像的高度。
知道了原理之後,就可以開始動手寫代碼實現了。先創建一個新的項目然後編寫發現和初始化KinectSensor的代碼,將DepthStream和SkeletonStream均初始化,然後注冊KinectSnsor的DepthFrameReady事件。主UI界面中的代碼如下:
<Window x:Class="KinectTakingMeasure.MainWindow"
        xmlns="http://schemas.microsoft.com/winfx/2006/xaml/presentation"
        xmlns:x="http://schemas.microsoft.com/winfx/2006/xaml"
        Title="MainWindow" Height="800" Width="1200" WindowStartupLocation="CenterScreen">
    <Grid>
        <StackPanel Orientation="Horizontal">
            <Image x:Name="DepthImage" />
            <ItemsControl x:Name="PlayerDepthData" Width="300" TextElement.FontSize="20">
                <ItemsControl.ItemTemplate>
                    <DataTemplate>
                        <StackPanel Margin="0,15">
                            <StackPanel Orientation="Horizontal">
                                <TextBlock Text="PlayerId:" />
                                <TextBlock Text="{Binding Path=PlayerId}" />
                            </StackPanel>
                            <StackPanel Orientation="Horizontal">
                                <TextBlock Text="Width:" />
                                <TextBlock Text="{Binding Path=RealWidth}" />
                            </StackPanel>
                            <StackPanel Orientation="Horizontal">
                                <TextBlock Text="Height:" />
                                <TextBlock Text="{Binding Path=RealHeight}" />
                            </StackPanel>
                        </StackPanel>
                    </DataTemplate>
                </ItemsControl.ItemTemplate>
            </ItemsControl>
        </StackPanel>
    </Grid>
</Window>
使用ItemControl的目的是用來顯示結果。方法創建了一個對象來存放用戶的深度數據以及計算得到的實際寬度和高度值。程序創建了一個這樣的對象數組。他是ItemControl的ItemsSource值。UI定義了一個模板用來展示和游戲者深度值相關的數據,這個模板使用的對象取名為PlayerDepthData。下面的名為ClaculatePlayerSize的方法將作為DepthFrameReady事件發生時執行的操作。
private void KinectDevice_DepthFrameReady(object sender, DepthImageFrameReadyEventArgs e)
{
    using (DepthImageFrame frame = e.OpenDepthImageFrame())
    {
        if (frame != null)
        {
            frame.CopyPixelDataTo(this._DepthPixelData);
            CreateBetterShadesOfGray(frame, this._DepthPixelData);
            CalculatePlayerSize(frame, this._DepthPixelData);
        }
    }
}


private void CalculatePlayerSize(DepthImageFrame depthFrame, short[] pixelData)
{
    int depth;
    int playerIndex;
    int pixelIndex;
    int bytesPerPixel = depthFrame.BytesPerPixel;
    PlayerDepthData[] players = new PlayerDepthData[6];

    for (int row = 0; row < depthFrame.Height; row++)
    {
        for (int col = 0; col < depthFrame.Width; col++)
        {
            pixelIndex = col + (row * depthFrame.Width);
            depth = pixelData[pixelIndex] >> DepthImageFrame.PlayerIndexBitmaskWidth;

            if (depth != 0)
            {
                playerIndex = (pixelData[pixelIndex] & DepthImageFrame.PlayerIndexBitmask) - 1;

                if (playerIndex > -1)
                {
                    if (players[playerIndex] == null)
                    {
                        players[playerIndex] = new PlayerDepthData(playerIndex + 1, depthFrame.Width, depthFrame.Height);
                    }

                    players[playerIndex].UpdateData(col, row, depth);
                }
            }
        }
    }

    PlayerDepthData.ItemsSource = players;
}
粗體部分代碼中使用了PlayerDepthData對象。CalculatePlayerSize方法遍歷深度圖像中的象元,然後提取游戲者索引位及其對應的深度值。算法忽略了所有深度值為0的象元以及游戲者之外的象元。對於游戲者的每一個象元,方法調用PlayerDepthData對象的UpdateData方法。處理完所有象元之後,將游戲者數組復制給名為PlayerDepthData的ItemControl對象的數據源。對游戲者寬度高度的計算封裝在PlayerDepthData這一對象中。
PlayerDepthData對象的代碼如下:
class PlayerDepthData
{
    #region Member Variables
    private const double MillimetersPerInch = 0.0393700787;
    private static readonly double HorizontalTanA = Math.Tan(57.0 / 2.0 * Math.PI / 180);
    private static readonly double VerticalTanA = Math.Abs(Math.Tan(43.0 / 2.0 * Math.PI / 180));

    private int _DepthSum;
    private int _DepthCount;
    private int _LoWidth;
    private int _HiWidth;
    private int _LoHeight;
    private int _HiHeight;
    #endregion Member Variables


    #region Constructor
    public PlayerDepthData(int playerId, double frameWidth, double frameHeight)
    {
        this.PlayerId = playerId;
        this.FrameWidth = frameWidth;
        this.FrameHeight = frameHeight;

        this._LoWidth = int.MaxValue;
        this._HiWidth = int.MinValue;

        this._LoHeight = int.MaxValue;
        this._HiHeight = int.MinValue;
    }
    #endregion Constructor


    #region Methods
    public void UpdateData(int x, int y, int depth)
    {
        this._DepthCount++;
        this._DepthSum += depth;
        this._LoWidth = Math.Min(this._LoWidth, x);
        this._HiWidth = Math.Max(this._HiWidth, x);
        this._LoHeight = Math.Min(this._LoHeight, y);
        this._HiHeight = Math.Max(this._HiHeight, y);
    }
    #endregion Methods


    #region Properties
    public int PlayerId { get; private set; }
    public double FrameWidth { get; private set; }
    public double FrameHeight { get; private set; }


    public double Depth
    {
        get { return this._DepthSum / (double)this._DepthCount; }
    }


    public int PixelWidth
    {
        get { return this._HiWidth - this._LoWidth; }
    }


    public int PixelHeight
    {
        get { return this._HiHeight - this._LoHeight; }
    }


    public string RealWidth
    {
        get
        {
            double inches = this.RealWidthInches;
return string.Format("{0:0.0}mm", inches * 25.4);
}
    }


    public string RealHeight
    {
        get
        {
            double inches = this.RealHeightInches;
return string.Format("{0:0.0}mm", inches * 25.4);
}
    }


    public double RealWidthInches
    {
        get
        {
            double opposite = this.Depth * HorizontalTanA;
            return this.PixelWidth * 2 * opposite / this.FrameWidth * MillimetersPerInch;
        }
    }

    public double RealHeightInches
    {
        get
        {
            double opposite = this.Depth * VerticalTanA;
            return this.PixelHeight * 2 * opposite / this.FrameHeight * MillimetersPerInch;
        }
    }
    #endregion Properties
}
單獨編寫PlayerDepthData這個類的原因是封裝計算邏輯。這個類有兩個輸入點和兩個輸出點。構造函數以及UpdateData方法是兩個輸入點。ReadlWith和RealHeight兩個屬性是兩個輸出點。這兩個屬性是基於上圖中的公式計算得出的。公式使用平均深度值,深度數據幀的寬度和高度,和游戲者總共所占有的象元。平均深度值和所有的象元是通過參數傳入到UpdateData方法中然後計算的出來的。真實的寬度和高度值是基於UpdateData方法提供的數據計算出來的。下面是我做的6個動作的不同截圖,右邊可以看到測量值,手上拿了鍵盤用來截圖。
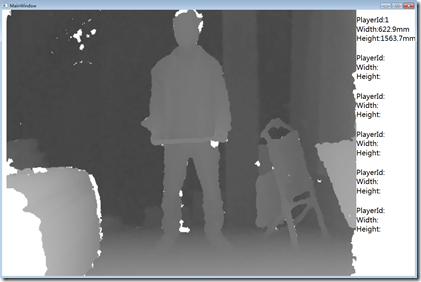
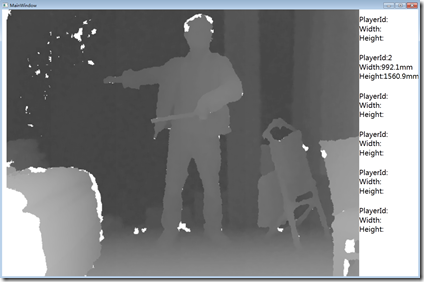
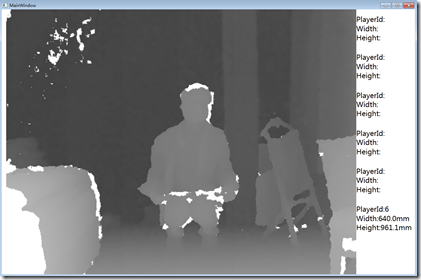
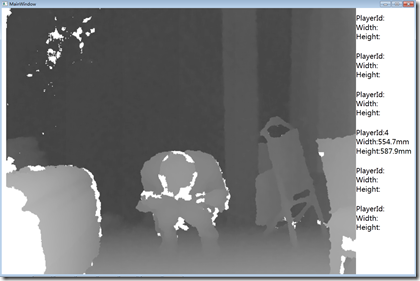
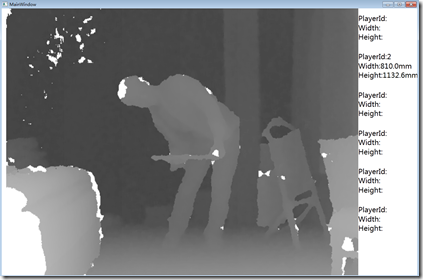

以上測量結果只是以KinectSensor能看到的部分來進行計算的。拿上圖1來說。顯示的高度是1563mm,寬度為622mm。這裡高度存在偏差,實際高度應該是1665左右,可能是腳部和頭部測量有誤差。以上代碼可以同時測量6個游戲者,但是由於只有我一個人,所以做了6個不同的動作,截了6次圖。還可以看到一點的是,如上面所討論的,當只有一個游戲者時,游戲者索引值不一定是從1開始,從上面6幅圖可以看出,進出視野會導致游戲者索引值發生變化,值是不確定的。
4.深度值圖像和視頻圖像的疊加
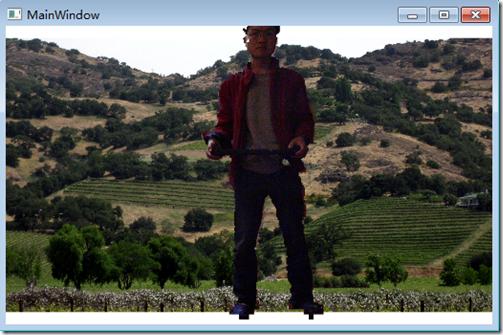
在之前的例子中,我們將游戲者所屬的象元用黑色顯示出來,而其他的用白色顯示,這樣就達到了提取人物的目的。我們也可以將人物所屬的象元用彩色表示,而將其他部分用白色表示。但是,有時候我們想用深度數據中游戲者所屬的象元獲取對應的彩色影像數據並疊加到視頻圖像中。這在電視制作和電影制作中很常見,這種技術叫做綠屏摳像,就是演員或者播音員站在綠色底板前,然後錄完節目後,綠色背景摳出,換成其他場景,在一些科幻電影中演員不可能在實景中表演時常采用的造景手法。我們平常照證件照時,背景通常是藍色或者紅色,這樣也是便於選取背景顏色方便摳圖的緣故。在Kinect中我們也可以達到類似的效果。Kinect SDK使得這個很容易實現。
Note:這是現實增強的一個基本例子,現實增應用非常有趣而且能夠獲得非常好的用於體驗。許多藝術家使用Kinect來進行現實增強交互時展覽。另外,這種技術也通常作為廣告和營銷的工具。
前面的例子中,我們能夠判斷哪個像素是否有游戲者。但是這個只能對於景深數據使用。不幸的是,景深數據影像的象元不能轉換到彩色影像中去,即使兩者使用相同的分辨率。因為這兩個攝像機位於Kinect上的不同位置,所以產生的影像不能夠疊加到一起。就像人的兩只眼睛一樣,當你只睜開左眼看到的景象和只睜開右眼看到的景象是不一樣的,人腦將這兩只眼睛看到的景物融合成一幅合成的景象。
幸運的是,Kinect SDK提供了一些方法來方便我們進行這些轉換,這些方法位於KinectSensor對象中,他們是MapDepthToColorImagePoint,MapDepthToSkeletonPoint,MapSkeletonPointToColor和MapSkeletonPointToDepth。在DepthImageFrame對象中這些方法的名字有點不同(MapFromSkeletonPoint,MapToColorImagePoint及MapToSkeletonPoint),但功能是相似的。在下面的例子中,我們使用MapDepthToColorImagePoint方法來將景深影像中游戲者所屬的象元轉換到對應的彩色影像中去。細心的讀者可能會發現,沒有一個方法能夠將彩色影像中的象元轉換到對應的景深影像中去。
創建一個新的工程,添加兩個Image對象。第一個Image是背景圖片。第二個Image是前景圖像。在這個例子中,為了使景深影像和彩色影像盡可能的接近,我們采用輪詢的方式。每一個影像都有一個Timestamp對象,我們通過比較數據幀的這個值來確定他們是否足夠近。注冊KinectSensor對象的AllFrameReady事件,並不能保證不同數據流產生的數據幀時同步的。這些幀不可能同時產生,但是輪詢模式能夠使得不同數據源產生的幀能夠盡可能的夠近。下面的代碼展現了實現方式:
private KinectSensor _KinectDevice;
private WriteableBitmap _GreenScreenImage;
private Int32Rect _GreenScreenImageRect;
private int _GreenScreenImageStride;
private short[] _DepthPixelData;
private byte[] _ColorPixelData;
private bool _DoUsePolling;
private void CompositionTarget_Rendering(object sender, EventArgs e)
{
    DiscoverKinect();
    if (this.KinectDevice != null)
    {
        try
        {
            using (ColorImageFrame colorFrame = this.KinectDevice.ColorStream.OpenNextFrame(100))
            {
                using (DepthImageFrame depthFrame = this.KinectDevice.DepthStream.OpenNextFrame(100))
                {
                    RenderGreenScreen(this.KinectDevice, colorFrame, depthFrame);
                }
            }
        }
        catch (Exception)
        {
            //Do nothing, because the likely result is that the Kinect has been unplugged.
        }
    }
}


private void DiscoverKinect()
{
    if (this._KinectDevice != null && this._KinectDevice.Status != KinectStatus.Connected)
    {
        UninitializeKinectSensor(this._KinectDevice);
        this._KinectDevice = null;
    }


    if (this._KinectDevice == null)
    {
        this._KinectDevice = KinectSensor.KinectSensors.FirstOrDefault(x => x.Status == KinectStatus.Connected);


        if (this._KinectDevice != null)
        {
            InitializeKinectSensor(this._KinectDevice);
        }
    }
}


private void InitializeKinectSensor(KinectSensor sensor)
{
    if (sensor != null)
    {
        sensor.DepthStream.Range = DepthRange.Default;

        sensor.SkeletonStream.Enable();
        sensor.DepthStream.Enable(DepthImageFormat.Resolution640x480Fps30);
        sensor.ColorStream.Enable(ColorImageFormat.RgbResolution1280x960Fps12);

        DepthImageStream depthStream = sensor.DepthStream;
        this._GreenScreenImage = new WriteableBitmap(depthStream.FrameWidth, depthStream.FrameHeight, 96, 96, PixelFormats.Bgra32, null);
        this._GreenScreenImageRect = new Int32Rect(0, 0, (int)Math.Ceiling(this._GreenScreenImage.Width), (int)Math.Ceiling(this._GreenScreenImage.Height));
        this._GreenScreenImageStride = depthStream.FrameWidth * 4;
        this.GreenScreenImage.Source = this._GreenScreenImage;

        this._DepthPixelData = new short[this._KinectDevice.DepthStream.FramePixelDataLength];
        this._ColorPixelData = new byte[this._KinectDevice.ColorStream.FramePixelDataLength];

        if (!this._DoUsePolling)
        {
            sensor.AllFramesReady += KinectDevice_AllFramesReady;
        }

        sensor.Start();
    }
}

private void UninitializeKinectSensor(KinectSensor sensor)
{
    if (sensor != null)
    {
        sensor.Stop();
        sensor.ColorStream.Disable();
        sensor.DepthStream.Disable();
        sensor.SkeletonStream.Disable();
        sensor.AllFramesReady -= KinectDevice_AllFramesReady;
    }
}
以上代碼有三個地方加粗。第一地方引用了RenderGreenScreen方法。第二個和第三個地方我們初始化了彩色和景深數據流。當在兩個圖像之間轉換時,將彩色圖形的分辨率設成景深數據的兩倍能夠得到最好的轉換效果。
查看本欄目
RenderGreenScreen方法中執行實際的轉換操作。首先通過移除沒有游戲者的象元創建一個新的彩色影像。算法遍歷景深數據的每一個象元,然後判斷游戲者索引是否有有效值。然後獲取景深數據中游戲者所屬象元對應的彩色圖像上的象元,將獲取到的象元存放在象元數組中。代碼如下:
private void RenderGreenScreen(KinectSensor kinectDevice, ColorImageFrame colorFrame, DepthImageFrame depthFrame)
{
  if (kinectDevice != null && depthFrame != null && colorFrame != null)
  {
    int depthPixelIndex;
    int playerIndex;
    int colorPixelIndex;
    ColorImagePoint colorPoint;
    int colorStride = colorFrame.BytesPerPixel * colorFrame.Width;
    int bytesPerPixel = 4;
    byte[] playerImage = new byte[depthFrame.Height * this._GreenScreenImageStride];
    int playerImageIndex = 0;

    depthFrame.CopyPixelDataTo(this._DepthPixelData);
    colorFrame.CopyPixelDataTo(this._ColorPixelData);

    for (int depthY = 0; depthY < depthFrame.Height; depthY++)
    {
      for (int depthX = 0; depthX < depthFrame.Width; depthX++, playerImageIndex += bytesPerPixel)
      {
        depthPixelIndex = depthX + (depthY * depthFrame.Width);
        playerIndex = this._DepthPixelData[depthPixelIndex] & DepthImageFrame.PlayerIndexBitmask;

        if (playerIndex != 0)
        {
          colorPoint = kinectDevice.MapDepthToColorImagePoint(depthFrame.Format, depthX, depthY, this._DepthPixelData[depthPixelIndex], colorFrame.Format);
          colorPixelIndex = (colorPoint.X * colorFrame.BytesPerPixel) + (colorPoint.Y * colorStride);

           playerImage[playerImageIndex] = this._ColorPixelData[colorPixelIndex];         //Blue
           playerImage[playerImageIndex + 1] = this._ColorPixelData[colorPixelIndex + 1];     //Green
           playerImage[playerImageIndex + 2] = this._ColorPixelData[colorPixelIndex + 2];     //Red
           playerImage[playerImageIndex + 3] = 0xFF;                                          //Alpha
          }
        }
      }

     this._GreenScreenImage.WritePixels(this._GreenScreenImageRect, playerImage, this._GreenScreenImageStride, 0);
    }
}
PlayerImage位數組存儲了所有屬於游戲者的彩色影像象元。從景深數據對應位置獲取到的彩色影像象元的大小和景深數據象元大小一致。與景深數據每一個象元占兩個字節不同。彩色影像數據每個象元占4個字節,藍綠紅以及Alpha值各占一個字節,在本例中Alpha值很重要,它用來確定每個象元的透明度,游戲者所擁有的象元透明度設置為255(0xFF)不透明而其他物體則設置為0,表示透明。
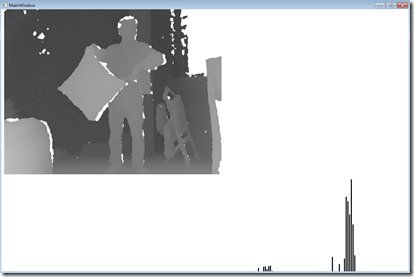
MapDepthToColorImagePoint方法接受景深象元位置以及深度值,返回對應的對應彩色影像中象元的位置。剩下的代碼獲取游戲者在彩色影像中的象元並將其存儲到PlayerImage數組中。當處理完所有的景深數據象元後,代碼更新Image的數據源。運行程序後,需要站立一段時間後人物才能夠顯示出來,如果移動太快,可能出來不了,因為景深數據和彩色數據不能夠對齊,可以看到任務輪廓有一些鋸齒和噪聲,但要處理這些問題還是有點麻煩的,它需要對象元進行平滑。要想獲得最好的效果,可以將多幀彩色影像合稱為一幀。運行程序後結果如下圖,端了個鍵盤,人有點挫:
5.結語
本文首先介紹了關於景深數據的簡單圖像數據,包括景深數據的直方圖顯示以及一些圖像處理相關的算法,然後介紹了景深數據中的游戲者索引位,借助索引位,我們實現了人物寬度和高度的計算,最後借助景深數據結合彩色影像數據,將景深影像和視頻圖像進行了疊加。
至此,景深數據處理介紹完了,後面將會開始介紹Kinect的骨骼追蹤技術,敬請期待。
作者: yangecnu(yangecnu's Blog on 博客園)
出處:http://www.cnblogs.com/yangecnu/